How to Hike the Skyline Loop Trail in Mount Rainier National Park
Are you looking to hike the popular Skyline Trail in Mount Rainier National Park? Then we got you covered! In this comprehensive guide, we’ll go over everything you need to know to hike the full Skyline Loop Trail in Mount Rainier, from how to get there, when to go, different route options, and what to expect along the Skyline Loop hike.
If you’re planning a visit to Mount Rainier National Park in Washington, you’ve likely heard of the Skyline Trail. Located in Paradise (a region along the southern slope of Mount Rainier), this stunning and hugely popular hike goes through beautiful wildflower-filled meadows with up-close views of Mount Rainier and a chance to see lots of wildlife like marmots, pikas, and mountain goats. What more could you want in a hike?!
Despite how popular and crowded this Mount Rainier hike can get, the Skyline Trail is not to be underestimated. The full Skyline Loop trail travels from subalpine meadows up to rugged and rocky alpine terrain as it makes its way to the scenic Panorama Point near the top of the climb. Many hikers choose to turn around here to do an out-and-back hike to this viewpoint, but to complete the full Skyline Loop Trail, you’ll continue hiking through rugged terrain and often through lingering snow patches that remain on the trail for most of the summer months. Plus, with so many intersecting trails in the area, it’s important to come with a plan and know the route you want to take. The Skyline Loop Trail is one that you’ll definitely want to be adequately prepared for, but the rewards on a clear day are absolutely amazing.
Did you notice the emphasis on the word clear? Yea, that’s important. Oftentimes, Mount Rainier likes to hide in a cloud, so those epic views you’d be expecting? Not there. And with that said…
We have one important disclaimer to make: We didn’t see Mount Rainier on our Skyline Loop Trail hike. It’s like she wasn’t even there! It was a sunny day, but the mountain just didn’t feel like coming out of the clouds. And as much as you probably don’t want to hear it, this can be a very likely scenario for you, too. So, even though we didn’t get quite the views we wanted to from this hike, we think we could still be of some help…
In this Skyline Loop Trail guide, we’ll share our experience on this popular Mount Rainier hike, so keep reading to see if it’s actually worth it to hike the Skyline Loop Trail on a less than ideal day. Plus, you’ll still get all of our handy tips and advice that still apply regardless of the views you get on the trail, including directions to the Skyline Trail parking lot, when to go, what to bring, and everything you can expect on this popular Mount Rainier hike!
In this Skyline Loop Trail hiking guide:
Check out our Mount Rainier hiking guide annd itineraries:
Best Hikes in Mount Rainier National Park + Tips
How to Spend One Day in Mount Rainier National Park
Mount Rainier National Park Itinerary for 3 to 4 Days"
Where is the Skyline Loop Trail in Mount Rainier National Park?
The Skyline Loop Trail is in Mount Rainier National Park in Washington, about 2.5 hours south of Seattle (so this hike can easily be done as a day trip or weekend trip!).
There are five different regions to Mount Rainier National Park. The Skyline Loop Trail is in the region called Paradise (and when you get there, you’ll see why it’s called this!). Paradise is found along the southern slopes of Mount Rainier that spans between the Nisqually Entrance on the west and Stevens Canyon Entrance on the east, and is home to beautiful wildflower-filled meadows, and picturesque and up-close views of Mount Rainier, its glaciers, and the surrounding Cascades, making it the most popular area in the park to visit. Here, you’ll find the park’s main visitor center, a lodge you can stay in from May to October, and a collection of gorgeous hiking trails around the foot of Mount Rainier, the most popular being the Skyline Trail.

This is a picture of the map from the Mount Rainier park brochure, with the two relevant park entrances and the Skyline Loop Trail labeled.

A view over the Paradise area in Mount Rainier National Park from the Skyline Loop Trail
Because of how popular the Paradise area is, the park has recently started a reservation system for accessing the Paradise corridor, which may affect how and when you can hike the Skyline Loop Trail in Mount Rainier. So, let’s get into everything you need to know about Mount Rainier reservations now…
How to get reservations for Paradise in Mount Rainier National Park
Here’s everything you need to know about Paradise reservations in Mount Rainier National Park.
When do you need a Mount Rainier reservation?
Reservations are needed between May 24th to September 2nd if you plan on entering Paradise between 7 am and 3 pm. Outside of the dates and times, a reservation isn’t required. The reservation is for a vehicle (not per person) and is good for one day.
Because there are two Mount Rainier National Park entrances through which you can reach Paradise (the Steven Canyons Entrance on the east, and the Nisqually Entrance on the west), the Paradise reservation will work to get you through either one.
How to get reservations for Paradise in Mount Rainier
Reservations are available on recreation.gov and cost $2. Some reservations are released about 90 days in advance in blocks of about a month, while some are released a day in advance. This is how it works:
Advanced reservations for Paradise
On February 21st, reservations open for visits between May 24th – June 30th.
On April 1st, reservations open for visits between July 1st – July 31st.
On May 1st, reservations open for visits between August 1st- September 2nd.
Reservations open at 8 am Pacific Time on recreation.gov. Be sure to have your account created and be on the site before 8 am when the reservations get released to give yourself the best shot of getting one for the day you want! If you couldn’t snag one, be sure to periodically check back because cancellations are released back into the system as they happen.
Next day reservations for Paradise
Next day reservations open on recreation.gov at 7 pm Pacific Time the day before your planned visit starting on May 24th. Again, they will likely go quick so be on the site ready!
How do Mount Rainier reservations work?
Mount Rainier reservations are timed entry reservations, meaning you select a time slot for when you want to enter the park. Reservations for Paradise come in two-hour windows (e.g. 9 am to 11 am, etc) for when you can arrive, and then you can stay in Paradise for the rest of the day.
For tons more information and answers to most of the questions you might have, check out the FAQ section on the National Park site.
Can I hike the Skyline Loop Trail in Mount Rainier without a reservation?
Yes! There are a few different ways that you can avoid having to get a reservation for Paradise and still be able to hike the Skyline Loop Trail in Mount Rainier.
You can come before May 24th or after September 2nd. If planning on hiking the Skyline Loop Trail outside of the reservation period, plan for coming after September 2nd. In May, the trail will likely still be covered in snow and require snowshoes and gear. Coming in early to mid- September is generally safe snow-wise, and the crowds might be slightly less, but keep in mind that you’ll miss the colorful summer wildflowers that Paradise is known for.
Get to Paradise either before 7 am or after 3 pm to enter without a reservation. If you’re planning on hiking the Skyline Trail, either one can work. Getting there before 7 am is ideal so that you can take your time on the trails, particularly if you plan on doing the entire Skyline Loop Trail, and get more out of your day.
If you can only get there for after 3 pm, you can definitely still get some time out on the trails. If you’re a fast hiker, you can still do the entire Skyline Loop Trail before it gets dark, especially during the longer summer days. Or, you can do an out and back hike on the Skyline Trail to Panorama Point, or just walk around some of the smaller loops in the area (we go over all the Skyline Trail route options below). Keep in mind that it takes about 40 minutes or so from either entrance to get to the Skyline Trail parking lot. So you likely won’t be starting your Skyline Trail hike until about 4 pm. So just be sure to plan your time accordingly, know when sunset is, and bring headlamps just in case.
If you have a site at the Cougar Rock Campground near Paradise, you can get in without a reservation for the days you have your camping permit. You can reserve a site here in advance, and your camping reservation will get you into Paradise starting at 1 pm on the first day of your stay. There are also first-come first-served sites as well, but the catch here is that just to get to the campground to see if there are sites available requires you to have a reservation to get in (or you can drive in before 7 am or after 3 pm). You aren’t guaranteed a site to be available, so it is a bit of a gamble. But if you happen to get a site, you can then continue to stay in Paradise without a reservation for the days your camping permit is valid for.
Similarly, if you have reservations at one of the two lodges in the Paradise Corridor (the National Park Inn in Longmire or Paradise Inn), then you can enter Paradise without a reservation for the days your reservation is good for starting at 1 pm on the first day of your stay.
How to get to the Skyline Loop trailhead
The trailhead for the Skyline Loop Trail is found in Paradise, near the Henry M. Jackson Visitor Center and Paradise Inn. To get here from either the Stevens Canyon Entrance or the Nisqually Entrance, it’s about a 40 minute drive.
From the Stevens Canyon Entrance
If you’re coming from the Stevens Canyon Entrance to the east, you’ll drive Stevens Canyon Road for about 19 miles. This is a paved road that runs along the edge of a valley. Along the way as you get higher, you’ll be treated to views of Mount Rainier, travel through tunnels, and pass by beautiful roadside waterfalls on your left. On your right, you’ll often be driving along the canyon’s edge with a steep drop off (as you’re driving in to Paradise), so it may feel harrowing to those not used to driving mountain roads. We would say that these sections are very similar to driving the Going-to-the-Sun Road in Glacier National Park.
There are several viewpoints to stop at (one of the most famous being Reflection Lake, a few miles before Paradise), and several trailheads.

The view of Mount Rainier from Stevens Canyon Road- you can see why we were hiking in a cloud when we got to Paradise!
After 19 miles at the end of the road, you’ll take a right onto Paradise Valley Road. This loop road takes you to the various parking lots, facilities, and trailheads in Paradise. About halfway along (just past the main lot for the visitor center, the loop becomes a one-way road that circles through beautiful meadows before meeting back up with Stevens Canyon Road.

Paradise Valley Road in Mount Rainier
After about 2 miles on Paradise Valley Road, you’ll reach the lower parking lot. This is the main trailhead for the Nisqually Vista Trail. You can also start the Skyline Loop Trail from here, though it will add a tad bit more distance, and there are no visitor services here like at the upper lot. We would suggest parking here only if the upper lot is full.
Just a bit further up the road is the main upper parking lot for the Skyline Loop Trail. Here is where you’ll find the main visitor center, ranger station, restrooms, and the Paradise Inn. The lot is pretty big, and in the past, before reservations, it would fill up by 9-10 am or so according to the park rangers, particularly on the weekends (for reference, we got there at about 8 am midweek and the lot was about half full, and we noticed that it filled up completely by about 9:30 am). However, with the new reservation system in place, this hopefully should not be an issue (though it might still fill up from people getting there before the 7 am reservation cutoff, and we still recommend an early start to beat the crowds on this trail!). If the Paradise parking lots do fill up by the time you get there, there is overflow parking along Paradise Valley Road just past the upper lot. Or, have a back up plan just in case and try to come back later in the day.

Looking back at the upper parking lot and Visitor Center in Paradise from the start of the Skyline Loop Trail
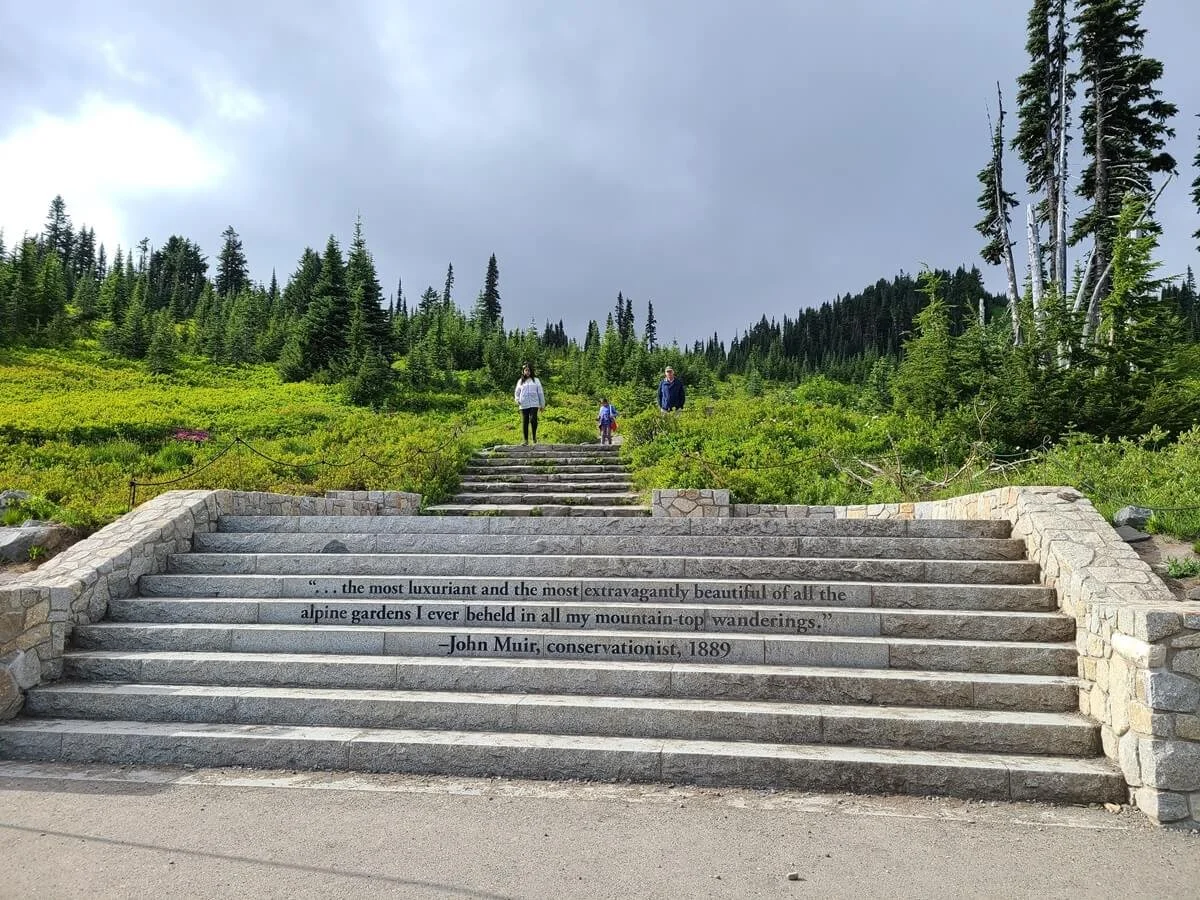
The main trailhead for the Skyline Loop Trail starts just beside the visitor center and is hard to miss. It begins on a wide stone staircase engraved with a John Muir quote and backdropped beautifully by Mount Rainier itself. (Other access points to the Skyline Trail are also found across from the Paradise Inn further up the parking lot.)
Soon after the wide stone steps, the trail splits with a sign…you can either hike the Skyline Loop Trail clockwise by staying straight, or you can hike the trail counterclockwise, heading right towards Myrtle Falls. We’ll talk about which direction is best to hike the Skyline Loop Trail in just a bit!
The start of the Skyline Loop Trail in the upper parking lot. Mount Rainier is normally in view in the distance, creating a very scenic start to the hike.

Head straight to go clockwise on the Skyline Loop Trail, or right to go counterclockwise
From the Nisqually Entrance
From the Nisqually Entrance on the west, it’s about a 17.5 mile straight shot to Paradise on Paradise Valley Road. This route is a little less harrowing and more forested than the route from the east until you get close to Paradise, but along the way there are several trailheads and quick stops you can make, such as at Ricksecker Point and Christine Falls.
Distances to the Skyline Loop Trail from key points
Seattle to the Skyline Loop Trail: 100 miles, 2.5 hours
Tacoma to the Skyline Loop Trail: 80 miles, 2 hours
Sunrise to the Skyline Loop Trail: 51 miles, 2 hours
Longmire to the Skyline Loop Trail: 12 miles, 25 minutes
Mowich Lake/Carbon River area to the Skyline Loop Trail: 95 miles, 2.5-3 hours
How Long is the Skyline Loop Trail in Mount Rainier National Park?
The area of Paradise where the Skyline Loop Trail is actually has a huge collection of intersecting trails and there are a number of ways you can combine them to make your hike along the Skyline Loop Trail as short or as long as you’d like. Most people hiking the Skyline Trail are looking to either do an out-and-back hike on the Skyline Trail to Panorama Point, or are looking to complete the entire Skyline Loop Trail. There is a proper Skyline Loop Trail that you can follow and it’s the most direct route to Panorama Point and beyond, but detouring off this main path onto other trails is possible, and will often get you to the same place (this makes more sense once you look at the Skyline Loop Trail map below!).
In this guide, we are focusing on the entire Skyline Loop Trail, as this is what we did, and it includes most of the highlights in the area. These are our hiking stats for the full Skyline Loop Trail in Mount Rainier:
Distance: 6.4 miles
Elevation gain: 1,800 feet
Time: 3.5-4 hours
Trail profile:
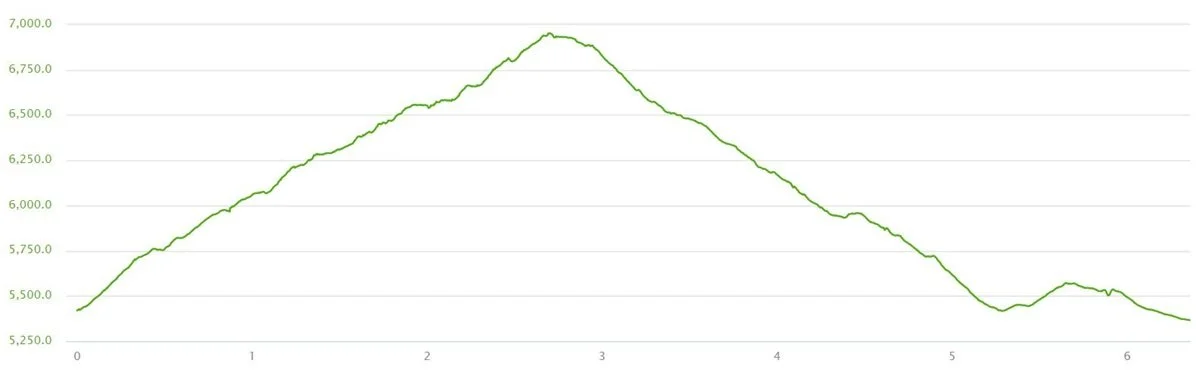
Our elevation profile of the Skyline Loop trail while hiking clockwise around the loop

A satellite view of our hike around the Skyline Loop Trail, with key points labelled
Skyline Trail route options
Hiking the entire Skyline Loop Trail will take you past views of the Nisqually Glacier, up to Panorama Point, along the High Skyline Trail, and past Myrtle Falls. However, you can see some of these highlights without hiking the entire loop if you’re short on time or energy. Here are some other Skyline Trail route options:
Skyline Trail to Panorama Point (4 miles/1300 feet): This is the most popular Skyline Trail route. This takes you up the western half of the Skyline Trail to a popular viewpoint over the Paradise area. It allows you to get some of the best views over Paradise without having to do the full loop, although it still goes across rugged terrain to get there and has most of the elevation gain as the full trail. This guide will cover this version of the Skyline Trail hike, as it’s part of the larger loop that we did.
Skyline Loop Trail via the Golden Gate Trail (4 miles/1700 feet): This is a shortened version of the full Skyline Loop Trail. You’ll head up to Panorama Point and continue past onto the High Skyline Trail, but then cut off about a mile and a half of the Skyline Loop Trail by taking the Golden Gate Trail back to the Paradise parking lot (and you’ll still get to pass Myrtle Falls along the way!). This is good for those who are short on time but still want to be able to do a loop hike to get different scenery the whole time, and for those who don’t mind a bit of a steeper section on the Golden Gate Trail since you need to make the same elevation change as the full loop trail but in a much shorter distance as it descends back down to Paradise.

The Golden Gate Trail is a more direct route to Panorama Point from the eastern side of the trail
Alta Vista Loop (1.5 miles/600 feet): This is a short loop that detours off the beginning of the Skyline Trail and goes to the top of a small bump with views over the Paradise area. This is a good option for those looking for a shorter, less strenuous hike in the Paradise area but still good views of Paradise and Mount Rainier.

This is a view over Paradise from the eastern side of the Skyline Loop Trail. You can see Paradise Valley Road and the parking area in the center. To the right, a trail winds up to the top of a small hill- this is the Alta Vista detour off the main Skyline Trail.
Skyline Trail to Glacier Vista (3 miles, 1000 feet): Hike most of the way to Panorama Point via the Skyline Trail, but stop just shy of the final climb at a great viewpoint overlooking the Nisqually Glacier and Valley. This guide will cover this version of the Skyline Trail hike, as it was part of the larger loop that we did.
Skyline Trail to Myrtle Falls (1 mile, 100 feet): This is another very popular but short walk to one of the most picturesque waterfalls in Mount Rainier National Park. Perfectly backdropped by Mount Rainier on a clear day, this beautiful waterfall is easy to get to along a paved path as you head counterclockwise along the Skyline Loop Trail. You’ll see Myrtle Falls later in this guide, as it was at the end of our hike along the full loop.
Hiking any of these options on or around the Skyline Loop Trail will get you to great views, so it really all depends on how long you want to be on the trail and what you want to see. Even if you plan to do the full Skyline Loop Trail, taking detours along the way is easily doable, such as to Alta Vista, Glacier Vista, or along the Deadhorse Creek Trail, and they usually lead quickly back to the main Skyline Trail. Because of all the options, the Skyline Loop Trail really is a make-your-own-adventure kind of a hike!
As we said above, in the guide, we’ll cover the entire Skyline Loop Trail as that’s what we did, so this guide will by default cover most of the highlights in the area, and most of the information here will apply to you no matter what hiking route you ultimately decide to take.
Skyline Loop Trail map
This Skyline Trail map is found at both the upper and lower parking lots of Paradise near the trailheads. As you can see, there are lots of intersecting trails in the Paradise area. It’s helpful to come with a plan and know which route you want to take ahead of time, and having a map like this when hiking the Skyline Loop Trail is super helpful to keep yourself on track.
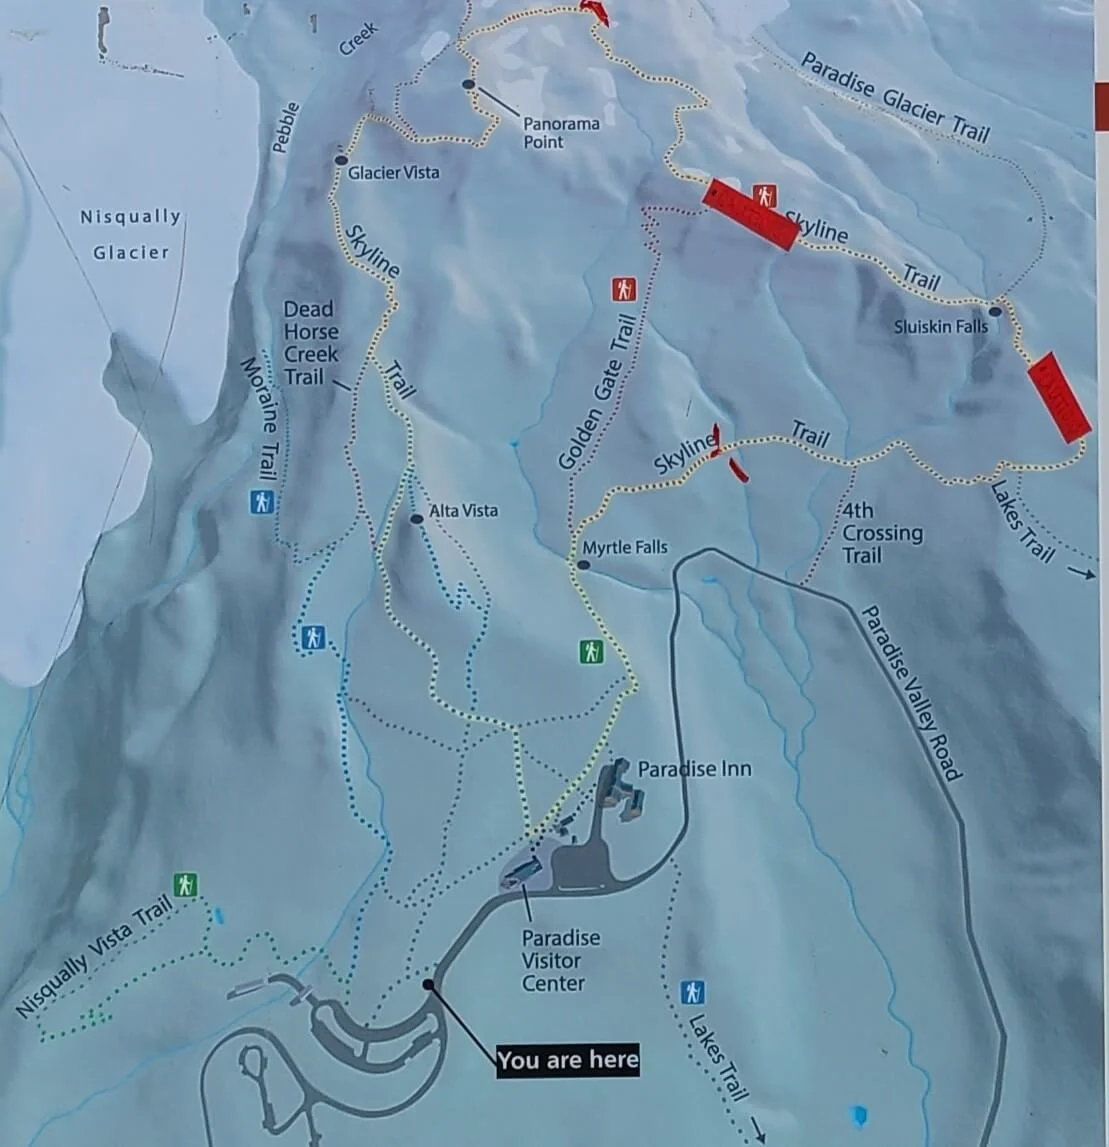
The official Skyline Loop Trail is highlighted in yellow, but you can see there are multiple side trails and detours that you can take along the way!
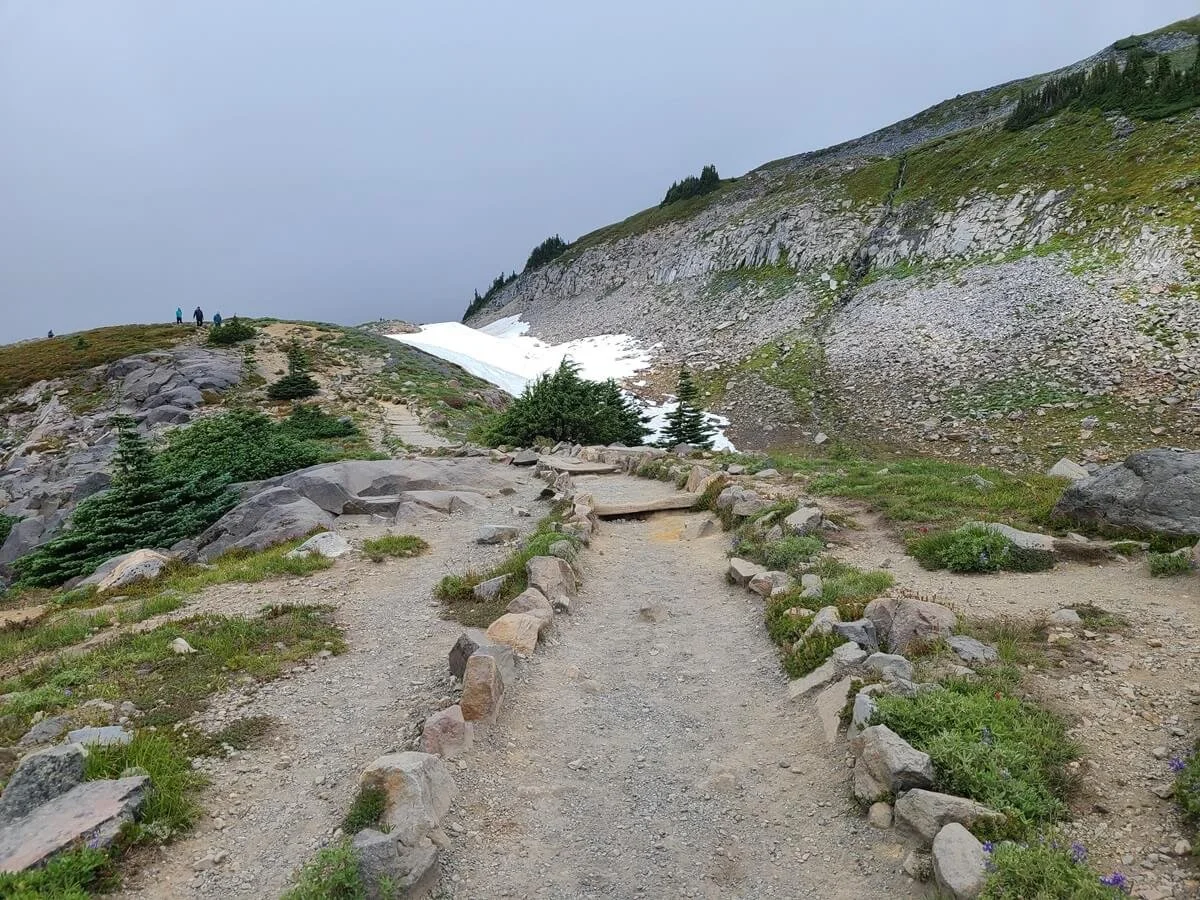
Navigation along the Skyline Loop Trail is easy, as all the junctions are well-marked. Just be sure to pay close attention to the signs at each junction, which are often lower to the ground and might blend in with the surroundings a bit if you’re not looking for them.
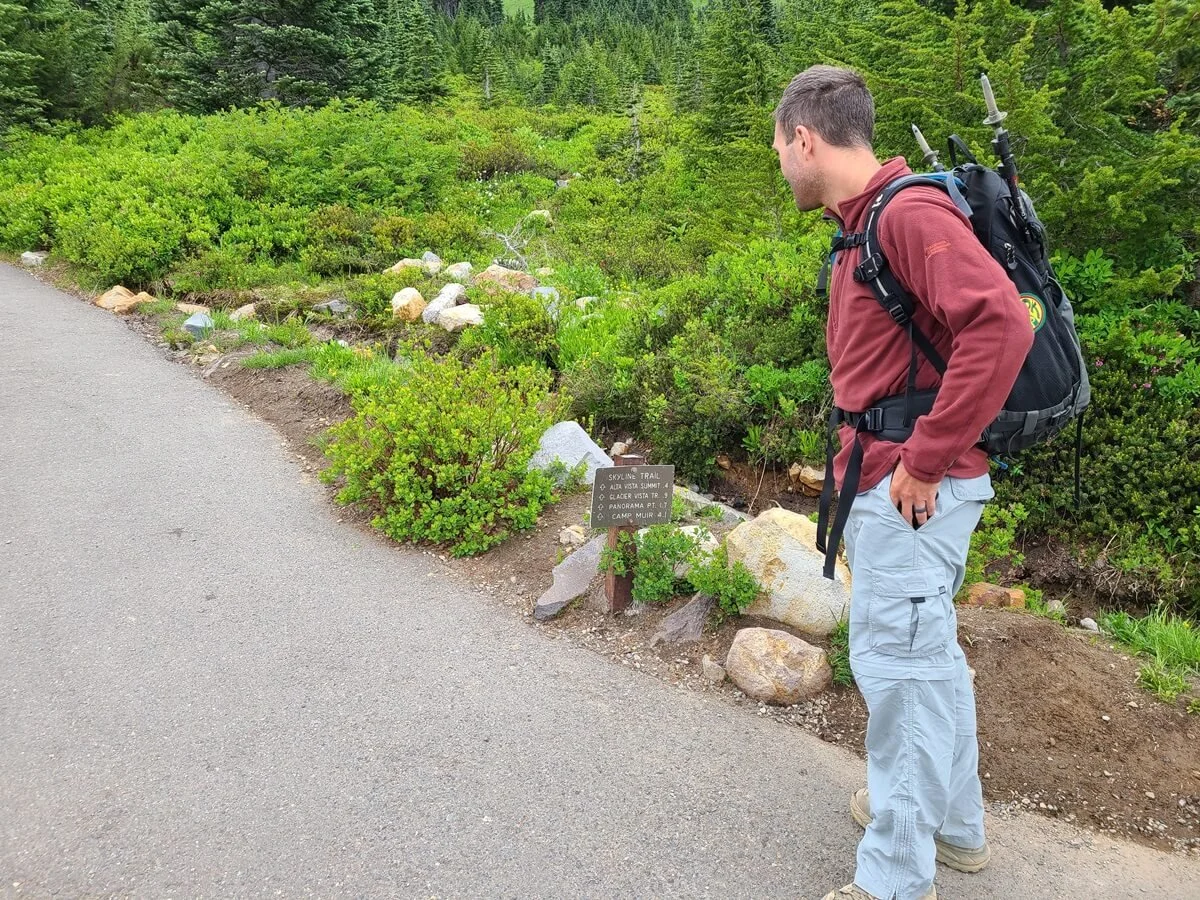
The small trails signs along the Skyline Trail in Mount Rainier
Which direction should I hike the Skyline Loop Trail?
Because the Skyline Loop Trail is, well, a loop, you can hike this trail either clockwise or counterclockwise. Here are our thoughts to help you decide which way you’d like to hike it.
We would recommend hiking the Skyline Loop Trail in the clockwise direction for a few reasons:
As you hike the west side of the loop in the clockwise direction, views of Mount Rainier are closer and more in your face than they are on the east side of the loop, and if you were hiking counterclockwise through here, you’d have to keep turning around for them. There are views of Mount Rainier on the east side of the loop if you were to hike counterclockwise along the Skyline Loop Trail, but the mountain feels further away and the view is often more obstructed than they are on the western half.
The west side of the loop is a bit of a steeper and more consistent climb than the east side of the loop as it is a shorter and more direct route to the highest point of the trail above Panorama Point, and for us personally, we prefer hiking up the steeper parts to save our knees on the descent. The eastern portion of the loop is more gradual, with more flat sections in between the climbs.
The west side of the Skyline Loop Trail is way more crowded and popular than the east side of the loop. This is because many people who hike the Skyline Trail do it as an out-and-back to Panorama Point, and the west side of the loop is the most direct and scenic way to do this. Because of this, we recommend hiking clockwise to get the crowded part of the trail out of the way first before heading over to the relatively crowd-free and more peaceful eastern half of the trail. If you are starting the Skyline Loop Trail early in the morning, hiking clockwise might even allow you to get this busy portion of trail done before the heavy crowds arrive.
The only possible pro we have for hiking the Skyline Loop Trail counterclockwise instead is that the eastern half of the loop often has a lot of snow on the trail until very late in the season (even into August). These large snow patches are often on steep parts of the trail so can be slippery and tough to cross. Often it’s easier to keep your balance and footing when going up these snow patches rather than down. But, if you bring good gear, such as trekking poles and spikes, you should be fine either way. So, make sure to check trail conditions of the Skyline Loop Trail before heading out!
How hard is the Skyline Loop Trail in Mount Rainier National Park?
The Skyline Loop Trail was surprisingly more challenging than we anticipated just based on the sheer number of people that this hike sees. Don’t let the crowds of people fool you- this is still a significant hiking trail and you should absolutely be properly prepared!
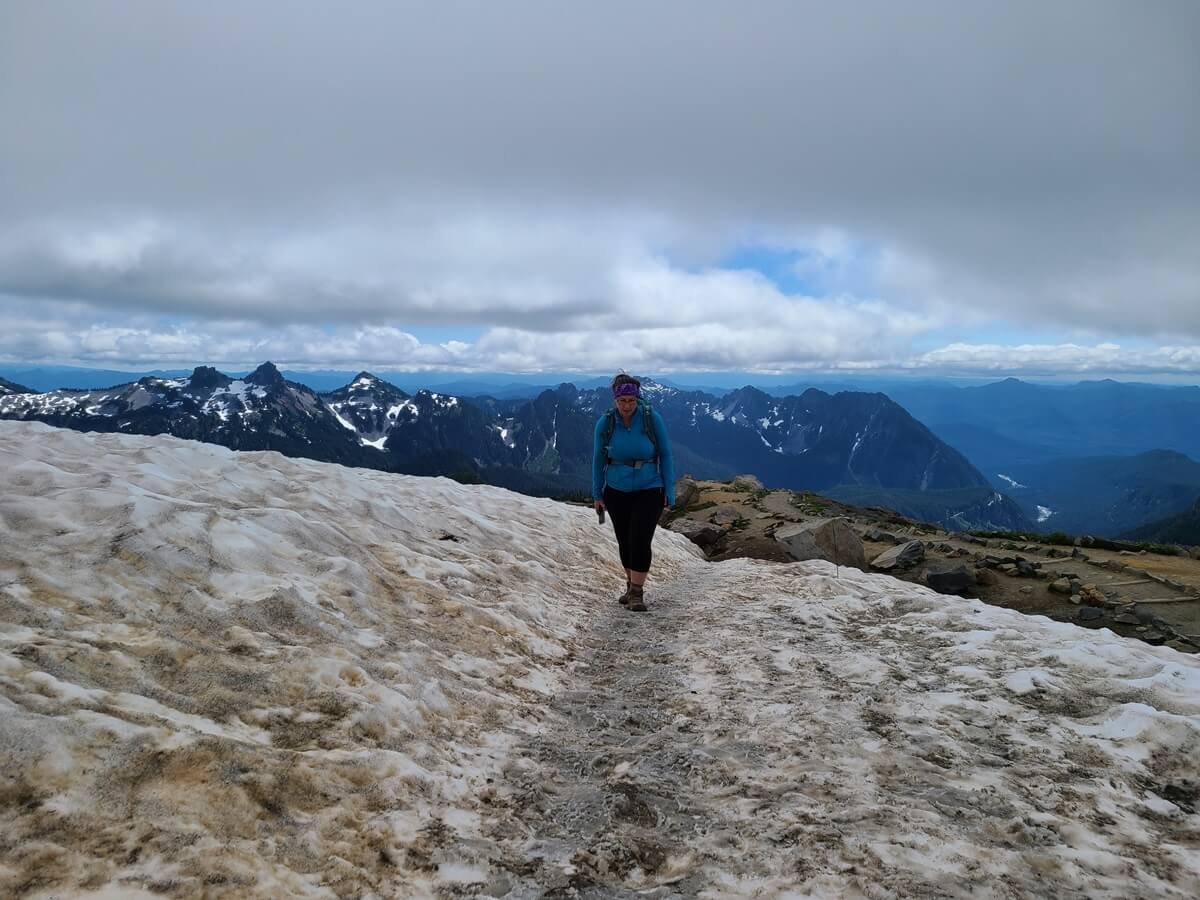
We would say that the Skyline Loop Trail in Mount Rainier is moderately challenging. There’s a good amount of elevation gain, and while the first part of the loop in either direction starts off deceptively easy on a nice paved walking path, the trail eventually becomes rocky, steep, and sometimes narrow. As you head up to Panorama Point, you’ll be hiking through more alpine-like territory with rugged terrain and cooler weather. The Skyline Loop Trail also holds onto snow until late in the season, and you’ll likely find yourself crossing several snow patches along the trail, particularly on the eastern half of the loop. We hiked the Skyline Loop Trail in mid-July and crossed probably a half dozen or so patches found on both sides of the loop. They can get slick so having poles is really helpful.
One of the steeper snow patches we had to descend along the Skyline Loop Trail
Overall, the Skyline Loop Trail shouldn’t be underestimated. Be prepared to be on a rugged and rocky trail for several hours, so have good hiking boots, plenty of food and water, and layers for the cooler weather and wind as you head up into alpine territory.
The Skyline Loop Trail in Mount Rainier: Trail Guide and Our Experience
Let’s get into our experience on the Skyline Loop Trail in Mount Rainier so that you know what you can expect on the hike! Keep in mind, though, as we said above, when we hiked the Skyline Trail, Mount Rainier was in a cloud and never came out (womp womp), so if you go on a clear day, your views will be 1000 times better than ours!
We had an early wake up call, as we were driving to Paradise from near the Sunrise area of Mount Rainier almost two hours away and were hoping to get an early start on the trail to beat some of the crowds. As we drove up Stevens Canyon Road to Paradise, though, we actually had never seen such heavy, thick fog in our lives! The road was barely visible in front of us, but because the forecast was projecting a sunny day, we were hoping that it would start to lift soon.
We got to the upper Paradise parking lot around 8 am with still zero views in sight, and the large lot was about half full already. As much as we wanted to just start on the trail, we decided to wait it out just a little bit to see if the fog would lift…after all, there was supposed to be a giant volcano right in front of us that we couldn’t see at all! Well, a little bit turned into over four hours of waiting, and Mount Rainier was still nowhere in sight. The fog was slowly lifting though, and we could start to see the foothills of Mount Rainier and the Tatoosh Mountain range behind us. We decided we needed to get started and just kept our fingers crossed that the fog would continue to lift and clear around Mount Rainier. Spoiler alert: It did not!
We finally started the Skyline Loop Trail at about 12:30pm, and at this point, the parking lot was packed despite the less-than-ideal conditions, and we knew it was going to be a crowded hike. We headed up the engraved stone steps near the visitor center that mark the start of the hike. Shortly after, there’s a junction and you can either head clockwise or counterclockwise around the loop. We stayed straight to hike the Skyline Loop Trail clockwise.
This beginning part of the Skyline Loop Trail is paved, but its surprisingly steep! It goes pretty consistently uphill through trees and shrubs, and definitely gets the heart pumping. But because it’s a paved path, it’s really just a cardiovascular challenge here and not a technical one. You’ll continue on this paved path for a bit through trees that begin to intersperse with meadows, and if you’re there at the right time, you’ll be treated to colorful wildflowers. As you get further up the trail, views of Mount Rainier open up straight ahead, and these views will only keep getting better and closer.

The Skyline Loop Trail begins right off the bat with some steep climbing, but the path is paved here
A view of the Skyline Loop Trail as it winds its way closer to Mount Rainier, which would normally be in view here on a clear day!
Looking back down the Skyline Loop Trail back towards the trailhead and the Tatoosh Range

A marmot taking in the scenic views along the Skyline Loop Trail!
From the start, the handful of intersecting trails becomes apparent as you continue along the Skyline Trail, but fortunately, each junction is well-marked, and you’ll simply want to continue following the signs for the Skyline Trail to stay on the main path. Having a map is super helpful here to decide which side trails you might want to take and where/if they reconnect back to the main trail.
The only time we got tripped up was at the intersection for the Dead Horse Creek Trail. The trail sign at the junction said that “Glacier Vista” was the trail to the left (which we knew we wanted to detour to), and the Skyline Trail was straight. This confused us a bit because we didn’t feel like we were at the junction for the Glacier Vista side trail quite yet, but we followed the sign anyway. What we figured out was that this was the Dead Horse Creek Trail instead (so we aren’t quite sure why the trail sign didn’t indicate that…but all the more reason to have a map on you!). Regardless, the Dead Horse Creek Trail simply parallels the Skyline Trail and then meets back up with it shortly after. We weren’t mad about it, though, because the Dead Horse Creek Trail actually runs closer to the Nisqually Glacier valley, so you get great views, and if we had to do it again, we would probably still take this detour.

Looking back along the Dead Horse Creek Trail- a detour off the main Skyline Loop Trail

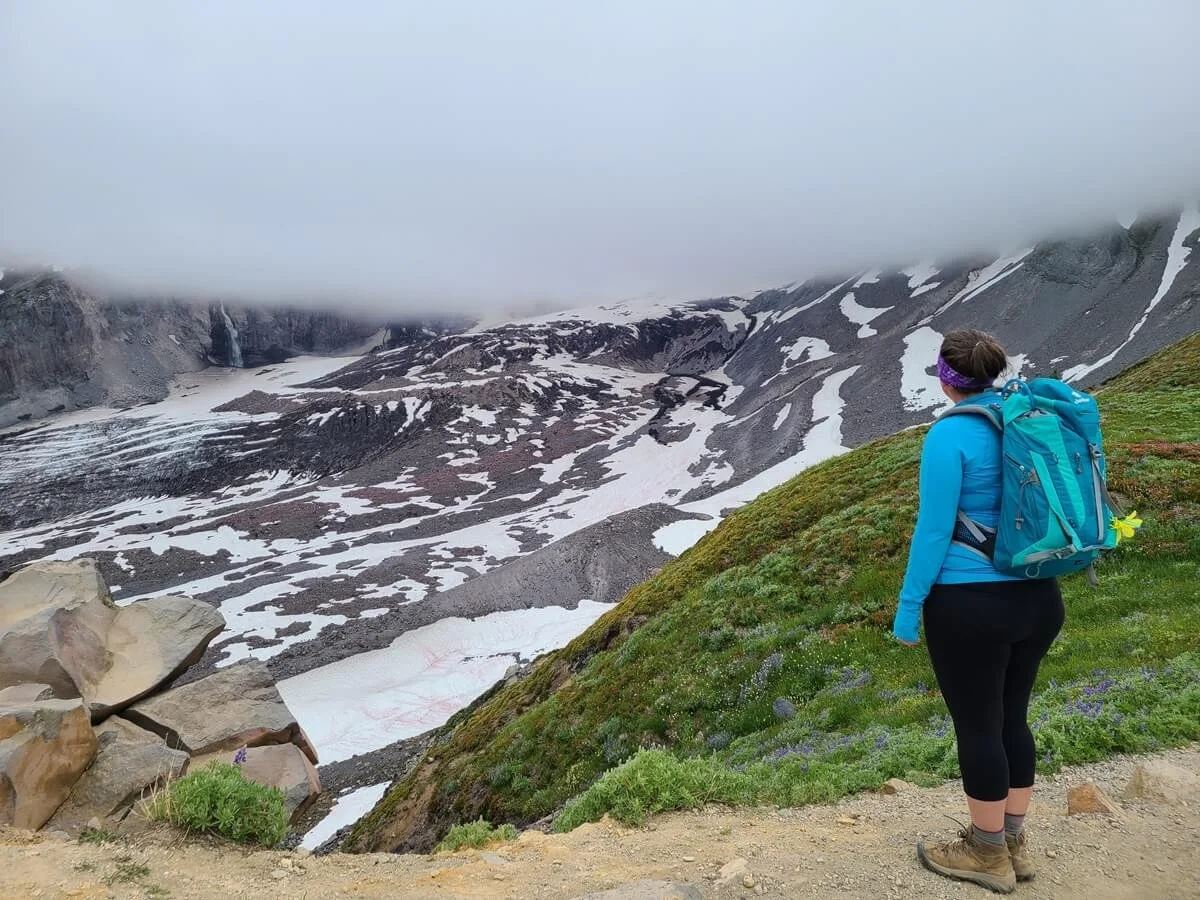
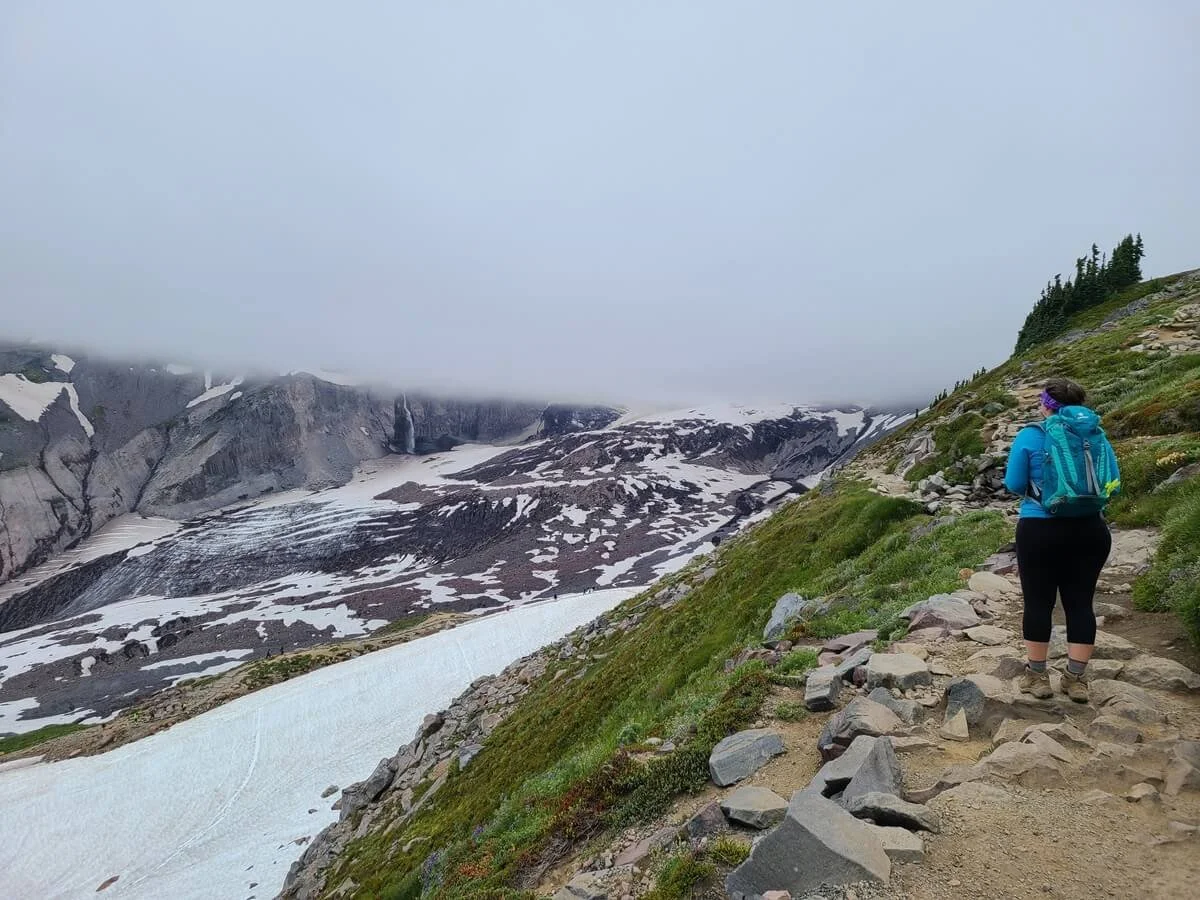
The base of the Nisqually Glacier and Mount Rainier from the Dead Horse Creek Trail- all we could see due to the thick fog surrounding the mountain!
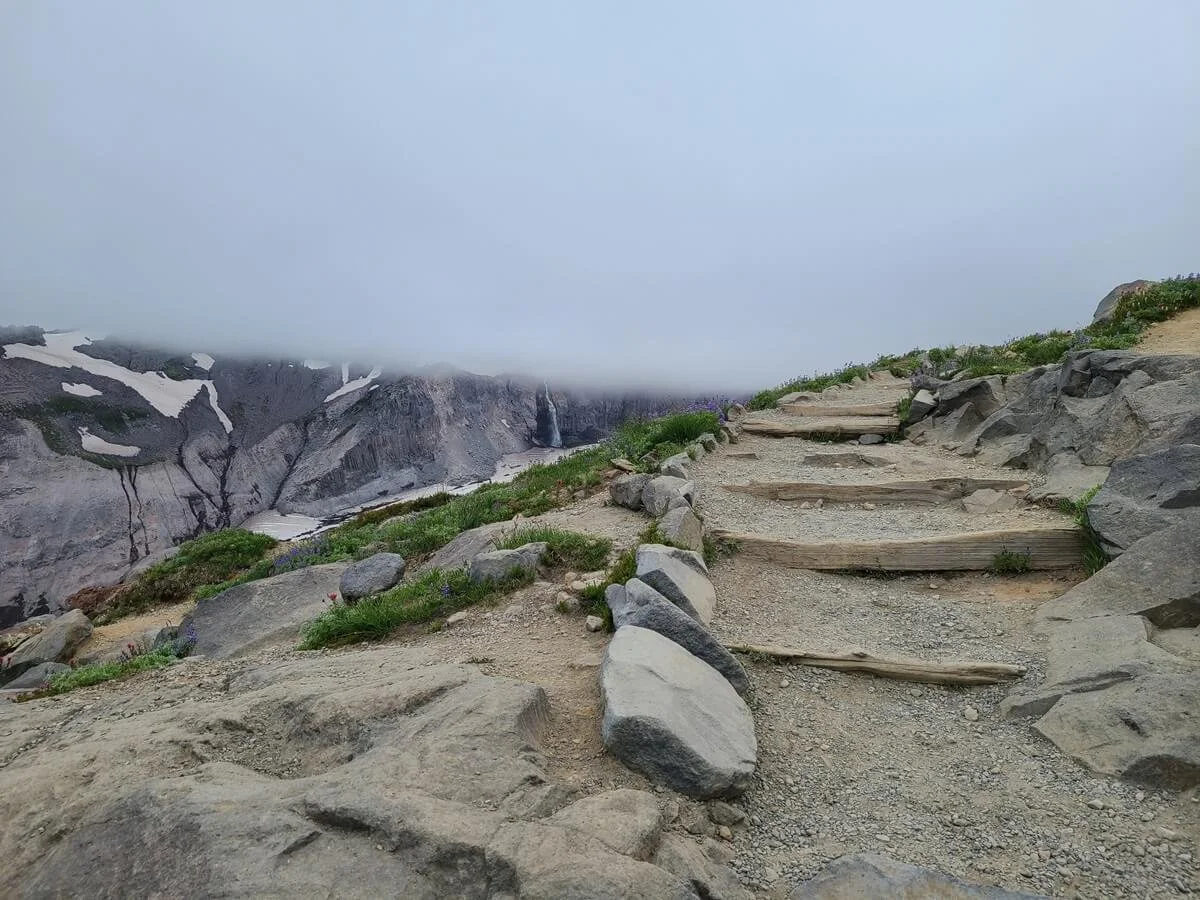
Shortly after the Dead Horse Creek Trail junction, the Skyline Loop Trail transitions from pavement into gravel and stone steps as it continues climbing, but it’s still relatively smooth. We would say the point where the trail starts to get pretty rugged and a little more difficult is right around where the Glacier Vista side trail branches off from the main path. Here, a steep spurt of rugged stone stairs and loose rock takes you up to a viewpoint overlooking the Nisqually Glacier as it cascades down the slope of Mount Rainier and stretches down the valley. You can also see waterfalls running down along the base of the mountain, and in cloudy weather, this was kind of cool because it made it seem as if the falls were appearing out of nowhere (though we will admit, we would have much rather seen the mountain!).

Heading towards the Glacier Vista viewpoint (the hill on the left in the distance). You’ll have to use your imagination here to pretend Mount Rainier is visible ahead!
Looking back down the Skyline Loop Trail as it climbs towards Glacier Vista

A steep stone staircase up to Glacier Vista along the Skyline Loop Trail
The Skyline Loop Trail starts to get a bit rugged as it heads up to Glacier Vista
We’d definitely recommend this tiny detour off the main Skyline Loop Trail to Glacier Vista as it really doesn’t add anything more to your hike and quickly rejoins the main trail after the viewpoint. You’ll also start getting great views back over Paradise from up here as well.

The trail to Glacier Vista runs alongside the valley with views of the Nisqually Glacier and Mount Rainier (again, you’ll have to use your imagination here!)

A marmot enjoying the view from Glacier Vista in Mount Rainier

The Nisqually Glacier cascading down the base of Mount Rainier which hides in a cloud
It’s up here that we started to see the first bits of snow along the Skyline Loop Trail. A lot of it was off trail, but there were some small patches on the trail that we had to cross. None of them were on any significant slopes so they weren’t too slippery or difficult here.
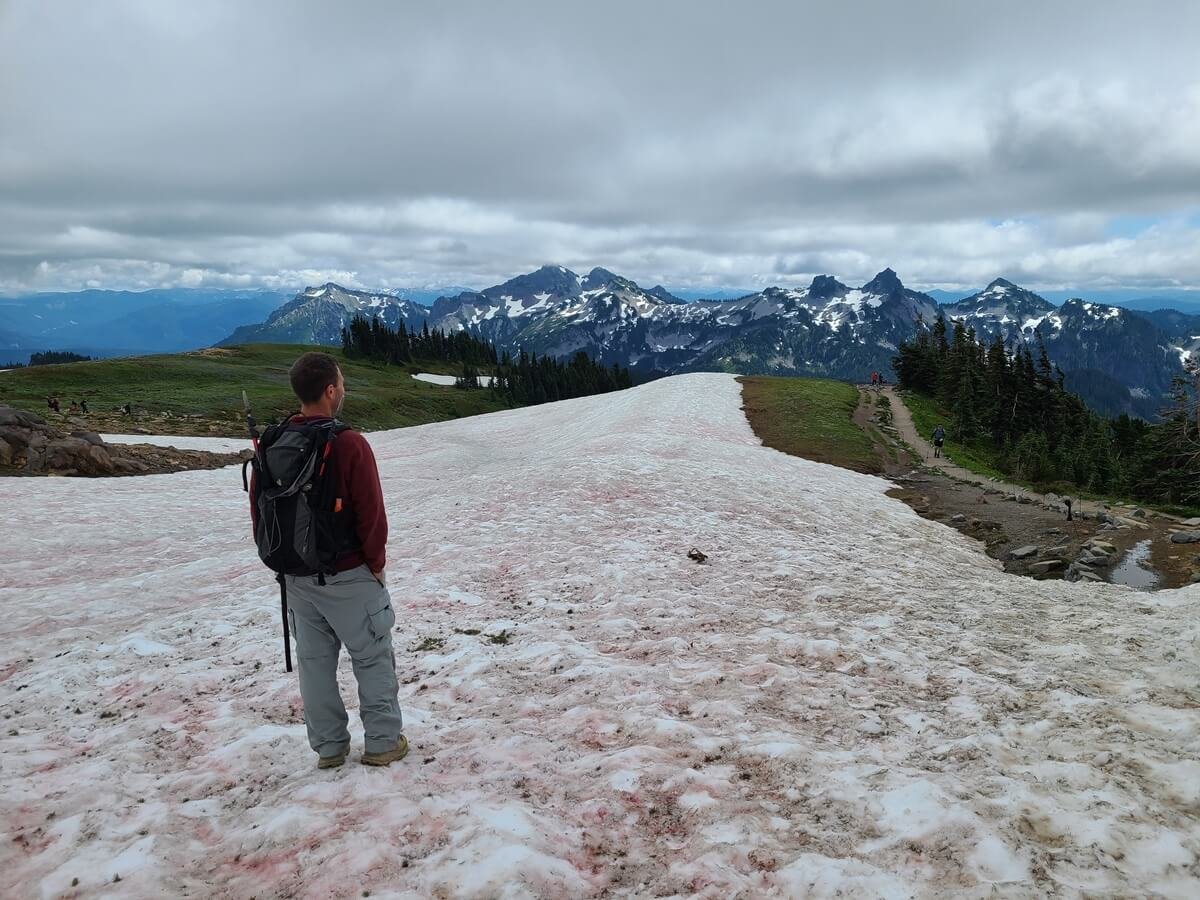
Our first encounter with snow along the Skyline Loop Trail
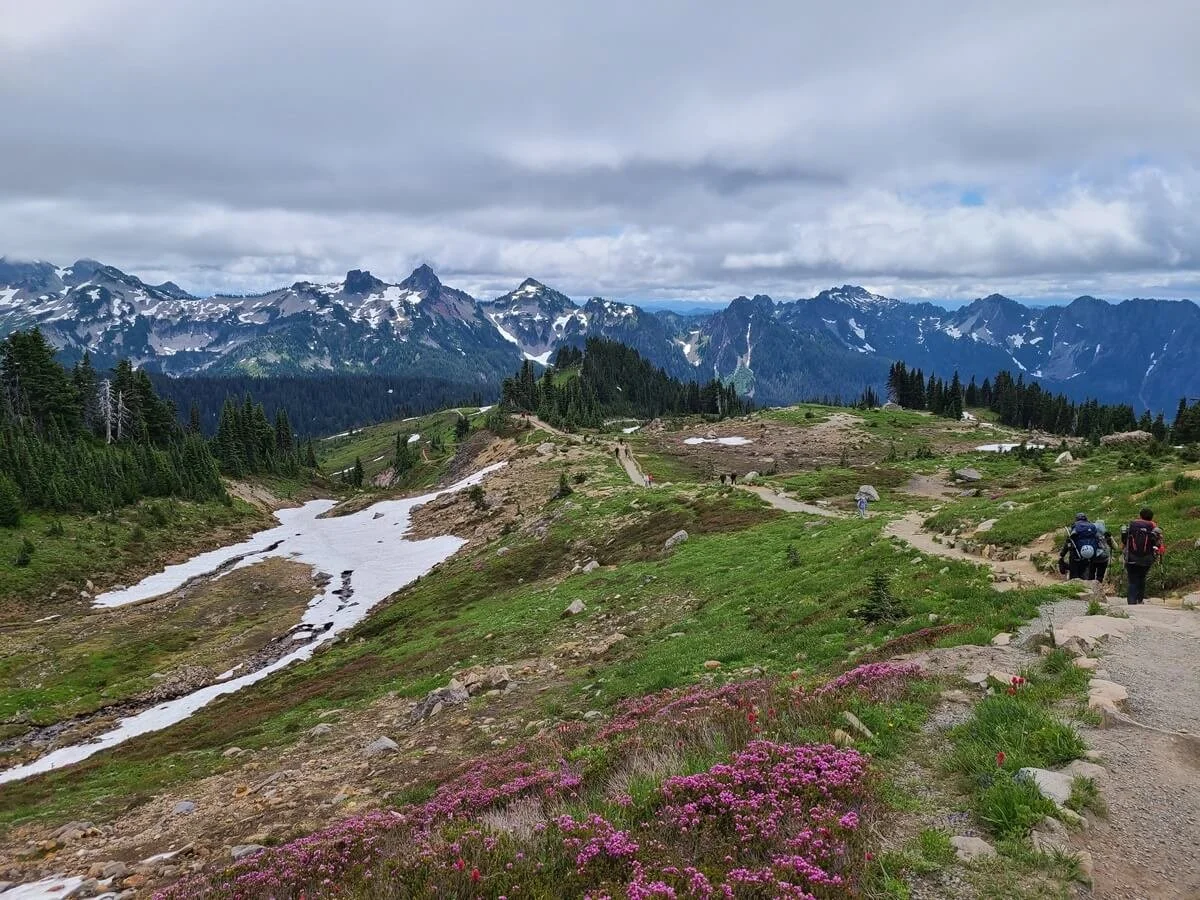
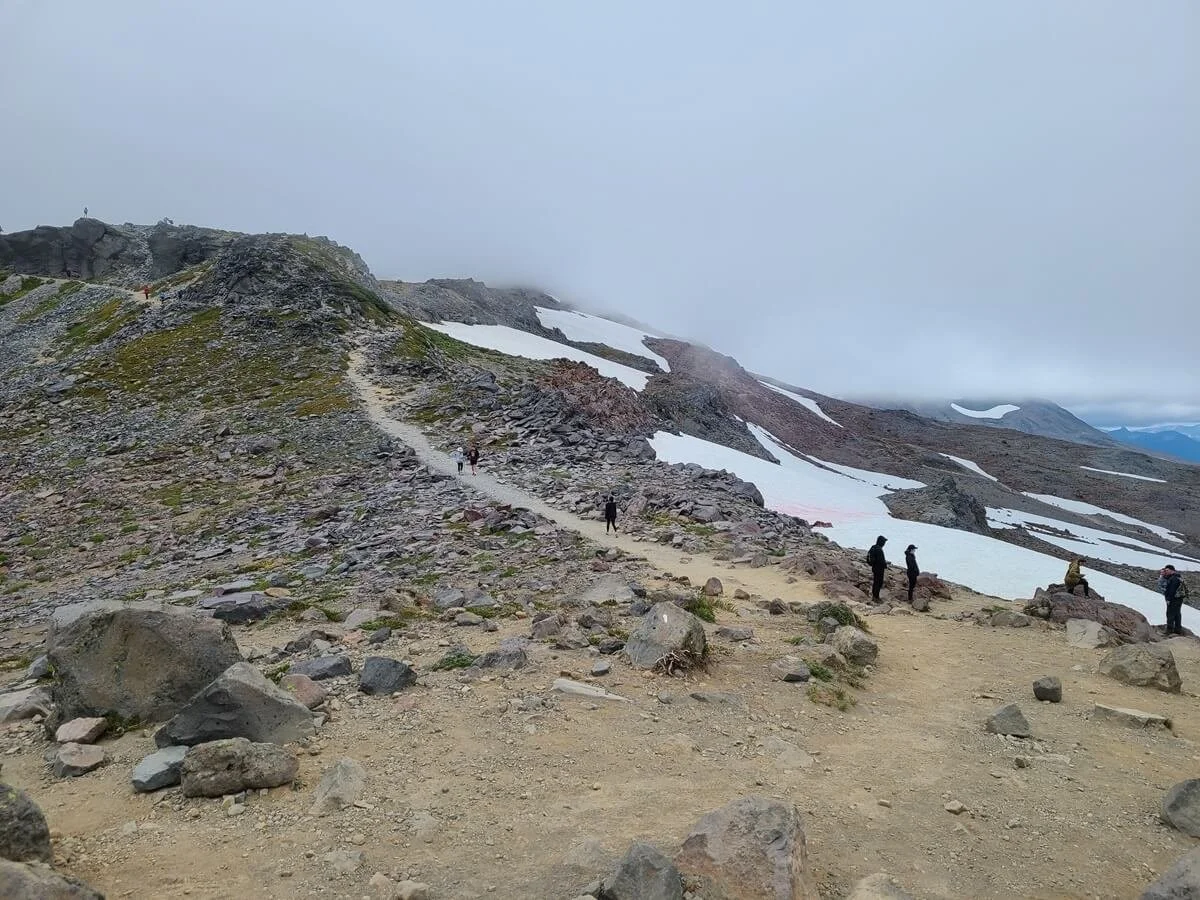
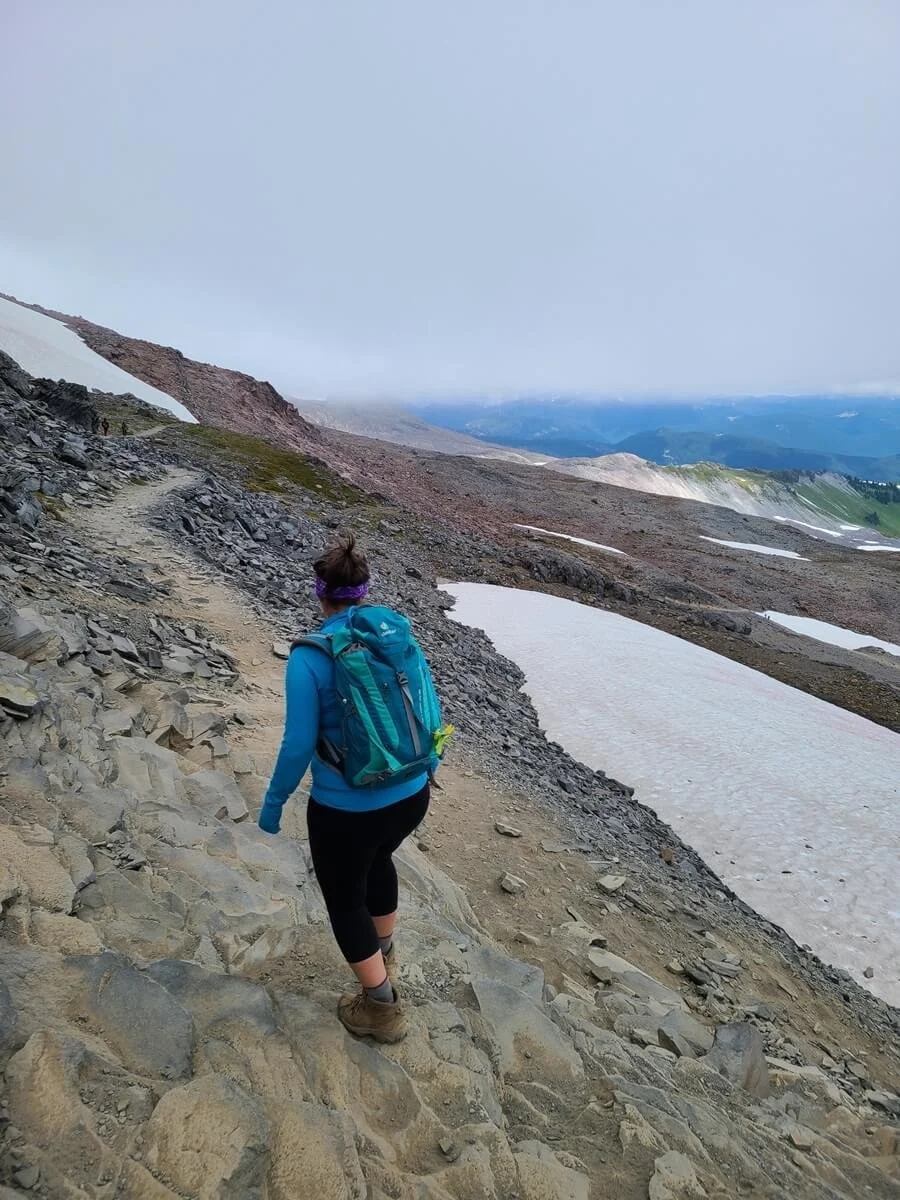
After the Glacier Vista detour, ahead you’ll see the ridge that you’ll be climbing up to (and you’ll also likely see a bunch of people that look like small ants making their way across). From here, the Skyline Loop Trail starts its rugged and rocky climb up to this ridge. Along the way, you’ll be walking along side of the Nisqually Glacier and Mount Rainier, so the views here are great and the mountain will be super close. Again, you may encounter snow along this portion of the Skyline Loop Trail.
The Skyline Loop Trail heads up to the near the top of the rocky cliff ahead and then travels across this ridge to get to Panorama Point
This part of the Skyline Loop Trail has amazing views of Mount Rainier as it hugs the side of the valley
Epic close-up view of Mount Rainier from the Skyline Loop Trail…if only it were out!
More snow along the Skyline Loop Trail
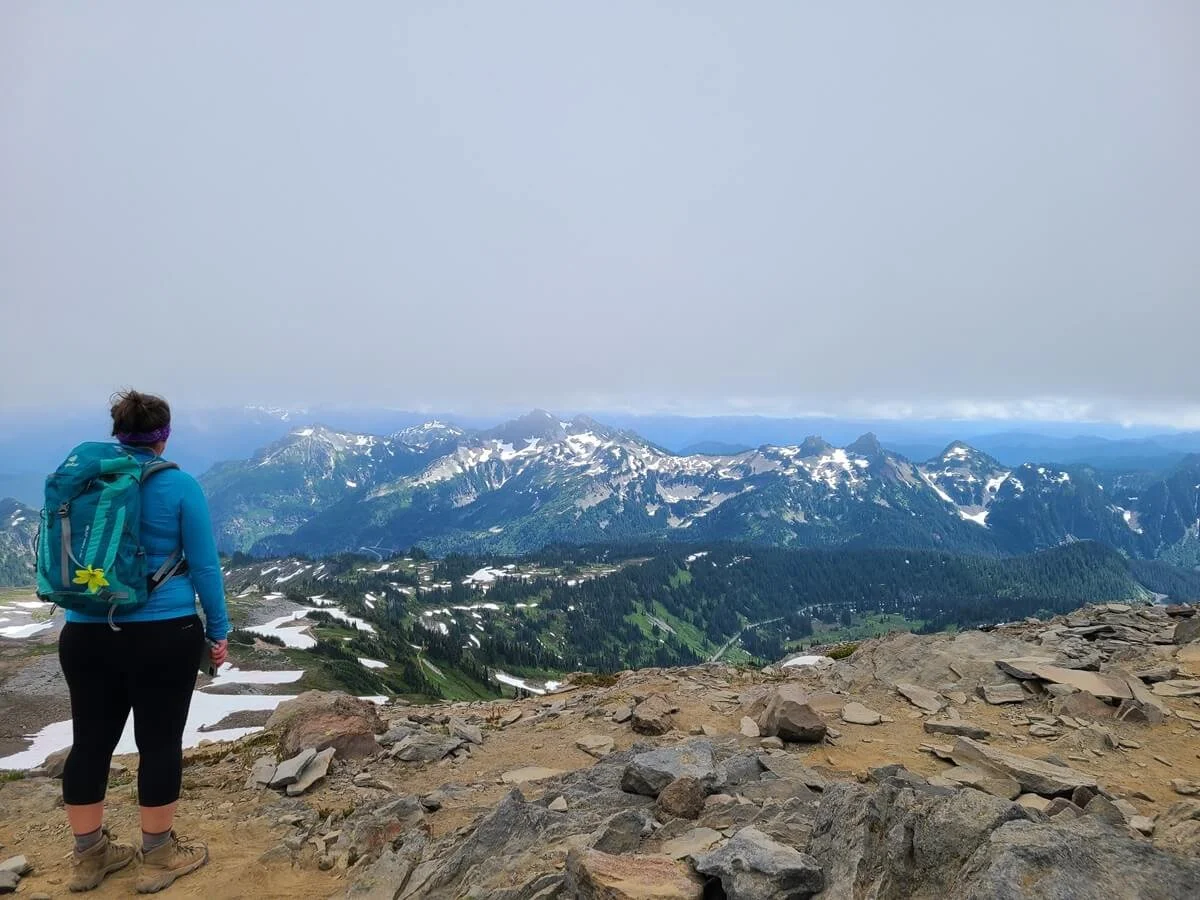
The Skyline Trail will make a turn so that you’ll start walking away from the glacier and across the ridge towards Panorama Point. At this point, the Skyline Trail has become pretty rugged with lots of gravel, loose rock, stone steps, and steep spurts of climbing. You’ll also be walking along a ledge up here with great views over Paradise, its network of trails, and all the ants (a.k.a. people) hiking.
A rugged and steep portion of the Skyline Loop Trail as it heads towards Panorama Point
Views of Mount Rainier and the Nisqually Glacier from the Skyline Loop Trail

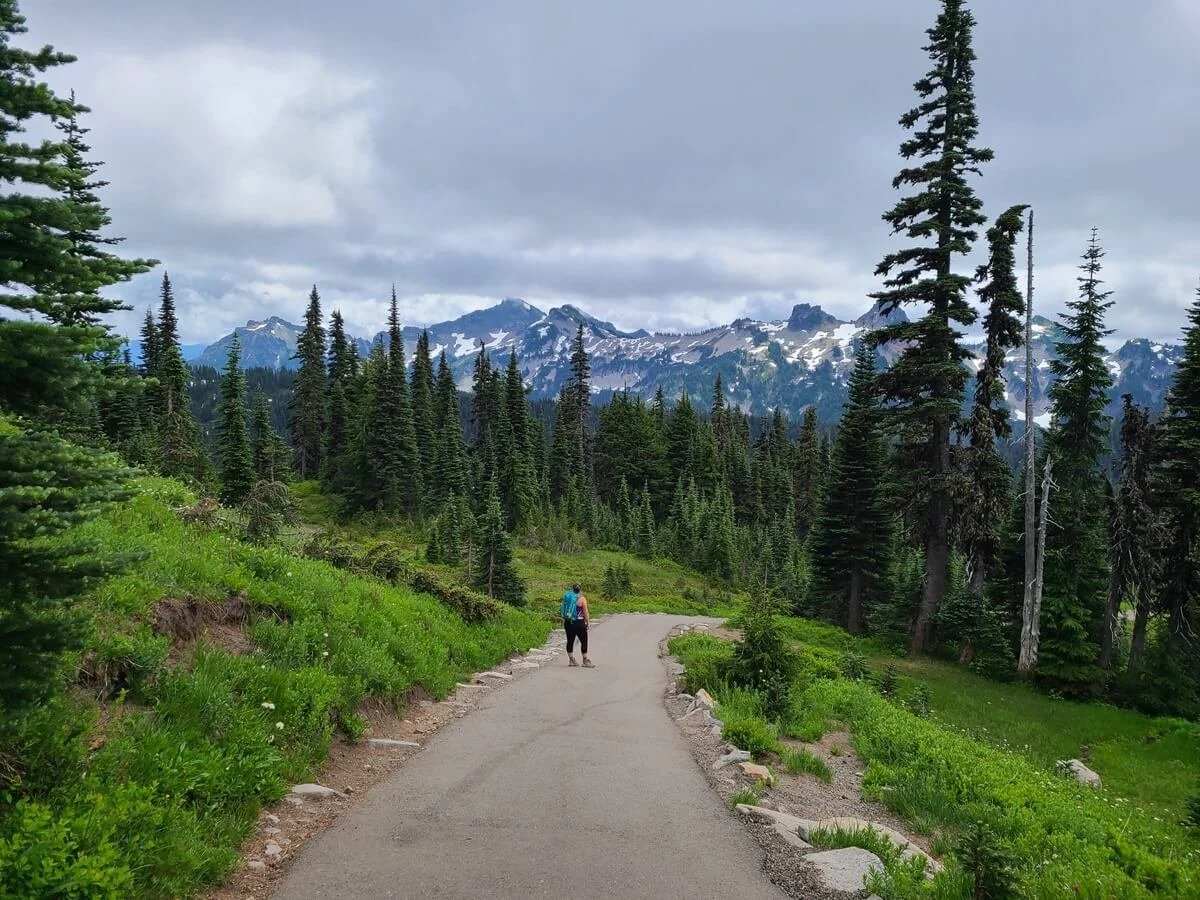
Even though Mount Rainier was in a cloud, the views over Paradise and the Tatoosh Mountains from the Skyline Loop Trail were still amazing
At one point along this section of the trail, you’ll come to the junction for the Pebble Creek Trail to Camp Muir, where climbers looking to summit Mount Rainier set up basecamp. Make sure to continue straight here towards Panorama Point.
The trail will flatten out for a bit and meander through wildflower-filled meadows, but eventually the trail will start climbing again up loose rock, dirt, and stairs until it brings you to one of the highlights of the Skyline Trail- Panorama Point.

A final push along the Skyline Loop Trail to Panorama Point
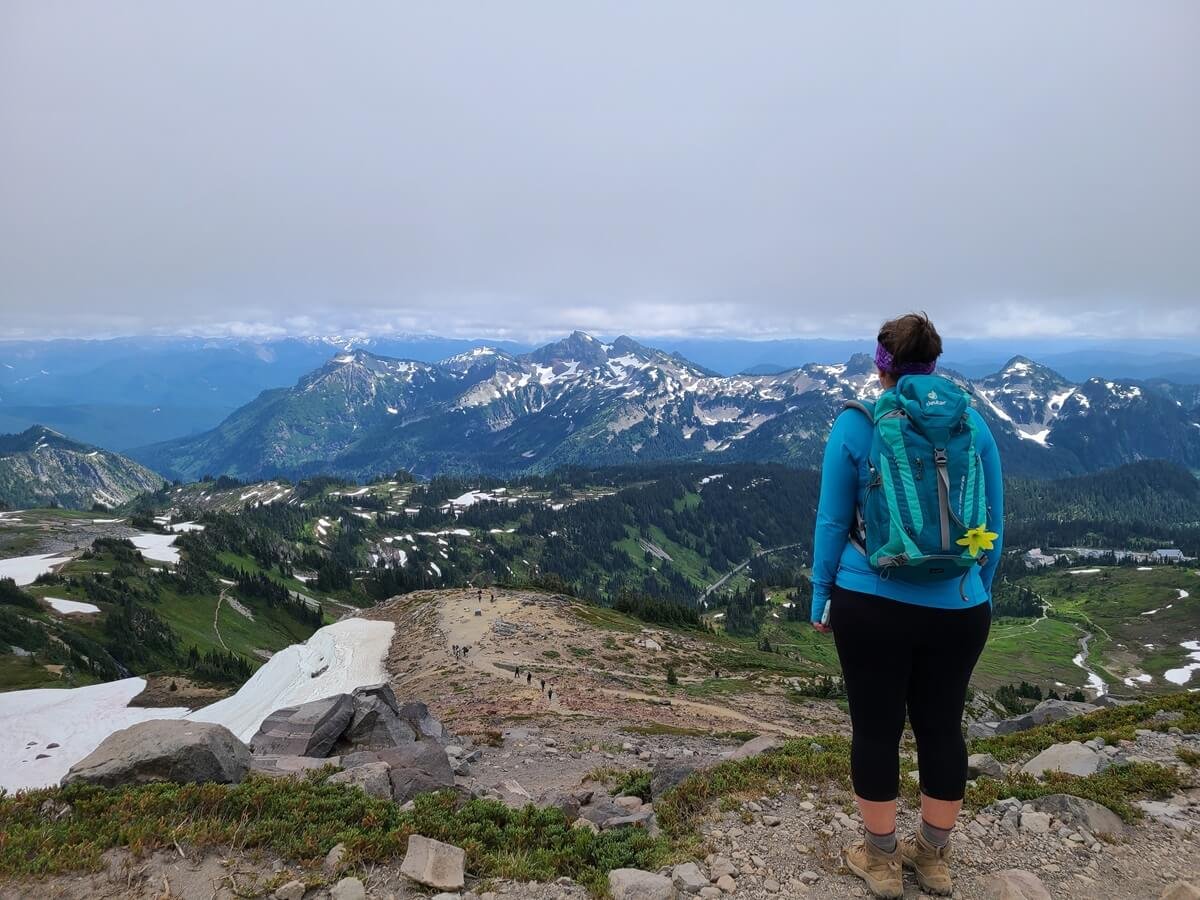
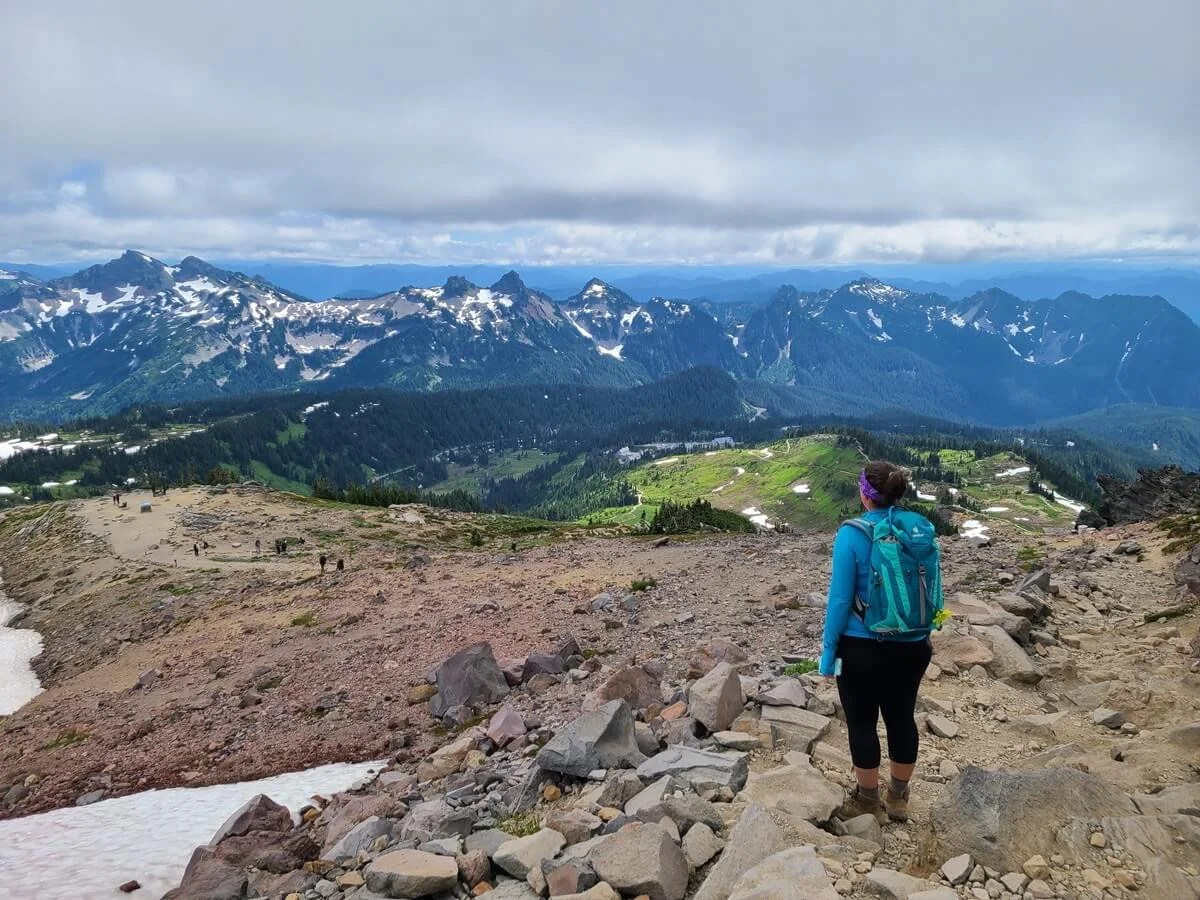
At Panorama Point, you’ll be standing at 6,800 feet in elevation overlooking the entire Paradise area. On a super clear day, you can see Mount Adams, Mount St. Helens, and even Mount Hood (there’s a sign there that shows and labels all the mountains you can see in the distance). It’s a great place to take a break and enjoy the views before tackling the last bit of climbing as you continue on the full Skyline Loop Trail.

Views over Paradise from Panorama Point
It was pretty windy and chilly up here, even in mid-July, so make sure you bring some layers with you!
If you’re doing an out and back hike to Panorama Point on the Skyline Trail, then here you can simply turn around and retrace your steps back to the parking lot. If doing the entire Skyline Loop Trail, then we’ll continue on!
From Panorama Point, you technically have two options. You can continue on the Skyline Loop Trail proper, which crosses the rocky slope just beside Panorama Point and doesn’t really gain any more elevation. However, this route is often snow covered and not easily passable. This was the case for us in mid-July. While we did see a handful of people attempting to cross here, we chose to take the second option.
The second option from Panorama Point is the High Skyline Trail. If you look behind you when standing at Panorama Point, you’ll notice a large rock face. The High Skyline Trail takes you across the top of that face and then back down the other side to rejoin the Skyline Trail proper. Even though it requires a little bit more climbing, we would actually still recommend this route over the lower route, even if the lower route is free from snow. From the top of the High Skyline Trail, the views are arguably even better that those from Panorama Point, as you can not only get a better vantage point over Paradise from up here, but Mount Rainier will be just about as close as you can get!

Here, Kevin at Panorama Point looking up at rocky ledge that the High Skyline Trail heads to. The main Skyline Trail goes across the snow patch to his right and cuts off the extra climbing up to the top of the ledge, but it’s usually safer to take the high route. Plus, the views of Mount Rainier are stellar from the top!
From Panorama Point, the High Skyline Trail switchbacks up a steep and rocky path. On the way, you’ll pass one of the most scenically placed bathrooms you’ll probably ever come across!

A bathroom with a view near Panorama Point

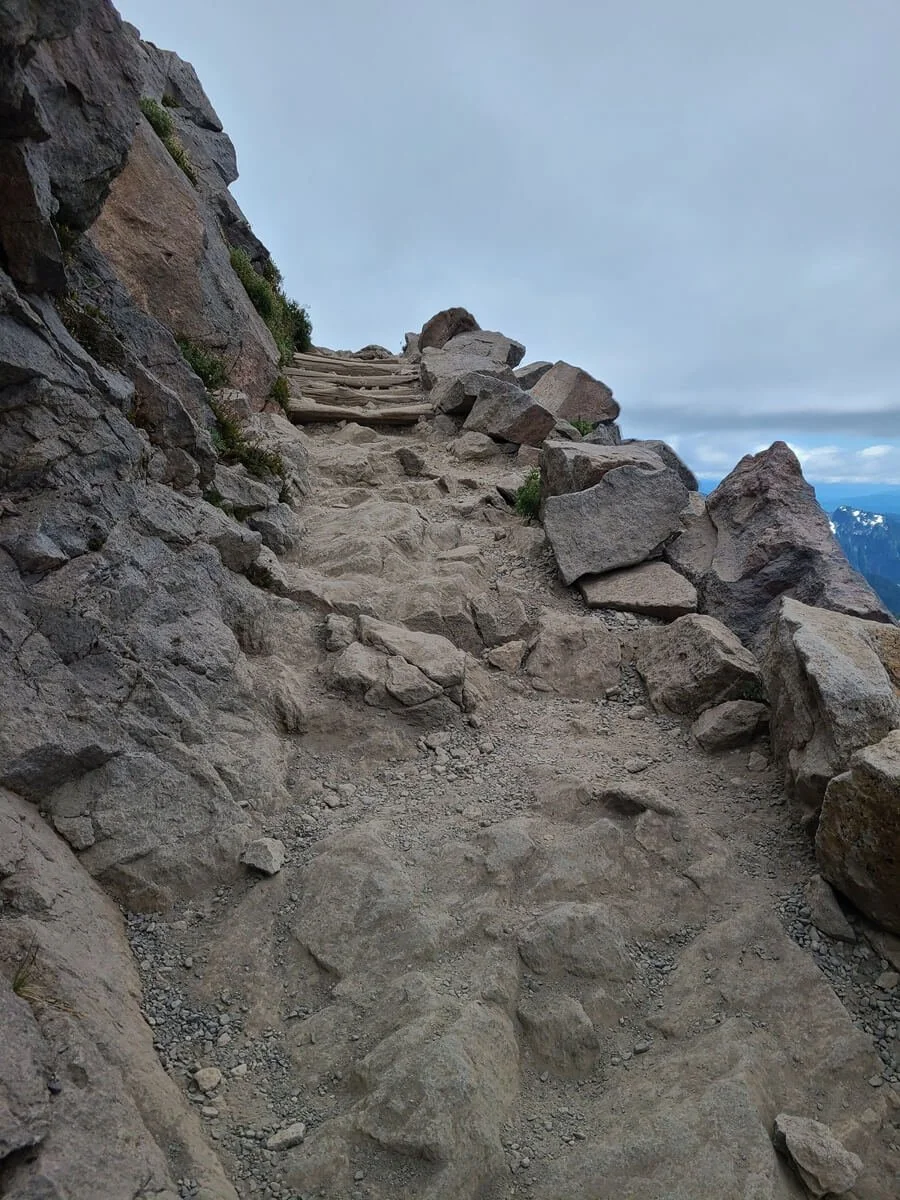
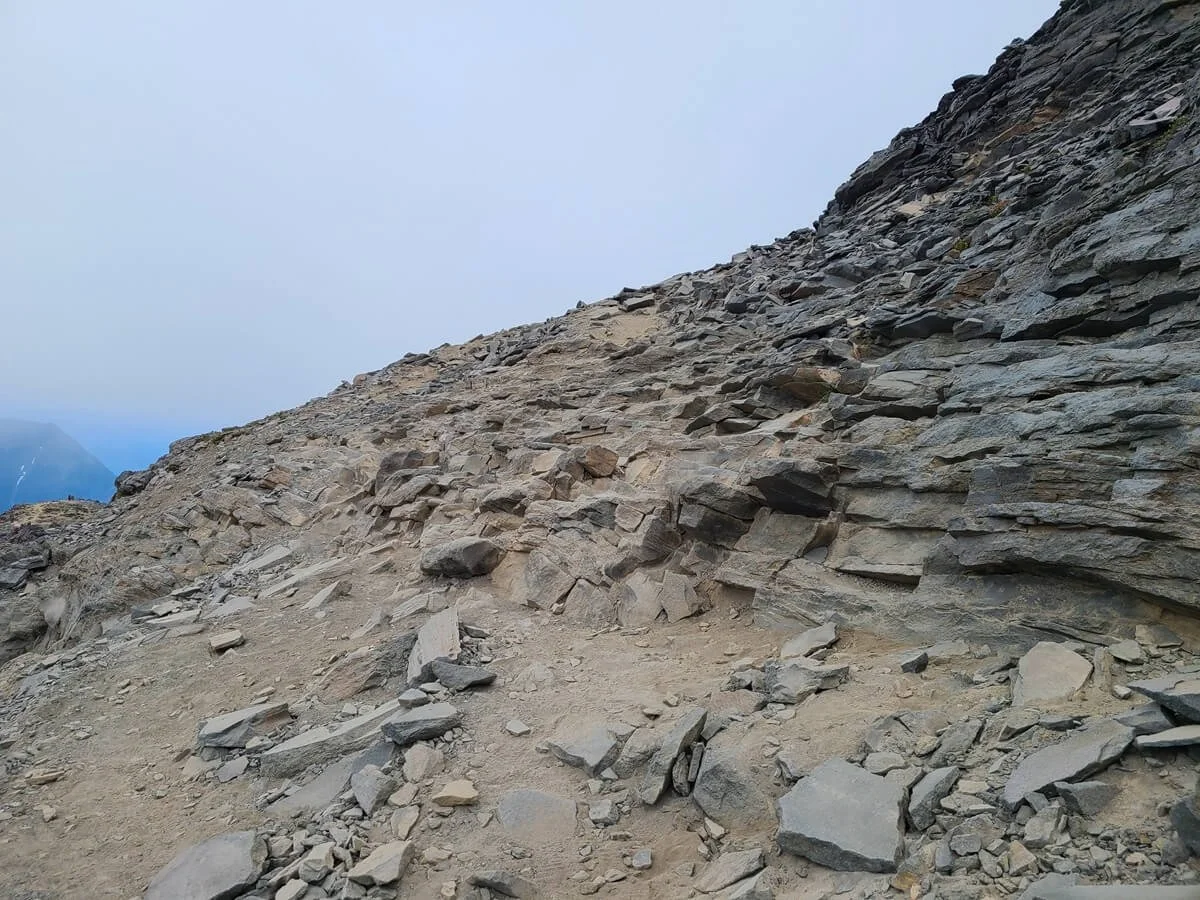
Rugged trail conditions along the High Skyline Trail above Panorama Point
Looking out over Panorama Point as we climb the High Skyline Trail
You’ll get a nice break near the top where you can look out over Panorama Point itself, and then there’s one final push to the top where you’ll have some of the most amazing views of Mount Rainier along the trail to the North, and views over Paradise and Panorama Point and its interconnecting trails to the South. Enjoy these views because from here, as you descend back through Paradise you’ll be heading away from the mountain. The Pebble Creek Trail again splits off from the main Skyline Trail up here. You can wander down this trail a little bit if you want to continue seeing some of the amazing in-your-face views of Mount Rainier a bit longer, but we wouldn’t recommend going too far down the trail as it is really meant for mountaineers looking to summit the mountain.
Looking up at the final push to the highest point of the Skyline Loop Trail
The trail wraps around a ledge overlooking Mount Rainier and the Nisqually Glacier. Without the fog, this would be an absolutely stunning in-your-face view of the mountain!
Looking out over Paradise from the top of the High Skyline Trail
The High Skyline Trail continues back down the other side of this rocky ledge. It’s a pretty rugged descent down loose rock and dirt, and you may encounter a bit of snow here. Keep your eye out for mountain goats that like to hang out up here! They were pretty close to the trail as we were hiking down.
The initial descent back down the High Skyline Trail
Looking back up the trail…this part of the Skyline Loop Trail is pretty rugged and steep as you descend through the alpine environment

Keep your eye out for mountain goats near the top of the Skyline Loop Trail!
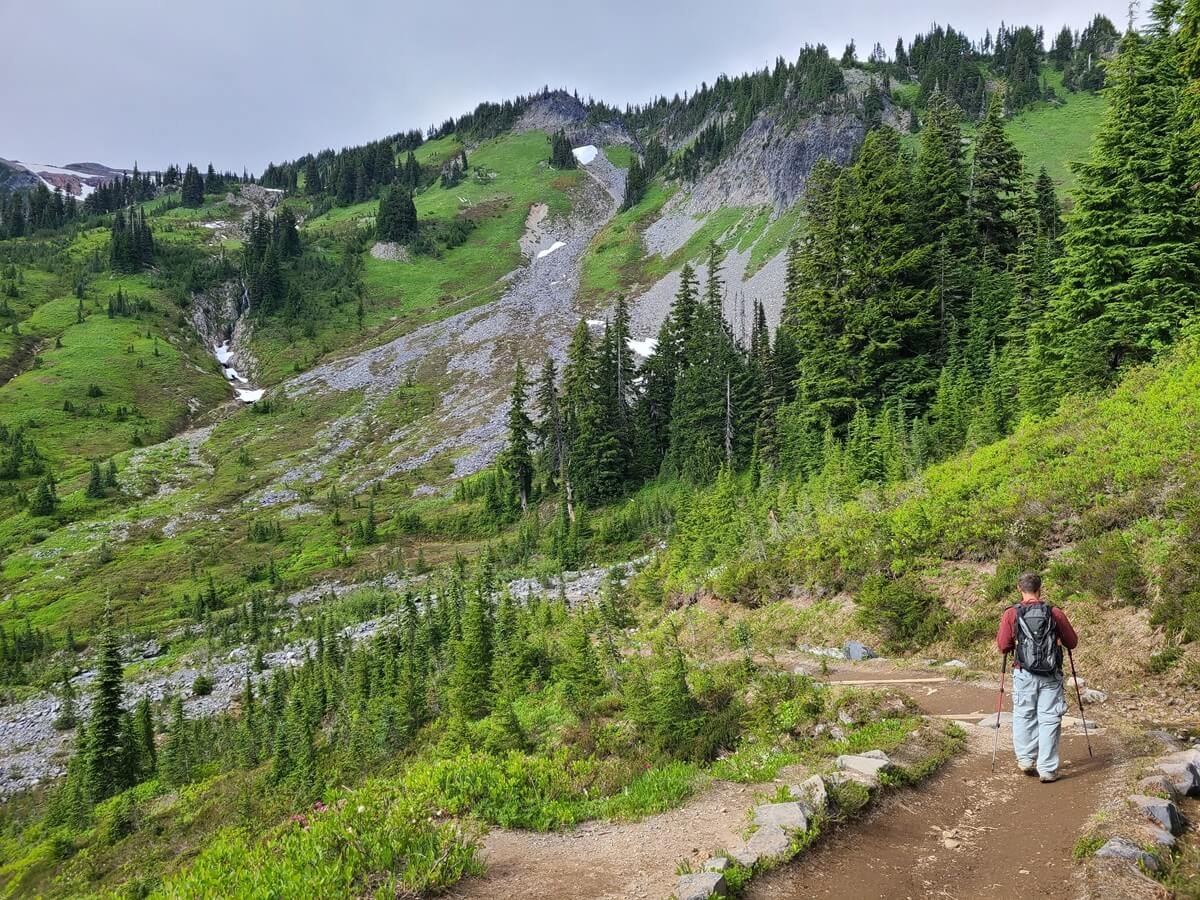
Once you reach the base of the rocky ledge of the High Skyline Trail where it reconnects back with the Skyline Trail proper, the trail gets a bit smoother. It’s still gravel and dirt, but much less rugged and steep, and eventually the rocky alpine landscape transitions back into a more gradual descent through wildflower-filled meadows. Now, Mount Rainier is behind you as you hike, and it’s a bit further away and more obstructed that it was as you climbed up to Panorama Point on the other side (which is why we prefer hiking the Skyline Loop Trail in this direction!). However, you still get great views out to the Tatoosh Mountains, distant Cascades, and Paradise as you descend. You’ll probably also notice how much quieter and less crowded this side of the Skyline Loop Trail is, so enjoy it!
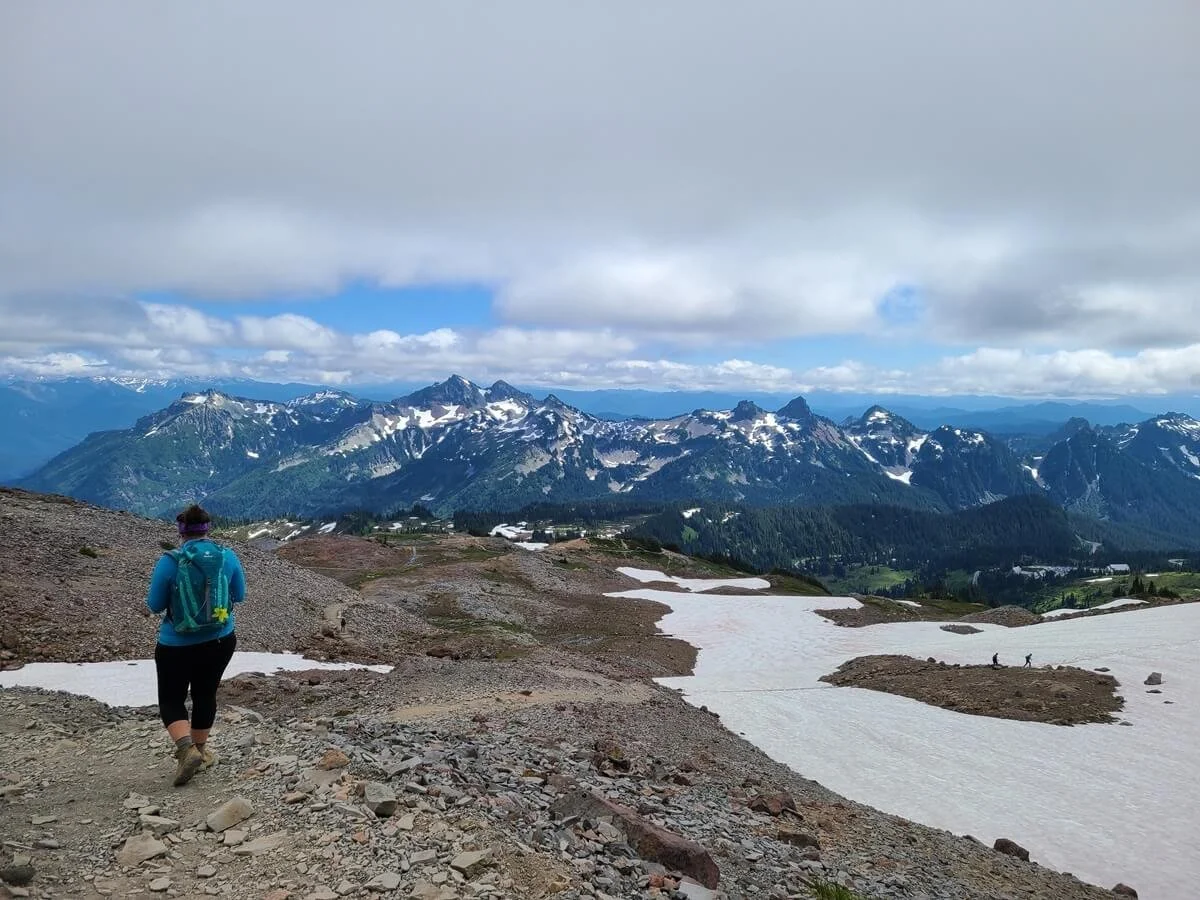
Descending back through Paradise on the Skyline Loop Trail. If you look closely, you can see a pair of hikers on the right attempting to cross on the lower trail to Panorama Point.

Back to the meadows and wildflowers!

Looking back at the High Skyline Trail as you descend back towards Paradise
At some point along the trail, you will come to the intersection with the Golden Gate Trail, which shortcuts the Skyline Loop Trail and gets you back to the parking lot a bit quicker. We had the time and were enjoying the time away from the crowds we experienced on the first half of the loop, so we stayed on the main trail as it continued to wander through the beautiful meadows.
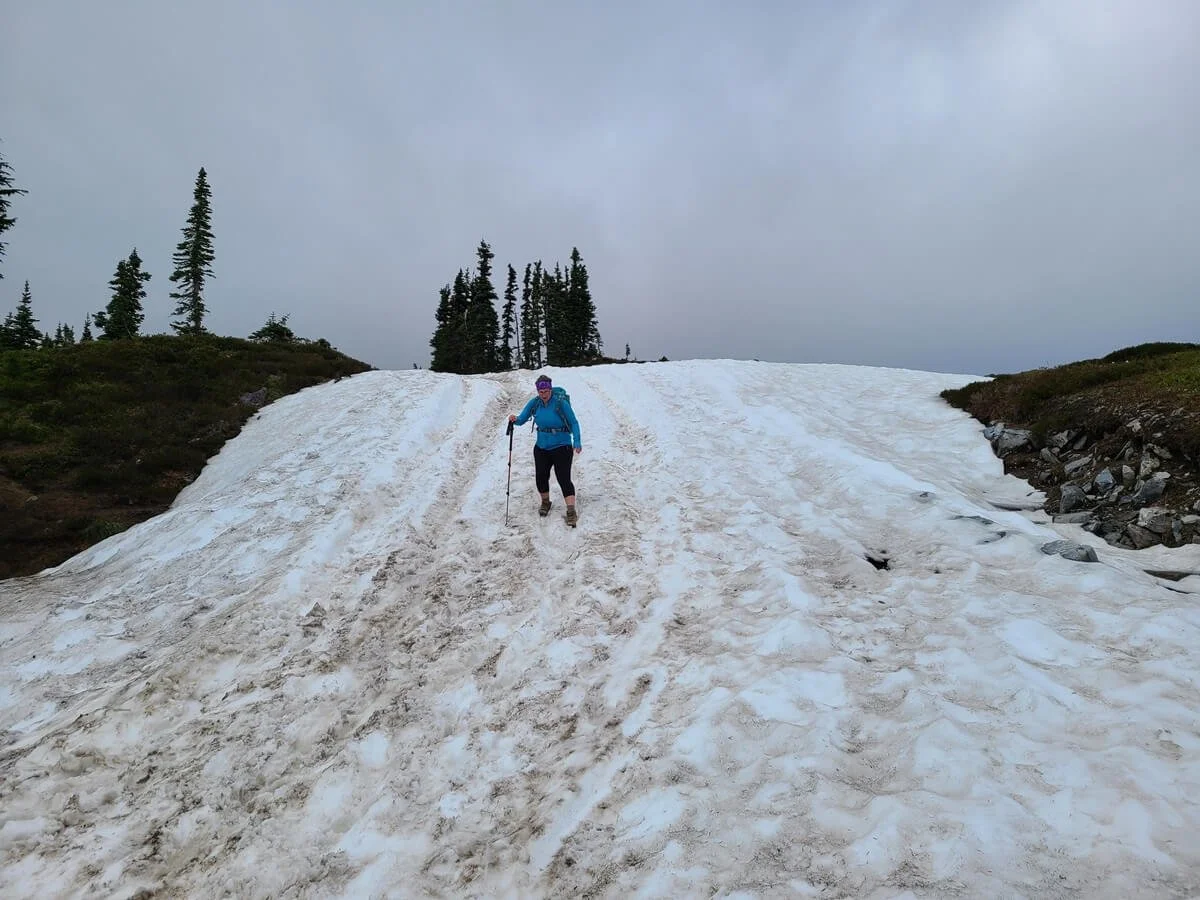
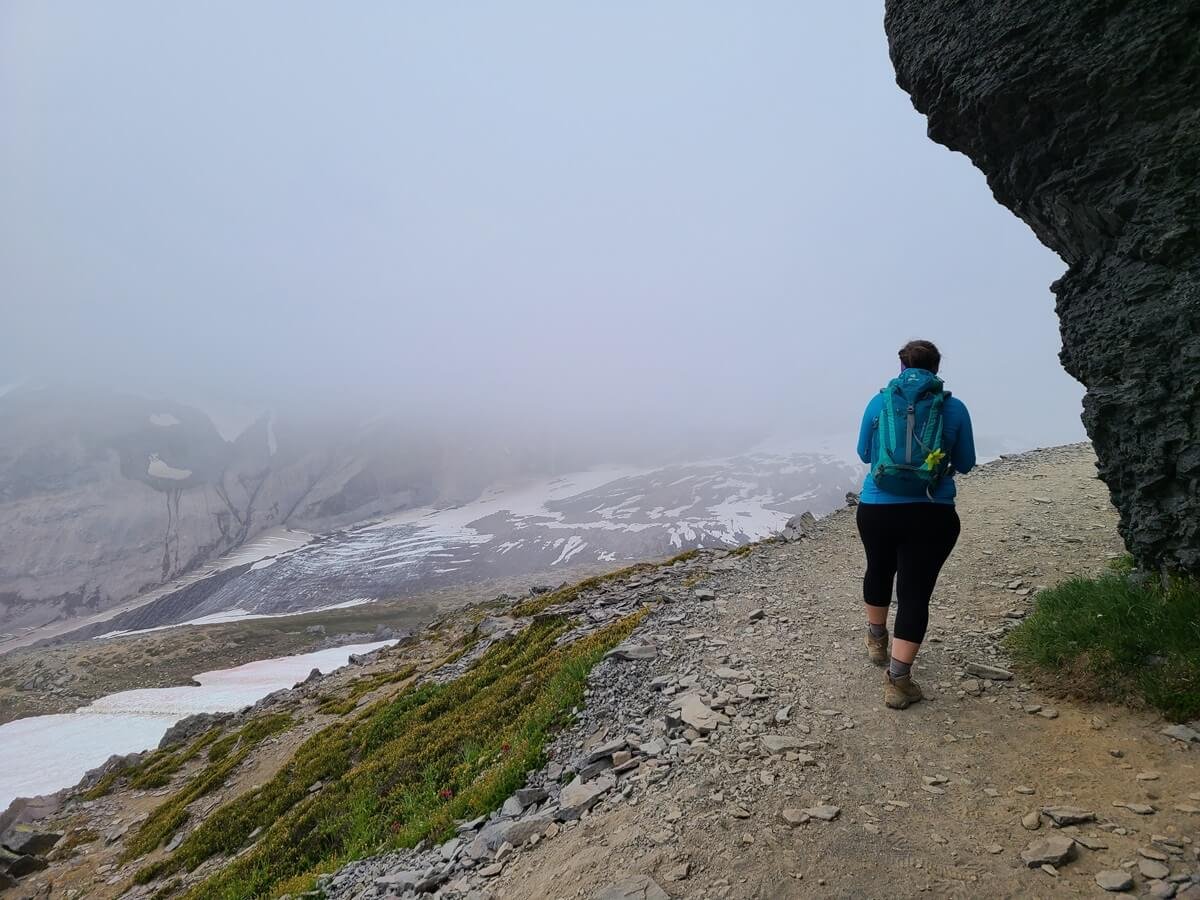
This half of the Skyline Loop Trail often holds onto its snow late into summer, so it’s likely that you’ll encounter some big snow patches over here. In mid-July, we had to cross several, and they were all on pretty steep slopes along the trail, making them extra slick and slippery.

Hiking down some slippery snow patches along the Skyline Loop Trail

More snow on the Skyline Loop Trail
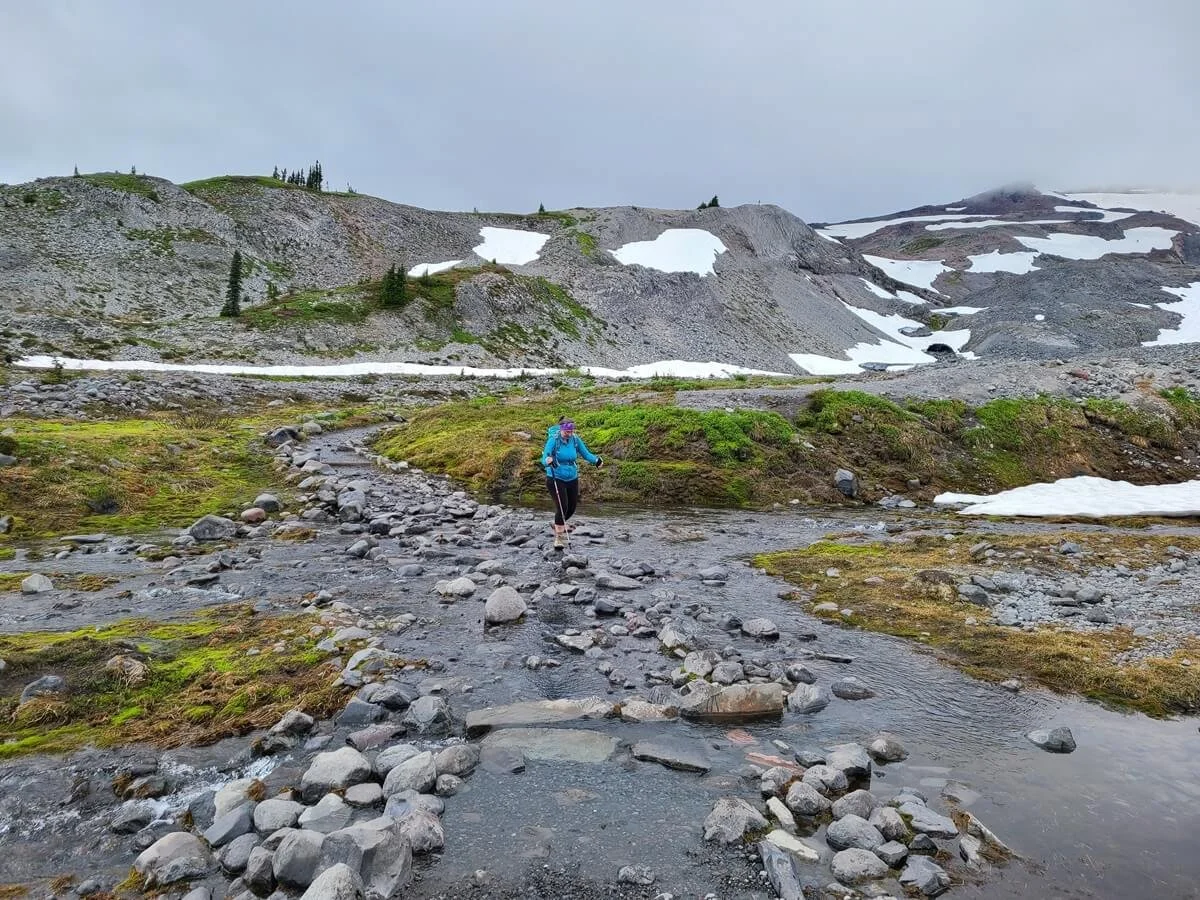
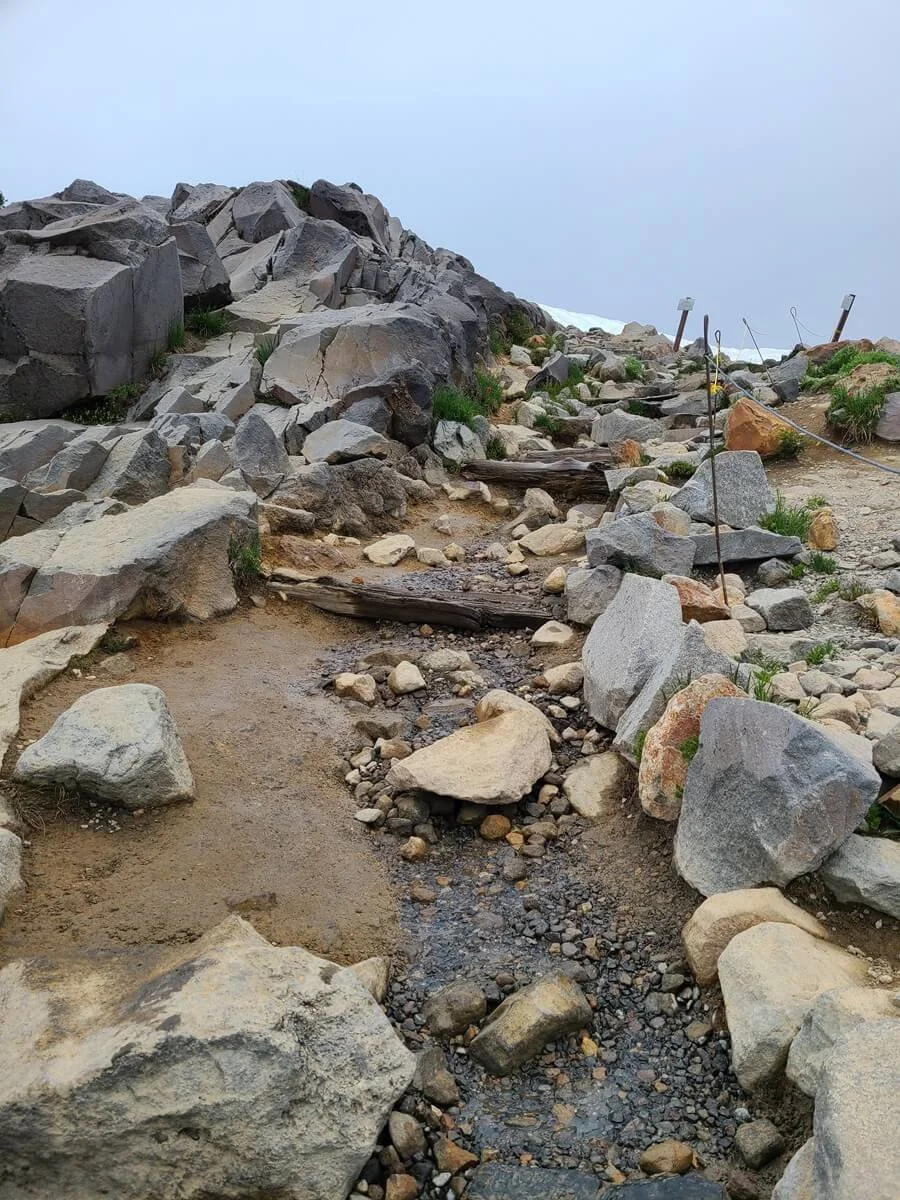
A stream crossing along the Skyline Loop Trail

Hiking through the beautiful meadows of Paradise on the Skyline Loop Trail
Eventually, the trail descends into a basin with small stream crossings and waterfalls before a short uphill climb back to the meadows.
Just past where the Golden Gate Trail rejoins the Skyline Loop Trail, you’ll come to Myrtle Falls.
Nearing the end of the Skyline Loop Trail. In this basin, you’ll cross some small streams and waterfalls before climbing back up to Myrtle Falls

The gradual climb back out of the basin towards Myrtle Falls
This famous waterfall is known for its picturesque backdrop of Mount Rainier. You’ll cross a bridge over the top and then swing around to a small viewing platform of the falls.
Walking across the top of Myrtle Falls

The scenic Myrtle Falls- let’s pretend that Mount Rainier is peaking out in the background…
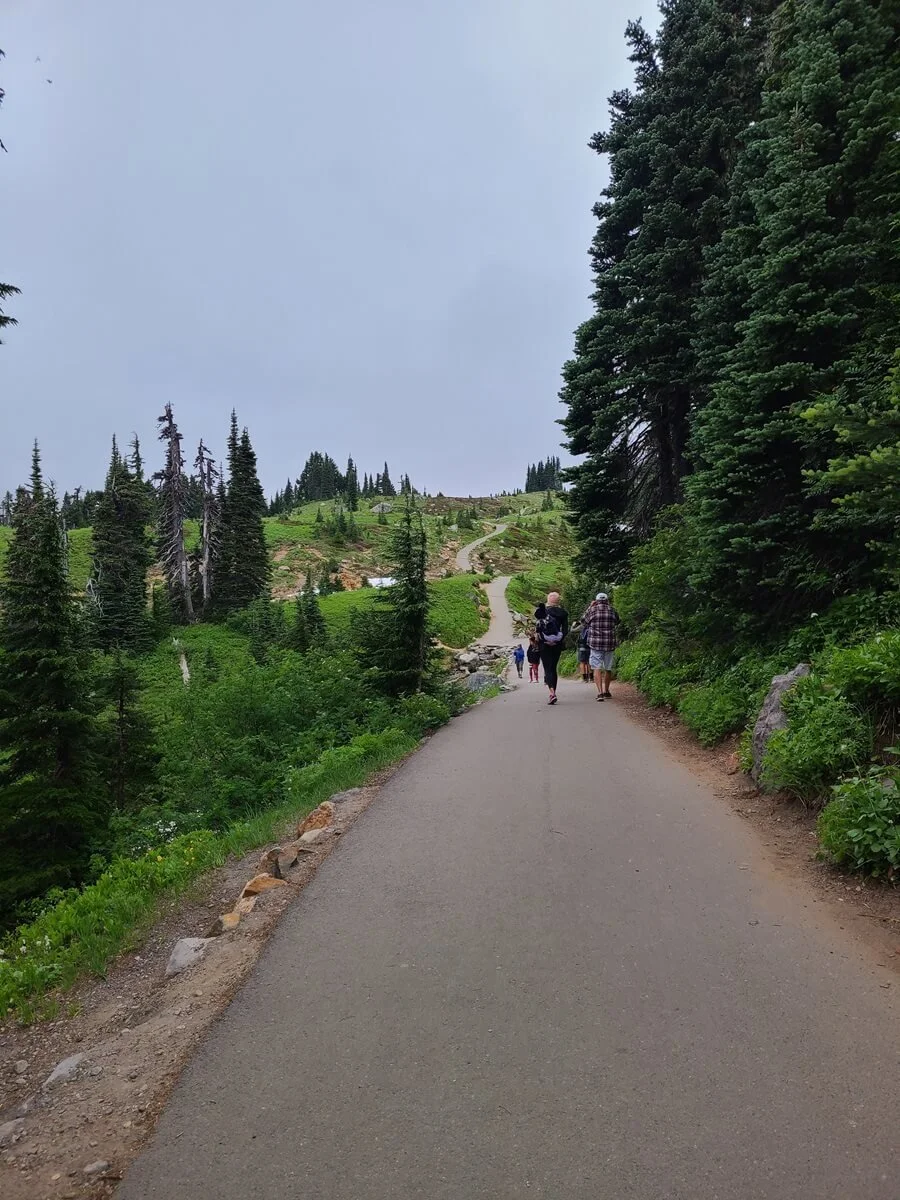
From here, it’s an easy paved half mile path back to the Paradise parking lot to end your adventure on the Skyline Loop Trail.
Is the Skyline Loop Trail Worth It?
The Skyline Trail is one of the most popular and well-known hikes in Mount Rainier, and it’s absolutely worth your time for amazing views of the mountain, but is the Skyline Trail worth it if Mount Rainier isn’t out?
If I’m being completely honest, I would say no, it’s not. One of the best parts about hiking the Skyline Loop Trail is getting to see Mount Rainier up close and personal, so without that, it definitely didn’t have the “wow factor” that the trail normally has and that we got from other trails in different areas of the park.
The other main factor that made this trail not worth it was the crowds. Now, I know lots of trails have become crowded lately, but the crowds on the Skyline Trail were on another level. There were so. many. people. And this was mid-week (a Wednesday!) on a day the mountain wasn’t even out! I couldn’t even begin to imagine what the trail is like on a nice weekend day.
When we reached higher vantage points along the trail and could see out over the Paradise area, we could just see all the little ants everywhere…it was like the trails were crawling. Of course, we are all for people getting out and hitting the trails (the whole reason we have this blog!), but unfortunately here, trail etiquette was just nonexistent. People were walking off trail everywhere (when there’s clear signs not to!), bringing their dogs on the trail, and getting way too close to wildlife to the point where they were scaring it off. Honestly, it didn’t feel like a hiking trail at all to us, which was kind of crazy considering how actually significant and rugged of a trail it really is.
For us, we had one day to spend in Paradise and the forecast had originally looked good. So we kept on pushing through the trail with hopes that the clouds would break- we were up there already, so why not? But it just never happened. So having to battle the crowds for less-than-ideal conditions just didn’t seem worth it after a point.
We will say that views out over Paradise and out to the Tatoosh Mountains were great, and it’s generally a very pretty hike, even without the view of Mount Rainier, so if you are content with views of the foothills, maybe seeing the bottom of the glacier, walking through pretty meadows, and just experiencing the ruggedness of the low alpine environment, then the Skyline Trail is a great half day hike in the park. But we’d say that if you know the mountain isn’t going to be out, it might not be worth making the trip to Paradise.
Best Time to Hike the Skyline Loop Trail
If you’re looking for a snow-free experience, there is a pretty small window in which you can hike the Skyline Loop Trail. The trail generally becomes passable without snow gear like crampons or snowshoes, and generally easier to navigate, by the end of June or early July and until about early to mid-October. However, some snow lingers on the trail well into August, so always be prepared for a bit of snow hiking. Make sure to check trail conditions and recent trail reviews before heading out, particularly in the early or late season, so you know what to expect and how to best prepare.
If you want to see the beautiful wildflowers that Paradise is known for, try to time your visit for mid-July to mid-August, but expect the heaviest crowds as well.

Wildflowers adorn the meadows of Paradise along the Skyline Loop Trail
When planning your Skyline Trail hike, keep in mind that Stevens Canyon Road closes for the winter season, typically between the end of October and May, so make sure to check the road status for updates regarding specific opening and closing dates. The road from the Nisqually Entrance usually remains open throughout the year.
What to Bring on the Skyline Loop Trail
Aside from the usual day hiking essentials, here are some things we would specifically recommend for the Skyline Loop Trail.
Hiking boots- The Skyline Loop Trail can get quite rugged at the higher elevations. We definitely recommend wearing sturdy hiking shoes with good traction and waterproofing.
Map- This area of Paradise has a ton of intersecting trails. Have a general trail map downloaded to your phone, have a paper map of the park, or snap a picture of the trail map at the trailhead so you can stay on track, and know where you want to go and which detours and side trails you want to take off the Skyline Trail.
Trekking poles/spikes- Trekking poles can help on the steeper descents as well as on the snow crossings found along the Skyline Trail for most of the summer. If hiking earlier or later in the season (June/early July, and late September/October), have spikes with you just in case there’s a lot more snow.
Sun protection- The entire Skyline Loop Trail is exposed to the sun, so make sure to have a hat, sunscreen, and even sunglasses- especially for glares off of the bigger snow patches.
Bug spray- Trails in Mount Rainier can get buggy in the summer months. We didn’t have an issue on this trail specifically, but we did on other trails in the park, so it’s always best to be prepared.
Layers- Even though the sun was out and it was mid-summer, it was significantly cooler and windier up at elevation. Remember, the trail starts at 5,400 feet and climbs up to almost 7,000 feet!
Park reservations- If you’re hiking the Skyline Loop Trail during the reservation period, make sure to save your reservation to your phone or print it to bring with you. Don’t rely on having cell service in the park!
Toilet paper- There is one bathroom along the Skyline Loop Trail (at Panorama Point) but it’s a good idea to bring your own TP because there might not be any.
Tips for Hiking the Skyline Loop Trail in Mount Rainier
Here are some more tips for hiking the Skyline Loop Trail!
Check trail conditions and closures
Especially if planning to hike the Skyline Trail earlier or later in the season, make sure to check trail conditions to know how to best prepare for the hike. We also like to check recent trail reviews on AllTrails to have the most up-to-date reports.
It’s also a good idea to keep an eye on road closures as seasonal closures happen, but also maintenance, construction, and road hazards can happen any time. Check the NPS site for road closures and estimated opening dates.
Check the weather and have alternative plans

The best view of Mount Rainier we got from the Skyline Loop Trail on a supposedly sunny day
Like we said above, we don’t think it’s particularly worth it to hike the Skyline Loop Trail if Mount Rainier won’t be out (this is just personal preference, though!). This is a bit tricky, though. For us, we had a great forecast, and Mountain Forecast gave us clear skies at all elevations of the mountain. However, big mountains like Rainier tend to make their own weather, and the forecasts aren’t always reliable, as was the case for us. It was actually a nice sunny day, but Mount Rainier remained in a cloud all day. So just temper your expectations and be prepared for possible disappointment. If you’re staying nearby to the Skyline Loop Trail, you can always check the webcams to see if the mountain is out before deciding to head out!
Also be sure to check the smoke forecast and air quality, as wildfires are common in Washington, particularly in the late summer.
Get an early start
We’ve said it several times but we’ll say it again…the Skyline Trail is crowded. We recommend starting early to avoid the worst of the crowds up to Panorama Point. But overall, if you come with the right mindset and expect the crowds, it will probably be an overall better experience for you.
Fees for Mount Rainier
Because the Skyline Loop Trail is in a National Park, you’ll need to keep a few costs in mind.
Mount Rainier National Park entry fee: A park pass costs $30 per vehicle and is good for 7 consecutive days in the park. You can purchase this online or at the park gates (bring a card!). Alternatively, consider buying the annual America the Beautiful Pass, which is $80 but good for an entire year and will get you into any of the National Parks and Federal Recreation Areas in the U.S.! If you’re planning on a Washington road trip visiting the other nearby parks such as the North Cascades, Olympic National Park, Mount Baker, and more, then this pass is totally worth it.
Reservation fee: The Skyline Trail is in Paradise, which requires timed entry reservations at certain times of the year and certain times of day. If you plan on visiting during these specific times, a reservation will cost you $2 and is good for your vehicle (not per person) for one day. For each day you plan on visiting during the reservation times, you’ll need a new reservation. Make sure to have your reservation printed or saved to your phone to show at the park gates.
Be bear aware
Mount Rainier is home to black bears, so make sure to be bear aware before heading out on the trails. It’s a good idea to have bear spray on hand in case of an emergency.
Practice Leave No Trace Principles
Because the Skyline Loop Trail is so heavily trafficked, it’s super important to follow LNT principles. Stay on trails to preserve the surrounding landscape, and don’t approach or harass the marmots and other wildlife who are just trying to do their own thing.
Can I bring my dog on the Skyline Loop Trail?
Unfortunately, pets aren’t allowed on any trails in Mount Rainier.
Can I camp on the Skyline Trail in Mount Rainier?
Camping isn’t allowed anywhere along the Skyline Loop Trail. There is a trail the branches off from the Skyline Trail that leads to Camp Muir, but this is really just a mountaineer’s basecamp, and getting here requires proper equipment and experience. If you’re interested in seeing where else you can backpack in the park and how to get a permit, check out the NPS site. (Hint: Permits are required and it is a good idea to reserve them well in advance!)
Where to Stay Near the Skyline Loop Trail in Mount Rainier
Because the Skyline Loop Trail is only about 2.5 hours from Seattle, it’s definitely possible to do this hike as a day trip from the city. But if you’re looking to spend more time in the park, there are options for staying much closer to the Skyline Trailhead.
The Cougar Rock Campground is just 20 minutes west of Paradise along Paradise Valley Road. It’s generally open from the end of May to October, and costs $20 a night. You can reserve a site at recreation.gov 6 months in advance of the date you want. Dates in mid-June through August tend to book up, so try to snag when as soon as they become available! But you can keep looking back for any cancellations that are released back into the system as your trip gets closer.
The great thing about getting a camping permit here is that this permit serves as your timed entry reservation into Paradise…you can use it to enter through both the Nisqually and Stevens Canyon entrances for each day that your camping permit is valid, without the need to secure the actual timed entry reservation!
This campground also has designated first-come first-served sites, but keep in mind, you’ll either have to have a timed entry reservation to access the campground, or come before 7 am or after 3 pm, and an available site isn’t guaranteed. We definitely recommend reserving in advance but if that’s not possible then it’s always worth trying for a last-minute site.
The Ohanapecosh Campground is just outside the Stevens Canyon entrance, about 45 minutes from the Skyline Loop Trailhead. This campground is generally open from the end of June to early September, costs $20, and can also be reserved 6 months in advance on recreation.gov (or it has first-come first-served availability as well). A reservation or camping permit here will not get you into Paradise, as it lies outside of the Paradise entrance gates, so you’ll need to keep that in mind when figuring out if you want to secure timed entry reservation for Paradise.
There are two other campgrounds in Mount Rainier, but they are several hours away from Paradise. The White River Campground is a good option if you also plan on exploring the Sunrise area of the park, while Mowich Lake is good for exploring the Carbon River area. Check out the NPS site for more information on each campground and what they offer, their opening dates, costs, and more.
Lodging near the Skyline Loop Trail
If you’re not looking to camp, you can consider staying at Paradise Inn, which is literally right at the trailhead for the Skyline Loop Trail, making it super easy to get an early start on the hike! Or you can stay at the National Park Inn in Longmire which is about a half hour away from the Skyline Loop Trailhead.
Other lodging can be found in Packwood, about one hour away from Paradise south of the Stevens Canyon entrance, or just outside the Nisqually Entrance in Ashwood, also about an hour away from the trailhead.
Other Mount Rainier Hiking Guides
Looking for more amazing hikes in Mount Rainier National Park after you’re done with the Skyline Loop Trail? Check out our other Mount Rainier trail guides to spark your wanderlust!
The Burroughs Mountain Trail- Get incredibly close views of Mount Rainier!
The Mount Fremont Lookout Trail- Head to a super picturesque fire tower with stunning views of Mount Rainier (and it’s a great hike for sunset!).
Dege Peak- A short and less traveled trail with great views over Sunrise.
The Tolmie Peak Lookout Trail- A great half day hike in a more remote region of the park to an historic fire tower with incredible views over Eunice Lake and Mount Rainier.
More Washington Travel Guides
Heading out on a Washington road trip and visiting more parks? Check out all of our Washington travel guides to help you plan your trip!
MOUNT RAINIER NATIONAL PARK ITINERARIES: Check out our one day Mount Rainier itinerary or our 3-4 Mount Rainier itinerary to help you plan out your perfect visit to the park!
MOUNT BAKER- Check out our favorite Mount Baker hikes, including Ptarmigan Ridge, Chain Lakes Loop, Skyline Divide, and Park Butte!
NORTH CASCADES NATIONAL PARK- Check out the Hidden Lake Lookout Trail and spend the night in a scenic fire tower!
Are you planning on hiking the Skyline Loop Trail in Mount Rainier? Let us know if you have any questions, we love to help!