How to Hike to Ryten on the Lofoten Islands
The hike to Ryten is one of the most popular (and best!) hikes on the Lofoten Islands. It’s filled with stunning views from start to finish, including the iconic view of the turquoise waters of Kvalvika Beach. In this guide, learn everything you need to know to hike to Ryten in Norway, including how to get there, costs, what to expect on the trail, and our best tips!

One of the most iconic views from the Lofoten Islands consists of a beautiful turquoise beach surrounded by green pointed peaks rising dramatically from the ocean. You’ve probably seen it before. It looks like it could be a picture taken in the Caribbean, or maybe Hawaii…but it’s not. It’s a view of Kvalvika Beach, and you might not have guessed that this tropical-looking beach is found way up in the Arctic Circle in Norway!
And the exact place to see this famous view over Kvalvika Beach? It’s found on the hike to Ryten, a summit located on the island of Moskenesoya (the same island where the famous town of Reine is located).
The hike to Ryten is short but moderate, containing some steeper sections of climbing and a couple of tricky rock sections of trail, but the effort is more than worth it, because while the Ryten hike is made famous by the view over Kvalvika Beach at the end of the trail, there is actually so much more to it than that. Stunning views over the ocean, fjords, inland lakes, jagged peaks, and epic coastline are found on the Ryten hike from start to finish.
Along the way, you can also make a steep but short detour down to Kvalvika Beach itself and enjoy a swim.
Because of this, the Ryten hike is certainly a crowded one, and you won’t find yourself alone on the trail. But it’s popular for a reason, and certainly worth the hype it gets to see this stunning scenery in person. So, don’t let the crowds deter you, and add the Ryten hike to your Norway bucket list!
In this guide, we’ll go over everything you need to know to hike to Ryten on the Lofoten Islands, including how to get there, when to go, costs to hike Ryten, what to expect on the Ryten hike, and all our best tips for the trail.
So, let’s get into it!
In this Ryten hiking guide:
Where is the Ryten Hike on the Lofoten Islands?
The Ryten hike is located near the town of Fredvang on the northernmost part of Moskenesoya, the final island making up the Lofoten archipelago. It’s about 30-35 minutes away from the popular town of Reine, 30 minutes from Nusfjord (a popular fishing village), and about 45 minutes from Leknes.
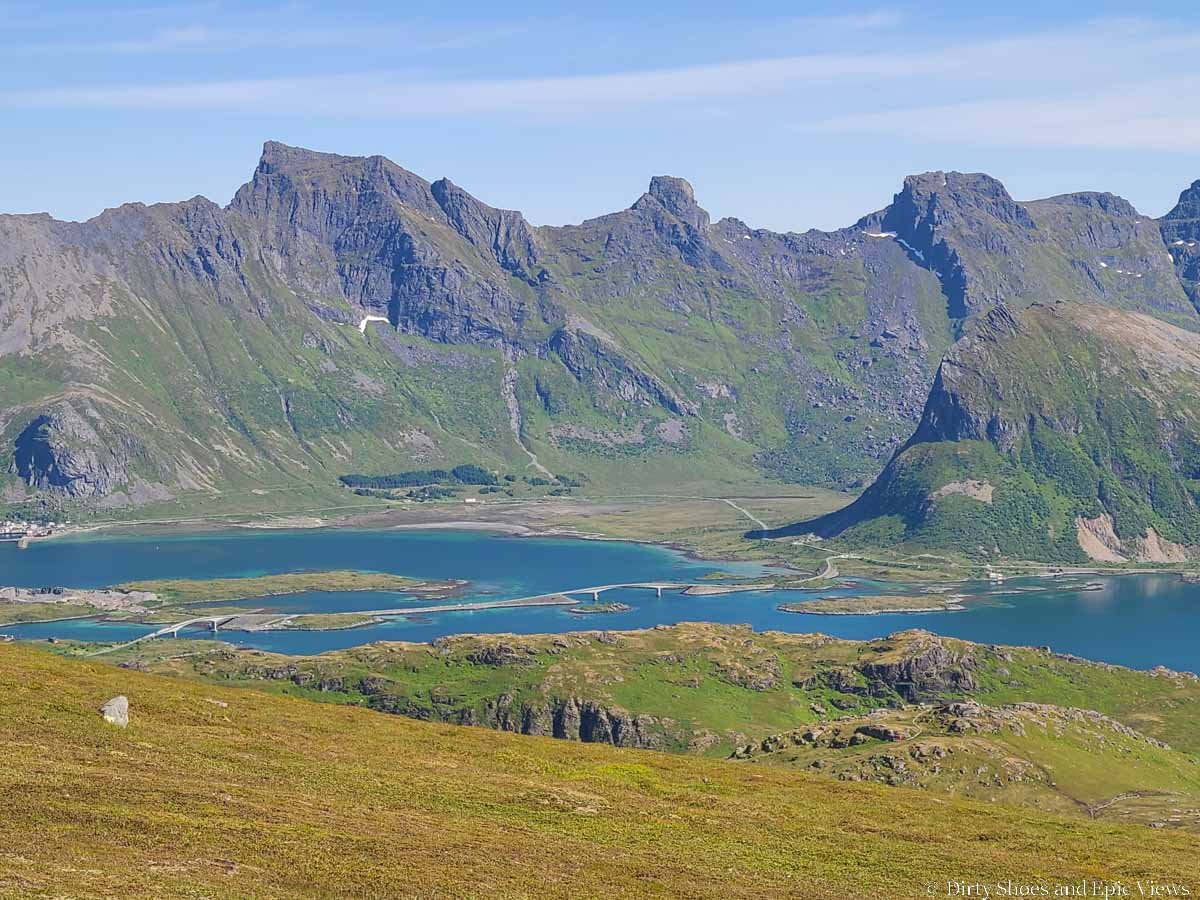
Looking down at the Fredvang bridges from the Ryten hike
Parking for the Ryten hike on the Lofoten Islands
To get to the Ryten trailhead, you’ll make a scenic drive through Lofoten along the E10 (the main road running through the islands) before turning off onto Fv808. You’ll cross two scenic bridges, but just a head’s up- these bridges can be a bit harrowing since they are narrow and hard to see ahead to what’s coming as you near the high point of the bridges, so be sure to look ahead for any oncoming traffic, especially for larger vehicles, before starting up the bridge!

The bridges into Fredvang on the way to the Ryten hike

The scenic bridges on the way to Ryten!

Driving over the narrow bridge to Fredvang
You’ll get stunning views on the drive to the Ryten trailhead!
After the bridges, bear right ont Fv806 (instead of continuing to Fredvang). Shortly after, you’ll see the first of two main parking lots for the Ryten hike.
This first one is on the left, here on Google Maps. There’s no big sign indicating parking for Ryten here (there was a small handwritten sign on a box by the road), so it’s not the most obvious thing in the world as you’re driving by. Rather, it’s a small lot on someone’s property with what seems to be an honor system of payment via cash or VIPPS (a Norwegian payment app). It was 100 NOK at the time of writing this. When we drove by near midday on beautiful summer Saturday, it looked like there were still quite a few spots open here.

The first small parking lot for the Ryten hike
We continued to the second Ryten parking lot, which is found here on Google Maps (called Innersand Parking). This is a much bigger lot, and has a restroom, drinking water, a place to wash dishes, a café with pizza and other snacks and drinks, and the option to camp overnight. It costs 100 NOK for a car for the day or overnight, and 150 NOK for a campervan or motorhome for the day or overnight (so it’s not a bad option for camping if you have a motorhome!).

The main parking lot for the Ryten hike at Innersand
We arrived at the lot around noon on a perfectly sunny Saturday in July- so pretty much the busiest time we could have possibly done this hike! And to be honest, this parking lot seemed a bit chaotic, but it was more like an organized chaos than anything. There was an attendant there, but there was just one of her, lots of cars coming in, and no signage directing cars on what to do. She was trying her best to stop all cars coming in, because she would make sure each person would get out and pay at the kiosk (you can use cash or card or the VIPPS app here), and then she would direct each individual car to a parking spot (which was helpful because the lot was pretty full and it made everything easier for cars to be directed right where to go).
Even though it was busy, everyone seemed to get a spot in the lot. It is a very large lot and since it’s a relatively short hike I think cars cycle through a lot here. So even though it looks busy, it’s unlikely that you would be turned around here. During less busy times of day, it will certainly be a less chaotic experience!
Though it’s a bit more chaotic than the first lot, there are definitely more amenities and space here, and it’s a slightly shorter hike to Ryten from here as well (just slightly, though- not enough to make a huge difference!). Also, while there is a restroom here, it’s just one, so expect to wait a bit in line both before and after your hike.
Map of the Ryten hike on the Lofoten Islands
Here’s a map of where the Ryten hike is on the Lofoten Islands and the two parking lots for the Ryten hike to help orient you.
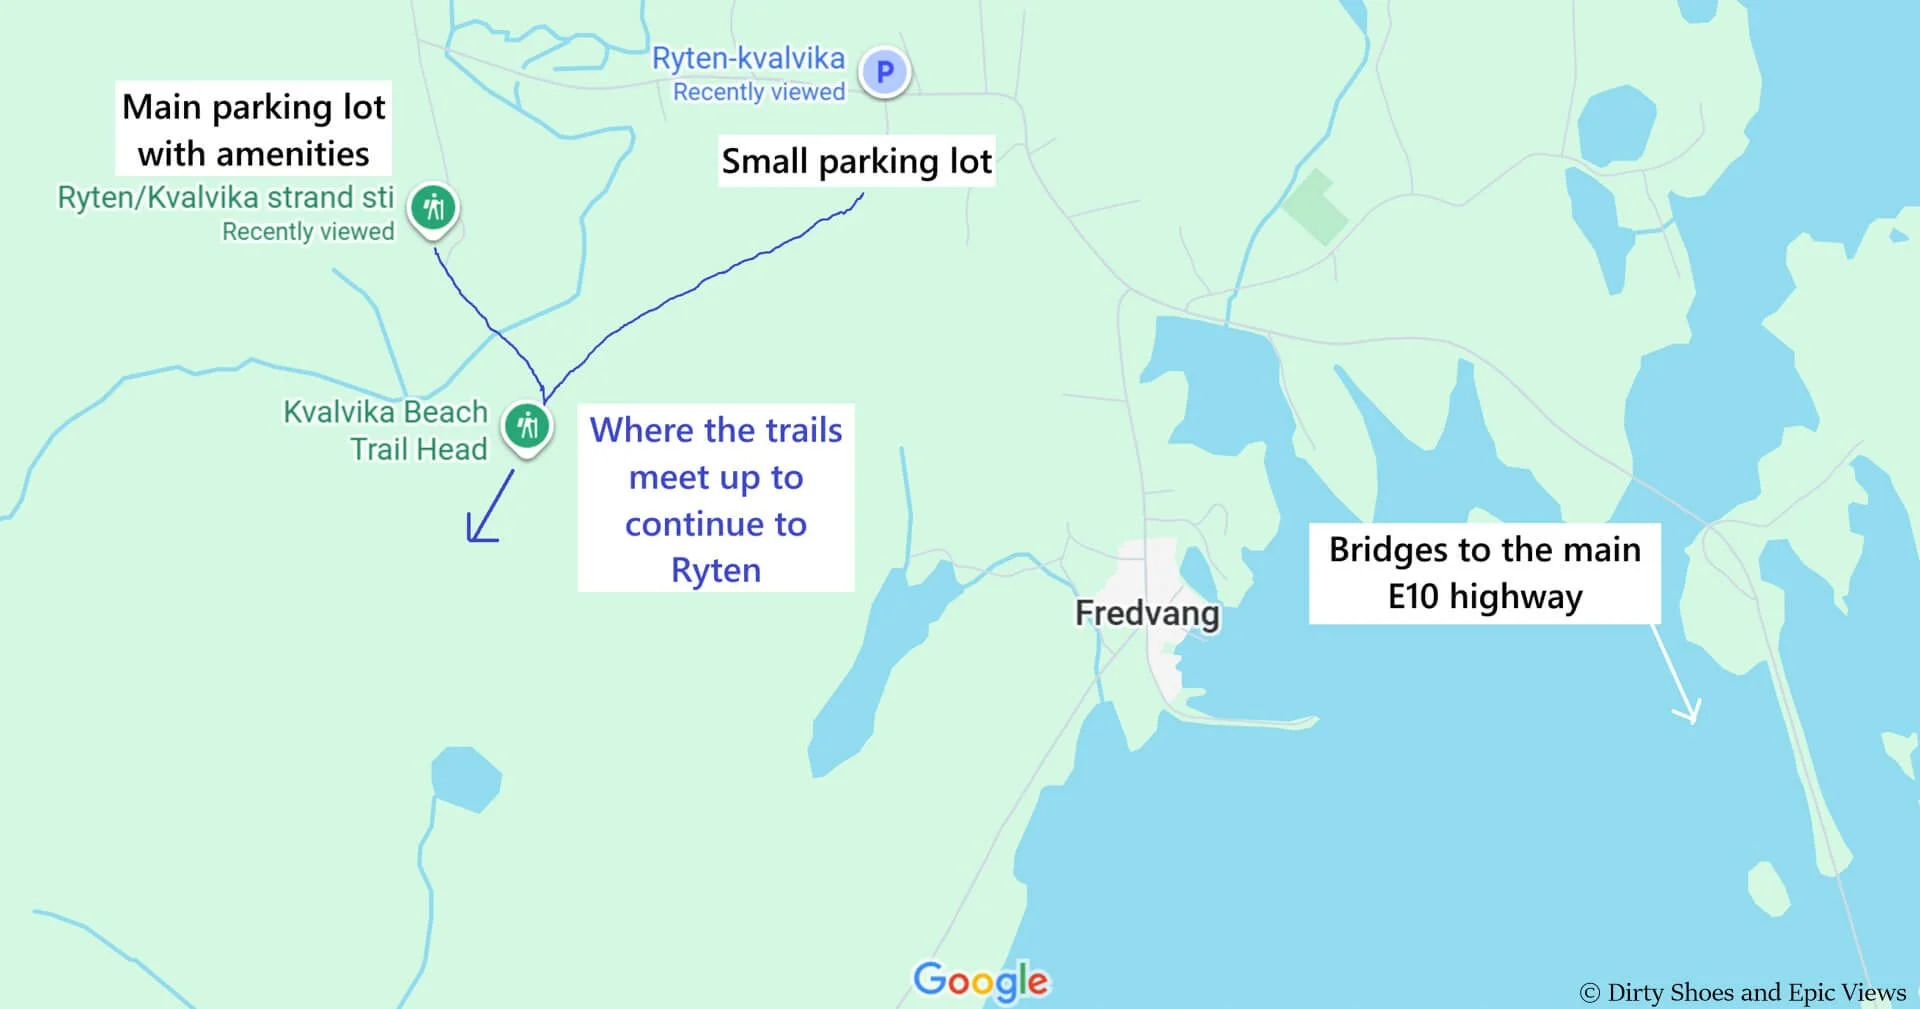
This map shows the two main paid parking lots for the Ryten hike on the Lofoten Islands
How Long is the Hike to Ryten on the Lofoten Islands?
Hiking to Ryten on the Lofoten Islands
We started the hike to Ryten from the Innersand parking lot, so this is what our stats reflect.
We also only did a direct hike to Ryten as an out-and-back hike, not taking the detour all the way down to Kvalvika Beach. If you want to hike down to Kvalvika Beach on the way to Ryten, this would add about a mile or so to the hike and almost 900 foot more of climbing (to climb back up from the beach on the way out).
We only have experience hiking to Ryten as an out-and-back hike from Innersand, which is also the most typical way to do this hike, so this is what our stats and trail description reflect.
Distance: 7.9 km / 4.9 mi roundtrip
Elevation: 570 m / 1,870 ft
Time: About 3 hours of hiking time, but plan to spend some additional time at the summit enjoying the views. If you want to hike down to Kvalvika Beach, plan to spend another hour or two.
Elevation profile of the Ryten hike

The out-and-back elevation profile of the Ryten hike on the Lofoten Islands
Ryten trail map

This shows a satellite view of our hike to Ryten from the Innersand parking lot
How Hard is the Hike to Ryten on the Lofoten Islands?
The hike to Ryten is moderate, with some extended steep climbs. However, it’s a very well-maintained trail, and the worst parts that are super muddy and boggy have foot bridges over them to make the hiking much easier. It’s well-signed and well-traveled, so it’s easy to follow and not get lost.

The hike to Ryten has lots of wooden planks to cross more boggy areas of trail

Some rocky and muddy sections along the Ryten trail

There are some extended steady climbs on the way to Ryten
There are a couple of spots along the first half of the Ryten trail (just after the first big climb) where there are some very brief but steep and rocky climbs that may be considered a bit of a scramble, but they are very doable (nothing technical or exposed) and there are chains to help you if needed. We found that we didn’t need the chains on the way up and we could simply step up the rocks, but they were more useful on the way down for balance.

A chain section on the Ryten hike
Other than these few very brief sections, the rest of the Ryten hike is straightforward and easy- it’s just a matter of huffing up some steep and steady climbs to the top.
The Hike to Ryten: Trail Description and Our Experience
We started the Ryten hike from the Innersand parking lot. From here, we could see all the ants making their way up the first big climb of the hike. I was worried that it was going to be a crowded hike from start to finish, but although there were a lot of people, everyone tended to spread out nicely and it wasn’t as bad as it looked from the start!
The trail starts off by heading through a flat meadow on a series of wooden planks that are lined with pretty wildflowers. These wooden bridges are single lane, but there are frequent “pull-offs” marked by “M”s where you can pull over to let others coming in the opposite direction pass you. You’ll actually find a bunch of these wooden pathways throughout a lot of the Ryten hike to protect the particularly boggy and muddy sections of trail.

The start of the hike to Ryten. Ahead is the first big climb of the hike.

Hiking across the series of wooden planks
The trail hooks left and the wooden planks start climbing up the hillside. At the top, it meets up with the main trail that is coming from the first parking lot. At this intersection, head right and begin the first climb of the hike. Ahead, you can see the top of the climb, so it’s not too bad.

Hiking up the hillside to the intersection with the main trail
This climb up is on a narrow dirt trail that does get a bit rocky. It’s a pretty gradual climb until you get close to the top, where it turns a bit steep. I think for me it felt a little bit more exhausting than it should have just because we did a big hike up to Munken the day before, and my legs weren’t really warmed up yet!

The climb up to the first pass on the hike to Ryten
When you’re almost at the top, you’ll get great views back over the meadows, parking lot, and out to the beach and ocean.

Views from near the top of the climb. The large farm area in the center left of the picture is where we started!
Head up the last bit of steep rocky climbing and you’ll come to a view of a pretty lake with distant mountains. It can get quite muddy around here, but luckily we had a lot of dry weather during our time in Lofoten so it wasn’t bad.

The last bit of climbing to the pass

A pretty lake view at the top of the pass
There’s also a pretty big area here to just rest and enjoy the views over the ocean before continuing on with the climbing. Lots of people were doing just that, so this is where we were able to break away from the crowds a bit and where people really started spreading out, which was nice.
From here, a sign will point you towards the trail to Ryten, and the path continues its climb up the next grassy hill.
This part of the Ryten hike is the most rugged, but nothing challenging. As you hike through here, you might see narrower dirt herd paths heading off the main trail, but we recommend just keeping on the obvious main path that ascends up the hill to keep on track.
As you start climbing above the lake, you’ll encounter the first chained section of trail. This is just a brief rocky section, and for us, the chain was entirely unnecessary, at least on the way up. It’s not very steep and it’s pretty easy to just walk right through this part.

The first chained section on the Ryten hike
Then, you’ll follow the narrow dirt path up to the second rocky section. Here, we saw lots of people trying to navigate down the left side of this area, but the easier part is to the right (when looking up the trail- we show this in the picture below). There are no chains here, but it’s a pretty simple staircase of rocks to navigate up where you might just use your hands for some balance.

The trail as it climbs up the next grassy hill to Ryten

Here, the trail has a little bit of a scramble. You can see a lot of people heading down on the left, but we found the right-most rocky side to be easier to climb up (the rocks just ahead of Kevin in the picture above).
The trail continues steeply up dirt, bigger rocks, and some loose gravel as you continue ascending the hillside. After not too long, you’ll come to the second (and last) chained section of the Ryten hike. While again very brief, this one is a little bit steeper and rockier, but we didn’t need the chain here either. We could just walk up through the rock chute. However, I definitely found it helpful on the way down (which we’ll show later in our trail description when we talk about the return hike!).


The second short chain section on the Ryten hike
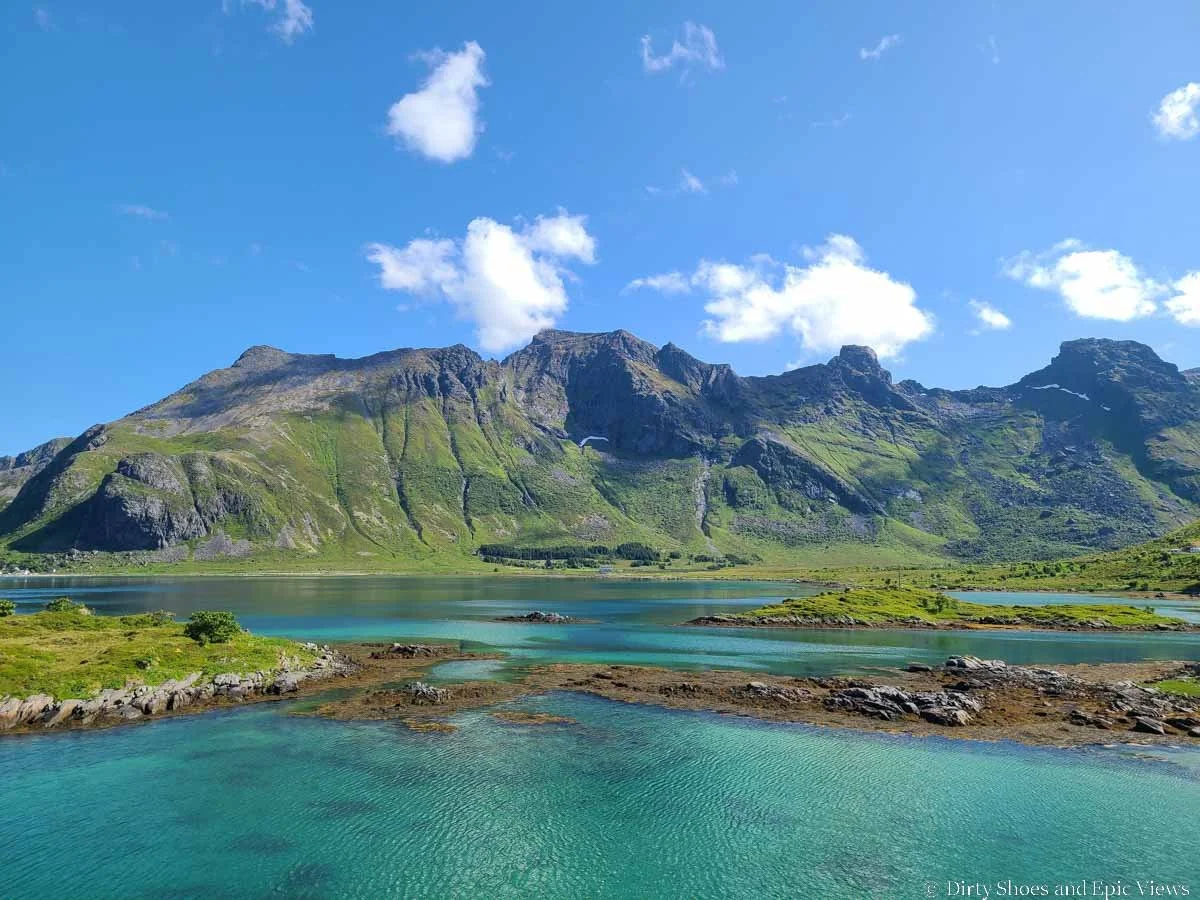
From the top of this climb, the views continue and really open up. Ocean views stretch out to distant jagged peaks. On the other side, more lakes, fjords, and mountains are now in view, and you’ll quickly realize why the Ryten hike is so popular!

Views from the Ryten hike

Views of fjords and peaks start to really open up!
A little bit more climbing will lead to a section of trail made up of a combination of single lane wooden planks that protect the more boggy and muddy sections of hillside, and granite sections of trail interspersed in between these footbridges. It’s very easy hiking through here as it’s mostly flat or very gentle climbing through the meadows.
The bridges are single lane, so look ahead and make sure the coast is clear before starting off on each one. You may have to wait a couple of minutes for oncoming traffic to clear through, but this is preferable to stepping off the planks or walking around them (as the whole point of them is to preserve and protect the landscape underneath!).

Wooden planks along the Ryten hike

These planks will drop you off at the start of another climb, this time up mostly granite slabs. It was muddy through here but easy to avoid if you just stay on the dry rock slabs.

At the top of this quick climb, there are more flat sections of wooden planks. Ahead, you’ll see the start of the next climb up the next grassy hill of the hike.

The next climb is the grassy hill ahead
This next section of the Ryten hike is a moderate and steady climb up. You’ll pass a trail junction for a “hytta” which ascends the hill to your right to the Fredvang Hut. It’s a short detour that adds a little extra climbing and will bring you back down to the main trail just ahead, but we didn’t find it necessary, so we skipped it.

The steady climb up

Don’t forget to enjoy the views behind you!

The junction to the hut. It’s a short detour to the top of the stairs if you don’t mind a little extra climbing!

This is the view of the small hytta (hut) from further up the trail. Can you spot it near the top of the grassy hill?
At the top of this climb, you’ll be greeted by the final section of flat boardwalks, and here you’ll finally see your destination, as well as the final steep climb to get to it. It might look a bit intimidating from here, and yes- it is quite steep, but it will go by pretty quickly- we promise.

More scenic wooden planks along the Ryten hike

Heading to the base of the final (and steepest!) climb on the hike to Ryten
The wooden planks spill you right at the base of this final climb (we got here about one hour into our Ryten hike). To your left will be a small lake, and a small sign to Kvalvika points down a path alongside this lake that will have you ascending the 900 feet or so down to the beach. To continue to Ryten, stay on the main path here and head straight up the hill ahead.
As you look up at the hill, you’ll see a large wide dirt path that heads straight up, but you also might see a handful of narrower herd path that branch off from this and head left, closer to the edge of the hill, and then up.
Any path heads up to Ryten, so it doesn’t really matter which one you take. The paths that get closer to the edge of the hill will give you earlier and better views of Kvalvika Beach as you ascend to the summit, so a lot of people were hiking along those paths.
On the way up to Ryten, we just wanted to put our heads down and make it to the top, so we just kept to the main wide path that led us there, sacrificing the earlier views of Kvalvika Beach until closer to the top. Plus, there actually weren’t too many others that we had to share this path with, so it was nice. We also liked it over here because if others did need to pass by or around us, the path was wide enough where no one had to stop and pullover- it’s easy to just hike around others.

The steep climb up to Ryten

Amazing views open up as you ascend the hill to Ryten!

Loving these views along the Ryten hike
For the way back down, we did decide to take the narrow herd paths along the edge. That way, the views of the beach were in front of us, and we could continue to enjoy them without having to focus on any strenuous uphill climbing.
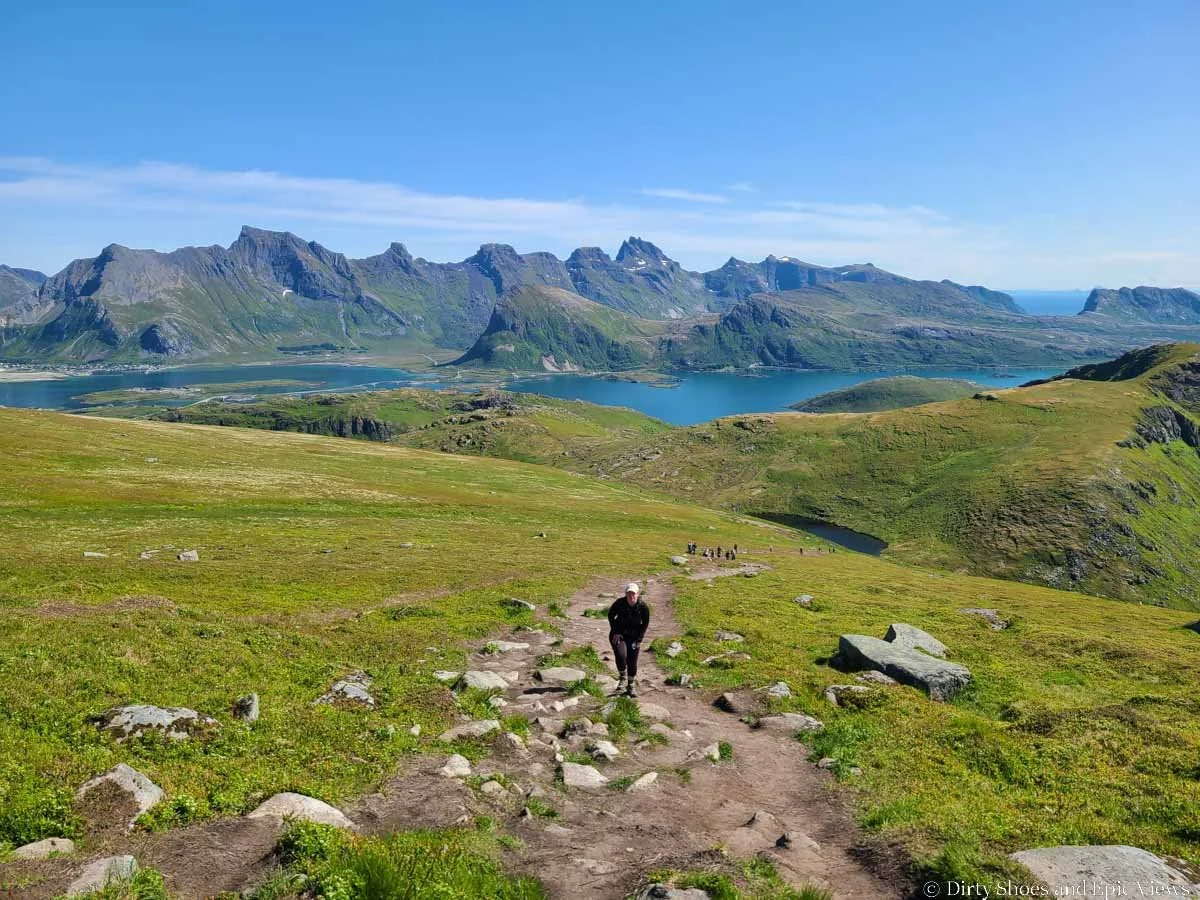
But any way you slice it, this final climb to Ryten is just a grind. It gets pretty steep, and becomes quite a leg workout. But as you get higher and higher, the panoramic lake, mountain and ocean views really open up, providing the motivation needed to keep on going.
If you’re on the main wide path, it’s sort of divided into two main climbs. At the top of the first climb (about the halfway point), the path juts left and levels out a bit, and from here, you get your first glances at Kvalvika Beach below!
From here, you can choose a number of herd paths to continue up, but we continued to stay on the main wide path to the top. Again, this is just another steep and steady climb to the top.

Here you can see all the herd path going up for the final climb to Ryten

Our first peek at Kvalvika Beach!

The final steep and steady climb to Ryten!

Getting close!

Views from near the summit of Ryten
After about 40 minutes of climbing from the beach junction below, we made it! Well, kind of…
The climb tops off at a wide flat viewpoint overlooking Kvalvika Beach. Here, you’ll find most people resting and enjoying the views, and although not quite the end of the hike, we’d say this is definitely the best viewpoint of the Ryten hike!

The Kvalvika Beach viewpoint near the Ryten summit

Stunning views of Kvalvika Beach from Ryten!
The views over Kvalvika Beach, the turquoise water, and the contrasting green jagged peaks that rise from the ocean and make this hike so famous are truly stunning. The Ryten hike is certainly worth the hype!
All along the hillside are gorgeous views and angles of the beach and ocean below, and if you walk along the edge on the other side, there are cool views of the rocky cliffs along the coastline that feel like something along the coast of Ireland.

The coastal cliffs of Ryten
One of the coolest features of this viewpoint, though, is a small rocky outcropping that people sometimes refer to as a “mini Trolltunga”. You can walk out on this tiny rock and get a great photo op overlooking the beach below. We thought there would be a line for this picture, but despite the number of people up here, no one seemed to be paying much attention to it!

The “mini Trolltunga” on Ryten overlooking Kvalvika Beach

Views of Kvalvika Beach
The view from Ryten is so much more than just the iconic view over Kvalvika Beach, though. From up here, you’ll have panoramic views of the ocean, inland lakes, rugged coastal cliffs, fjords, and jagged peaks of the Lofoten Islands. The Ryten hike really has it all, so it’s definitely one to put on your to-do list.

Panoramic views over the Lofoten Islands from Ryten
The true summit of Ryten can also be seen from this large viewpoint. It’s just a few minutes more of gradual uphill hiking to get to it. Kevin ran up there quickly while I stayed behind and just enjoyed the views of Kvalvika Beach. The view at the top isn’t too different, with the exception that you can no longer see down to Kvalvika Beach, but you can see over the other side of the summit to the coastline and mountains over there, so it’s probably worth the small effort to get up there and just tag the summit.

The last bit of trail to get to the true Ryten summit, seen ahead

Unique views on the other side of Ryten’s summit
We ended up spending about an hour on top of Ryten just enjoying the views and the perfect day, but eventually we had to pull ourselves away, as hard as it was.
The hike back down from Ryten was a breeze. The initial descent off the summit is steep, but it’s fast-going. We stuck to the herd paths near the edge of the hill so that we could keep enjoying the views of Kvalvika Beach for as long as possible.

Savoring the views on the hike back down from Ryten

Keeping Kvalvika Beach in view for as long as we possibly can!

Taking the herd paths down from Ryten
The rest of the hike out was pretty straightforward and quick with the exception of the brief rocky sections towards the beginning of the trail. On the descent, the chains were definitely more useful to navigate the steeper sections of rock and to keep balance. The trail may bottleneck a little bit through here as people wait to take their turn through these sections, but it wasn’t too bad for us now that it was late afternoon.

The small scramble down the chain section of the Ryten hike
We made it back to the Innersand trailhead in about an hour and 15 minutes.
Overall, we thought the hike to Ryten was well-worth the hype. It’s a scenic hike from start to finish, with views of the ocean, lakes, peaks, coastline, and of course, the famous turquoise waters of Kvalvika Beach. It can be crowded, but even at midday on a nice summer weekend, I actually wasn’t too bothered by the crowds on this hike and we were able to find some peaceful moments and time to ourselves on the trail. I think I was just too focused on the amazing scenery to really care!
The Best Time to Hike to Ryten on the Lofoten Islands

A picture-perfect day in July on the Ryten hike
The best time to hike to Ryten on the Lofoten Islands is in the warmer summer months between May and September. If you plan to hike in the boundaries of that timeframe (namely May to early June, and September, I’d recommend checking out AllTrails for the most recent trail conditions by fellow hikers to see if there’s any lingering snow and mud.
June, July, and August are the busiest times to hike Ryten because the weather is warm and generally pretty nice and stable, and days are long. We hiked in Lofoten during the first week of July and had absolutely perfect weather. However, the Lofoten Islands are known to have unpredictable and moody weather, so just come prepared for anything.
Be sure to double-check the forecast before heading out on the Ryten hike. We’d recommend that if there’s strong rain and wind in the forecast, skip this hike. It can get overly challenging (and potentially dangerous at the top), and the trail can become way too muddy and boggy and also hard to navigate.
If you visit Lofoten between the end of May and mid-July, you can experience the midnight sun and have lots of room to work around any sort of bad weather- if you’re willing to be flexible and start your hikes at any odd hour of the day!
We’d recommend saving the hike to Ryten for a clear sunny day if you can- the sun really lights up the water and gives it that iconic, almost Caribbean-like turquoise hue. However, even in less-than-ideal lighting, you’ll get moody views over the jagged peaks that are equally as stunning.
In terms of the time of day, I feel like mid-morning to midday would have the best lighting on Ryten. The sun will be directly shining down on the beach and really light up the colors. By the time we reached Ryten at mid-afternoon, some of the mountains rising from the beach were in a bit of a shadow, but honestly, it didn’t matter because the view was still stunning.

Mid-afternoon lighting on Kvalvika Beach from Ryten
Also as far as time of day goes, midday will certainly bring the highest crowds, but we found that this didn’t take away from the hike at all. We hiked to Ryten midday on a sunny summer Saturday in July- we didn’t mean to, but our schedule just kind of fell into place that way. It was busy, but people tend to spread out along the trail and it wasn’t that bad. The trail tends to jumble up more in the beginning because of the steep initial climb and then the rockier portions of trail that slow people down and may create brief bottlenecks, but after this, people start to find a pace and spread out. Also, the viewpoint at the top is large so you can definitely find your own space.
No matter what time of day you hike, don’t expect to ever have this trail entirely to yourself. Some trails in Lofoten see people at all times of day, particular around the time of the midnight sun, as people want to experience the midnight sun from the trails and viewpoints around Lofoten. However, we did notice the trail quieting down significantly as we hiked out in the late afternoon, with many more people hiking out than in.
Where to Stay Near the Ryten Hike on the Lofoten Islands
The Ryten hike is pretty equidistant between the popular town of Reine and the town of Leknes. Staying anywhere in between these two towns is ideal to avoid a long drive to the trailhead.
We stayed closer to Reine as we wanted to focus on hikes in that area, and it was an easy and scenic half hour drive to the Ryten trailhead.
Camping on the Lofoten Islands
Lots of people love camping in Norway because of the freedom to move around, be flexible, spend more time in nature, and wake up to stunning Norwegian scenery. Camping is also pretty convenient in Norway because they follow a principle called Allemannsretten, or the Right to Roam, meaning that in general, hiking and free camping is allowed in most places, not just in designated or paid areas, making it a very cheap alternative to staying in more expensive accommodations. But with increased tourism in the country, limits and restrictions have understandably come into play- these are much needed to preserve the landscape as well as protect cultivated land and local’s property.
Check out this website for more information about the do’s and don’ts of where to camp on the Lofoten Islands, proper camping etiquette, and to find more information on designated campsites with facilities, which are recommended over wild camping at road pull-offs and one-off spots. If you do choose to wild camp, please be sure to not set up within 150 meters of any building or cultivated land, respect any signs, and please leave no trace! Following these rules will help keep camping and the Right to Roam accessible to everyone in the future.
As we mentioned earlier, you can camp overnight at the Innersand parking lot for fairly cheap if you have a campervan or motorhome. This is a great option to have a cheap place to stay with facilities, and to be able to hit the trail early or late to beat the bigger crowds (or to hike up to Ryten for the midnight sun!).
Tips for Hiking to Ryten on the Lofoten Islands

Catching a glimpse of Kvalvika Beach from the hike to Ryten
Here are some of our final tips for the Ryten hike in Norway:
Wear good hiking boots with traction and waterproofing. Though a lot of the Ryten trail is well-maintained with wooden footbridges, you’ll still encounter a lot of rock, some mud, and some steep climbs. Be sure to have good hiking footwear for this one.
Consider bringing hiking poles. We typically don’t hike with them, but the descent off of Ryten can be steep at times, particularly off the summit, so poles can be helpful to save the knees a bit.
Stick to the trails. While Norway does have the right to roam, increased tourism and trail use is causing a lot of erosion to the landscape (you’ll see a lot of it on the Ryten hike!). They do a lot to maintain this trail and build foot bridges over the muddiest and boggiest places, and it is encouraged to do your best to stay on these designated paths and avoid creating new paths to better preserve the landscape. It might require a little bit of patience, especially if you hike to Ryten at a very crowded time, because you might have to wait a while for oncoming hikers to clear off of the planks, but you can tell they really are putting in a lot of work to better preserve this beautiful area.
Expect crowds. Speaking of crowded trails, the Ryten hike is not immune to the peak summer crowds of the Lofoten Islands, and you’ll likely be sharing this trail with lots of other people. So just go in mentally preparing for that, and please just be respectful of others (stepping aside for faster hikers, using patience on bottleneck areas, not playing loud music, etc).
Have bug spray and sunscreen. We found that bugs can be quite annoying on Lofoten hikes so bug spray might help. Also, the Ryten hike is totally exposed to the sun so be sure to have plenty of sun protection.
Bring layers and rain gear. We recommend being prepared for any type of weather- wind, rain, sun, etc. It can be chillier up on the Ryten summit, even on a hot day.
More Lofoten Islands Guides
Heading to the Lofoten Islands and looking for more things to do after your hike to Ryten? Be sure to check out all our Lofoten Islands guides!
The Complete Guide to the Lofoten Islands: How to Visit and Things to Do!
How to Hike to Reinebringen: The Best Hike on the Lofoten Islands
How to Hike to Munkebu Hut and Munken on the Lofoten Islands
Do you also want to explore the southern fjords of Norway? We have lots of tips and guides on that as well!
The hike to Ryten was an epic hike in the Lofoten Islands, and one that deserves to be on your Norway bucket list. Got any questions about hiking to Ryten on the Lofoten Islands? Let us know in the comments below! Happy hiking!