How to Hike to the Munkebu Hut + Munken: One of the Best Hikes on the Lofoten Islands in Norway
Are you looking for an epic hike on the Lofoten Islands? The hike to Munkebu Hut and to the Munken summit promises epic scenery from start to finish, filled with jagged peaks, lakes, and waterfalls. In this guide, learn everything you need to know to hike to Munkebu Hut and Munken on the Lofoten Islands, including how to get there, the best time to hike, what to expect on the trail, and more!

The Lofoten Islands of Norway are a stunningly scenic archipelago in the Arctic Circle known for their quaint and colorful fishing towns surrounded by dramatic and jagged peaks rising right from the ocean. And one of the best ways to take it all in is from the trails!
There are tons to choose from, but one of our favorite hikes on the Lofoten Islands was the hike to the Munkebu Hut and Munken peak.
The Munkebu Hut is a scenic overnight hut that sits in a beautiful basin surrounded by lakes and waterfalls of Lofoten’s interior wilderness. To get here, you’ll climb from the town of Sorvagen (near the tip of the Lofoten Islands) past a series of lakes, waterfalls, and mountain views. The hut is a worthy destination on its own for a day hike or to spend a night, but if you want to continue further for a more challenging (and even more scenic!) hike, then definitely consider continuing the hike to Munken.
From Munkebu hut, a well-worn but steep and rugged path leads up to Munken, an 800-meter peak that sits just above the hut. While the true summit is accessible to rock climbers only, the saddle just below the summit is accessible to hikers and provides stunning panoramic views over lakes, mountains, and the ocean on each side of the islands.
What we loved about the Munkebu Hut and Munken hike was how unique it was. Many of the other popular hikes on the Lofoten Islands are short and steep hikes up to a viewpoint mostly overlooking the ocean and Lofoten coastline- hikes like Reinebringen, Ryten, Offersoykammen, and Festvagtind. And while each of these hikes offers incredible views and are worth doing, we loved that the hike to Munkebu Hut and Munken brings you more into the interior of the islands so that you can experience the rugged wilderness of Lofoten from a different perspective.
On top of that, the trails here felt empty compared to the more popular nearby hikes. We did share the trails with others, but it was a much more quiet and peaceful experience than trails like Reinebringen and Ryten! And though the hike is a bit on the longer side, there are truly non-stop epic views of lakes, waterfalls, and jagged peaks to keep you going.
Want to hike to Munkebu Hut and Munken? You’re in the right place!
In this guide, we’ll go over everything you need to know to hike to Munkebu Hut and Munken on the Lofoten Islands. We’ll share how to get to the trailhead and where to park, when to go, hiking stats, what to expect on the trail, and all our best tips.
So, let’s get into it!
In this Munkebu Hut and Munken hiking guide:
How to Get to the Munkebu Hut and Munken Trailhead (+ Parking)
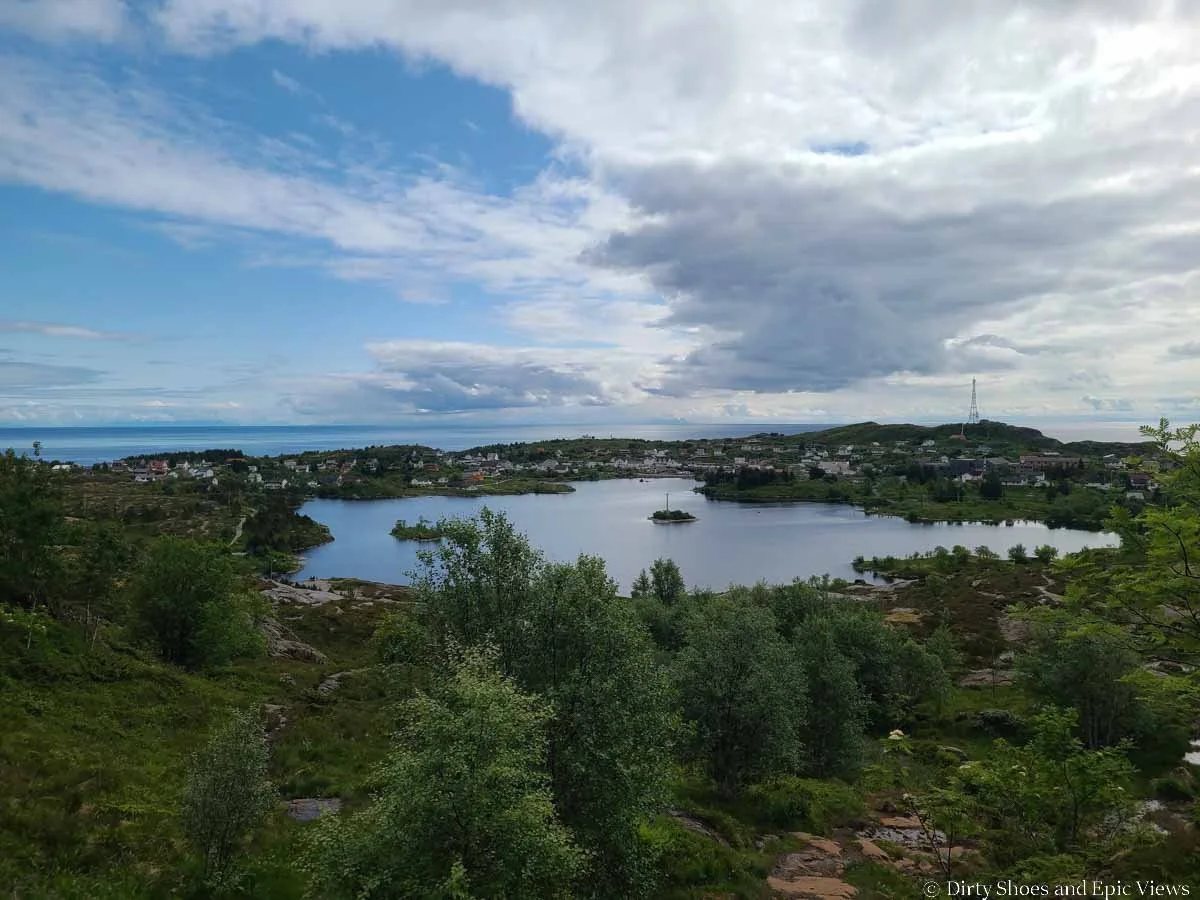
The trailhead for the Munkebu Hut hike is found in Sorvagen, a small town located along the E10 road at the southern tip of the Lofoten Islands.
Sorvagen is just a ten- minute drive from Reine, a popular spot in the Lofoten Islands (where the famous Reinebringen hike is located).
To get to the trailhead, you’ll want to set your GPS to the Tindstinden Hike Trailhead on Google Maps, located on the western side of Sorvagvatnet (the big lake in Sorvagen). There are other approaches to the Munkebu Hut and Munken, but this is the most standard, straightforward, and easiest way.

The side road off the E10 that leads to the Munkebu Hut trailhead
The parking lot here is relatively small, and when we got here close to 1 pm on a nice summer Friday, it was nearly full.
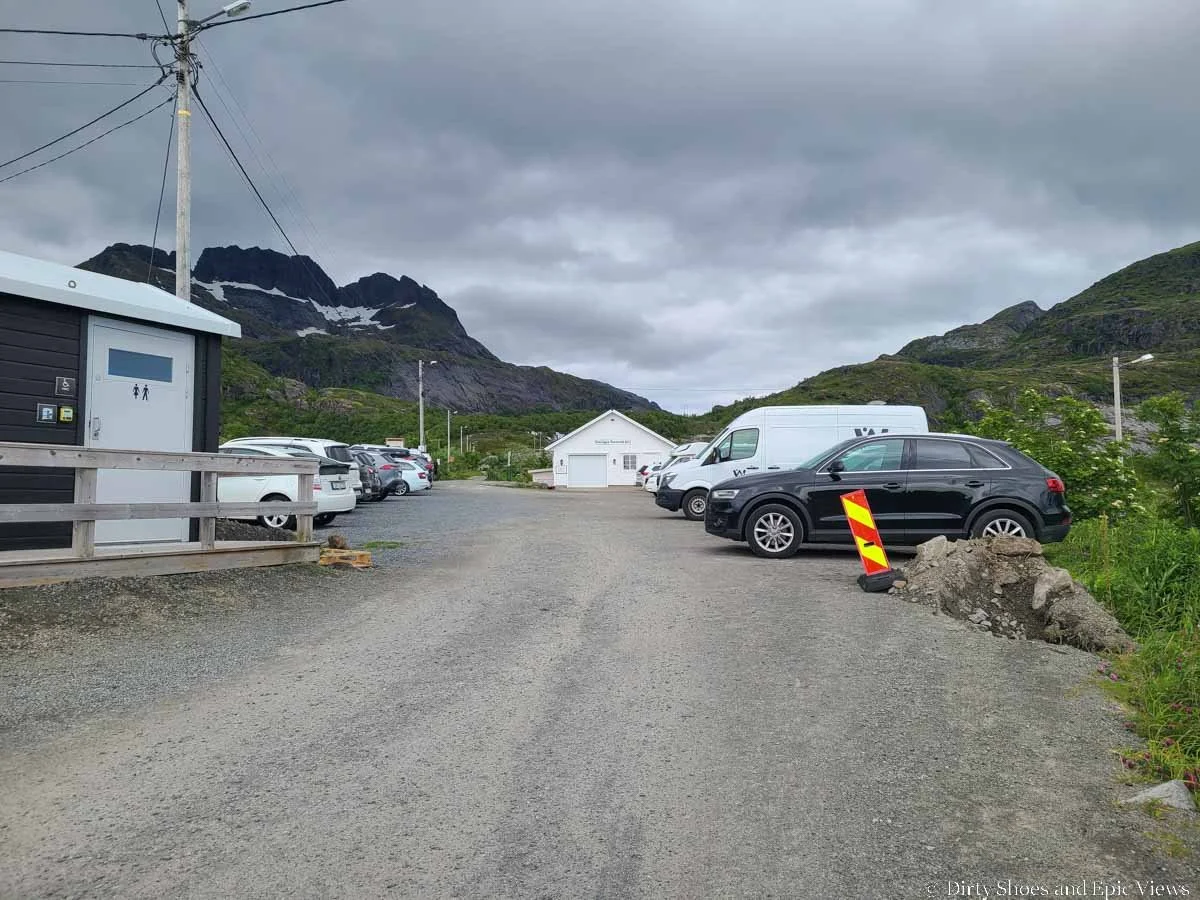
The small parking lot at the Munkebu Hut trailhead
If full, there may be other spots in town where you can also pay to park and then walk up to the trailhead from there. There is one public lot across from the school along the E10 here, but it seems quite expensive and only payable via an app. We recommend checking the Google link above to see recent reviews of the current payment situation there. It’s about a half kilometer walk from the trailhead.
Parking at the actual Munkebu Hut trailhead costs 60 NOK per 4 hours (you’ll likely need longer) and a credit card can be used (there’s a machine at the top of the lot). There are also bathrooms there that cost 10 NOK by card as well.
We stayed at an accommodation right in Sorvagen and could walk to the trailhead, which was helpful in avoiding parking fees!
Map of Munkebu Hut trailhead
This map shows where parking is possible for the Munkebu Hut and Munken hike.

This map shows the Munkebu Hut trailhead as well as alternate parking across from the school in Sorvagen
Route Options to Munkebu Hut and Munken
Before hiking to Munkebu Hut and Munken, I will admit that we didn’t fully research the hike to really know what all the options were, and going in, we actually didn’t realize that there are several route options to hike to Munkebu Hut and up to Munken. Some maps don’t even show all the options, and on top of that, the trail junctions and paths along the actual trail aren’t very clearly marked.
We took what seemed like the main path to Munkebu Hut- it was pretty well-defined and easy to follow in most places and got us there just fine. We did it as an out- and- back hike and it’s how we will describe the trail to Munkebu Hut and Munken below. But we did see other paths and trails along the way and wondered where they went, and we pieced it all together after our hike.
Here are the main options for hiking to Munkebu Hut and Munken specifically from the Sorvagen trailhead.
Munkebu Hut routes
Option 1: The standard route

Hiking past the summit of Djupfjordheia on the standard route to Munkebu Hut. The summit of Munken is just ahead!
This is how we hiked to Munkebu Hut. It’s an out- and- back trail and seems to be the most obvious and common way to get to the hut.
When hiking from the trailhead in Sorvagen, you’ll eventually walk along a small bay alongside one of the lakes on the hike in. Shortly after this, you’ll come to a very obvious junction, and when we were there, this junction was unsigned. We sort of had to take an educated guess about which path we should take, and we chose to bear right heading uphill. Shortly after some climbing, there was a sign that pointed towards Munkebu Hut that assured us we were on the right path.
This trail to Munkebu Hut climbs above a series of lakes to get to a summit called Djupfjordheia before gradually descending back down to the hut.
This trail to Munkebu Hut is actually the only trail that is shown on the map at the trailhead, and it’s well- trodden, which is why we assume this is the main path to the hut. This is the path we took, and the one we’ll describe below.
Option 2: The lower route
At the same unmarked junction we talked about above, instead of bearing right and climbing uphill, you can continue straight and walk a flat path along the shore of another lake down in the basin before climbing steeply up to Munkebu Hut from there.
As we were climbing up the other path, we could look down and see quite a number of people on the trail down there, which initially had us questioning if we were going the right way or if that was a path with a different destination altogether. But when we finished our hike and consulted some guidebooks we found at the Tourist Center in Reine, we did see that this is an established trail to the hut. In fact, the guidebook describes the hike to Munkebu Hut as a loop trail that ascends to the hut via this lower trail and then returns via the main trail we described above.

The view of the lower trail to Munkebu Hut from our hike. If you look closely, you can see a narrow path cutting through the grassy meadow below.
We can’t say much about this lower trail as we didn’t hike it, but if you are interested in this alternate path, we suggest checking out a guidebook first (there are some great ones in the Reine Tourist Center here).
Option 3: The route via Merraflestinden
Merraflestinden is another nearby summit overlooking the Lofoten coastline and can be hiked en route to Munkebu Hut.
As you walk along the small bay we described above, you’ll see some cabins to your right. A herd path leads to the cabins, and we thought that was the only thing this path does, but apparently it is also the start of a trail up to Merraflestinden.
The trail will climb up to a ridge below the summit, and you can choose to hike all the way to the top, or bypass the summit by hiking a trail along its slopes. Either way, trails connect back down to the main path to Munkebu Hut. Of course, this route will require a bit more climbing than simply doing the main trail.
We saw the backend of the trail to Merraflestinden on our hike out to Munkebu Hut and contemplated climbing to the overlook on our way back out, but by the time we made it back to that point, I was feeling too tired and didn’t find it necessary after all the views we’d already seen!
If you are interested in taking this route to Munkebu Hut, check out this AllTrails route, which details the hike as a loop, taking the main trail all the way out to the hut, and then hiking the trail over Merraflestinden on the way back.
Munken routes
Option 1: From Munkebu Hut
The first option to hike to Munken is to do it right from Munkebu Hut. A well-worn herd path leads right past the hut and steeply and steadily climbs up to the Munken summit. The trail is well-established and marked by occasional cairns to keep you on track. We will describe this trail to Munken in our trail description below.

Hiking to Munken from the Munkebu Hut, which can be seen sitting by the lake below
Views on the way to Munken
Option 2: The direct route to Munken
When hiking from Sorvagen, Munkebu Hut is actually a detour on the way to Munken and there is a more direct route up to the summit.
Apparently, a trail splits off from the main trail shortly after descending from Djupfjordheia (the high point of the trail). We did not see any obvious junction or trail split as we hiked, though we weren’t specifically looking for one at the time.
I do remember at one point as we were hiking down to the hut that I looked over towards the meadows on my right and noted that there were cairns off in the distances. At the time, I just chocked it up to being an ill-defined path through here and people just making cairns everywhere, but now looking back, they were likely the cairns leading towards Munken from this direction.
According to maps, this direct route meets up with the other path to Munken (the one from Munkebu Hut) about halfway up the summit. Again, on our way up to Munken we saw no obvious split or marker indicating a junction where the two trails could have met up. So you’ll have to really keep your eyes peeled for notable cairns and herd paths and have some experience with route finding to be able to locate this trail from either end.
We found the main trail to Munken from Munkebu Hut to be well-trodden and pretty easy to follow, and getting to visit the scenic hut was nice- it was a good place to have a break and enjoy the views before continuing on. But, I do wish that we could have just taken the direct route back on the way down to shave off some time and distance on the hike back.
Map of Munkebu Hut hiking routes
Here’s a map to help you better visualize the different hiking routes to Munkebu Hut and Munken.
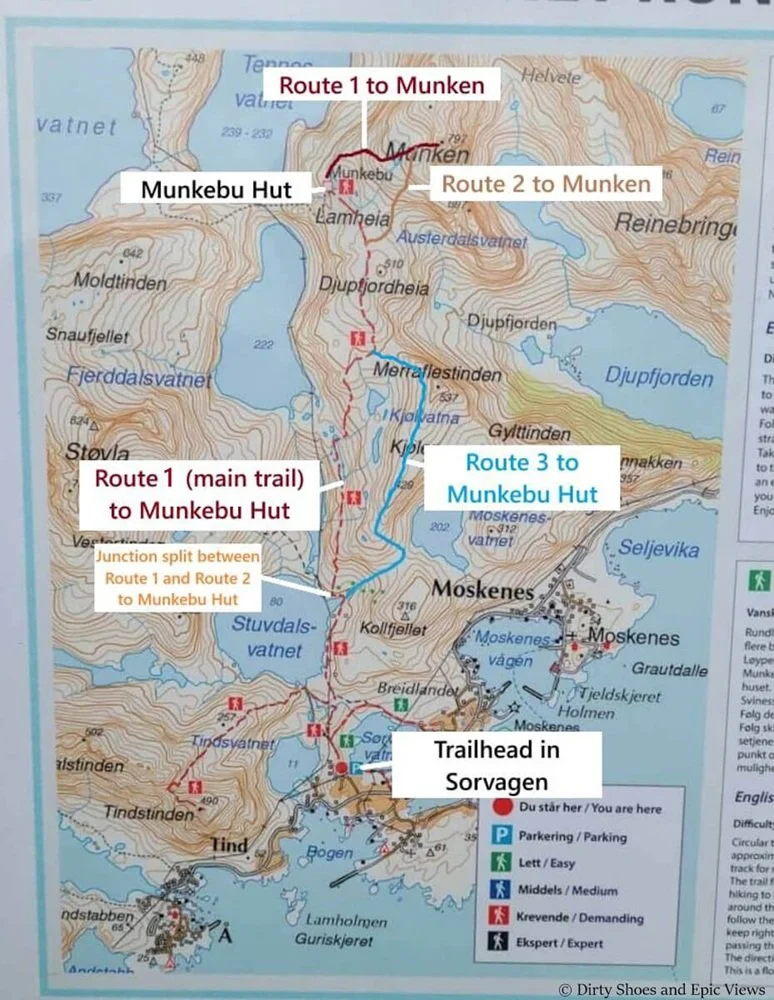
Hiking routes to Munkebu Hut and Munken
How Long is the Hike to Munkebu Hut?
Our hiking stats for the Munkebu Hut hike reflect the out- and- back path from Sorvagen via the main trail over Djupfjordheia. This seems to be the typical and standard path taken to get to Munkebu Hut.
Distance: 11 km / 6.8 miles roundtrip
Elevation: 718 m / 2,356 ft
Time: 5 hours
How Long is the Hike to Munken?
These are our trail stats for the complete out-and-back hike to Munken from the trailhead in Sorvagen via the trail that passes through the Munkebu Hut.
Distance: 14.5 km / 9 miles out and back
Elevation: 1,095 m / 3,592 ft
Time: 8 hours
From the Munkebu Hut, the hike to Munken is just over a mile one-way to the top (about 1.8 km), with about 1,240 feet (378 m) of climbing (so it’s pretty steep!).
Elevation profile for the Munkebu Hut and Munken hike

The out-and-back elevation profile for the hike to Munkebu Hut and Munken
Map of the Munkebu Hut and Munken Hike
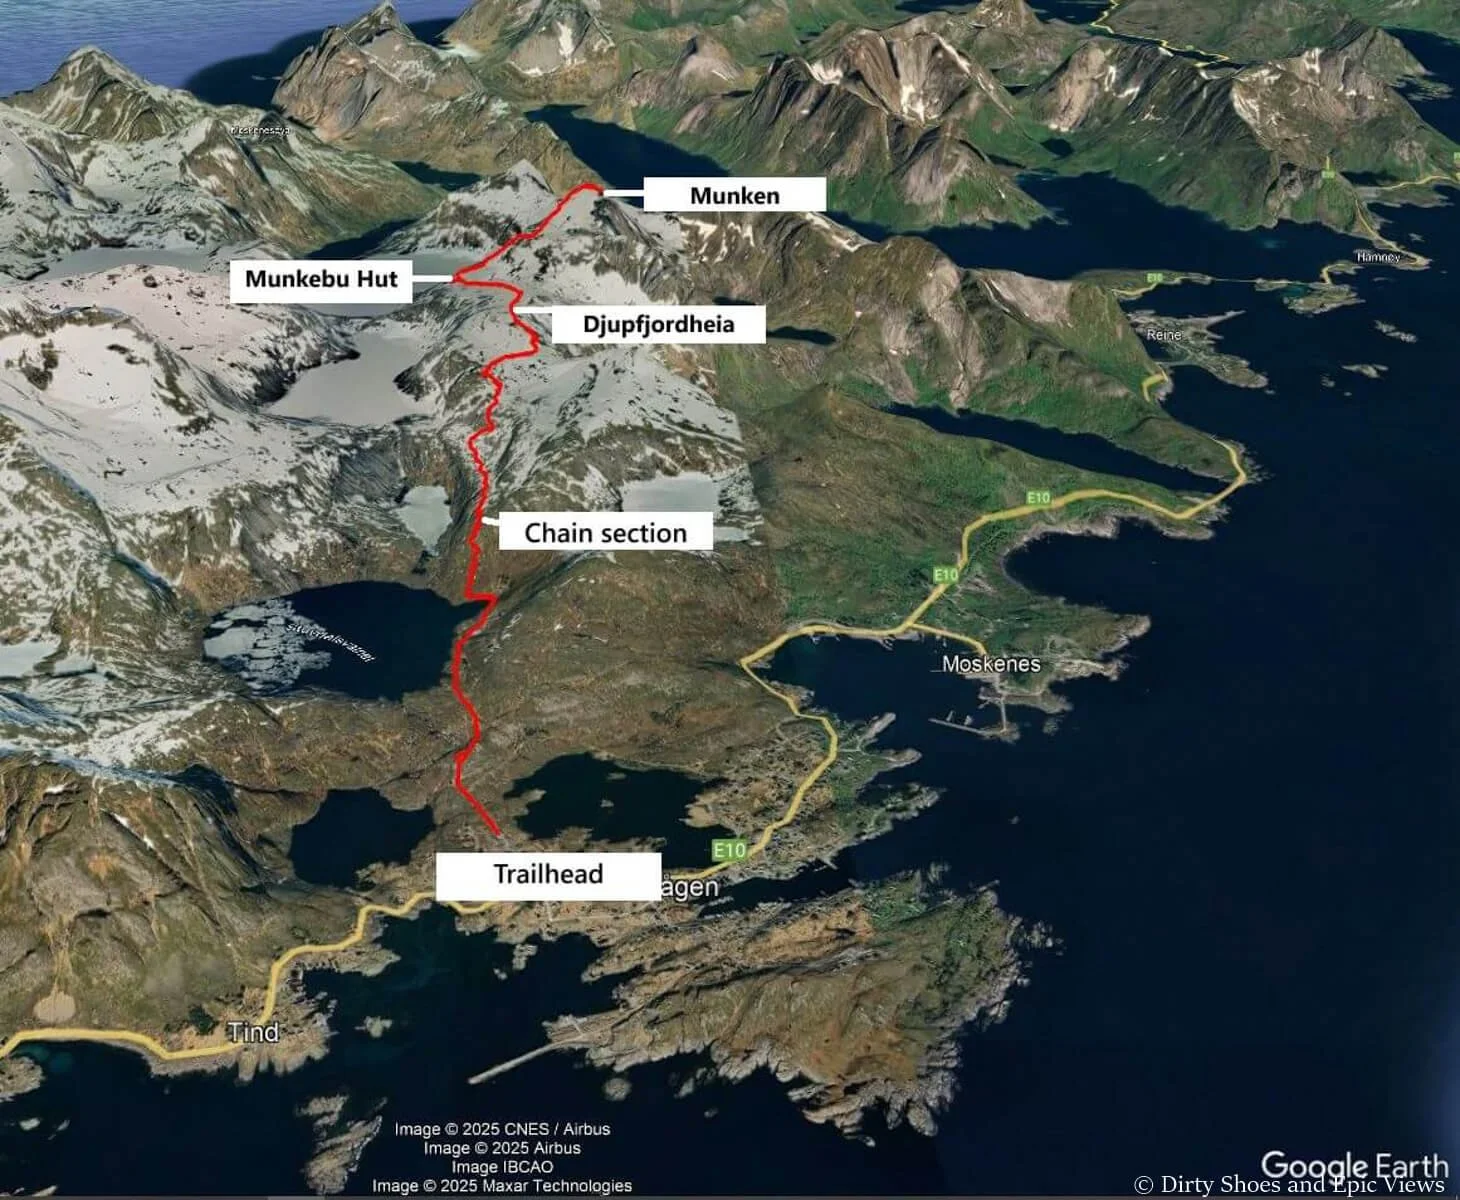
A satellite image of our hike to Munkebu Hut and Munken
How Hard is the Hike to Munkebu Hut and Munken?
The hike to Munkebu Hut is on the moderate to hard side. There are some steep and rocky climbs, and the trail can get quite rugged and even pretty muddy depending on how the weather has been.

Some parts of the Munkebu Hut trail can get rocky, rugged, or muddy
There is one section along the trail that ascends steeply up slick granite rock slabs, and chains are in place to help with balance and footing. You might not find them entirely necessary on the hike up, but the way down is much trickier, especially if the rock is at all wet, and you’ll be glad to have the help of the chains.
Using the chains on the hike to Munkebu Hut
Other than the chains, which is a short part of the whole Munkebu Hut trail, there is nothing technical about the hike and it’s pretty straightforward- just long and a lot of climbing.
The other slightly challenging (or maybe ‘frustrating’ is the better word) aspect of the hike to Munkebu Hut is the route finding.
For the most part, the trail to Munkebu Hut is pretty evident, and there are sporadic signs, cairns, and red “T”s on the rocks to help you stay on track. However, the junctions were not marked well at all, and sometimes we weren’t 100% sure we were on the right path (though we always actually were!). The first major junction just past the small bay was completely unmarked and we had to take an educated guess on which way to go (we went right). Luckily, just shortly past the junction after a bit of climbing, a sign pointed towards Munkebu Hut to assure us we were on the right path- not sure why they couldn’t put the sign just below at the trail split!
Keep your eyes peeled for the red Ts (seen above) and rock cairns on the way to Munkebu Hut
And if you did want to take any of the alternate routes to Munkebu Hut that we mentioned above, it might be pretty difficult to figure out at first since we found no other trails to be marked.
The hike to Munken from the Munkebu Hut is also a moderate to challenging trail. It’s a steep and rugged climb for pretty much the entire way (but keep looking behind you for motivation as the views just get better and better!). The path itself is fairly obvious, and there are sporadic cairns you can look for to keep you on track.

Most of the trail to Munken is steep, rocky, and rugged
There were a few tricky sections where some very light scrambling had to be done to maneuver up some rocky areas, and at times the trail was pretty muddy. It wasn’t bad climbing up it, but on the way down it could get a bit slick and tricky to maneuver around.
Overall, we’d rate the Munkebu Hut/Munken hike on the hard side of moderate- it’s long, there’s a lot of climbing (often steep), the path can be rugged, rocky, and muddy, and there are some minor challenges with route finding along the way.
The Hike to Munkebu Hut: Trail Description and Our Experience
We’re breaking up this trail description into two parts: first is the hike to Munkebu Hut, and second will be the hike to Munken. Munkebu Hut is a great destination on its own for a day hike, so if you want to stop here and not continue up to Munken, that’s perfectly fine and you’ll still get amazing views!
As we’ve said, our trail description will cover only the out- and- back path we did that climbs over Djupfjordheia on the way to the hut as we didn’t do any of the other alternative (but less common) routes.
The trail to Munkebu Hut starts off at the far end of the small parking lot, just beside the small white building. Here, you’ll find information about the trails in the area, as well as a trail map which is useful to take a picture of for reference on the hike.
The Munkebu Hut hike starts off on a wide and flat gravel path as it heads to the other side of Sorvagvatnet Lake. Take note of the nice picnic spots here for a potentially nice place to eat when you finish the hike!
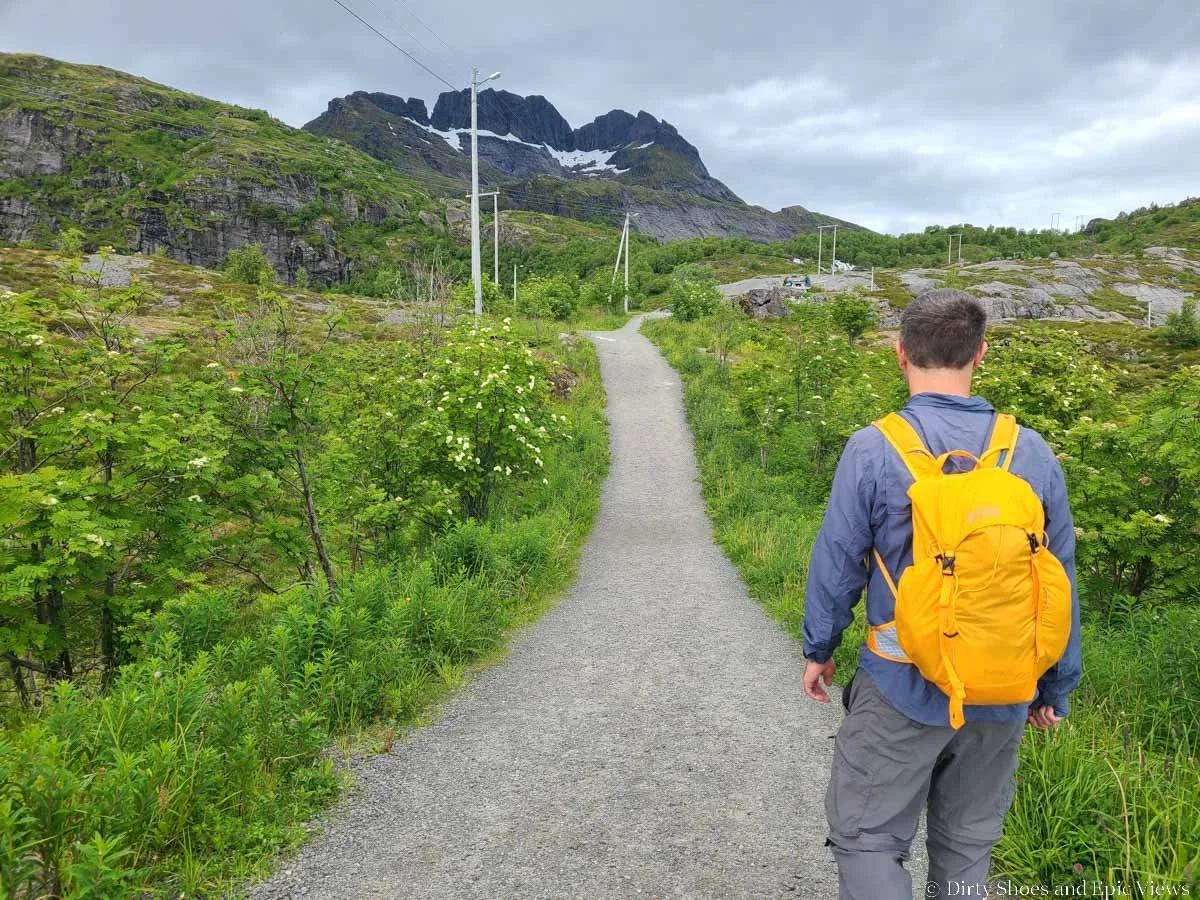
The start of the Munkebu Hut hike in Lofoten

Scenic picnic tables along Sorvagvatnet Lake
You’ll quickly come to a trail split that is unsigned, but bear right to continue walking around the lake.
Then you’ll come to another small white building. You’ll see a yellow “STOP” painted on the rock here, and instead of continuing straight, you’ll bear right up the granite rock towards the blue informational sign. You’ll climb up onto this small granite bump above the backside of the lake and follow the rock path towards the impressive waterfall just ahead.

At the end of the gravel path, head up the granite rock to the right, past the blue informational sign seen above

The scenic waterfall behind Sorvagvatnet Lake

The views back over Sorvagvatnet Lake and the town of Sorvagen
Enjoy these views before descending a herd path down towards a small footbridge that crosses the stream below.

Past the waterfall, you’ll find this small foot bridge over the stream
There didn’t seem to be any apparent trail signs through here. You might see another blue informational sign close to the waterfall, but don’t go that way. Instead, the trail bears right after the bridge and starts up a fairly steep and rocky (and often muddy) climb to the next lake basin. Be sure to look behind you for views back over Sorvagvatnet Lake, Sorvagen, and the ocean!

The rocky and muddy path to Munkebu Hut
This climb is short (only about 5 minutes) and will spill you out at the next lake (Stuvdalsvatnet)- and just fyi, this hike is filled with lakes so this is just the start!
You’ll also see a faded sign pointing towards Munkebu Hut to let you know you are indeed on the right path.

If you see this sign, you’re on the right path! The faded arrow at the bottom points towards Munkebu Hut.
Here, the path levels off and becomes a narrow dirt trail as it works its way towards the backside of the scenic lake.

Walking alongside Studvalsvatnet on the Munkebu Hut hike

At the far side of the lake, you’ll walk right along the shore of a small but scenic bay. Here, a cabin is found just to your right (and this is where supposedly a trail branches off for the climb up to Merraflestinden- route option 3 that we described above).

Walking along the shore of the small bay. Red arrows point towards the main trail.

The scenic view from the shore of the bay- this was taken on the return hike in the late evening
Just after passing the bay (and about a half hour into our hike), there was an obvious but unsigned (at least at the time we hiked this) split in the trail, and we weren’t sure which way to go. We took an educated guess that we should bear right and continue uphill and hoped for the best. And after about five minutes of climbing, we did come across a sign that finally gave us assurance that we were on track for Munkebu Hut, and we wondered why this signage wasn’t down at the actual junction! Red “T”s started appearing on the rock along the trail- another sign that we were on track (these red Ts are common waypoints along Norwegian trails).

This shows the junction just after the bay. We headed right, up the steep path through the woods.

A few minutes after the junction, this sign assured on that we were on track for Munkebu Hut!
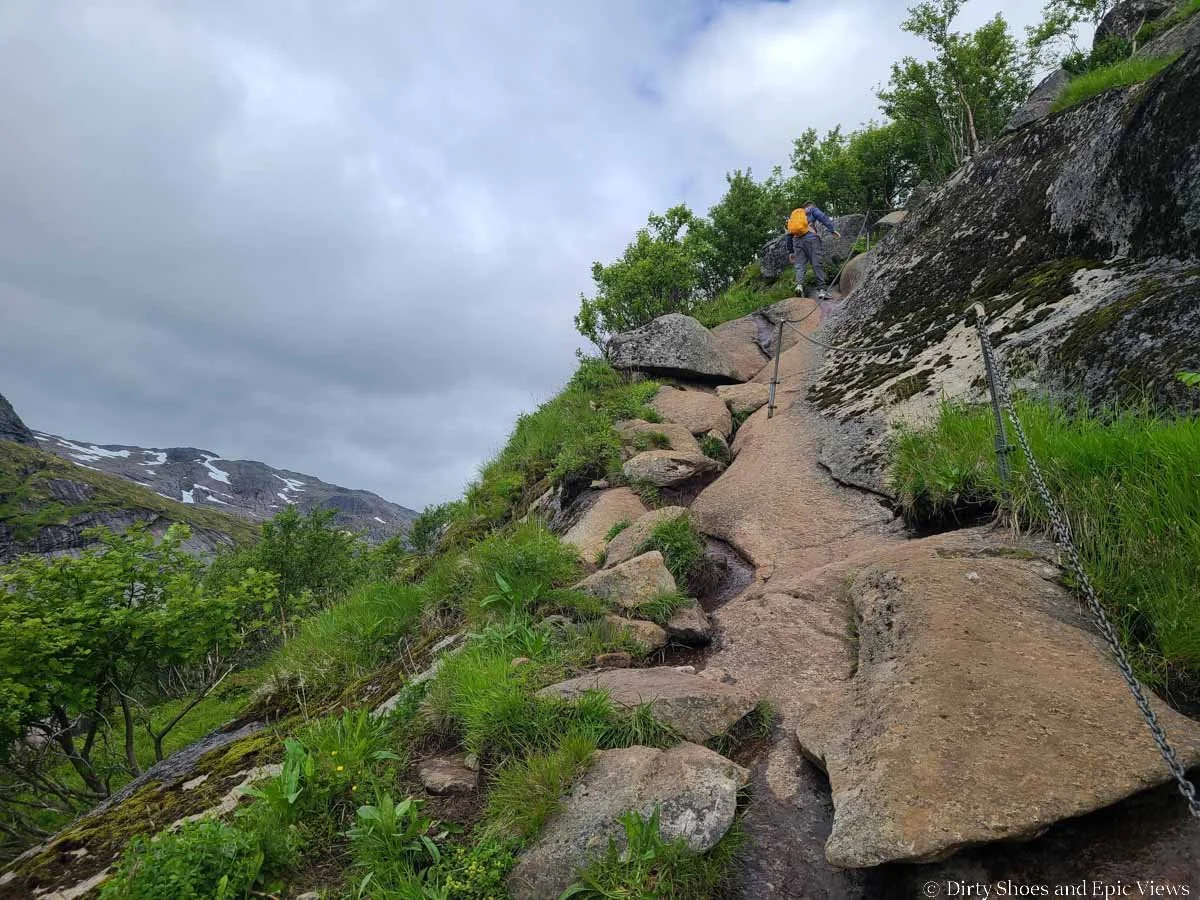
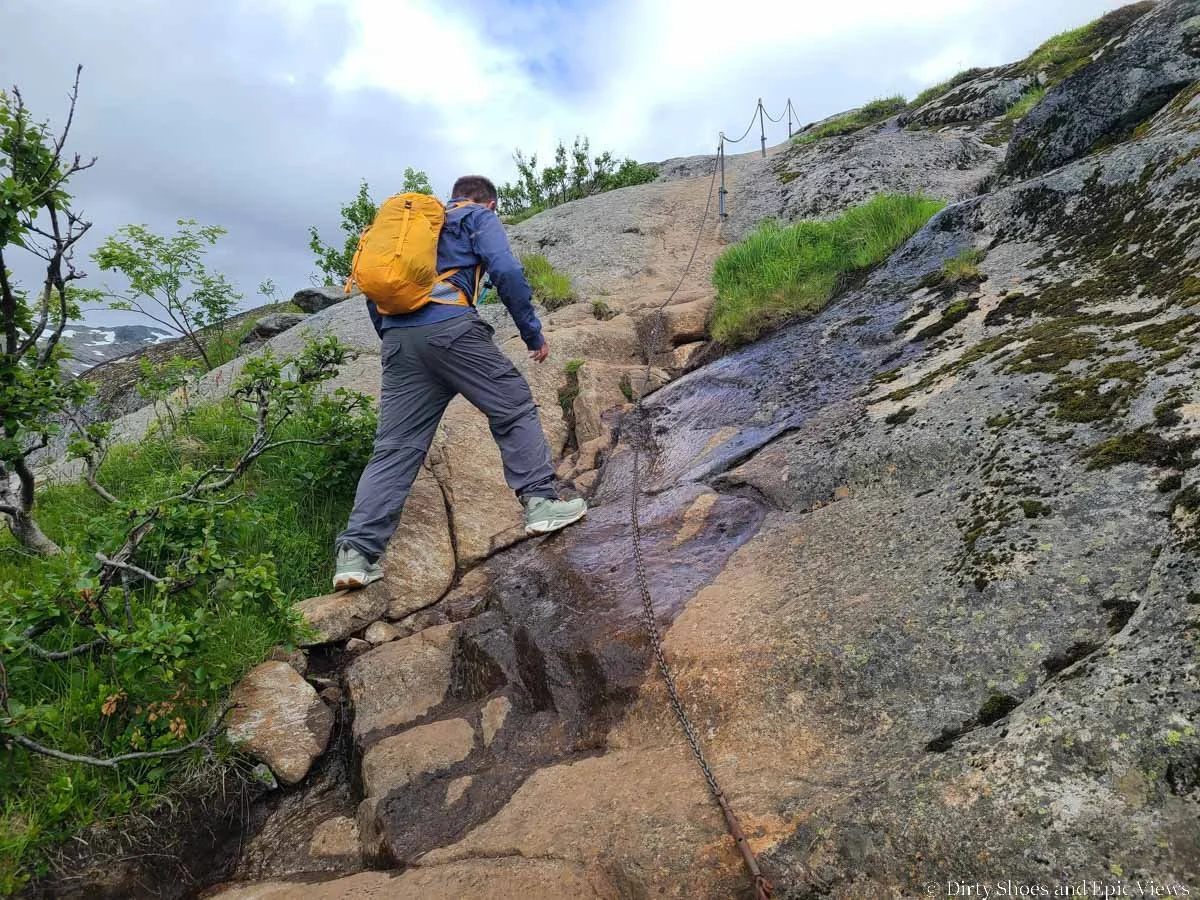
From the unsigned trail split, the path turns rocky and steep as it climbs through the woods towards Munkebu Hut. But after just a few minutes, views back over the lake and now distant ocean open up.
As you continue to climb above the trees, the trail isn’t the most well-marked trail in the world, but the combination of granite rock and muddy herd paths sort of form an obvious path that guides you along. The higher you get, the more the mountain views open up, and the first of several waterfalls along this hike comes into view in the distance.

The steep ascent after the junction

This part of the Munkebu Hut hike had a lot of steep granite sections

Views of lakes and the ocean start to appear behind you!

The granite can get slick and muddy on the hike up to Munkebu Hut

The views really start to open up!
We also could see another trail in the lake-spotted meadows below with some people on it which made us initially question our own route choice, but we later learned that this was the lower trail to the hut (route option 2 we described above).
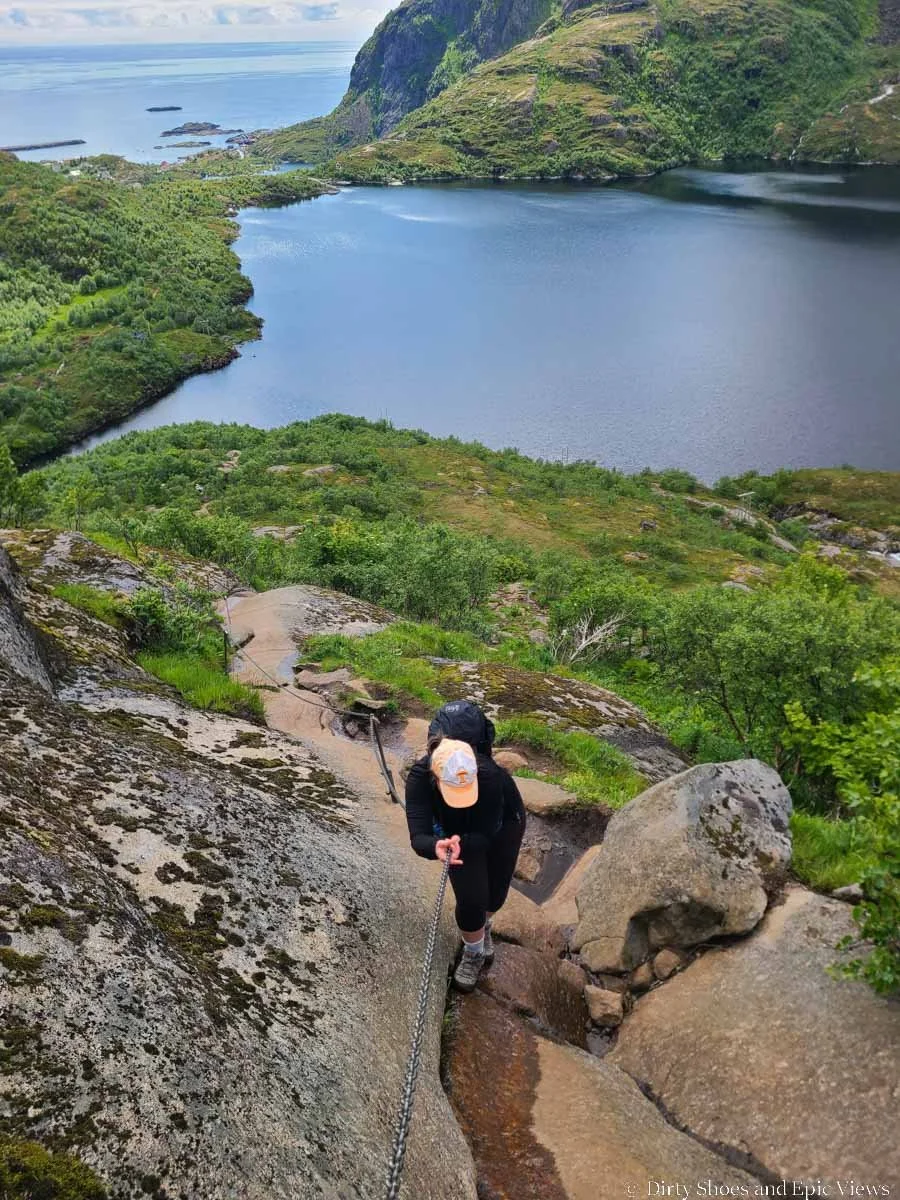
The trail can get steep through here, and if wet, it can become a bit slick on the granite rock slabs. There are two particularly steep and slick portions of smooth granite rock that have chains to help you keep your balance and footing as you climb. You might not feel like they are entirely necessary on the way up (especially if the rock is drier), but on the way down, I felt they were definitely needed to navigate down the slick rock.
The chained section on the Munkebu Hut hike
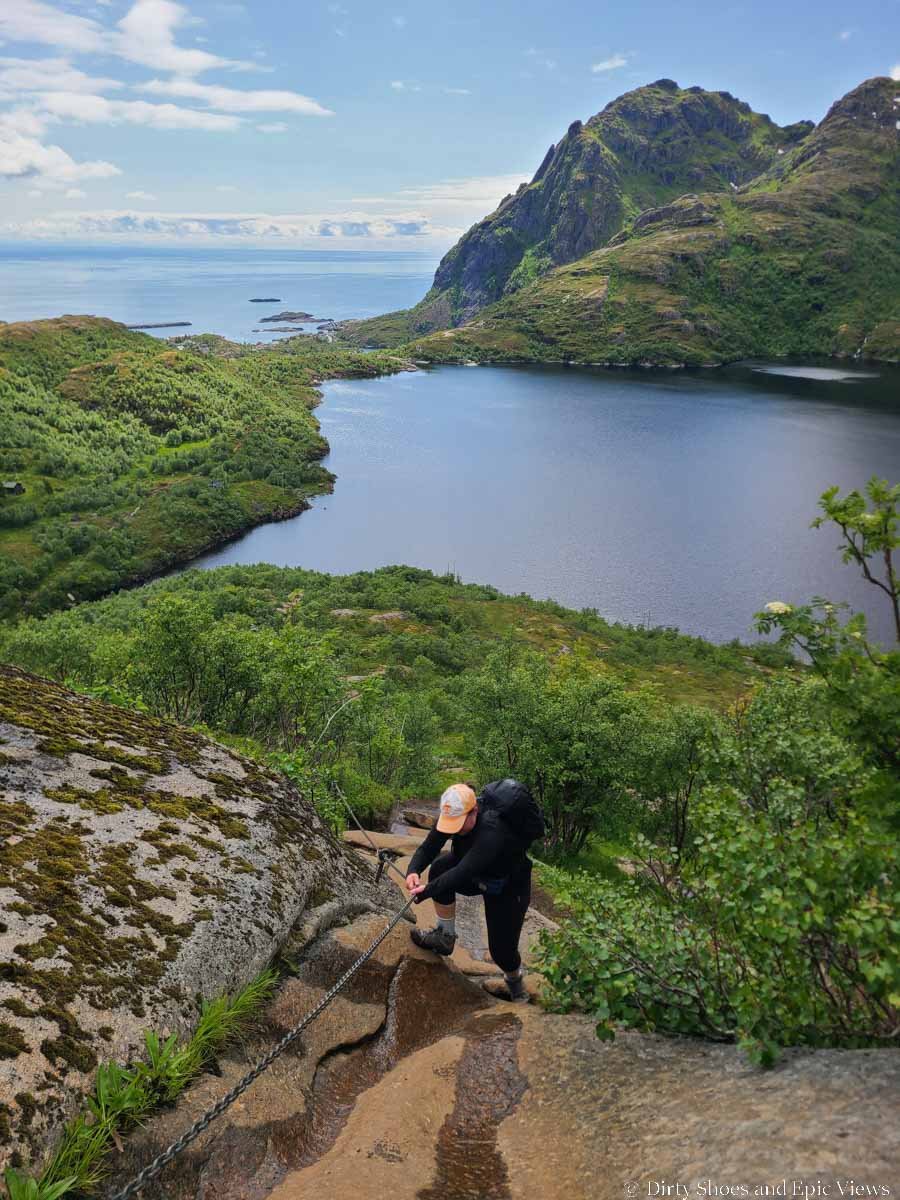
Using the chains to navigate some slick portions of the trail

The way down the chains was a bit trickier!

Enjoying the views as we descended back down the chains at the end of the day!
The last bit of chains before topping out
To make the chain section even more challenging, this lower half of the Munkebu Hut hike was actually quite buggy, and trying to pull yourself up steep rock using chains while getting swarmed by bugs was not too fun!
Once past the chain section of trail, we topped out onto the granite hump we were climbing to wide open views over lakes, mountains, and waterfalls, and we really felt now that the hike was getting good!

The awesome views from the top of the chain section on the way to Munkebu Hut
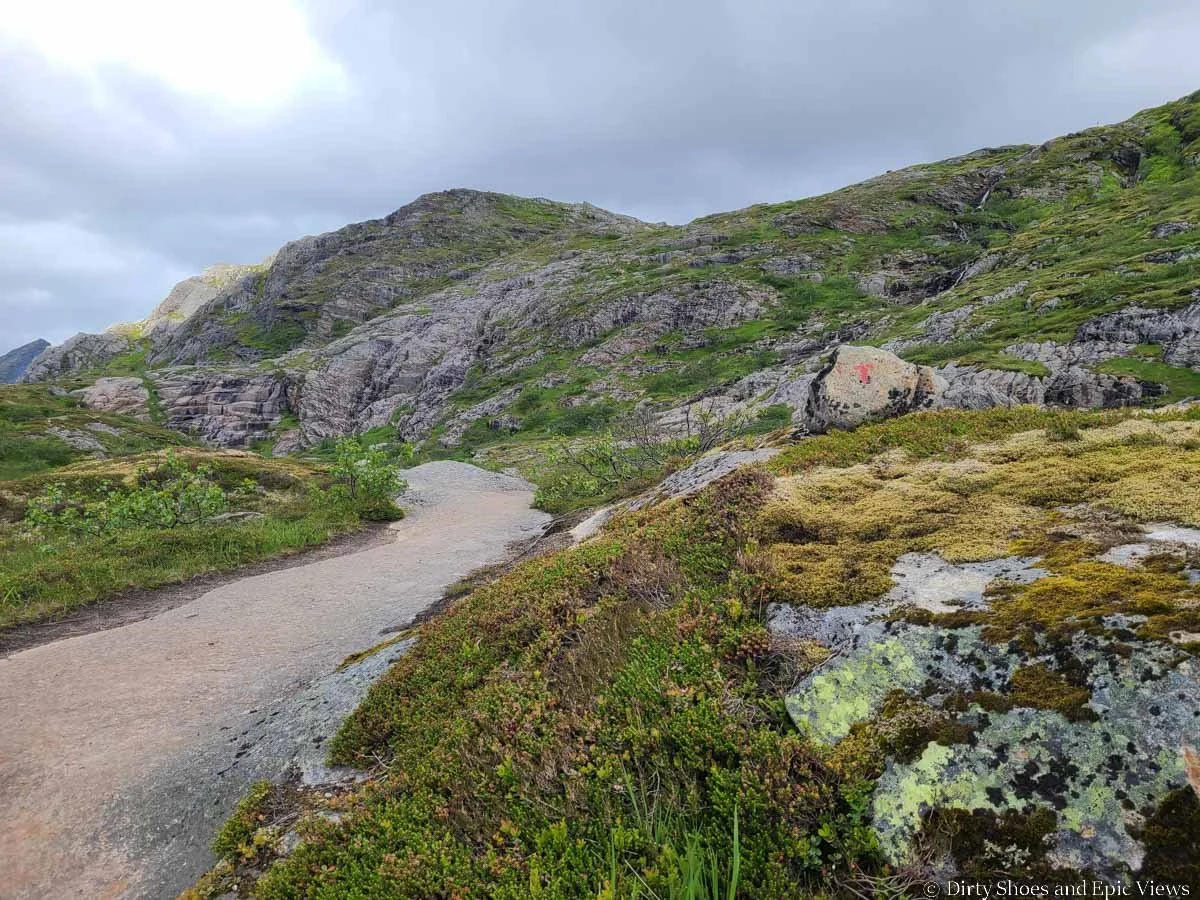
Thankfully up here, we also started seeing more rock cairns to keep us on track.
From here, the trail levels out again as it weaves its way through a rocky meadow-like landscape. You’ll hike along a mix of wet rock and muddy herd paths, and occasionally the trail can get a bit rugged. It sometimes got a little confusing when a bunch of herd paths attempted to navigate around particularly muddy sections of trail, but just keep your eyes out for the occasional cairns and red “T”s.

From here, you can see the trail continue through the meadow ahead before the next big climb of the hike

The Munkebu Hut trail can get pretty muddy and rugged

Some rugged sections of the Munkebu Hut trail

Walking by small tarns and mountain views on the way to Munkebu Hut
About an hour and a half into our hike, we came to an actual trail sign (finally!) that pointed us up the next big climb of the hike to Munkebu Hut. At this point, we were just 2.3 km away. Here, there was a faint trail that went left to explore more of this lake basin, but head right to keep following the main trail up to the hut.

The trail sign points the way up a ricky path alongside the waterfall
From the sign, the trail begins a steep and rocky ascent, at first alongside a small waterfall. There are several cairns here that will keep you on track during the climb.
As you climb, you can glance back over the landscape that you just hiked through, a beautiful green basin dotted with small tarns. And about halfway up this climb, another larger lake with a waterfall streaming down the cliffside comes into view.

This part of the Munkebu Hut hike is steep and filled with loose rock and dirt

The views really open up and you can see the trail that you’ve hiked below

More lakes come into view!
The trail continues climbing steeply up mostly granite slab and loose rock until it finally tops out over gorgeous views of another alpine lake. You can also see back towards the ocean and the series of lakes you’ve already hiked by. From this higher perspective, it’s hard to tell, but each of these lakes is tiered and at completely different elevations, which is really neat!

Beautiful lake views

Looking back towards Sorvagen and the ocean
You’ll get a very short reprieve from climbing through here, but ahead is the next (and final!) hill you’ll have to conquer on the way to Munkebu Hut. The top of this final climb is Djupfjordheia- the summit of the Munkebu Hut hike.

Looking at the final climb of the Munkebu Hut hike
As you hike through this flat area, you’ll have great views of Merraflestinden and the trail that runs along its slope. If you decided to hike to Munkebu Hut via Merraflestinden, this is the trail you’ll be hiking down to meet back up with this main trail to Munkebu Hut, jut before this final climb up to Djupfjordheia.

Looking back at the trail to Merraflestinden
And finally, your last big ascent on the Munkebu Hut hike begins. It’s another steep climb, but this time more dirt than rock.
On the way up, a view opens up to the right over Djupfjorden and the bridge on the E10 that connects Moskenes with Reine.

Climbing the final hill on the way to Munkebu Hut

The view over Djupfjorden
We reached the top of the climb on Djupfjordheia, marked by a large summit cairn, in just over two hours after we started the hike. The panoramic views up here were incredible, and we stopped here to rest, take it all in, and eat some trail snacks. Up here, you are surrounded by views of jagged peaks, and now you can see for the first time the tiered alpine lakes that sit just behind the hut- this is the view that makes the Munkebu Hut hike so picturesque and iconic, so it got us excited to keep going!

Views from the top of the climb

The view of the lakes near Munkebu Hut!
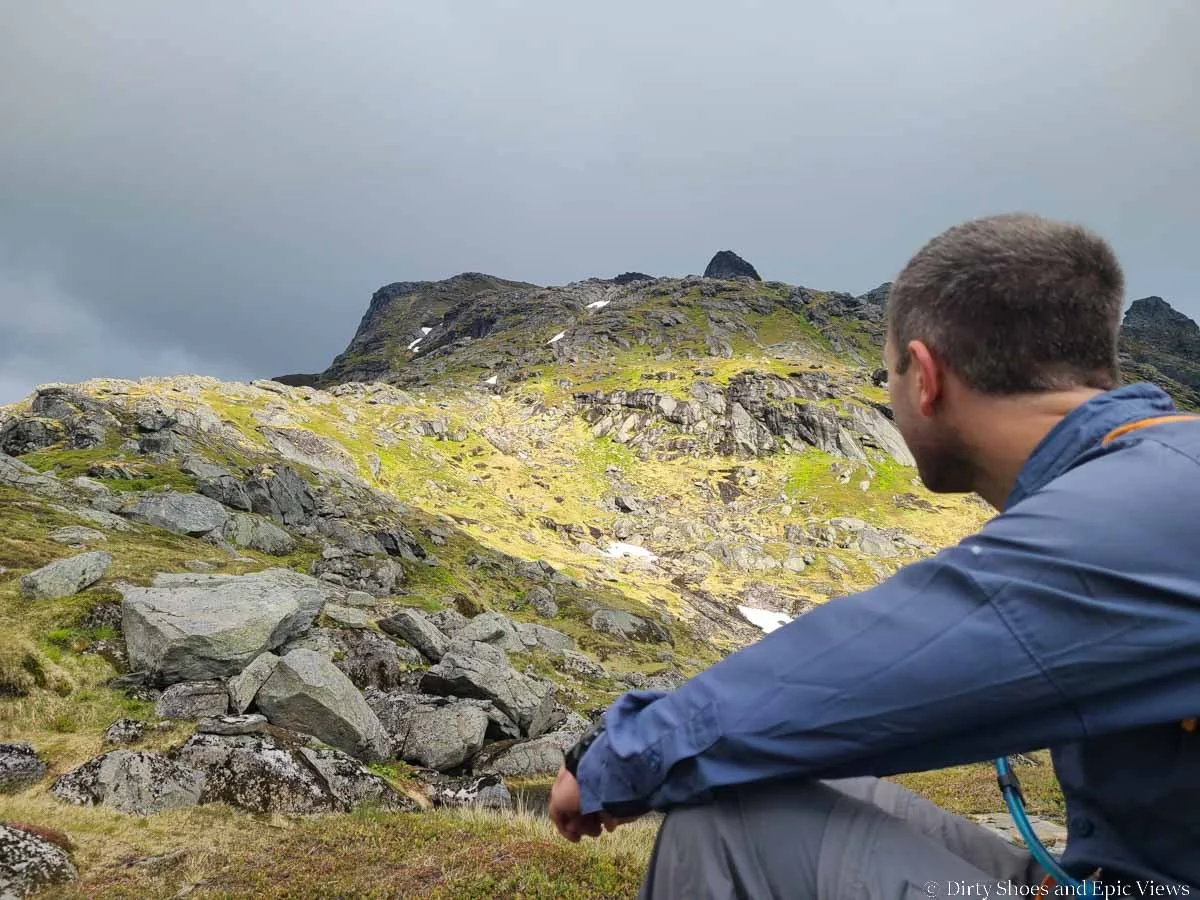
From up here, we looked around and wondered where Munken was. We weren’t sure what it actually looked like from below and we kept making our guesses. In particular, there were three semi-close pointed peaks, and we kind of kept joking to eachother that one of those was Munken (in reality, we thought there was no way- they did not look hikeable without climbing gear!). I remember distinctly telling Kevin, “If one of those is Munken, we are not climbing it- sorry!”.
Well, turns out, the joke was on me, because one of those was indeed Munken! The leftmost of the three jagged peaks was Munken, which I never would have guessed because it looked so formidable and imposing from this angle! And while the actual true summit of Munken is indeed only accessible with climbing gear and experience, the “North Top”, or the flat ridge just below the summit (to its left) was what we were shooting for. Even still, from this angle, it seems pretty daunting! But of course, we didn’t know at the time, so we carried on naively.

Munken is the leftmost peak! The hike will take you to the flat ridge just below it on the left.
From Djupfjordheia, the hike down to Munkebu Hut was a pretty gradual and easy-going descent on mostly narrow dirt herd paths through the rocky meadow. As we mentioned previously, somewhere shortly after descending off the summit there should be the start of a herd path that climbs directly to Munken from here. We weren’t explicitly looking for it, but we don’t remember seeing any obvious trail split or indication of one, so keep your eyes peeled if you are looking for it, and take note of any rock cairns in the distance that head toward Munken.

Making the easy descent to Munkebu Hut
Instead, we continued to follow the occasional rock cairns and red “T”s down to Munkebu Hut, and before we knew it, the scenic hut came into view. There was still some lingering snow around here in early July, and we crossed two small and easy snow patches en route. In less than a half hour from the Djupfjordheia summit, we had made it to Munkebu Hut.

The final bit of hiking to get to Munkebu Hut…can you see it in the distance?
Munkebu Hut sits right along a small lake beneath the slopes of Munken. There’s lot of room to explore here, and there are gorgeous views over the tiered lakes that sit behind the hut.

Munkebu Hut

Epic views from Munkebu Hut!
The hike back
We followed the same trail from Munkebu Hut back to the trailhead. It starts with a gradual climb back up to Djupfjordheia (we had descended down to the hut a lot more than I realized coming in, but luckily it’s gradual so not a bad climb back up!).

View from the hike out from Munkebu Hut
From the high point, you’ll start your long descent back to the trailhead. It’s just a lot of steep and rocky downhill from here and by the end, it seemed to go on for a while. The chain section in particular was a bit challenging on the descent, as the rock was quite smooth and slick and the chains were definitely needed for balance and stability.

Looking out over the lakes from the top of the chains

Descending the chains on the way back from Munkebu Hut
It’s worth it here to note that at the bottom of the first chain section, us and another couple got off trail (we were following what felt like the obvious way to go, but there are a network of herd paths sometimes that navigate the terrain differently). We ended up unknowingly bypassing the second chain section by taking a random herd path but then had to descend a sketchy boulder back down to the main trail. But other than that one minor detour, it was a pretty straightforward descent back to Sorvagen.
The Hike to Munken: Trail Description and Our Experience
Munken looks a bit intimidating from below, but trust us when we say it really isn’t that bad when climbing from Munkebu Hut. It’s steep, but it’s very doable.
As we sat near Munkebu Hut, we looked up towards Munken, watching some small ants make their way up the mountainside. They seemed to be making good time going up, so that gave me the motivation I needed to get started.
Sitting near Munkebu Hut and looking up at the climb towards Munken. The peak of Munken is peering out but the ridge that we hiked up to isn’t quite visible from here.
An obvious dirt herd path leaves from behind Munkebu Hut and turns to head in the direction of Munken. It really doesn’t take too much climbing before you can look back and get a very picturesque view back over Munkebu Hut, its nearby lake, and the surrounding mountains.

Look for this dirt path just past Munkebu Hut to start the hike up to Munken


Getting beautiful views back down over Munkebu Hut
The trail to Munken starts off not too steeply at first, but then after not too long, you’ll be climbing a steep and semi-rugged path up the mountain. There are occasional particularly muddy and/or rocky sections to navigate, and sometimes we did have to use our hands to maneuver up in some places, but we wouldn’t say any of it is a full-on scramble.
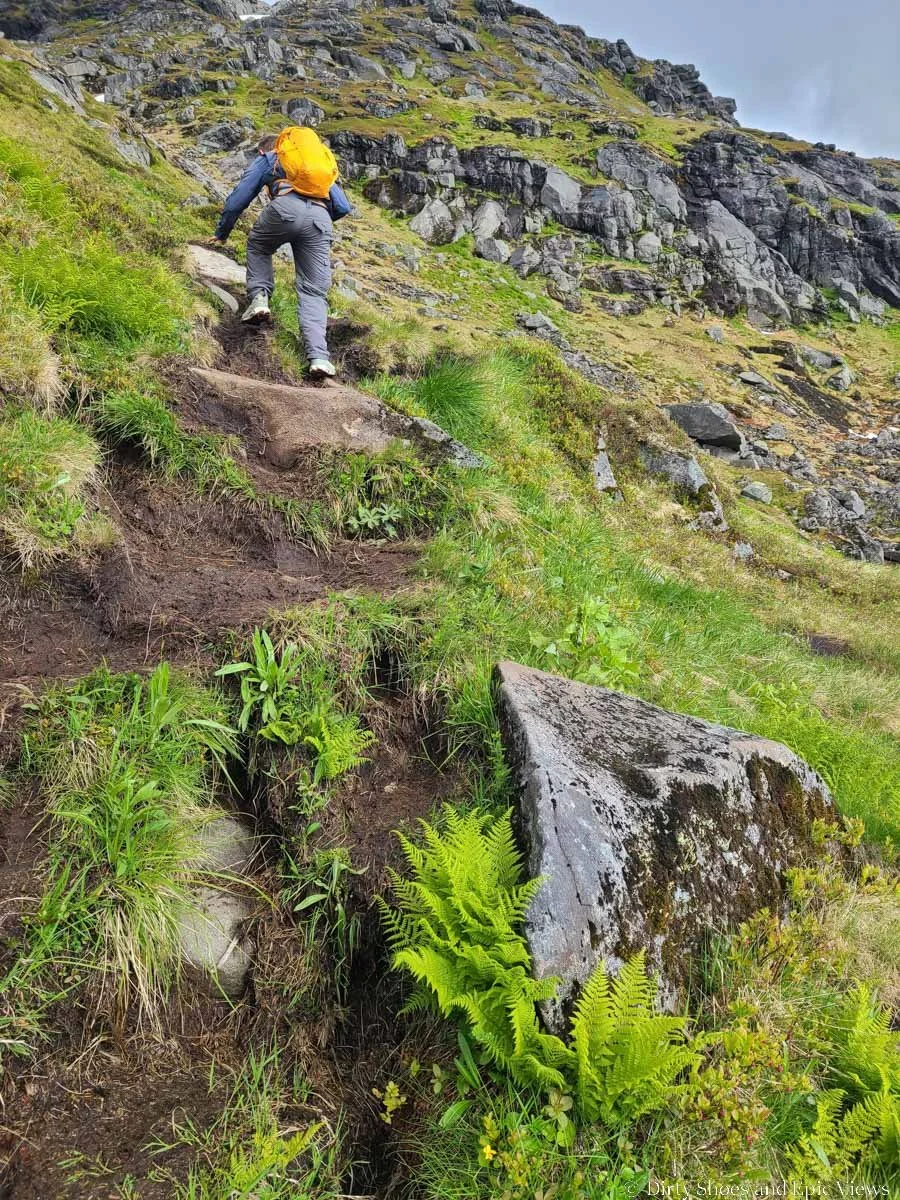


The hike to Munken can get pretty rugged, muddy, and steep


But no matter how steep or exhausting the climbing gets, the views that are opening up behind you will certainly keep you motivated. These views are absolutely incredible up here. You can see the tiered lakes with their waterfall in between, and the expanse of mountains around them. And as you climb even higher, more hidden tiered lakes come into view below. The views to the South (from where you hiked in) also open up, and it’s just a sea of lakes and peaks all around.

Epic views from the hike to Munken!

Climbing the rugged steep and trail to Munken
The trail makes a continuous and steady rugged climb up rock, dirt, and mud, and it doesn’t really let up until the top, so the hike to Munken is really just a slog, but so worth it! Overall, it is a pretty obvious trail to follow, with semi-frequent cairns to keep you on track.
About halfway up the climb, there were some nearby snow patches and some small tarns alongside the trail. We think that somewhere in here is where the direct route to Munken meets up with this trail, although again, we didn’t see any clear junction. Looking back, we do notice a path of footprints through the snow patches in this area that may be the start of this direct route, but we can’t be sure. So if you want to take this route on the way back down Munken to shorten your hike back by a bit, keep your eyes peeled very carefully for any signs of a herd path or rock cairns marking the alternate trail.
The top part of the hike to Munken becomes a rockier, but still exhaustingly steep, climb to the top. I definitely took a lot of microbreaks during the climb, with the excuse that I just wanted to enjoy the phenomenal views.


Nearing the ridge at the top of Munken!
As you get closer to the top, you’ll begin to get glimpses of the sea of jagged peaks on the northern side of the islands as sort of a preview of what’s to come when you summit!

Catching glimpses of the mountain views on the other side of Munken!

Almost there!
We reached the saddle of Munken just over an hour after we started from Munkebu Hut. Once you crest the saddle, to the right is the true summit of Munken (reached only by rock climbing), so you’ll want to turn left and walk across the relatively flat ridge out to Munken’s North Top, marked in the distance by a large rock cairn and pole.
There was still a decently sized and slick snow patch up here in early July, but nothing that was impassable, thankfully.

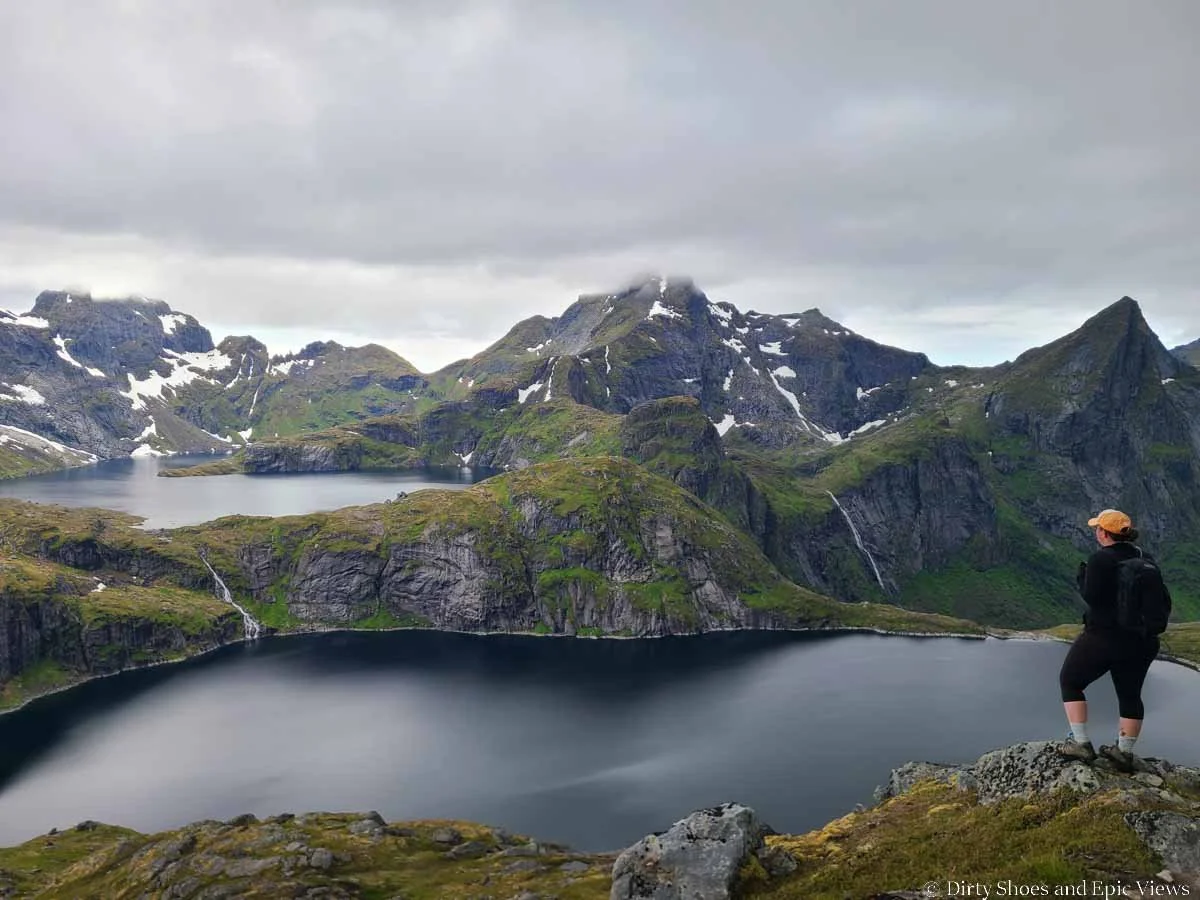
Cresting onto the ridge of Munken, with the true summit in the background. Here, you can also see the stretch of lakes that you passed on the hike in, and the ocean in the distance where you started your hike!

Hiking the final bit of trail to the summit of the North top of Munken, marked by the large cairn and pole
Once you reach the far side of this ridge after just a few minutes of final hiking, the panoramic views open up and they are truly jawdropping. On one side, you get to look over the branches of Reinefjorden (the fjords that jut into the island from Reine’s rugged coastline) and the sea of dramatic mountains that surround them.
On the other side, you can look over the epic interior of the Lofoten Islands and see a handful of tiered lakes surrounded by rugged alpine peaks.
From up here, you’re able to get a peek into Lofoten’s wild interior, but also still be able to see the ocean on both sides of the island- it’s pretty cool!

Staring out over the epic fjords and jagged peaks of Lofoten from the top of Munken!

The views from Munken are incredible!
This North summit of Munken is actually a pretty big area, and we only shared it with one other couple for just a short amount of time before we had it to ourselves! It was really refreshing to get to experience a quieter hike on the Lofoten Islands during an otherwise busy summer season.
After running around, taking pictures, and checking out all the views, we sat for a bit to enjoy the view and eat our lunch, but it unfortunately was actually hard to stay up there for too long. A wall of clouds had moved in over the mountains and it got quite cold up here, so after about 45 minutes or so of being at the top, it was time to make our way back down.
The way down from Munken to Munkebu Hut was a little bit trickier than the way up. Especially towards the bottom, there were some slick slabs and steep muddy sections that weren’t too hard on the way up, but they required some agile maneuvering to get down. Overall though, it’s just a steady and steep descent back down to Munkebu Hut which took us just over an hour to complete.

Hiking back down from Munken can be a bit tricker as you try to navigate the sometimes muddy and slick parts of the trail
The Best Time to Hike to Munkebu Hut and Munken
The best time to hike to Munkebu Hut and Munken is the summer months between mid-June through August (and possibly into September). In the more shoulder season months of that timeframe (June and September), snow may be on the trail, so be sure to check recent reviews for current trail conditions. When we were in Lofoten in early July, we were told that just a few weeks prior, people were reporting the Munken trail impassable due to snow. However, by the time we hiked it, there were just a few small and easily passable snow patches.
Summers on the Lofoten Islands are typically pretty nice, especially in May, June, and July. We visited Norway expecting to have plans frequently thwarted by rain and bad weather, but it was actually the complete opposite in early July! We had near perfect weather. When we asked locals if this was normal for this time of year, all of them confirmed that it was. You may get passing showers or the occasional rainy day, but in general, summers seem to be pretty nice here with generally stable weather!

Clear skies over Munken in July!

We did have some low-lying clouds over the mountains during parts of our hike, but we stayed dry!
And to really maximize your time in the Lofoten Islands, visit between the end of May and mid- July to experience the midnight sun! Because the Lofoten Islands lie in the Arctic Circle, the sun stays above the horizon for roughly 6 weeks in the summer, meaning you literally have 24 hours a day to hit the trails (though we do recommend sleeping here and there!). It’s great, though, for working around bad weather, or squeezing in a long to do list in a short amount of time. We didn’t get off the Munkebu Hut trail until 10:30 pm, and it was still so light out!
Where to Stay Near the Munkebu Hut Hike
Sorvagen is the most ideal place to stay to hike to the Munkebu Hut and Munken. If you stay right in town, you can easily walk to the trailhead and avoid the hassle of parking (this is what we did!).
Sorvagen is at the perfect location right at the base of the Munkebu Hut/Munken hike
However, the popular towns of Reine and Hamnoy are just about a 15 to 20 minute drive away. The town of A, which is the last town along the Lofoten Islands, is about 5 a minute drive away as well.
You could technically stay anywhere along the Lofoten Islands as a base- it just depends on how much driving you want to do. The town of Svolvaer, which is on the eastern edge of the Lofoten Islands and is a common point of arrival via its airport, is about a 2 hour and 15 minute drive from the Munkebu Hut trailhead on the western edge of the islands. However, the hike to Munkebu Hut and Munken is long, so that would make for a very long day and we’d recommend staying closer for this hike.
Camping on the Lofoten Islands
Lots of people love camping in Norway because of the freedom it gives you to move around, be flexible, spend more time in nature, and wake up to stunning Norwegian scenery. Camping is also pretty convenient in Norway because they follow a principle called Allemannsretten, or the Right to Roam, meaning that in general, hiking and camping is allowed in most places, not just in designated or paid areas. There are tons of places you can find to camp (for free!) on uncultivated land throughout the Lofoten Islands, but with increased use and tourism to Norway, it’s extra important to be aware of any rules and regulations regarding free camping.
Check out this website for more information about the do’s and don’ts of where to camp on the Lofoten Islands, proper camping etiquette, and to find more information on designated campsites which are recommended over wild camping at road pull-offs and one-off spots (simply to help preserve the landscape and prevent damage from overuse and overtourism). If you do choose to wild camp, please be sure to not set up within 150 meters of any building or cultivated land, respect any signs, and please leave no trace! Following these rules will help keep camping and the Right to Roam accessible to everyone in the future.
Can you stay overnight at Munkebu Hut?

Munkebu Hut
In the past, Munkebu Hut was open to overnight stays. It is run by the Norwegian Trekking Association, and to stay there, at least one person in your group needs to be a member, and there is also a nightly fee. Advanced booking is required here.
However, the Munkebu Hut is currently closed to overnight stays due to increased misuse and vandalism of the cabin- so sad and unfortunate! Hopefully in the near future it will open back up, so be sure to check the website above for updated information, and if you do decide to stay, please be respectful of the hut and its surroundings and practice leave no trace principles.
Can you camp near Munkebu Hut?

An epic campsite near Munkebu Hut
We mentioned the Right to Roam above and how camping is generally allowed in most places in Norway, with some rules and restrictions in place to protect local property and preserve the landscape from overuse. Check out this map of where restricted camping areas are on Loften, and particularly along the hike to Munkebu Hut.
There is also some information at the trailhead about wild camping in the area. If you zoom in the map linked above, you can see that the area around Munkebu Hut has some restrictions, saying that camping “might” be forbidden here as you are not supposed to camp within 150 meters of an inhabited house or cabin. I’m not sure if Munkebu Hut would be considered part of that restriction, and we certainly saw plenty of tents set up nearby the hut. It might be best to check with the Tourist Center in Reine just to double check where it’s okay to pitch a tent before heading out for the night. We will also say to just be mindful of camping too close to the water sources which are used as drinking water.
Tips for Hiking to Munkebu Hut and Munken

Here are some of our final tips for hiking to Munkebu Hut and Munken on the Lofoten Islands!
Don’t hike in rainy or wet conditions. The Munkebu and Munken hikes are not ones to be on in bad weather. The trail can get overly muddy, and the slick rock on various parts of the trail can become overly challenging and potentially dangerous. Most of the hike to Munkebu Hut and Munken is also completely exposed to the elements, so don’t go if thunderstorms are in the forecast. We found that YR was usually the most reliable forecast for the area.
Wear good hiking boots with traction and waterproofing. There is a lot of slick rock and mud on the trail to Munkebu Hut and Munken.
Consider bringing hiking poles. We typically don’t hike with them, but I can see how they would be very useful on the hike back down, as the descent is long and steep.
Study the route ahead of time. As we’ve mentioned, there are a few different trails to Munkebu Hut and Munken, and the path sometimes isn’t that well-marked or signed. Read a few accounts, take a picture of the map at the trailhead for reference, and we also recommend checking out a guidebook at the Reine Tourist Center to get a better idea of where you need to go on the trail (especially if you want to deviate off the standard path we described above).
Stay on the trail. While Norway does have the right to roam, with increased tourism and trail use it is encouraged to do your best to stay on the designated trails and avoid creating new paths to better preserve the landscape. It sometimes might be hard to do on the Munkebu Hut hike as you’re trying to find your way, but you’ll be able to see firsthand what all the different herd paths does to the landscape while on this trail.
Have bug spray and sun screen. The bugs can be quite annoying on the bottom half of the hike to Munkebu Hut so bug spray might help. And as we’ve said, this trail is almost totally exposed so be sure to have sun protection.
More Lofoten Islands Guides
Heading to the Lofoten Islands and looking for more things to do after the Munkebu Hut hike? Be sure to check out all our Lofoten Islands guides!
The Complete Guide to the Lofoten Islands: How to Visit and Things to Do!
How to Hike to Reinebringen: The Best Hike on the Lofoten Islands
The Ryten Hike on the Lofoten Islands: Complete Guide and Tips
Do you also want to explore the southern fjords of Norway? We have lots of tips and guides on that as well!
The hike to Munkebu Hut and Munken was definitely one of our favorite hikes on the Lofoten Islands to avoid the crowds and get epic scenery. Let us know if you have any questions on hiking to Munkebu Hut or Munken, we’d love to help!