The Skyline Divide Trail in Washington: Mount Baker’s Best Day Hike
Looking for one of the best day hikes near Mount Baker in Washington? Then check out the Skyline Divide Trail in the Mount Baker-Snoqualmie National Forest! This moderate trail is jam-packed with amazing in-your-face views of Mount Baker that rival those of the nearby National Parks, and was definitely one of our favorite hikes in the Mount Baker area. In this guide, learn everything you need to know to hike the Skyline Divide Trail in Washington, including how to get there, what to bring, and what to expect on the trail.

Mount Baker is a picturesque glaciated volcano and the third highest peak in Washington State, yet it is often overlooked thanks to the more popular nearby National Parks, including Mount Rainier and North Cascades National Parks. However, the Mount Baker area has endless hiking opportunities filled with epic views of mountains, meadows, and wildflowers, meaning you can get an experience here that rivals the nearby National Parks but without the crazy crowds. Sign me up, right?
While there are tons of trails in the area, one truly stood out to us for its amazing views of Mount Baker…the Skyline Divide Trail.
The Skyline Divide Trail in Washington feels like something out of a Bob Ross painting, with picturesque views in every direction once on the ridge. It’s a moderate trail that starts off climbing quickly through the forest, but when you emerge from the trees and get onto the ridge, you’ll immediately see why that climb was worth it. I don’t know if it’s because we had a not-so-perfect day hiking the Park Butte Trail on the other side of the mountain the previous day when Mount Baker was hiding behind a cloud, but emerging out onto the ridge and seeing Mount Baker in clear view and so up close on a crystal clear day was absolutely breathtaking.
But before you hit the trails, we want to give you all the information you need to have a great hike on the Skyline Divide Trail in Mount Baker. In this guide, we’ll go over how to get to the trailhead (it’s a tricky one!), what to bring, when to hike, and what to expect along the Skyline Divide Trail. So, let’s get to it!
In this Skyline Divide Trail hiking guide:
Where is the Skyline Divide Trail?

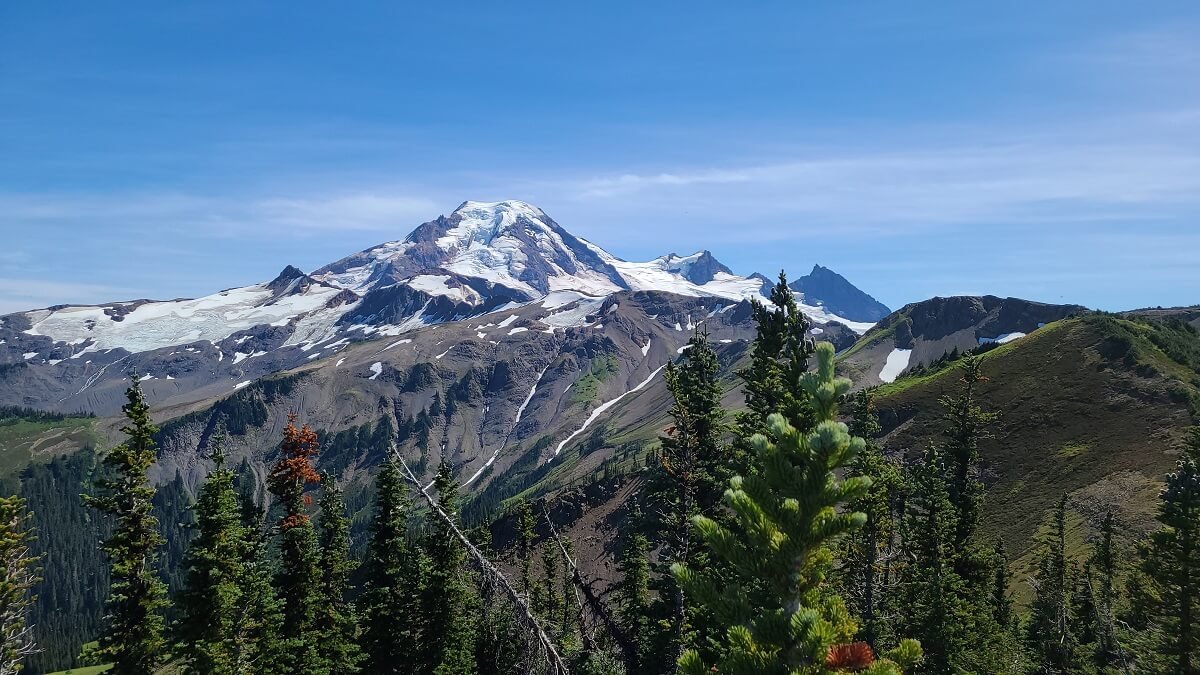
A beautiful shot of Mount Baker from the Skyline Divide Trail
The Skyline Divide Trail in Washington is located in the Mount Baker-Snoqualmie National Forest, which is part of the Cascade Mountain Range in Northern Washington State. This National Forest is about 3 hours North of Seattle and just shy of the Canadian Border. It actually sits just adjacent to North Cascades National Park, so the Skyline Divide Trail makes a great addition to a Washington State National Parks road trip itinerary!
How to get to the Skyline Divide trailhead
The main region that has many of the best hikes in Mount Baker is the Mount Baker Highway, or Hwy 542, which follows the North Fork of the Noosack River along the North side of the mountain. Several campgrounds, trailheads, and points of interest can be found along this scenic drive.
This 40 mile drive ends at Artist Point, a popular area for hiking and sightseeing. However, the Skyline Divide Trailhead is quite a bit before Artist Point, close to the small town of Glacier, which lies about half- way down this scenic road (20 miles east of Deming).
Once you pass through Glacier, you’ll take a right onto Glacier Creek Road, or NF-39, and then a quick left on NF-37. This 13-ish mile dirt road follows the Noosack River for a bit before making a turn and steeply switchbacking up to the Skyline Divide Trailhead.
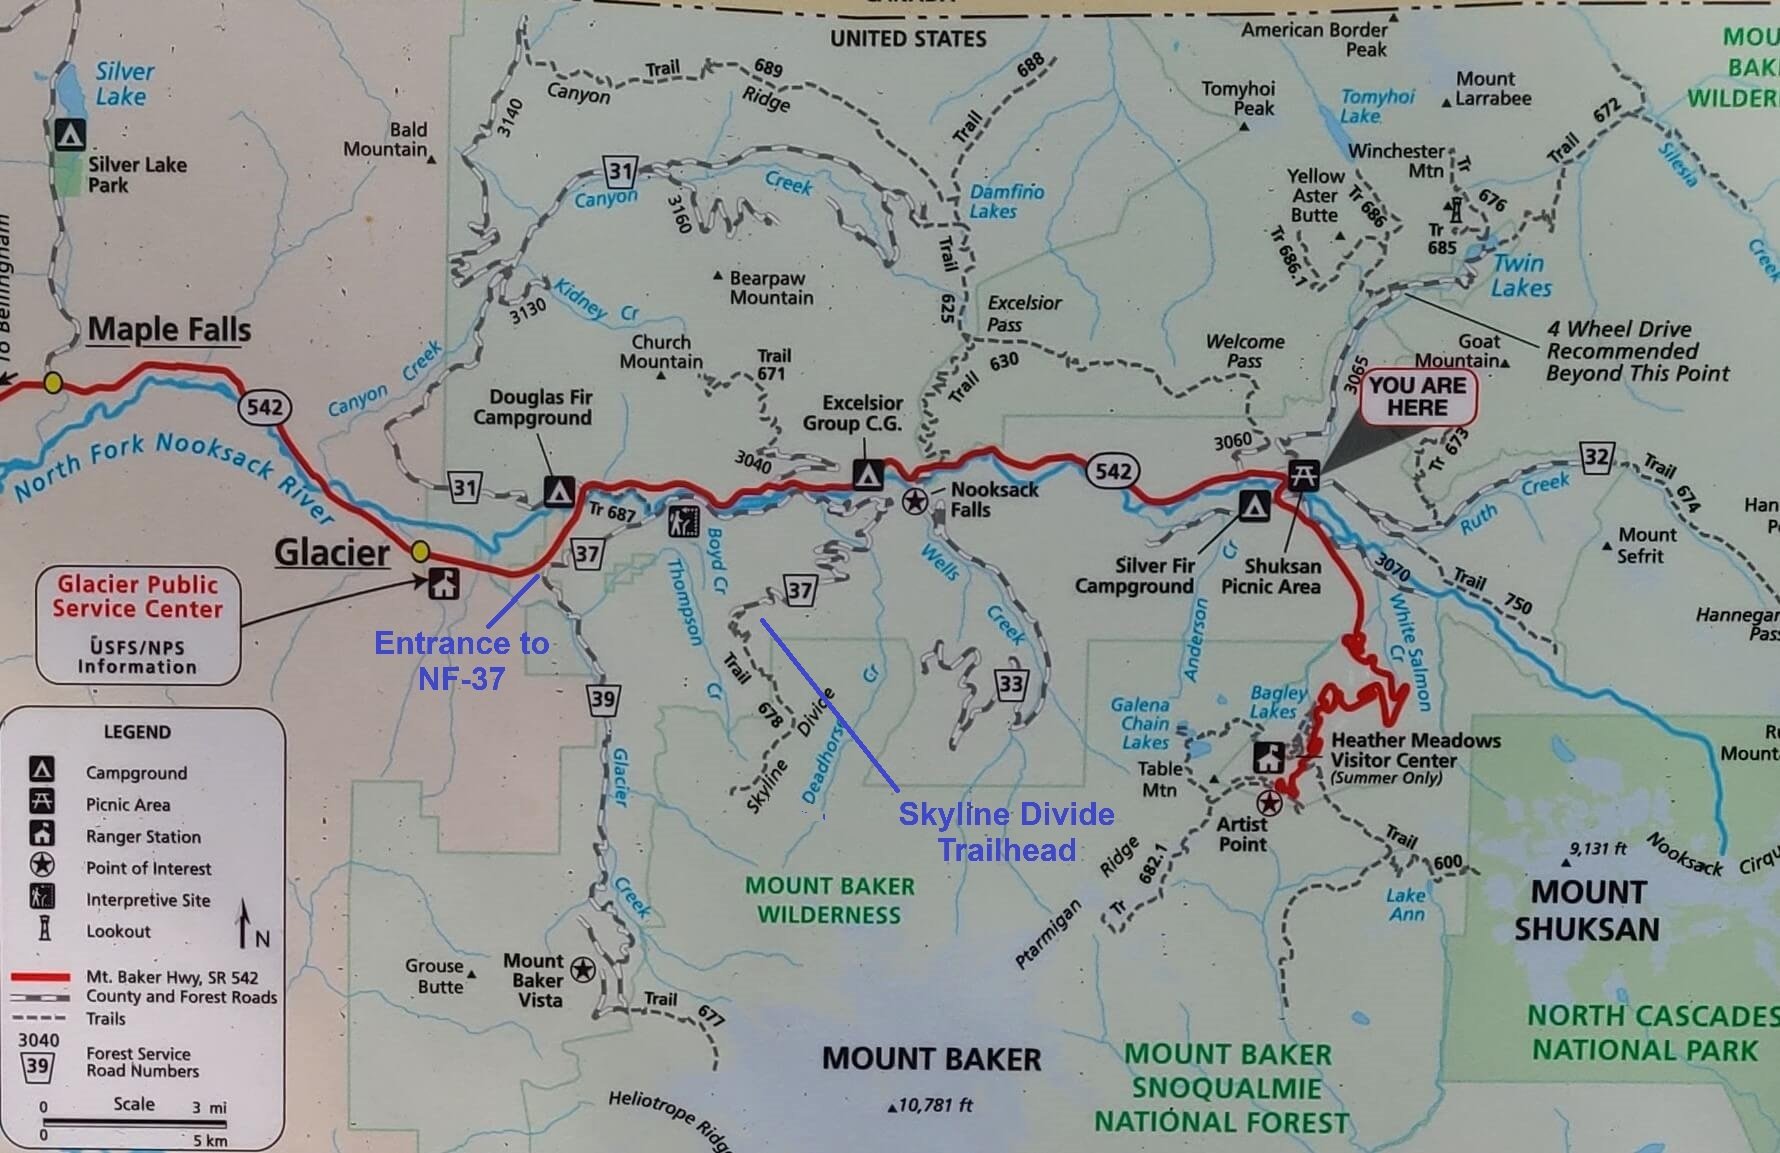
Above is a map of the Mount Baker Highway, with the NF-37 access point and the Skyline Divide Trailhead marked. The turn-off for the NF-37 route is just past the town of Glacier as you head up the Highway.
NF-37 is a rough dirt road that makes access to the Skyline Divide Trail a bit tricky. It’s rough, narrow, steep, rocky, and filled with crazy potholes, and we would highly recommend having a high-clearance 4x4 vehicle to make the drive. Even with this kind of vehicle, it still took us about an hour (which felt so long) to make the 13 mile trip because we just had to drive very slow around all the obstacles, so plan accordingly! We wouldn’t recommend taking a car up there, although to be fair, we did see some at the trailhead (not sure how they did it but kudos to them!). That said, it’s not one of those scary mountain roads with exposure that makes you feel like you’re going to fall off the side of a cliff or anything. It’s very forested, but just a rough, slow drive.
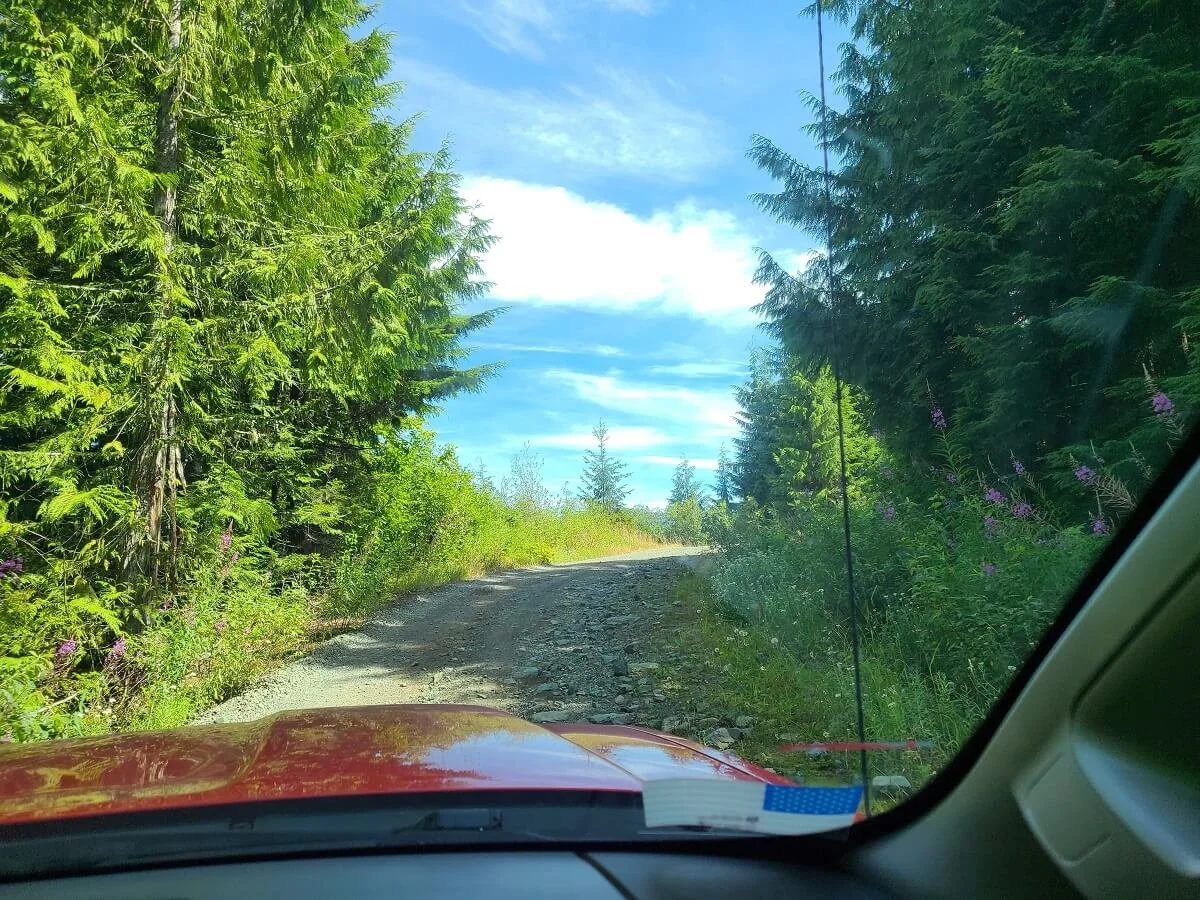
The rocky road up to the Skyline Divide Trailhead in the Mount Baker Wilderness
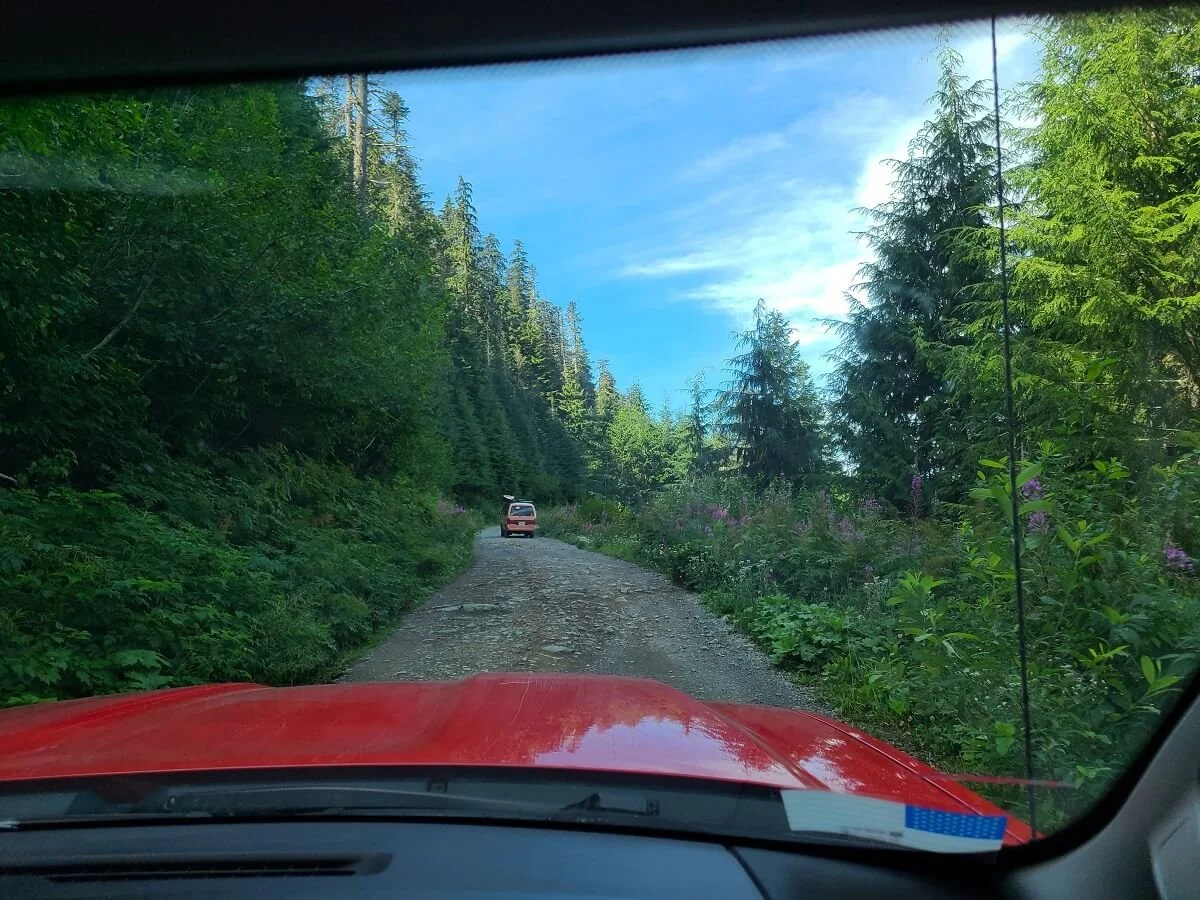
The road to the Skyline Divide Trail gets rocky and narrow as you switchback up to the parking lot.
This road ends right at the Skyline Divide Trailhead parking lot, which can hold about 20 or so cars, so it’s best to get there early, especially on a nice summer weekend. We actually got to the trailhead at noon (super late!) in the middle of the week in August and there were still a few parking spots left. There is a vault toilet in the lot (have some toilet paper on hand just in case!).

The Skyline Divide Trail parking lot
How Long is the Skyline Divide Trail?
The Skyline Divide Trail in Washington is an out and back trail where you can really go as far as you’d like before turning around because you don’t have to get to the very end to get amazing views. Towards the end, the trail sort of fades out into more of a rugged scramble route as it gets closer to the mountain and tops off at Hadley Peak. We weren’t very clear on where the Skyline Divide Trail actually ended, but we hiked as far as we felt we needed to before turning around, which ended up being about 7.3 miles roundtrip and was also where many people seemed to be breaking before turning around as well. This distance is actually pretty consistent with what AllTrails reports as well.
Here are our hiking stats for the Skyline Divide Trail in Mount Baker:
Distance: 7.37 miles roundtrip
Elevation Gain: 2,559 feet
Time: About 4-5 hours, depending on how much you stop to enjoy the views!
Trail profile:
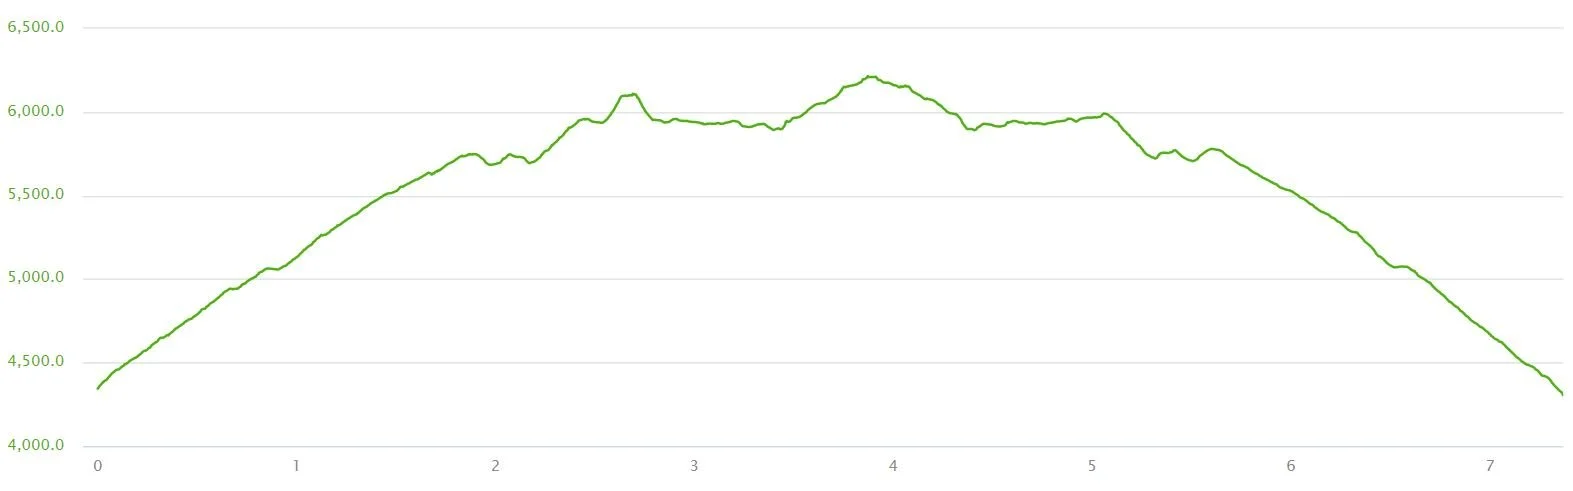
Our elevation profile of our hike on the Skyline Divide Trail in Washington
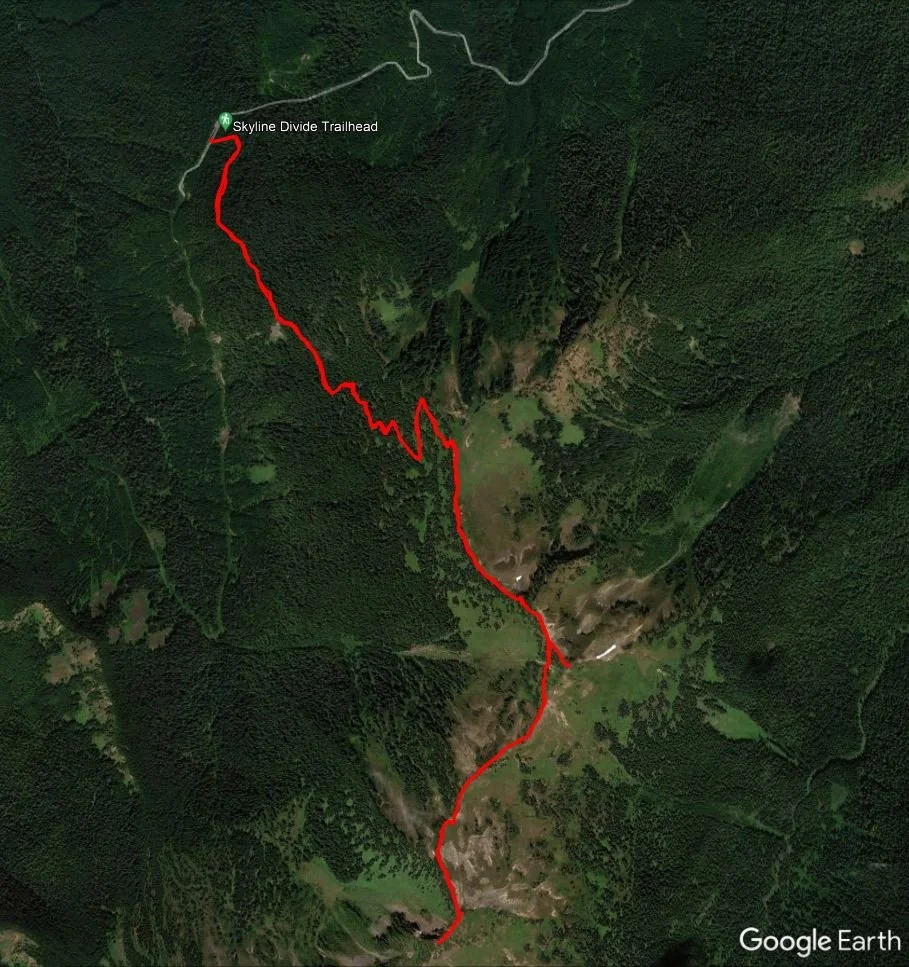
A satellite shot of our hike on the Skyline Divide Trail
How hard is the Skyline Divide Trail?
We would consider the Skyline Divide Trail to be moderate. The beginning has quite a steep and consistent climb for about two miles to get up to the ridgeline portion of the hike with all the views. The first mile or so of this hike climbs at about a 1,000 foot per mile elevation gain, which is steep! By the time you hit the ridgeline, you’ll be at about 1,400 feet of gain in just under two miles. This part is through the woods with minimal views, and you’ll likely experience an insane level of annoying bugs (more on that later!), so this part of the hike is a bit of a grind.
Once on the ridgeline, the Skyline Divide Trail definitely eases up a bit, but it’s not just a flat walk from here. The ridgeline is made of a series of small knolls, or bumps, which are made up of short but steep little climbs, both on the way out, and again on the way back. These all add up to about another 1,000 feet of climbing or so, though it doesn’t seem so bad because of how broken up the climbing is. Plus you’ll have absolutely amazing views of Mount Baker and the surrounding Cascade Mountains the entire time you’re on the ridge, which certainly helps a bit.
The rolling hills of the Skyline Divide Trail
This is the sign at the Skyline Divide trailhead which states that the hike has about 1,500 feet of climbing. I’m not entirely sure why they have that as it’s a bit misleading. The 1,500 feet really only applies to making it to the ridge where the views just only begin to open up. If you continue beyond (and you’ll want to!), there will be quite a bit more elevation gain to your hike!
Aside from the elevation gain, there really isn’t anything too difficult to the Skyline Divide Trail. It’s an easy- to- follow trail with nothing technical, except for one small section as you climb up the last bump. This part has a little bit of a scrambling element to it, but it’s a very short section. We’ll show more of this when we describe the Skyline Divide Trail below.
The Skyline Divide Trail: Our Experience
Right from the start of the hike, the Skyline Divide Trail starts quickly climbing through the forest right off the bat and doesn’t let up much, especially for the first mile, where you gain about 1,000 feet. This is entirely through the woods and without many views, but it’s mostly nice cushy trail that’s easy to follow as it switchbacks up.


The absolute worst part of this section of the Skyline Divide Trail, though, wasn’t the steepness or the lack of views. It was the bugs. If you comb through any reviews from AllTrails of this hike, you’re likely to see plenty of people who agree with me. Their reviews might seem a bit overdramatic, but believe me when I say, they are not. The bugs on this trail are no joke. For some reason, they were way worse than any other hike that we did in Mount Baker! They weren’t really mosquitos…more like giant flies that latch onto you and follow you no matter what you do to dissuade them, and then little flies that swarm and bite. We had constant buzzing around our faces and ears that I felt like I continued hearing well after the hike was over. They were pretty unbearable and made the climb up a bit miserable to be honest. Learn from our mistake and wear a bug net. You’ll thank us later.
At the top of the climb, about 1,400 feet or so up from where you started the Skyline Divide Trail, the trees will disappear and you will be weaving through a meadow of tall grass as views start to open up and Mount Baker begins to show itself.

Breaking out of the tree line with Mount Baker starting to appear!
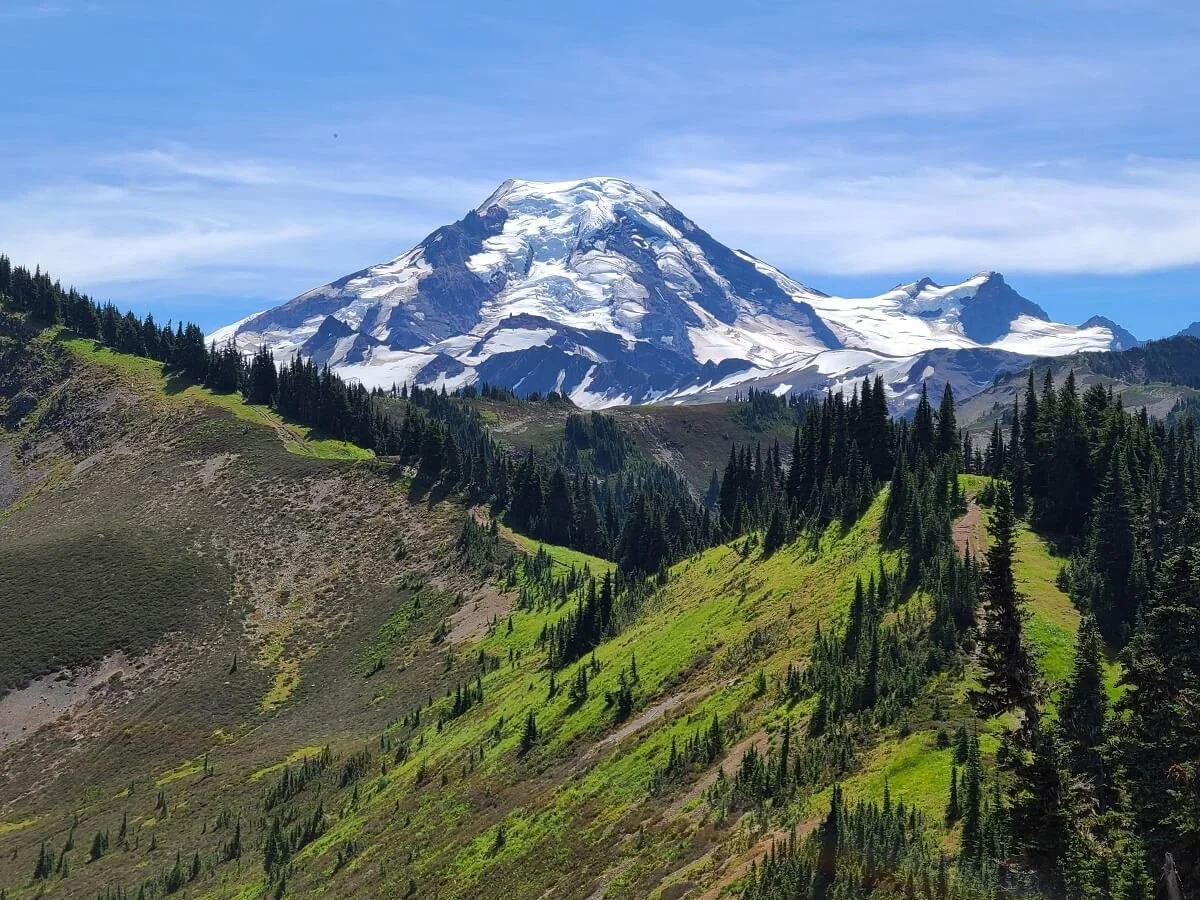
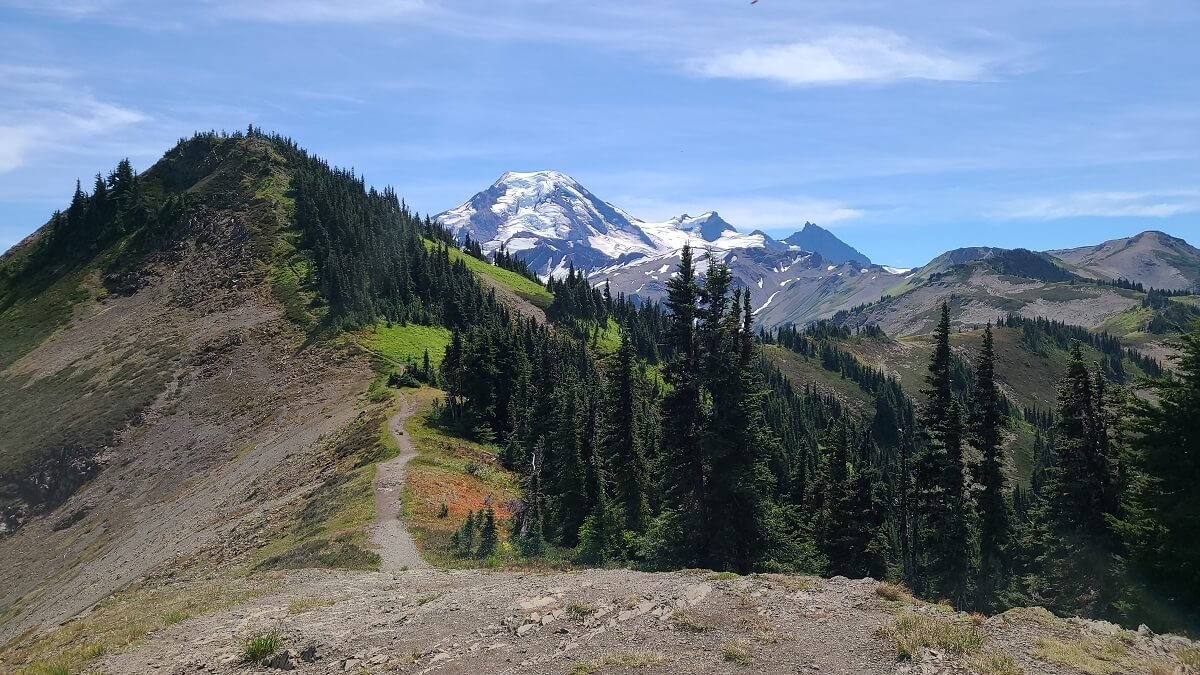
Once you officially break out of treeline and onto the ridge, Mount Baker will be right in front of you in all its glory…this right here will make all the climbing and bugs totally worth it!

Look at that Mount Baker view…not bad, huh?!
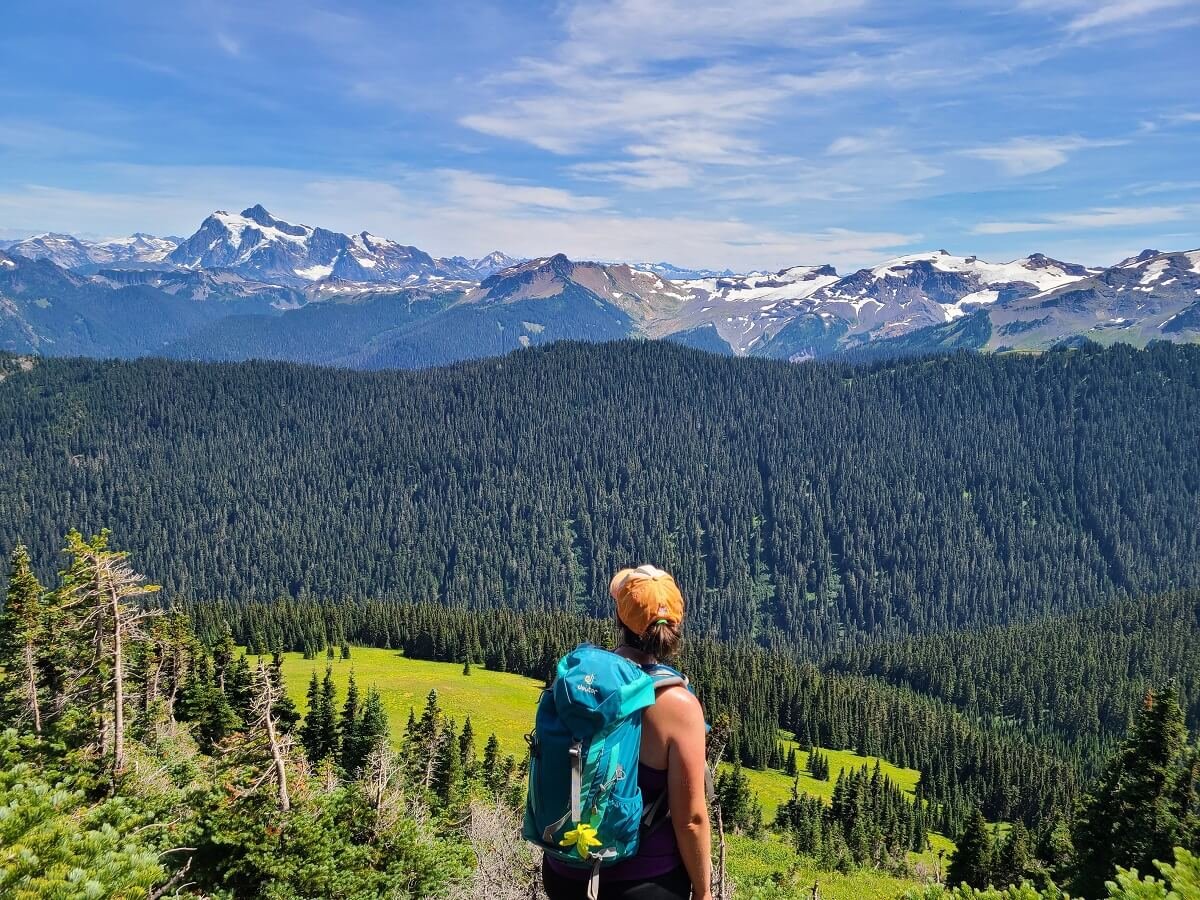
The great news is that from here, these views stay with you the entire time you’re on the ridge. You’ll even have amazing views out to Mount Shuksan and the rest of the Cascade Mountain range in the distance. And if you’re here at the right time of year, you’ll likely see lots of colorful wildflowers.
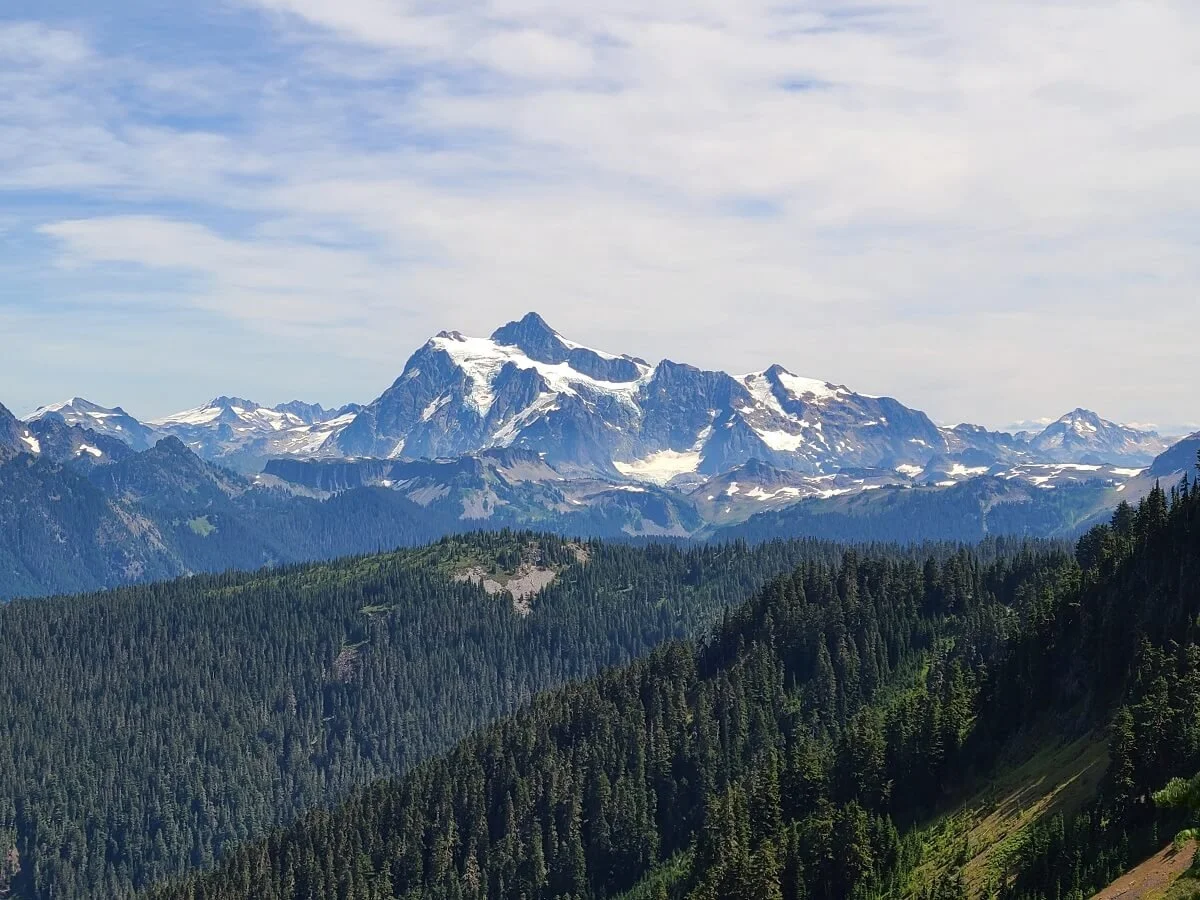
A view of Mount Shuksan from the Skyline Divide Trail
At the beginning of the ridge, you’ll see a pretty clear split in the path (you can see it in the picture above). We heard that the left fork goes to some nice designated camping spots if you’re looking to backpack. Otherwise, stay right on the path heading towards Mount Baker to continue on the Skyline Divide Trail.
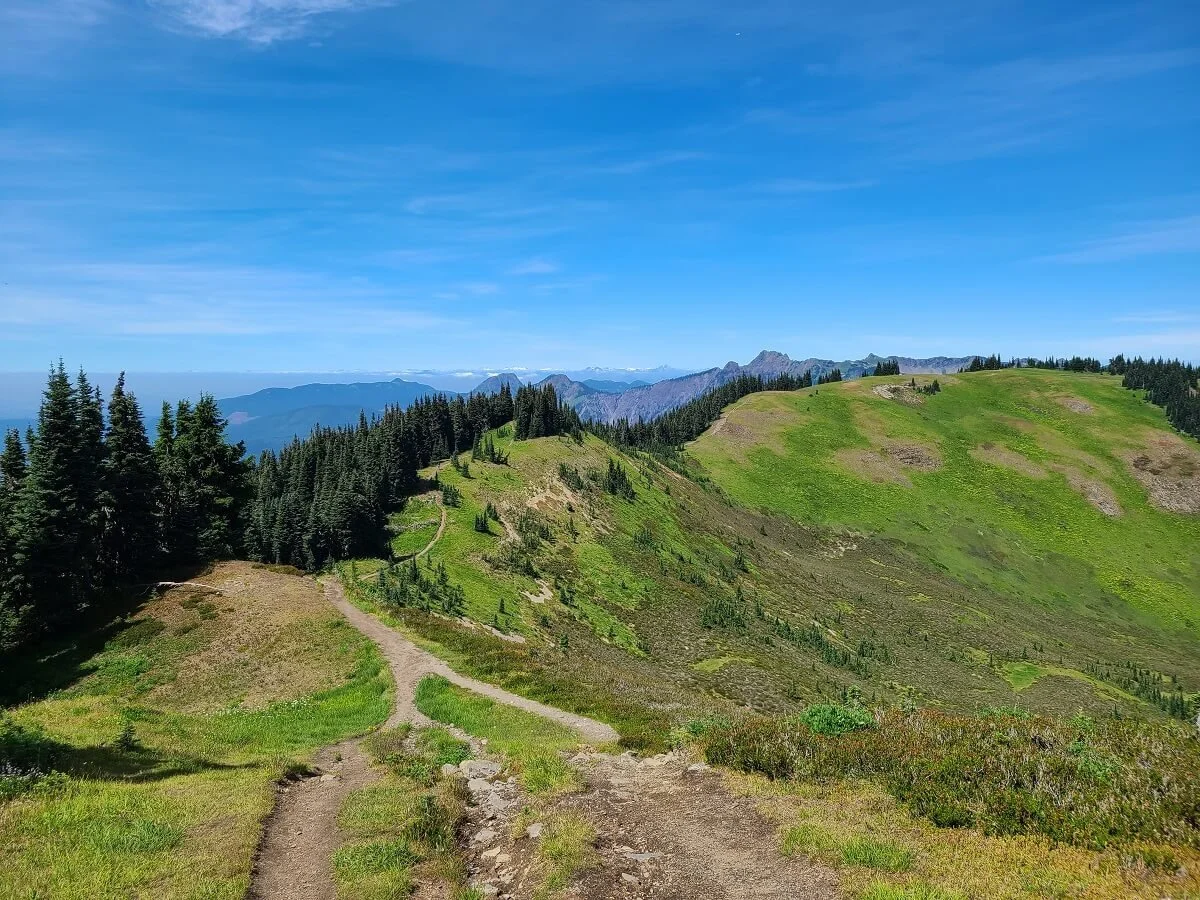
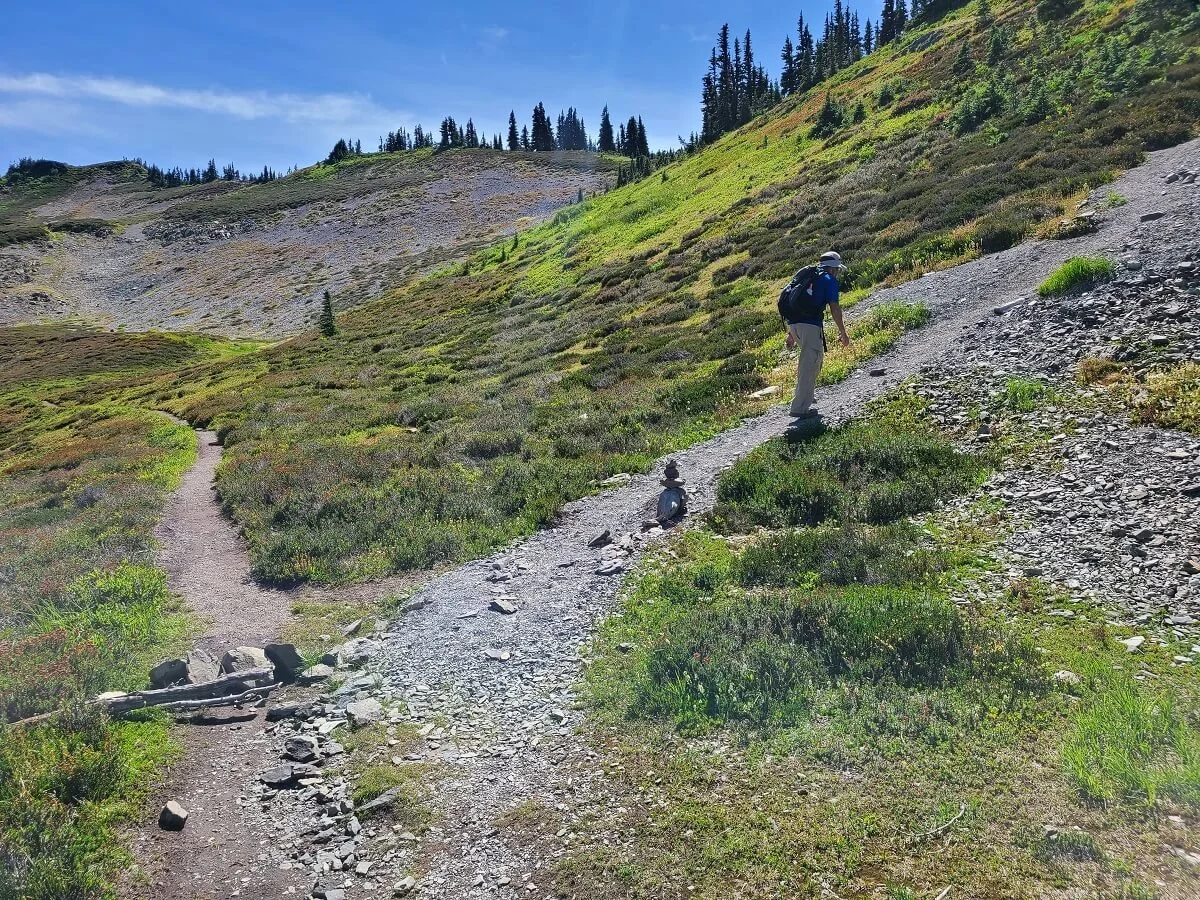
As you look ahead, you’ll see the trail sprawl out in front of you over a series of small bumps. Each of these looks small, but the paths up them are pretty steep and often involve some slippery dirt and loose rock, but nothing too terrible.

Looking ahead on the Skyline Divide Trail as it winds its way closer to Mount Baker

The Skyline Divide Trail as it climbs up and over various bumps
Looking back down the Skyline Divide Trail towards the beginning of the ridge

Non-stop views along the Skyline Divide Trail!
After the first few bumps, you’ll come to another clearly visible split in the path. The path that heads straight is a short out and back detour that goes up a very steep path to a bit of a bigger bump along the ridge. You can avoid this by taking a right at this junction instead and hug the side of this hill to continue along the Skyline Divide Trail.
Here, you can see the detour trail going up the hill ahead. If you want to skip this climb, then you can take a right just before the climb starts and go around instead.
We decided to go up this bump to see what kind of views we could get from the top. The path up this hill was particularly difficult and slippery. It was quite steep and had lots of loose footing, so it was a bit more difficult to climb than the rest of the trail had been. The views at the top were good, but not much different than what you’ll see along the rest of the Skyline Divide Trail anyway (just at a slightly higher vantage point), so if you don’t feel like exerting the extra effort to get up and down this bump, then we’d say you’re not missing much. We just enjoyed the fact that we were the only ones up here, so we sat and enjoyed the views and had a snack for as long as we could tolerate the bugs. We then headed back down the same slippery path, which was slow-going, and rejoined the Skyline Divide Trail, this time taking a left at the bottom to continue on.

Starting the climb up the hill with Mount Shuksan in the background

The slippery dirt path up the hill

The view on the way down
Views of Mount Shuksan and the Cascades from the top of the hill

From this vantage point, you can see the Skyline Divide Trail and the sprawl of the Mount Baker Wilderness
After a bit of a flat stretch with gorgeous head-on views of Mount Baker, you’ll come to another clear split in the path. This time, though, the path was marked very clearly on the way to go. The path straight ahead was blocked by branches, and there was a small rock cairn indicating that we should turn right here. Apparently heading straight will take you to another backcountry camping area along the Deadhorse Creek about a mile down. Otherwise, you’ll bear right here and take the trail that climbs yet another knoll.

The views along the Skyline Divide Trail just get better and better as you go!

Gorgeous views of Mount Baker
Following the cairn pointing us up the last hill along the Skyline Divide Trail
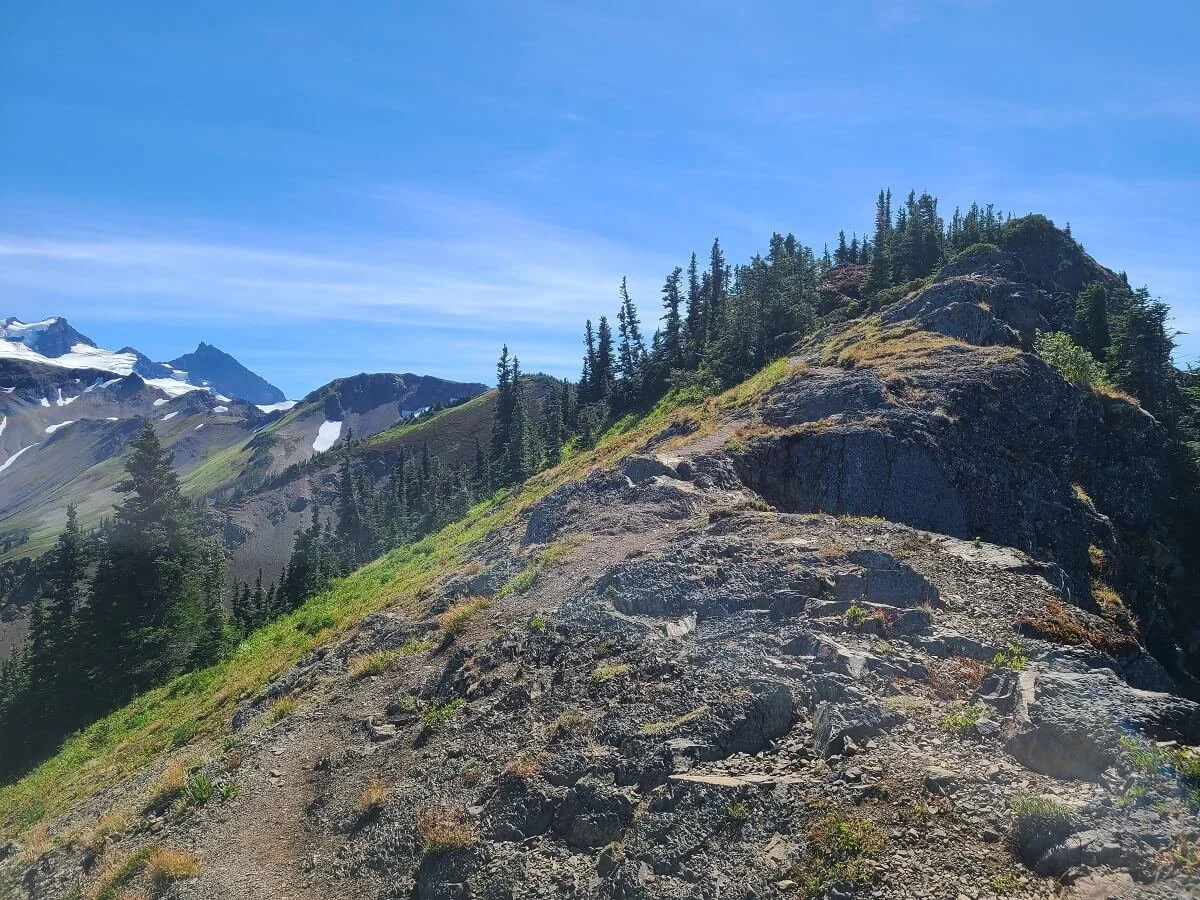
The climb up this hill has a very short scramble section near the beginning. It requires a bit of hand and footwork to get up, but for just a few steps, so it’s very doable. From here, the trail comes back again and you’ll be gradually climbing to the top of another hill with more amazing views of Mount Baker.

The short scramble on the Skyline Divide Trail

Heading down this scramble section on the way back

Climbing up for more views of Mount Baker!

You can’t really beat the views of Mount Baker from the Skyline Divide!

The top of this hill is the point where most seemed to be taking their breaks to enjoy the views before turning back. We noticed that the trail kept going along the ridge, climbing a bit more to another high point. We decide to see where this took us for a bit. At this point, the ridge and dirt path got a bit narrower and slightly more rugged. We got to the point that seemed to be the highest along this part of the trail and decided to stop as the views weren’t really getting any different. So we stopped for a short break, enjoyed the views, and turned back.
The Skyline Divide Trail as it continues further

A view from our vantage point where we turned around on the Skyline Divide Trail
The view of Mount Baker from our turnaround point
Going to this point and back was about 7.3 miles roundtrip with about 2,500 feet of elevation gain. It’s not entirely clear where the official trail for the Skyline Divide Trail ends, so just go as far as you feel comfortable. The trail eventually makes its way out to Hadley Peak, which involves a bit more of a rugged trail with some scrambling. Check out this account of the hike to Hadley Peak to see if you’re up for it.
On the hike back, you’ll have to back over all the same bumps you hiked out on, but once you hit the end of the ridge, the hike back down through the forest goes extremely fast because it’s steep and all downhill.
Best Time to Hike the Skyline Divide Trail

Hiking around Mount Baker is generally best from July through early October, when many trails are likely to be snow-free, although on the earlier and later ends of this spectrum you still have a chance to run into lingering snow or ice depending on the year. We visited in mid-August, and while we still ran into some lingering snow even this late in the year on other trails around Mount Baker, the Skyline Divide Trail was perfectly free of snow. We recommend checking recent AllTrails reports and the Forest Service site for recent conditions.
Wildflowers are at their best in July, but so are those pesky bugs. If you’re after fall colors, plan to hike the Skyline Divide Trail late September to early October, but again, be prepared for changing weather and possible snow or ice along the trail if you hike this late in the year.
As far as time of day goes, we recommend getting to the Skyline Divide trailhead in the morning to snag a parking spot if coming on a nice summer weekend day. However, we arrived midday during the middle of the week in August and had no problem finding parking. Even though it’s one of the more popular hikes in the area, we still never felt like the trail was crowded at all, which is one of the things we love about hiking in Mount Baker! Just make sure you allow yourself enough time in the day to hike about 7 miles or so roundtrip.
Where to Stay Near the Skyline Divide Trail in Mount Baker
If you’re looking to camp near the Skyline Divide Trail in Mount Baker, you’ll have a few different options. The two main campgrounds along the Mount Baker Highway are the Douglas Fir Campground and the Silver Fir Campground. Both can be reserved online. The Douglas Fir Campground is the closest to NF-37 as it is just past the town of Glacier, but it will still take you over an hour to get to the Skyline Divide Trailhead as the drive up NF-37 is slow-going. Staying at Silver Fir, closer to Artist Point, will add about another 20 minutes.
What’s great about the Mount Baker-Snoqualmie National Forest is that if you don’t want to stay at an established campground, free dispersed camping is allowed along forest roads (dirt roads off the main highway) as long as you can safely park your vehicle completely off the road. We called the Mount Baker Ranger Station just to verify with them what was allowed and where they would recommend, and we suggest you do the same. We ended up camping at the Salmon Ridge Sno-Park, which is an empty parking lot (used only in winter) just across from the Silver Fir Campground and near the Shuksan Picnic Area. We also saw a bunch of people camping at a primitive camping area along the Noosack River off the road up to the Skyline Divide trailhead (Forest Road 37), which is super convenient for hiking the Skyline Divide Trail.

Our camper in our dispersed campsite in the Mount Baker-Snoqualmie National Forest
Please remember when you are dispersed camping that there are no facilities or services offered, so be very careful to clean up after yourself and leave no trace to help preserve these places for everyone to use!
If you’re not looking to camp near Mount Baker, you can find limited lodging and cabin options in the town of Glacier. Bellingham is a bit further out (about an hour and 45 minutes away). You can also do a day trip to Mount Baker from Seattle, but it will be about 3 hours of driving each way to get to the Skyline Divide Trailhead.
Camping on the Skyline Divide Trail
You can definitely plan a backpacking trip on the Skyline Divide Trail, which would provide you with some epic front door views of Mount Baker to wake up to. No specific wilderness permits are needed for camping on the Skyline Divide Trail, but we recommend stopping into the Service Center in Glacier to ask any questions you have and get more information on camping in the area.
Only set up camp in designated areas and those places that look like they have been used for this purpose. As we described above, a key place to set up camp is off the side trail as soon as you hit the ridge after the initial climb. There are a few other spots along the trail that look good, too, particularly along the flat part of the ridge before you climb up the last hill marked by the cairn.
When camping, be bear aware, as black bears can frequent the area, so practice leave no trace principles and properly store your food with a bear can.
Tips for Hiking the Skyline Divide Trail
Here are a few final tips that we have before you set off on the Skyline Divide Trail in Washington!
What to bring on the Skyline Divide Trail. Aside from the usual basics when day hiking, here are a few things we would emphasize having on the Skyline Divide Trail:
Sunscreen/hat- Once on the ridge, the Skyline Divide is a very exposed trail, and the summer sun can be intense.
Water- And plenty of it. There is really no place along the Skyline Divide Trail to filter any, so pack at least three liters per person before heading out.
Bug body armor- Seriously. Do they make that? If not, make sure to load up on the bug spray, and we would really recommend a bug net. They were their worst on the hike up to the ridge, but even along the ridge they were pretty bad, especially whenever we stopped to try and enjoy the view.
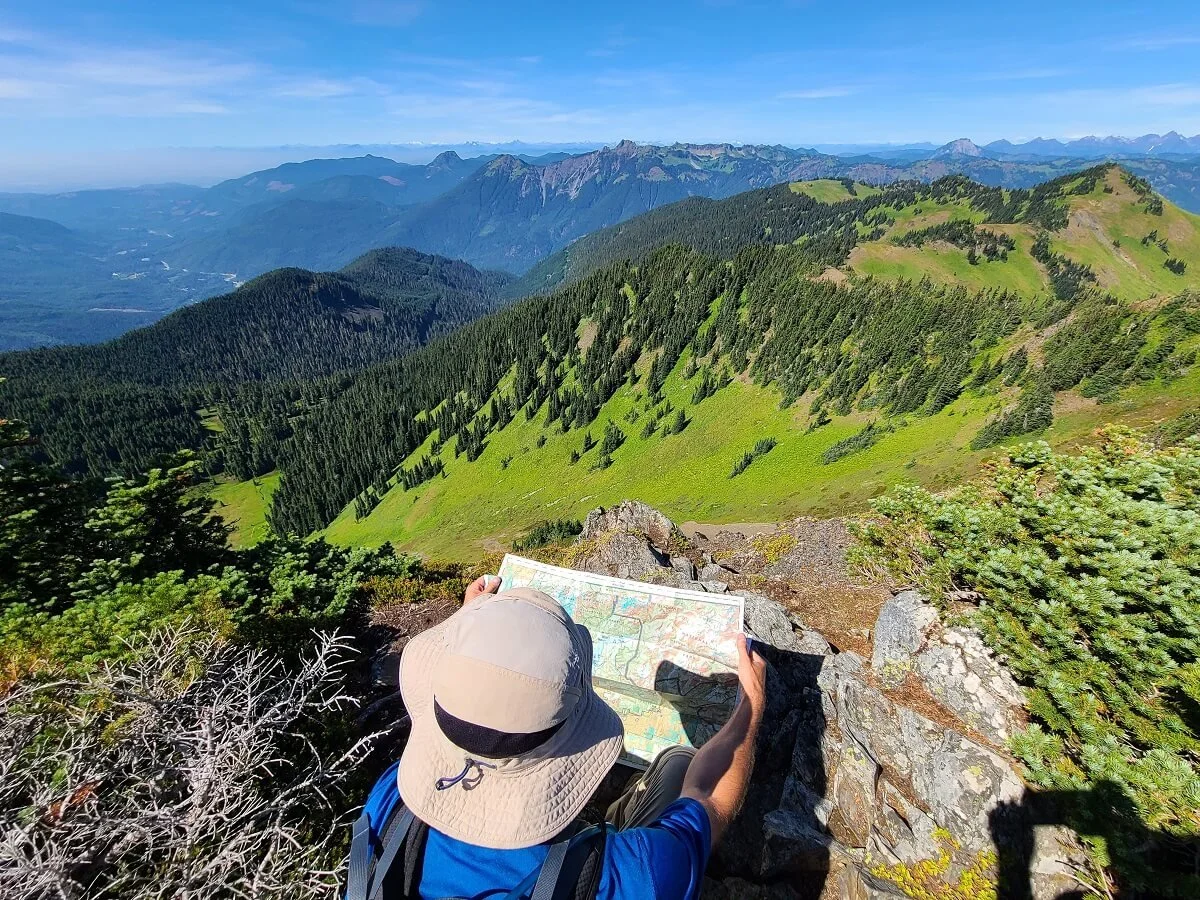
A trail description like this one and a map- There are lots of unmarked splits in the trail and having a map and/or description would be helpful to orient yourself as you go. There’s actually a pretty good topographic map on the trailhead sign that you can snap a picture of before your hike.
Layers- It can get windy up on the exposed ridge.
Have a Forest Pass. Parking at the Skyline Divide Trailhead requires a day pass, which costs $5 and can be bought online in advance or at either the Glacier Public Service Center or Heather Meadows Visitor Center in person. Make sure to remember to bring a copy to display on your dashboard. You can also use the Northwest Annual Forest Pass, or even the America the Beautiful Annual National Parks Pass, which is amazing if you already have this pass from visiting the other Washington National Parks!
Check wildfire status. Unfortunately, the fires in this part of the country are only getting worse, and being aware of wildfires and air quality is just another added element to hiking in Mount Baker and anywhere in this area. Thick wildfire smoke can not only affect views, but also just be very unhealthy to hike in. We like this website to check for the smoke forecast in Washington. You can also google “AQI in Washington” to get forecasts of how healthy the air is. This site is a good one to check out.
Bears. The Mount Baker Wilderness is bear territory, so make sure you are bear aware and store all food properly (and don’t leave anything out unattended).
Check conditions. Before heading out on the Skyline Divide Trail, check conditions of both the trail and for any road closures. You can check the US Forest Service site, call either the Mount Baker District Ranger Station or the Glacier Public Service Center, and use AllTrails to get recent reports from fellow hikers. This will help you be prepared with proper gear and equipment and know of any road closures or openings.
No cell service. Be prepared for the possibility of having no service, and download any maps, passes, and trail descriptions in advance.
More Hikes Near the Skyline Divide Trail
Looking for more things to do near the Skyline Divide Trail? Luckily, Mount Baker is a treasure trove of amazing vista-filled hikes. Check out our other guides to more Mount Baker hikes!
PTARMIGAN RIDGE TRAIL- This alpine trail gets you up close and personal to Mount Baker, but, with permanent snow-crossings, it is one you’ll have to come prepared for. Check out our Ptarmigan Ridge trail guide to learn more!
CHAIN LAKES LOOP- This popular Mount Baker hike takes you to several alpine lakes and great views of Mount Baker.
PARK BUTTE- This popular hike is found on the southern side of Mount Baker and takes you to a fire tower with epic Mount Baker views.
Be sure to check out our general guide that summarizes all our favorite Mount Baker hikes to learn more!
Planning on hiking the Skyline Divide Trail in Mount Baker? We hope this guide helped you plan your trip! Let us know if you have any questions about the Skyline Divide Trail in Washington below, and happy hiking!