Complete Guide to the Tent Ridge Hike in Kananaskis (Near Banff National Park)
The Tent Ridge hike is one of our favorite hikes in the Canadian Rockies! It has amazing views over the Kananaskis region with some fun scrambling and ridge walks to keep things interesting. It’s a popular hike, but the challenge and difficulty of the Tent Ridge hike should not be underestimated, as it involves things like light scrambling with exposure and sketchy scree ascents and descents. In this guide, we’ll go over absolutely everything you need to know about hiking Tent Ridge in Kananaskis, including how to get there, when to go, how hard it is, and what to expect along the trail.

While many people flock to the Canadian Rockies to visit Banff National Park (and rightfully so!), there are so many other places near Banff that have equally breathtaking scenery and hiking, and with potentially less of the crowds- places like Yoho National Park, Kootenay National Park, and, one of our newfound favorites – Kananaskis Country.
Kananaskis Country is a collection of over ten provincial parks and recreation areas found just southeast of Banff National Park. It encompasses the mountain town of Canmore (which is about 20 minutes east of Banff along the Trans-Canada Highway) as well as a huge area of wilderness spanning south from the Highway. There aren’t many services out here, but what you will find is epic mountain scenery, beautiful roadside lakes, and some of the best hiking in the Canadian Rockies, including the epic Tent Ridge hike.
During our most recent visit to the area, we had time for one hike in the Kananaskis region, so we really wanted to make it count. During our research, we found so many amazing Kananaskis hikes, but the one that really jumped out to us was the Tent Ridge hike. It seemed to have a little bit of everything- views of the insanely picturesque Spray Lake, a beautiful ridge walk, epic mountain views, and some scrambling to keep it fun and interesting, and all within a reasonable mileage that wouldn’t take the entire day. Plus, it’s a loop hike so you never hike the same part twice. Sounds perfect, right? We knew that it has gotten to be a very popular hike in this area, but often, things are popular for good reason, and so we decided it would be worth it anyway. Spoiler alert: It was.
We are so glad we chose the Tent Ridge hike as our one hike in Kananaskis. It most definitely has an incredibly high bang-for-your-buck factor. BUT (and there’s a big but here)…this hike should not be underestimated. The Tent Ridge hike, even though it’s relatively short, is a pretty intense and challenging hike. The steepness (both up and down) on lots of loose rock and scree combined with ridge walks and some minor scrambles that have a bit of exposure can be both exhausting as well as difficult or even unnerving for those that aren’t quite used to this type of hiking. Tent Ridge has gotten extremely popular over the years and we found that the challenge of the hike is often not quite well described, and I think this leads to many people underestimating its difficulty- we definitely saw quite a few people who were struggling and maybe in over their heads.
In this Tent Ridge hiking guide, our goal is to give you a realistic description of the Tent Ridge hike in Kananaskis and all of its challenges (from a pair of average hikers who are also pretty familiar and comfortable with scrambling) to help you decide if Tent Ridge is a hike you want to tackle. We’ll also go over absolutely everything else you’ll need to know to hike Tent Ridge near Banff, including how to get to the trailhead, what you should bring, how to stay safe, when to go, and so much more.
Ready to hike Tent Ridge? Let’s get to it!
In this Tent Ridge hiking guide:
About the Tent Ridge Hike in Kananaskis
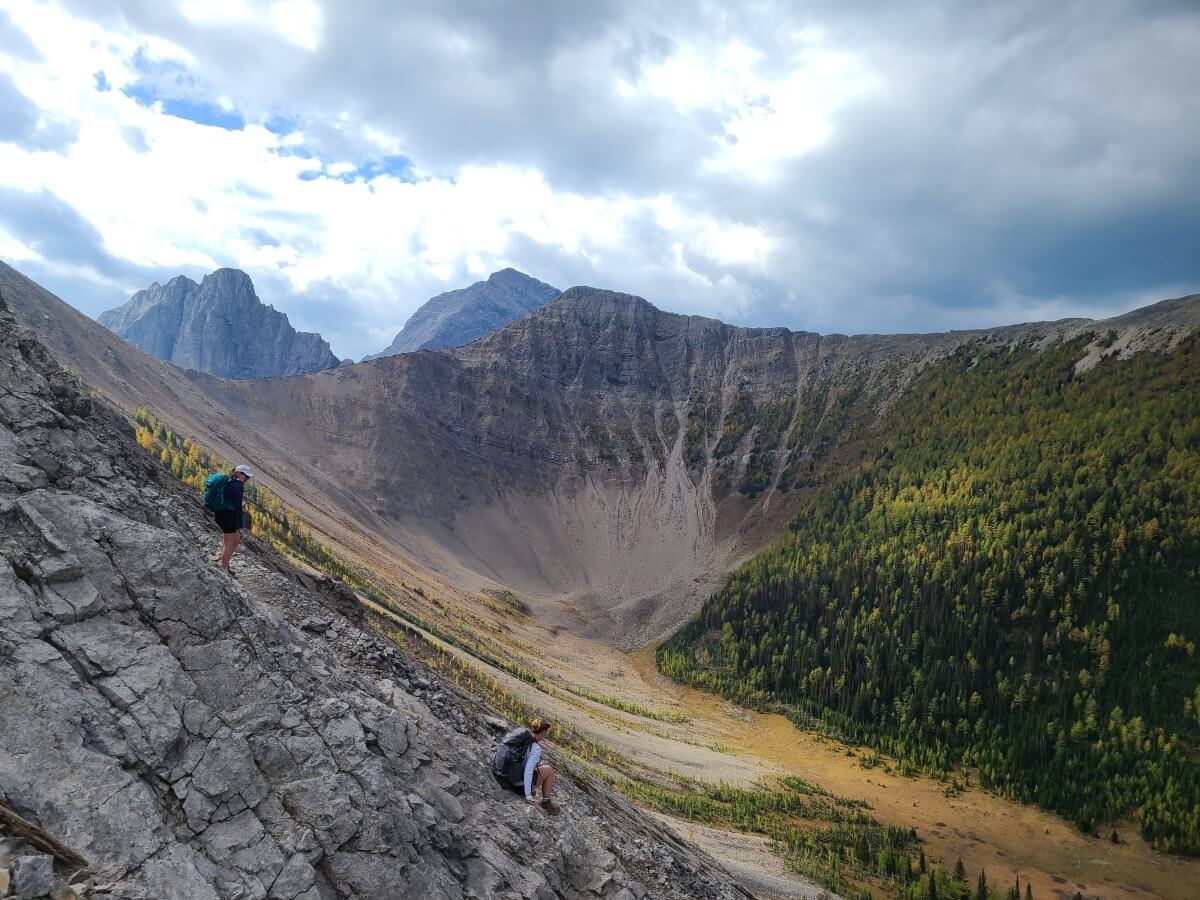
Tent Ridge is a horseshoe-shaped ridge with phenomenal views over the Kananaskis region near Banff National Park in Alberta, Canada. The hike consists of some light scrambling with a touch of exposure along with a steep climb up to the first of two peaks along the ridge. Then, it’s down a steep scree slope to a small saddle before making another steep and slick climb up loose rock and scree to the second and higher peak along the ridge (often referred to as the summit of Tent Ridge). After the summit, you’ll continue on the ridge along a series of short ups and down to the final incredible viewpoint over Spray Lake before beginning a tough steep descent back to the car.

The incredible view over Spray Lake from the Tent Ridge trail in Kananaskis
Before we did the Tent Ridge hike in Kananaskis, we tried to do some research on it by looking at recent reviews and posts. We thought by doing this, we had a pretty good idea of what the trail would be like, but in hindsight, we found that we really didn’t!
Many of the descriptions of Tent Ridge that we had come across were pretty general. Many vaguely mentioned one scramble part of the hike on the way up to the ridge as being the hardest part but that it wasn’t too bad, and conveyed that the rest of the hike was straightforward and a pretty easy ridge walk after that. We never really saw good pictures representing what “the scramble” was (and in hindsight, we didn’t really get a good idea of what the whole rest of the ridge entailed). I think because of this, we ended up being surprised at how challenging the Tent Ridge hike actually was! We felt the true challenge of the hike isn’t conveyed well by many of the descriptions we had read about it, and therefore many people may underestimate it. Then again, it’s all subjective of course. We won’t say that it’s overly difficult (and we’ll get more into this later), but I think that because we were just mentally prepared for something a little less challenging, it felt a bit more intense and challenging to us in the moment while we were on it (hopefully that makes sense!).
A rocky ledge along the Tent Ridge hike in Kananaskis- just one of the many interesting elements along this trail!
We did also read recent reviews from AllTrails, and it seemed to be a bit of a mixed bag. Some reviewers made it sounds almost like a walk in the park, with one minor scramble at the beginning, and others made it seem extremely intense and scary and warned people not to do this hike if they had any fear of heights. Most fell somewhere in the middle.
Overall, what it comes down to is people’s different experience levels with hiking and scrambling in particular on whether or not they felt the Tent Ridge hike was difficult or scary and with such a mixed bag of descriptions and reviews, it makes it hard to tell what the hike will actually be like. Our goal here is to give the best possible representation of the Tent Ridge hike to help give you a better idea about what to expect on the trail and whether it’s something you want to tackle! Our goal is certainly not to discourage anyone from the hike (because we think it’s an amazing hike, and again one of our favorites in the area!), but we just want to make sure you go in comfortable with the challenges and knowing what you’re getting into so you are as prepared as can be!
With that said, let’s get into the logistics of the Tent Ridge hike in Kananaskis!
How Long is the Tent Ridge Hike in Kananaskis?
The Tent Ridge hike is a loop trail (so you never hike the same part twice!). Here are our stats for hiking Tent Ridge in Kananaskis.
Distance: 6.68 miles (10.8 km)
Elevation gain: 3,152 feet (960 m)
Time: 5.5 hours
Trail profile:
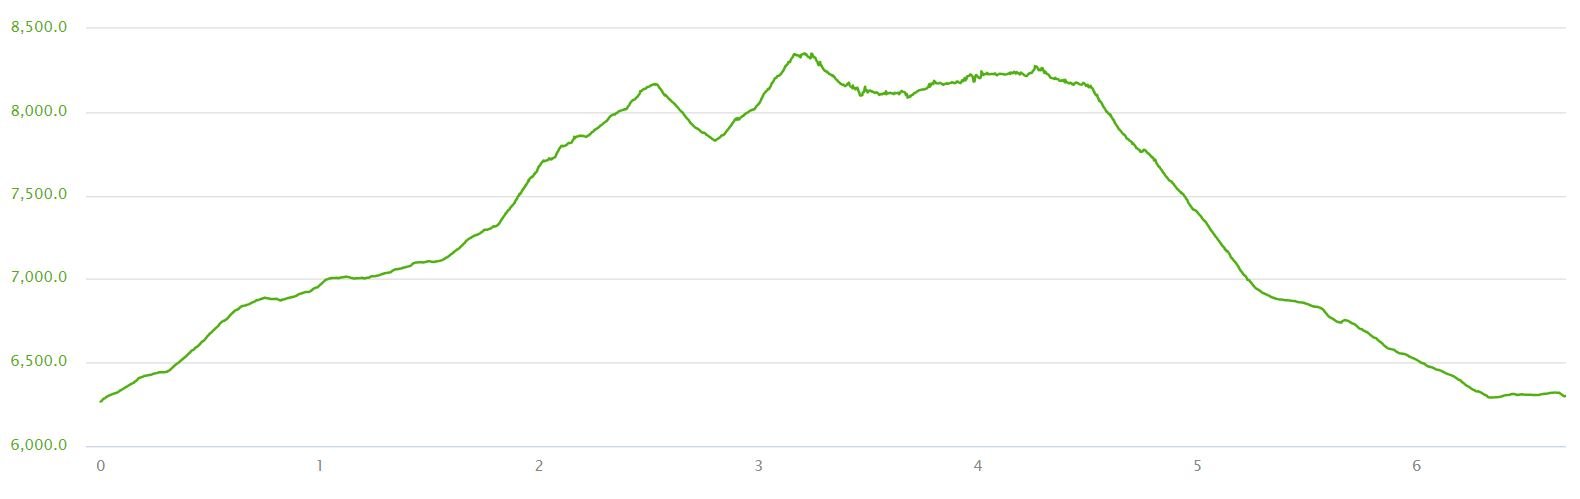
The elevation profile of the Tent Ridge hike in Kananaskis
Tent Ridge trail map
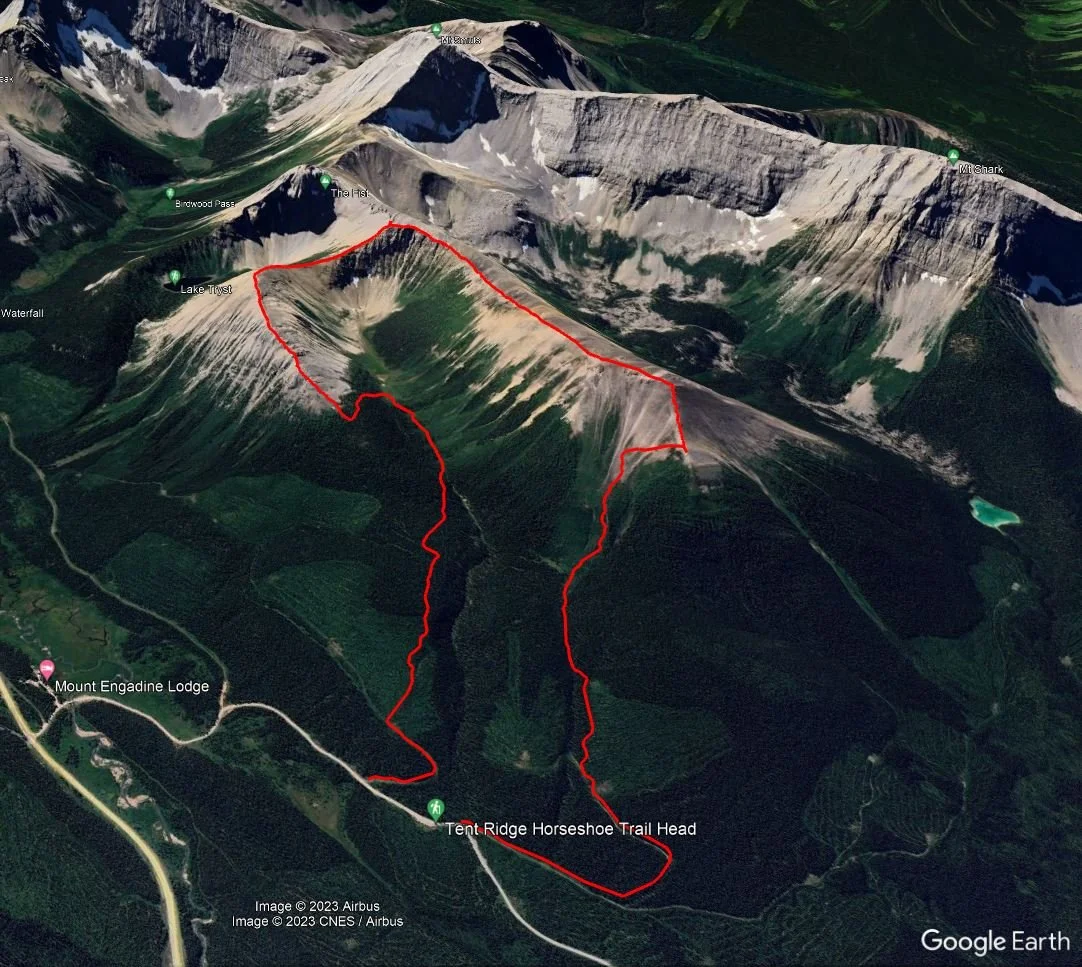
A satellite shot of our hike on the Tent Ridge trail in Kananaskis
How Hard is the Tent Ridge Hike in Kananaskis?
This is a surprisingly hard question to answer, because it really depends on who you talk to. As we said above, we read many mixed reviews that rated the Tent Ridge hike anywhere from an easy half day hike to an intense and challenging one. It really depends on people’s past experience and comfort with scrambling, but overall, after doing the hike ourselves, we would say that based on the reviews and descriptions we read, we had underestimated its true difficulty, and I think this may happen often.
We want to give the most accurate depiction of the Tent Ridge hike possible based on our experience and what we saw along the trail. For context, we consider ourselves pretty experienced hikers and have a bit of experience with climbing and scrambling.
We would rate the Tent Ridge trail as moderately difficult. It’s steep, there are a good number of ups and downs, a lot of the terrain is either pretty rocky or made up of loose dirt and scree which can be exhausting to hike on after a while, and there are a few sections requiring light scrambling.

Climbing up one of the short scrambles along the Tent Ridge hike in Kananaskis
Most descriptions of Tent Ridge mention a scramble at the beginning of the ridge and say it’s the most difficult part of the Tent Ridge hike, after which it’s relatively smooth sailing along the rest of the ridge. So, we were prepared for one potentially scary and sketchy scramble and then it would be easy. But, it was quite opposite for us, actually! We thought the scramble parts heading up to the ridge that everyone emphasizes as being the sketchiest part of the hike (and there was more than one) were quite easy, and we were basically able to walk right up with no issue. Reviews mention a bit of exposure here, but we weren’t phased by it at all. Again, we are used to this kind of stuff and think it’s actually quite fun! On the contrary, it was the parts along the rest of the ridge that people didn’t seem to either mention or emphasize that I found the hardest! Continuing along the ridge, there are quite a few steep ups and downs involving loose rock and dirt underfoot that are exhausting to hike on after a while and require a lot of concentration and balance, and there are still a number of rocky sections to navigate…nothing as technical as the early scrambles, but you’ll still be working.

Hiking along the rocky Tent Ridge trail
Again, this is all subjective and depends on experience level. On the scramble parts we found easy, we saw quite a few people struggling. Some were taking a long time and not sure about their footing, some went up the wrong way and had to backtrack down, others were trying to find paths around the scramble to bypass it altogether. But on other parts of the trail where we had to take more time, others flew right passed us, while at other times we saw some tears being shed out of exhaustion.
Overall, I think many people focus on one particular scramble being the most difficult part of the Tent Ridge hike such that the hike as a whole gets a bit underestimated. I do agree that the scramble section is certainly the most technical, and probably the most sketchy part for those not used to scrambling, but it’s just one part of a larger hike filled with steep inclines and declines, slippery trails, and rocky ridges, and it does all add up. The miles on this one felt a little bit longer than they usually do for us, that’s for sure.
Shortly, we will describe our experience on the Tent Ridge hike with as much detail as we can to help you decide if you are up for the challenge!
How Long Does it Take to Hike Tent Ridge in Kananaskis?

It took us 5.5 hours to hike Tent Ridge. This is with a few short picture breaks. Plus, we really weren’t in a huge hurry because we were enjoying the views so much. I would say we went at about an average pace on this hike. We passed people and people passed us. I’d say to plan anywhere between about 4.5 hours to 6.5 hours for the Tent Ridge hike.
How to Get to the Tent Ridge Trailhead in Kananaskis
There are two ways to get to the Tent Ridge trailhead in Kananaskis depending on where you’re coming from. Either way, you’ll want to set your GPS to “Tent Ridge Horseshoe Trail Head” so you know exactly where to go (there is no trailhead sign!).
Also, there are no shuttle services into this area so you’ll need a car to do this hike.
Tent Ridge hike directions if you’re coming from Calgary:
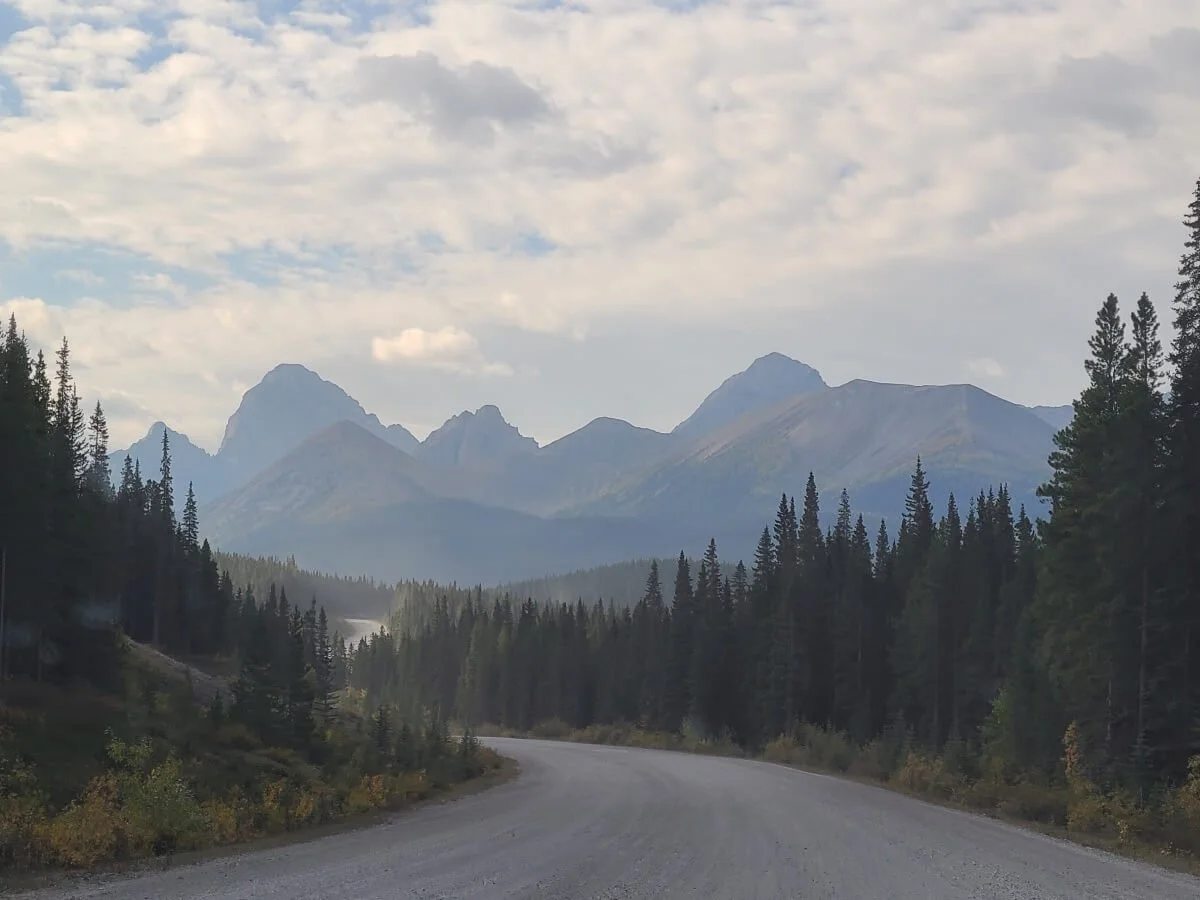
It will take about 2 hours to get to the Tent Ridge hike from Calgary. From the Trans-Canada Highway, you’ll hop off onto the Kananaskis Trail (route 40), which is a paved road into Kananaskis Country with beautiful mountain scenery along the entire way. After about 50 km, you’ll turn right onto the Smith-Dorrien/Spray Trail (route 742). This is a dirt road but it’s pretty smooth on this end of it and doable in any car. After about 28 km on this road, take a left onto Mount Shark Road, another dirt road that leads up to the trailhead (we’ll describe this below).

Views from the road in Kananaskis on the way to the Tent Ridge trailhead
Tent Ridge hike directions if you’re coming from Canmore or Banff:
From Canmore, it will take about one hour to get to the Tent Ridge trailhead, and about an hour and a half from Banff.
From Canmore, hop onto the Smith-Dorrien/Spray Trail for about 40 km until you make the right turn onto Mount Shark Road. The Smith-Dorrien/Spray Trail is a dirt road and the first part out of Canmore is really washboarded and bumpy. However, once you get passed Whiteman’s Pond and the Ha Ling Peak trailhead, which seems to be the busiest part of the road, it becomes smooth and you can go quite fast. We were able to knock off a bunch of time from our ETA on Google Maps. The drive in from this direction is really beautiful as all the mountains and lakes of Kananaskis surround you.
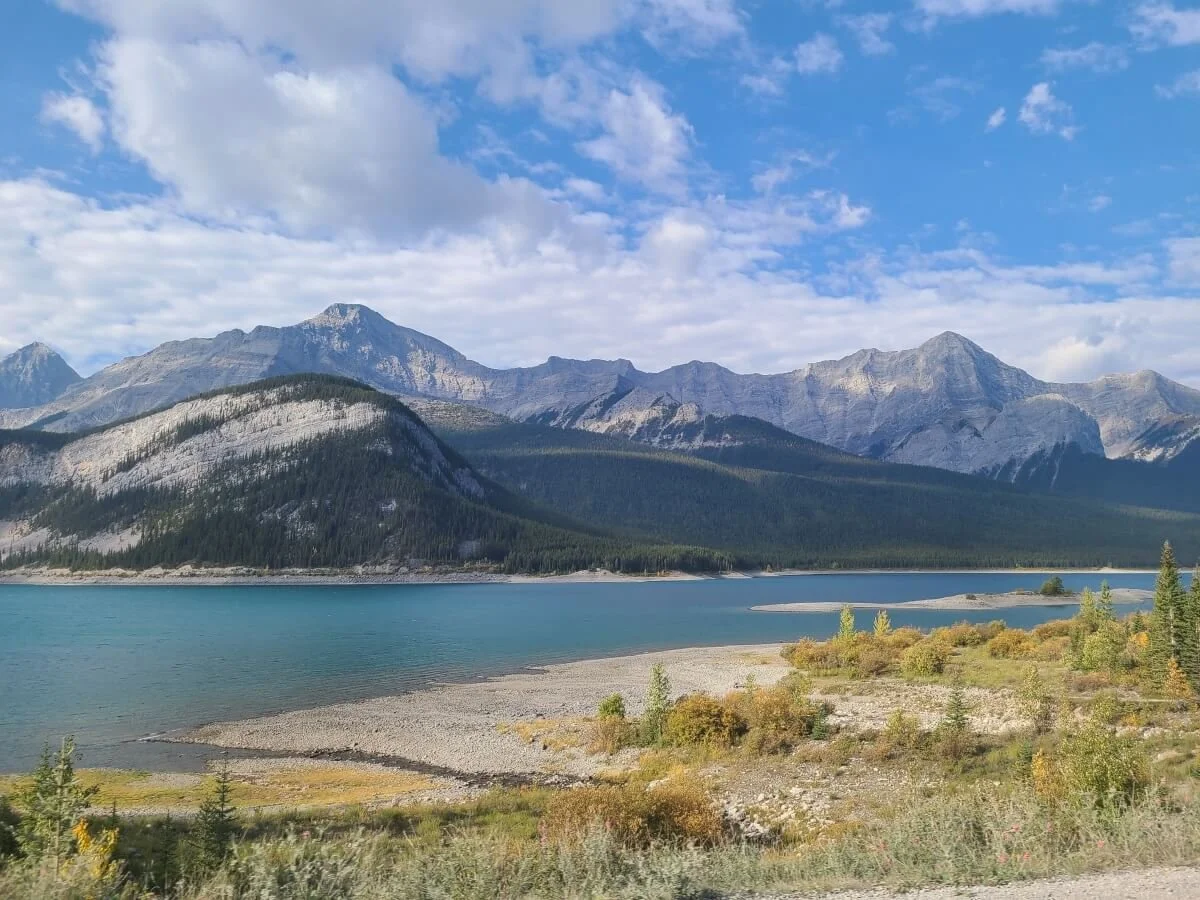
Driving past Spray Lake on the way to the Tent Ridge trailhead
Tent Ridge trailhead parking
As you approach Mount Shark Road, you can actually see part of Tent Ridge from the road. It doesn’t look like much from here, but trust us, it’s more intense than it looks!
This is a hazy and dusty view through our windshield, but you can see the entire Tent Ridge hike ahead! It’s the shorter pointed peak on the left (the one in front of the more jagged taller mountains), and the taller ridge on the right, connected by a saddle between them.
Once you’re on Mount Shark Road, you’ll pass by the Engadine Lodge to your left so you’ll know you’re on the right road. Passed this, trailheads are not marked or labeled on this road (so it’s important to have the GPS set!). The first area where you’re likely to see a ton of cars parked is the trailhead for Mount Smutwood (another great Kananaskis hike!), which will be shortly after the lodge on the left. Keep driving passed this. Just under 2 km up Mount Shark Road from the junction you’ll reach the Tent Ridge parking lot and trailhead. You’ll likely know you’re there based on the sheer number of parked cars (if you find yourself passing by the Mount Shark helipad, you’ve gone too far). The Tent Ridge parking lot is really just a widened part of the road where you can park on the right- hand side. Cars will likely be lined up along the right side of the road as well, so just do your best to find a spot without blocking the road.

The parking area for the Tent Ridge hike along Mount Shark Road
Because the Tent Ridge hike is actually a loop trail, there are two possible trailheads you can start from here. They aren’t well-marked, but they are pretty easy to find once you’re at the lot. Both trailheads are across the road from the parking area (so, on the left side of the road when driving in).
How to hike clockwise on the Tent Ridge trail
When facing away from the parking lot (towards the left side of the road), the Tent Ridge trailhead that has you hike in a clockwise direction will be on your left. Walk back down the road a little bit until you see the trail start on your right. There’s no trailhead sign here…it’s marked simply by a pink ribbon attached to a shrub, and there will also be a small sign indicating no camping or fires.
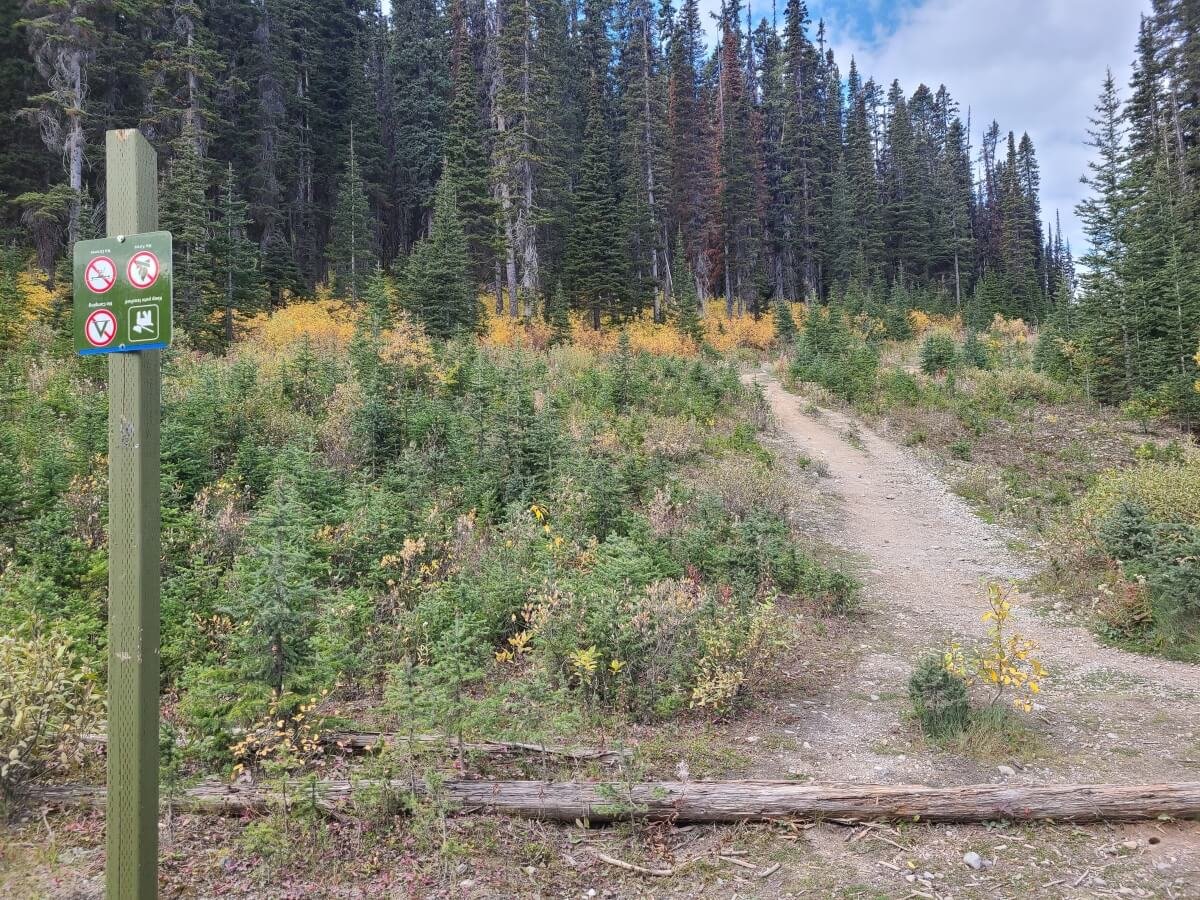
Look for this path right off of Mount Shark Road to start the Tent Ridge hike clockwise
How to hike counterclockwise on the Tent Ridge trail
When facing away from the parking lot, the Tent Ridge trailhead for the counterclockwise direction will be to the right. Walk up the road a bit and you will see an obvious path veering left off the road, again marked with a simple no camping sign and pink tape. Going this way starts off on a wide path that is an old logging road. About a half kilometer into the trail, instead of continuing on the old road, take a left to continue up to Tent Ridge.

This trail marks the start of the Tent Ridge hike in the counterclockwise direction. Note the small sign and pink tape.
Map to Tent Ridge trailhead

This map shows the two ways to get to the Tent Ridge trailhead. The blue marks the road you’ll take in from Canmore or Banff, while the yellow shows the best way from Calgary.
So, which Tent Ridge trailhead should you start from? I’m glad you asked…
Which Direction Should You Hike Tent Ridge?
Most people recommend hiking Tent Ridge in the clockwise direction, and we would agree. The main reason is because you will hike up the more technical scrambles instead of down (going down these would definitely be trickier than going up). Instead, you’ll be hiking off the ridge down a steep scree slope, which is still punishing on the legs and knees, but not technical or exposed.
The other reason we would recommend hiking Tent Ridge clockwise is for the views. All along the ridge are amazing views, but it’s the more western part of the ridge where Spray Lake really comes into view, and if you are hiking clockwise, you’ll be facing it for this whole section of the ridge. Plus, you get what I’d call a “grand finale” view over the lake at the very end of the ridge and as you come down of the ridge. For us, it was kind of like saving the best views for last. The views off the eastern side of the ridge are good, but those off the west side are better.

When you hike Tent Ridge in the clockwise direction, views of Spray Lake dominate your view on the latter half of the hike!
Best Time to Hike Tent Ridge in Kananaskis
The best time to hike Tent Ridge in Kananaskis is from July to September. This will give you the best chance of the trail being snow-free, however, snow can linger into July depending on the year and start in mid-to-late September. We hiked Tent Ridge in mid-September and missed the first coating of snow by about a week.
While summer is an extremely popular time to hike Tent Ridge, late September to early October attracts people to the trail to see larches at their peak colors. Tent Ridge is an amazing place to see them as the ridge overlooks a huge larch forest that surrounds Spray Lake and runs up the slopes of the ridge. When we hiked in mid-September, they were starting to turn and we got to see some color, but they were still definitely not at their peak yet.

Looking over the colorful larches from the Tent Ridge trail in Kananaskis in mid-September
Waiting to hike Tent Ridge to see the larches, though, is a bit of a gamble. The ridge could be covered in snow by the time peak hits, which happened the year we were there. And since this hike crosses avalanche territory, you should really only do a winter hike on Tent Ridge if you have the right experience and gear.
In terms of crowds, you will definitely find them on the Tent Ridge hike. This trail has gotten very popular over the years (for good reason!). If you want to try and avoid them, steer clear of all summer and early fall weekends. Unfortunately for us, our itinerary and the weather locked us into a weekend hike and it was mobbed, which admittedly took away from the hike a little bit…and this was in mid-September. I can’t imagine what the summer crowds are like! Otherwise, try starting very early (think sunrise…) to get ahead of the pack, or alternatively, try starting a little bit later to avoid the worst of the crowds. This was our strategy and we think it worked. We started hiking Tent Ridge at about 11 am and definitely think we were able to stay behind most of the crowd who had started much earlier, and by the time we got back to the car the lot had cleared out a ton. We were still hiking with quite a bit of people, but we avoided the worst of it. Just be sure not to start too late and know your pace…you’ll want to avoid hiking out in the dark if you can as this is prime bear territory (more on that in just a bit…).
Things to Know Before Hiking Tent Ridge in Kananaskis

Here are some other important things to know before tackling the Tent Ridge hike in Kananaskis.
Bears. We feel like the most important thing for you to know before hiking Tent Ridge is that Kananaskis Country is heavy bear territory (both Grizzly and black bears), and there are frequent sightings from the trails. In the days before our hike, we had read recent reviews of a very nearby trail (Mount Smutwood) with frequent sightings of a Grizzly on or near the trail, with one person even resorting to using their bear spray. And just a week or so after we had hiked Tent Ridge, there were reviews of a bear sighting from the Tent Ridge trail itself along with a brief trail closure.
September and October in particular are when bears become pretty active, and perhaps a little more aggressive, as they prepare for their winter hibernation. In the couple of weeks we were in the general Banff area in September, there were several Grizzly incidences and sightings even on commonly traveled trails, and some parks even close trails completely in September due to higher levels of bear activity. We saw three bears during our September visit (luckily all from the car!).
Be bear aware, don’t hike alone, make a reasonable amount of noise, particularly in heavily wooded parts of the trail and before blind corners and turns, and make sure to carry bear spray that is easily accessible (aka not tucked away in your pack).
Weather. Pick a nice day to hike Tent Ridge, not just to get good views but just for overall safety. I wouldn’t recommend hiking Tent Ridge if rain or storms are in the forecast. The entire ridge is very exposed, and rain would make an already slick and sketchy trail more challenging and dangerous. Even on a nice day, come prepared for everything, as weather can change quickly here. Be especially prepared for high winds along the ridge.
Cost. Hiking or camping in Kananaskis country requires a Conservation Pass which costs $15 CAD for the day or $90 for the year (this is purchased per vehicle, not per person). To park at the Tent Ridge trailhead, you’ll need this Conversation Pass. It’s easy to purchase online, and you don’t even have to print it out. Your plate will automatically be registered into the system. You can also buy them in person at Kananaskis Visitor Centers and the Canmore Nordic Center.
Cell service. Service can be spotty or non-existent out here. Be sure to have Google Maps downloaded and any sort of trail map you might be using. It would also be good to have something like a Garmin Inreach satellite device in case of an emergency on the hike.
Trail conditions. Make sure to check for any alerts in the area and read about current trail conditions to be aware of any recent bear activity, trail closures, or any hazardous conditions on the trail. We like to check both the Alberta Parks website for specific alerts, and also AllTrails for fellow hikers’ reviews and warnings.
Gas. Keep in mind there are no gas stations the entire length of the Smith-Dorrien/Spray Trail so fill up in Canmore. There is one on route 40 closer to Peter Lougheed Provincial Park as you drive down from the Highway on that side.
What to Bring on the Tent Ridge Hike in Kananaskis
Aside from the usual day hiking gear, here are some things in particular that we would recommend having on the Tent Ridge hike.
Bear spray- This is the number one thing to have! Chances are you will never use it, but it’s a really important insurance policy to have.
You can rent bear spray from a few places in Banff for about $10 CAD per day (we checked out Ultimate Sports and Bear Street Outfitters). If you plan on being in Banff and the area for a long time (more than a week), it might be more cost effective to simply buy bear spray. We had found it on sale at a Cabella’s in Calgary so it was cheaper than renting for the two weeks we were there. When we were done with it, we gave it to our Airbnb host to use since you can’t fly with it. We had also later read that you can give unused cans to staff at a visitor center so that they can use it for bear safety demonstrations.
Hiking boots/shoes- This is non-negotiable for the Tent Ridge hike. You’ll want shoes or boots with good traction and ankle support as the hike involves navigating lots of rocks, loose scree, and some scrambles.
Layers- Even on a nice day, the ridge can be cold and windy. Bring rain gear, too, just in case there is rapidly changing weather.
Trekking poles- These can really help with the steep descents off the ridge.
Sunscreen and hat- Most of the Tent Ridge hike is along the exposed ridge. But be sure to hang onto your hat along the ridge…it might blow away!
First aid kit and satellite device- With limited service, it’s a good idea to have some sort of satellite device in case of an emergency on the trail, and to have a kit for minor scrapes or bumps.
Plenty of food and water- We like hiking with our 3L bladders filled with water. You can fill them up at the Alberta Parks Visitor Center in Canmore. Also stock up on food in Canmore or wherever you’re coming from, as there really is nowhere to get them once you leave Canmore and head into Kananaskis.
Where to Stay Near the Tent Ridge Hike in Kananaskis
The one annoying thing about the Tent Ridge hike is that there really aren’t many options to stay super close to the trailhead. Your best bet is to camp if you want to be as close as you can. Some campgrounds require reservations and some don’t. Check out this list of campgrounds in the Kananaskis parks for more details on each one. The closest would be Spray Lakes West (about a half hour away on the other end of Spray Lake). Just make sure to carefully check the dates of operation (some close by August).
We stayed at the Bow River Campground, just off the Trans-Canada Highway near Canmore (along the Three Sisters Parkway), the night before our hike. It was still an hour drive to the Tent Ridge trailhead from there. It was a pretty primitive campground (non-potable water and vault toilets), but it worked for the night. Try to get sights at the back end of the campground (they are the best and most private!). We showed up around 5 pm on a Saturday night and while literally all the hundreds of sites in Banff National Park were taken, there were still a handful of sites here just a half hour away!
If you don’t want to camp, options for lodging in Kananaskis near the Tent Ridge trailhead are limited, with most being found in Kananaskis Village along the paved route 40, including a hostel and a lodge. Otherwise, there are plenty of options in Canmore (both in the main town and near the Bow Flats/Three Sisters Parkway area closeby) and Banff, though they will be quite pricey. We would opt to stay in Calgary and make the longer drive in simply for the cheaper accommodations! Check out this guide to accommodations in the Canmore/Kananaskis area.
The Tent Ridge Hike in Kananaskis: Our Experience
Okay, now that we got all that nitty gritty out of the way, here’s probably what you’ve been waiting for…our actual experience hiking the Tent Ridge trail in Kananaskis! Hopefully we can give you a clear idea of what the hike is actually like and if you’re up for the challenge! We’ll be describing the Tent Ridge hike in the clockwise direction, as that’s what we did and what we recommend doing.
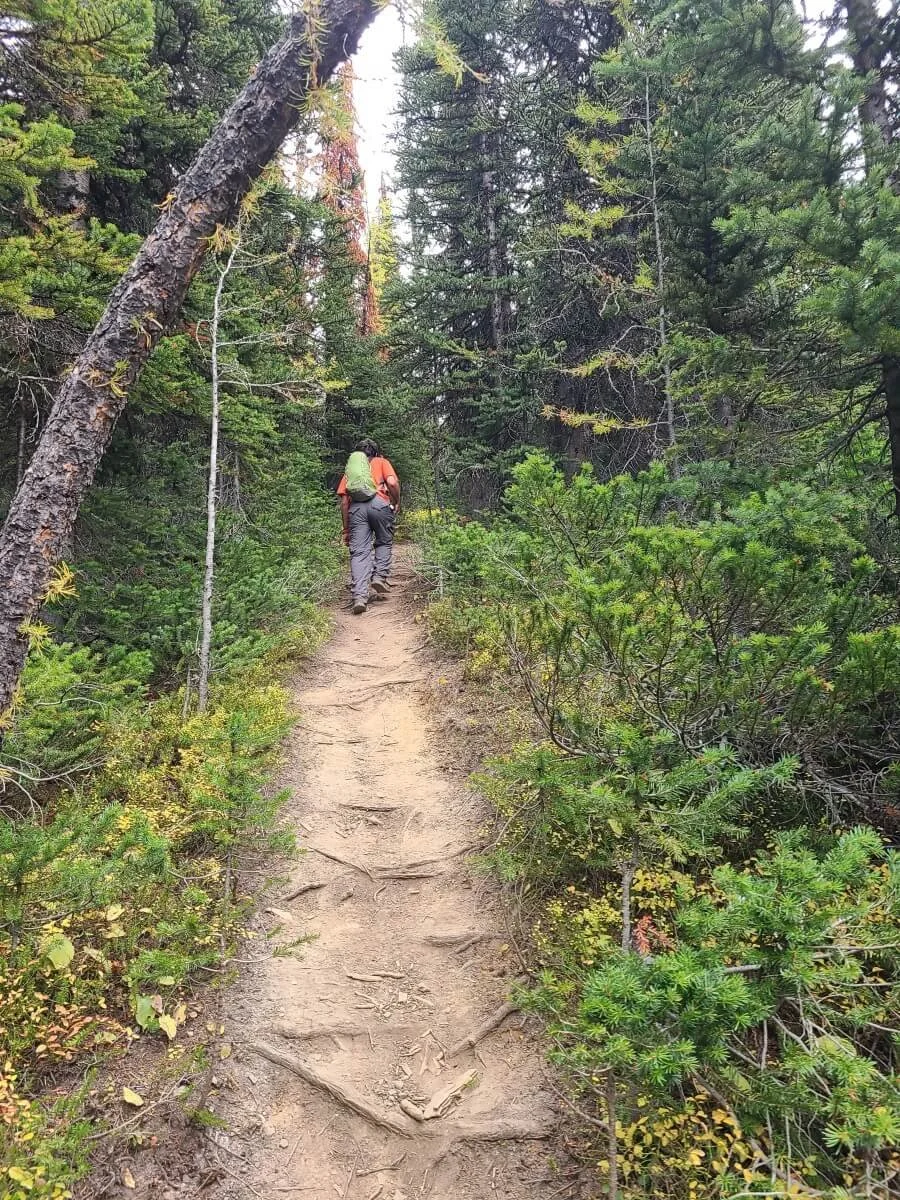
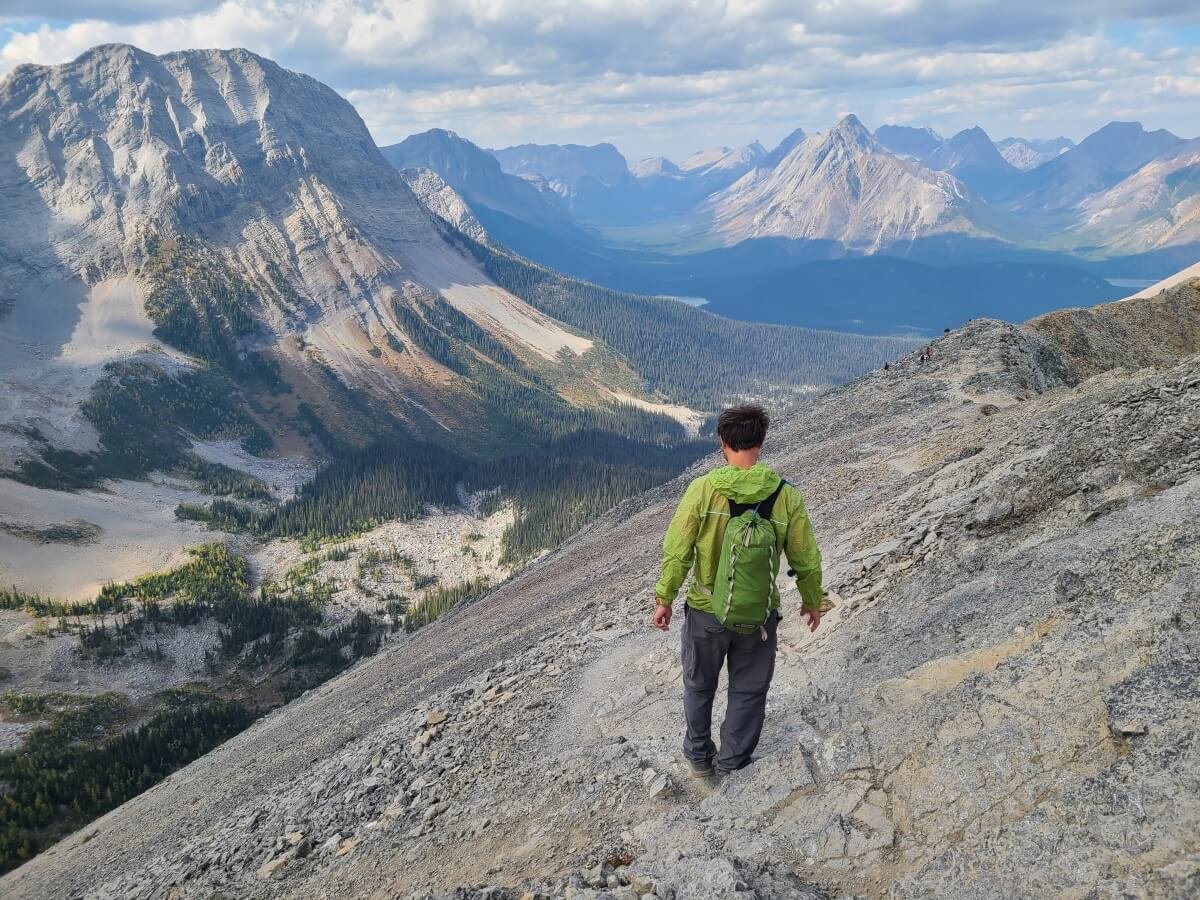
From the trailhead, the Tent Ridge hike starts right off the bat on a gradual but steady uphill. It did feel steep at times, but that just might be because we were on our last hike of a busy two weeks of hiking and we were feeling it! On this first portion of the hike, you’re mostly in the woods, but if you look behind you, you’ll get peeks of the mountains rising out of the valley in a sort of preview of what’s to come!


Looking back along the Tent Ridge hike towards the emerging mountain views
Of note, there was one or two places where I noticed the trail seemed to split off, but one direction was always blocked by some small logs or branches placed across the trail, so just pay attention to that.

An early part along the Tent Ridge trail where a separate path is blocked by downed trees
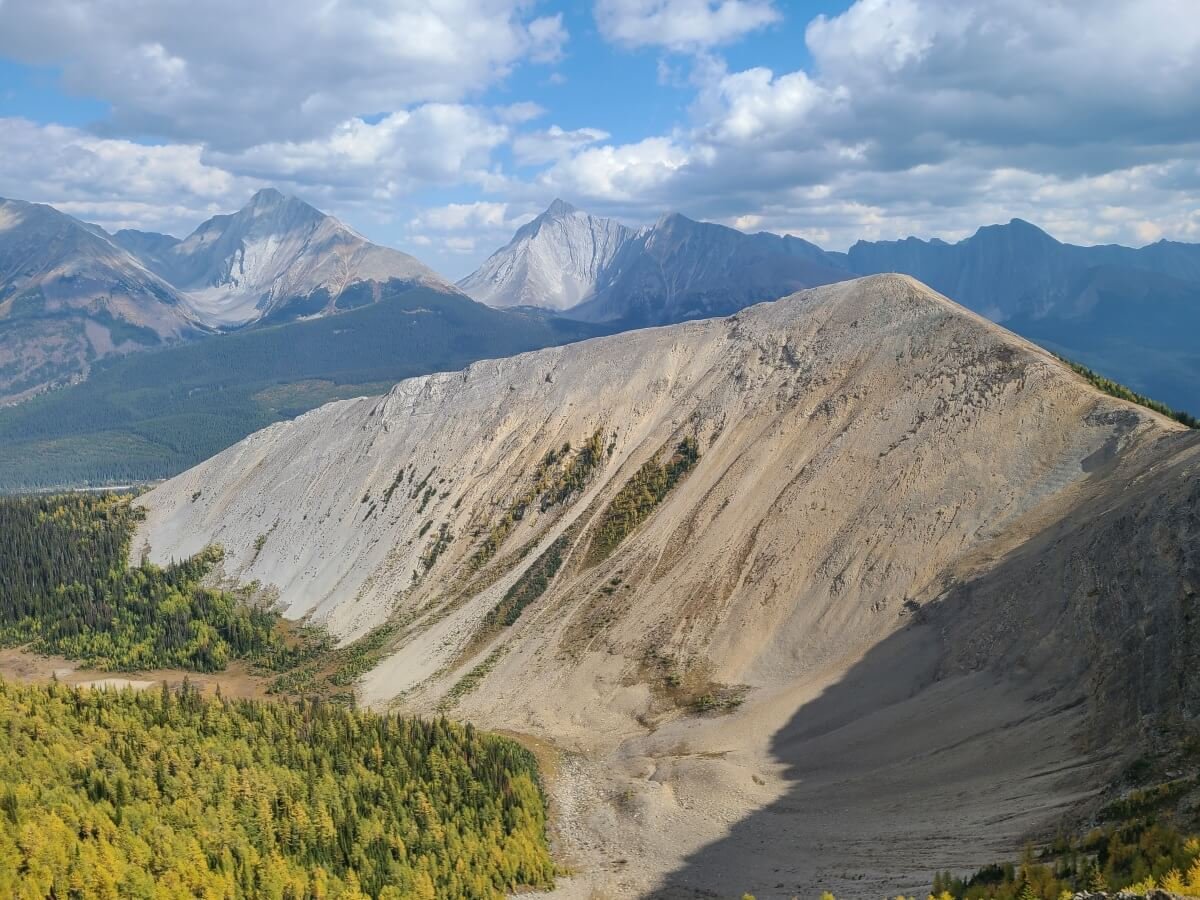
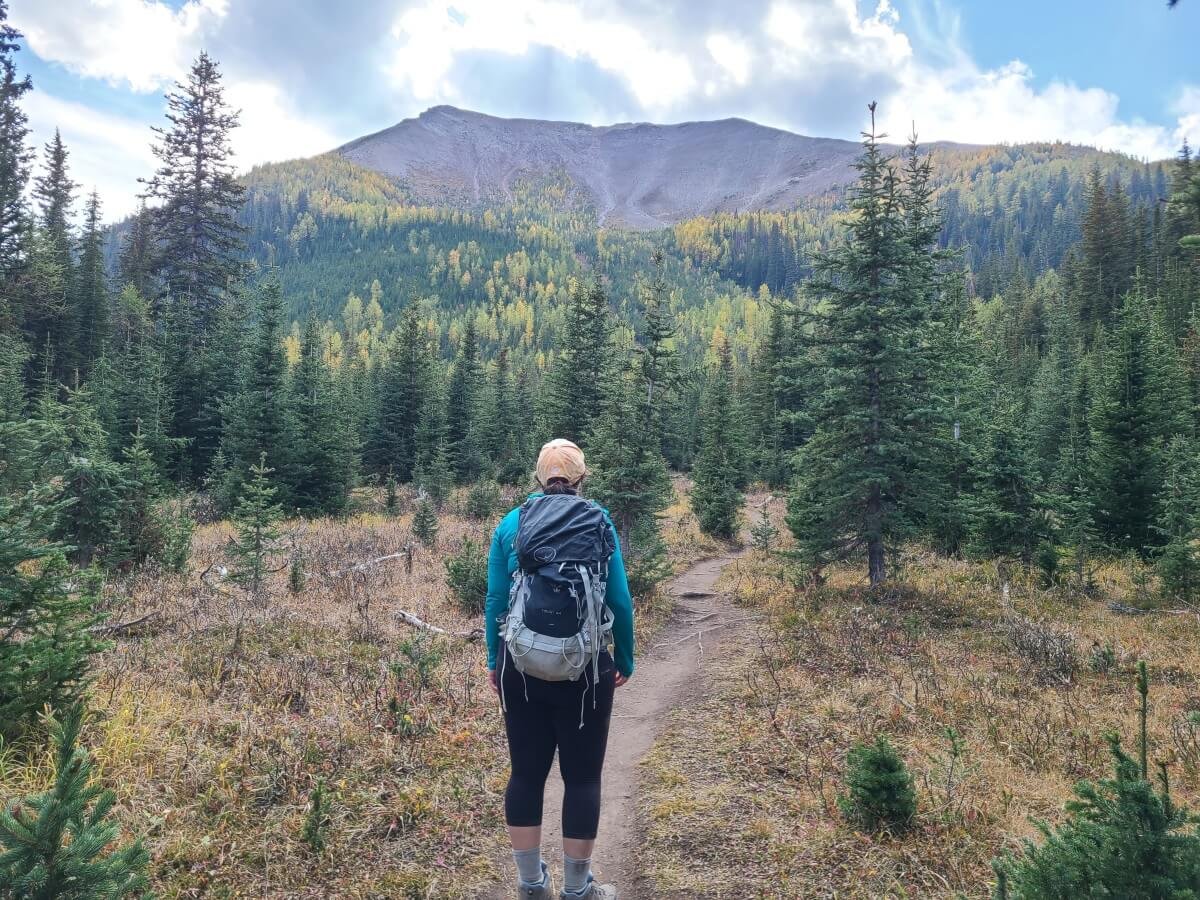
Eventually the trail flattens. You’ll start to leave the forest behind and the actual ridge that you’ll be on top of later in the day will come into view in front of you. This first part of the ridge that you’ll see is actually the more western side of the horseshoe-shaped ridge (the last part of the ridge you’ll be hiking).

Looking up at Tent Ridge from the trail below!
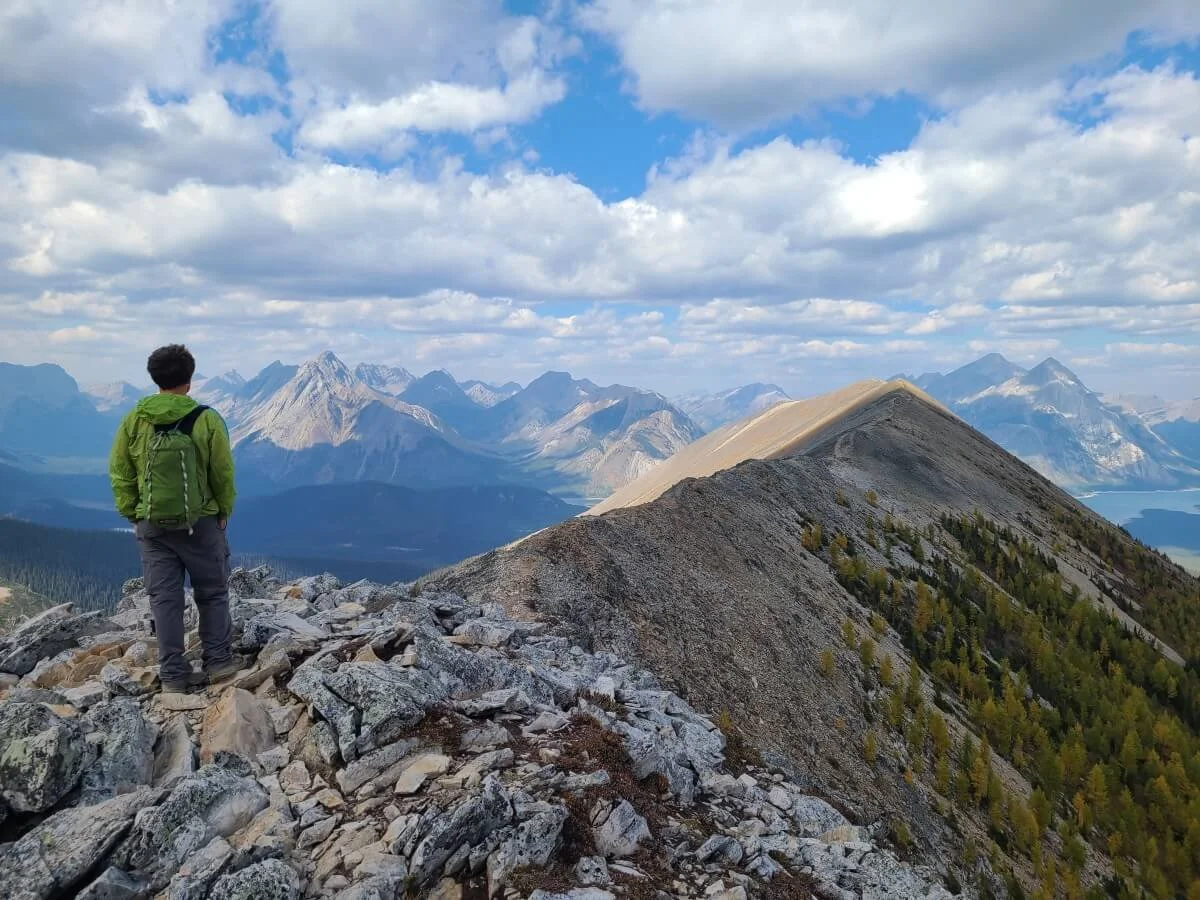
You’ll follow along the bottom of the ridge into an open meadow, and here, the entire Tent Ridge is sprawled out around you! It took us a minute to realize what we were actually looking at and that this entire thing was the whole ridge…it looked so much bigger and longer than we were expecting and to be honest, it did look pretty intimidating from down here! When we looked closely, we could all the little ants making their way around each part of the ridge (it was busy that day!).

Standing below the Tent Ridge horseshoe! The left peak is the first peak you will cross (the one with the weather station). After, you’ll hike down to the saddle and back up a steep path to the peak on the right (the summit of Tent Ridge).
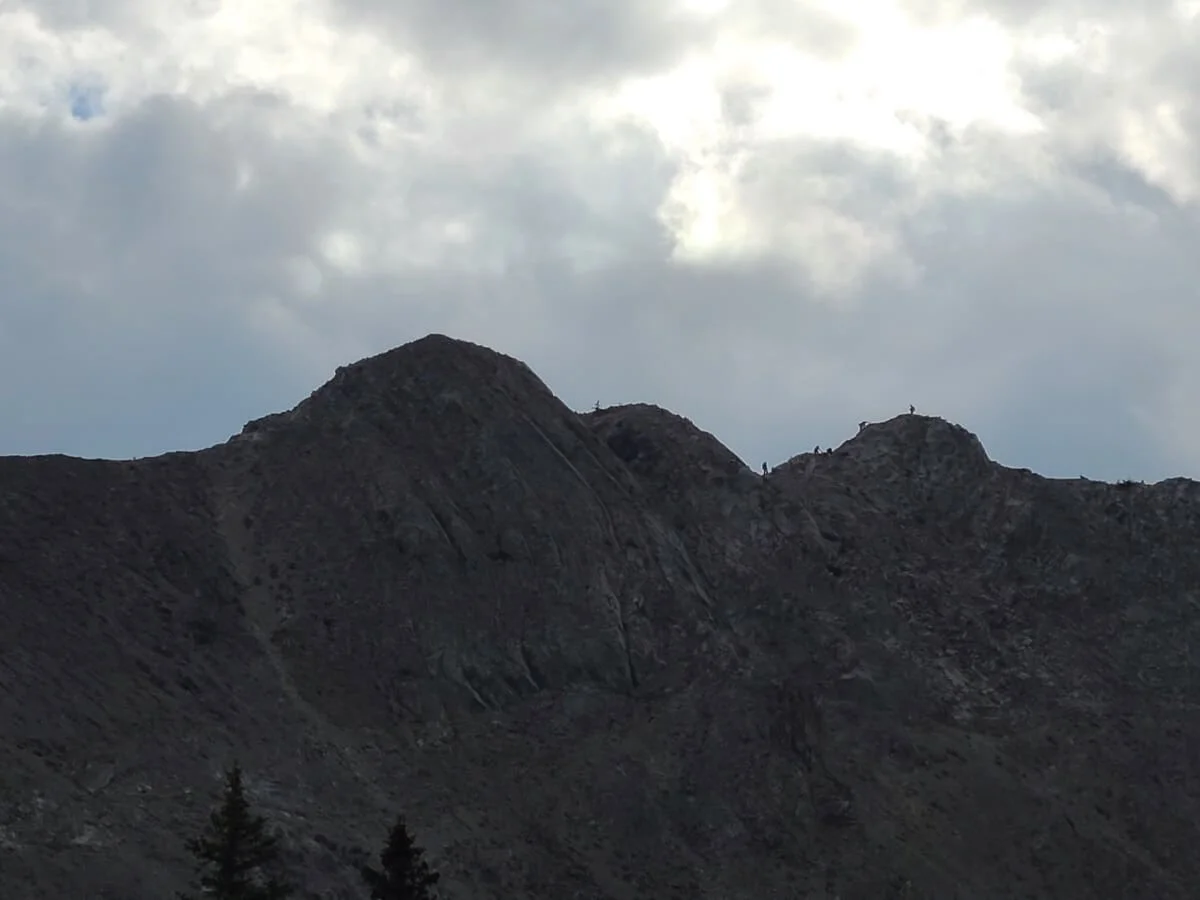
A zoomed-in view of the people up on Tent Ridge
From the meadow, the trail turns left towards the eastern side of the ridge and again climbs briefly though the woods to a little clearing that sits just below the start of the ridge climb. From this clearing, you start to get your first great views back to Spray Lake and over the surrounding mountains, but it only gets better from here. At this point, you’ve hiked about 1.8 miles and have already climbed about 1,000 feet in elevation.

View over Kananaskis start to open up at the base of the climb up Tent Ridge
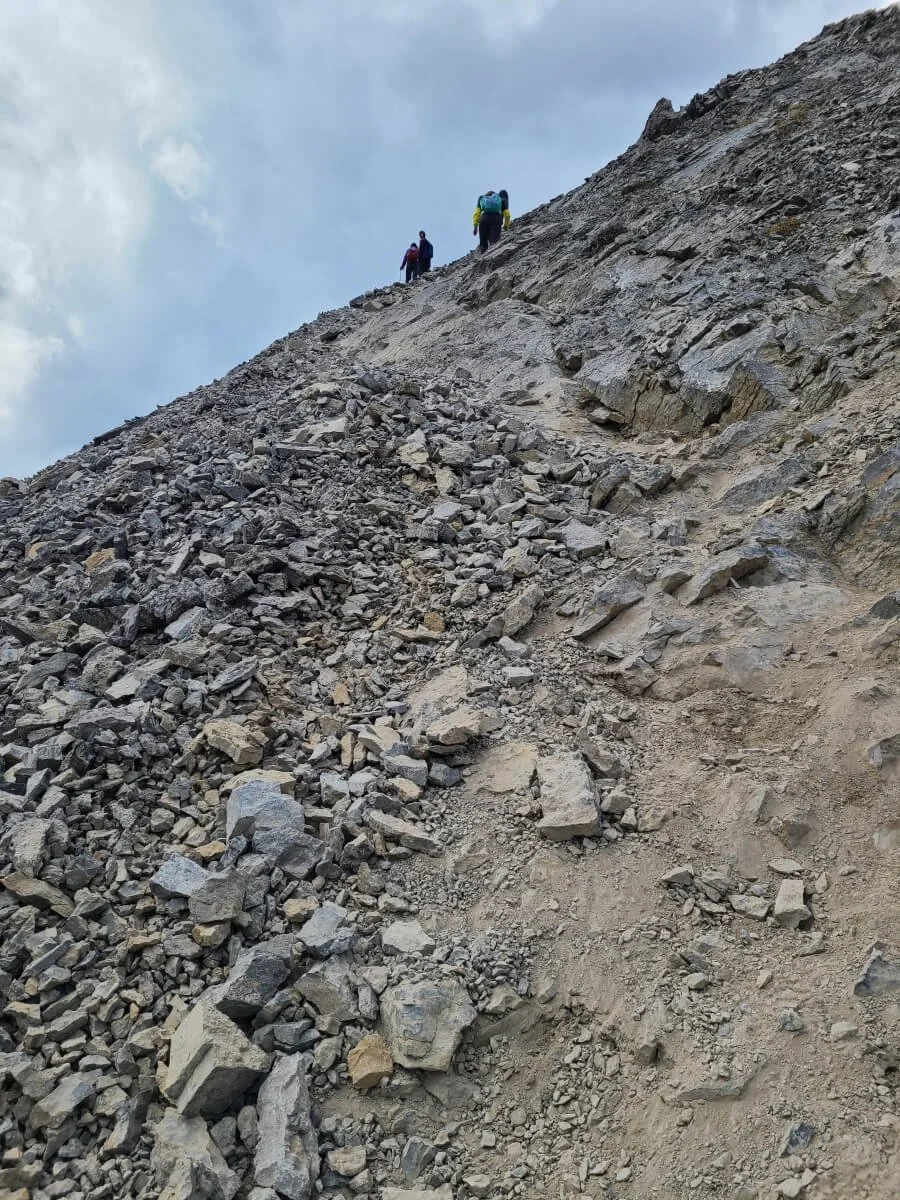
But, here is where the real climbing begins. Here, the trail transitions from soft dirt and gradual inclines to steep climbs up rock and scree up the eastern side of the ridge.
This initial part of ridge climbing consists of little zigzags through the scree up the steep slope. It’s well-trodden so not that slippery of a climb up because the path through here has been so well established. From the bottom, it looks like it’s going to be just a short spurt of climbing so it didn’t seem like it would be too bad, but really, from here, it’s just up…and up…and more up. On the bright side, the views really open up all around and get better and better the higher you go, but especially behind you, so don’t forget to turn around every once in a while to enjoy the view over Spray Lake (and to get a quick breather, too!).

Looking back down the climb up Tent Ridge with gorgeous views that keep getting better and better!
As you get higher on the Tent Ridge hike, you also get a different perspective of the whole horseshoe-shaped ridged, and it does look intense. I didn’t realize just quite how much elevation is lost between the two peaks along the ridge, and the second peak (the summit) of the ridge looked pretty intimidating from this angle- it looked quite steep (spoiler alert: it was just as steep as it looked from over here!).

Looking at the summit of the Tent Ridge hike
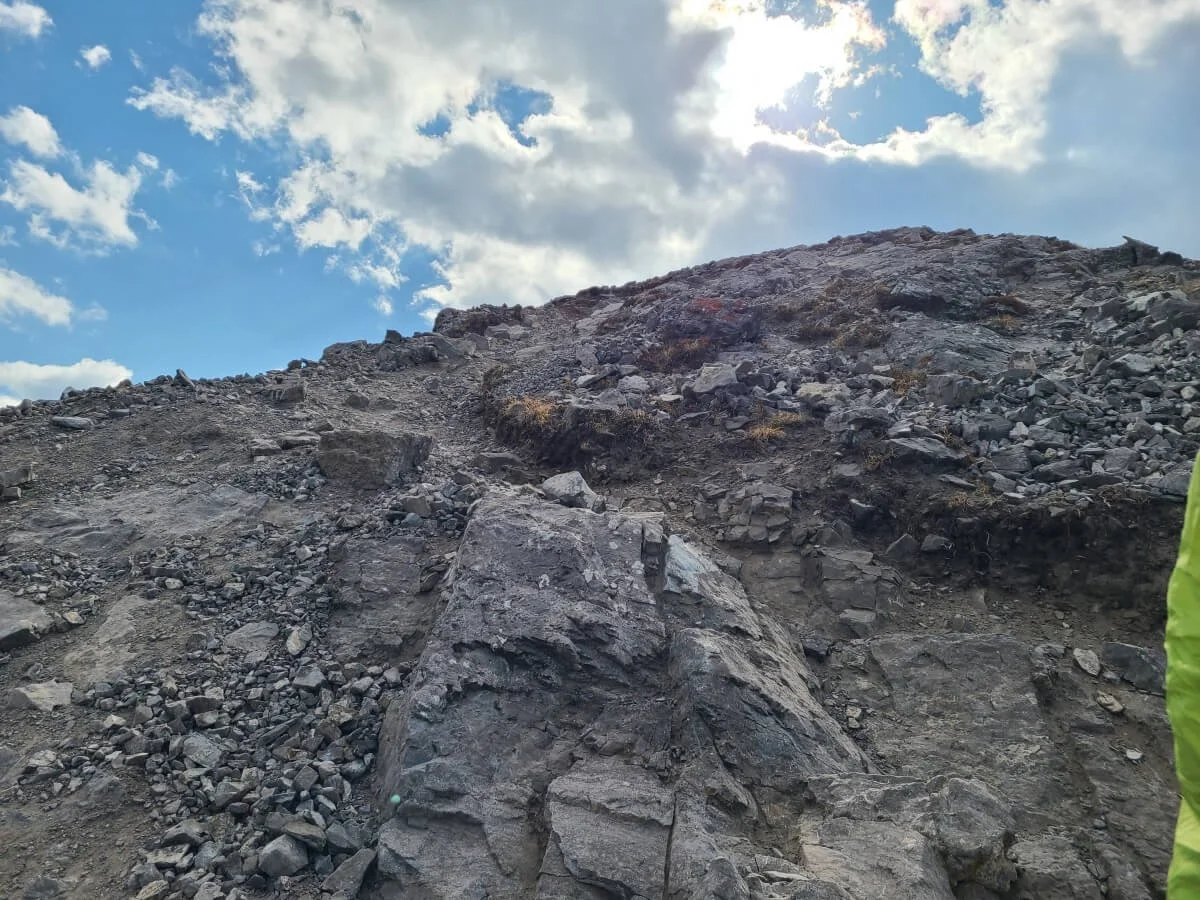
After you make your way a bit up the ridge, you’ll come to the infamous short scrambles on the Tent Ridge hike. There are a few of them here. The first is a very short chimney-like feature that requires just a touch of scrambling and should be no problem.
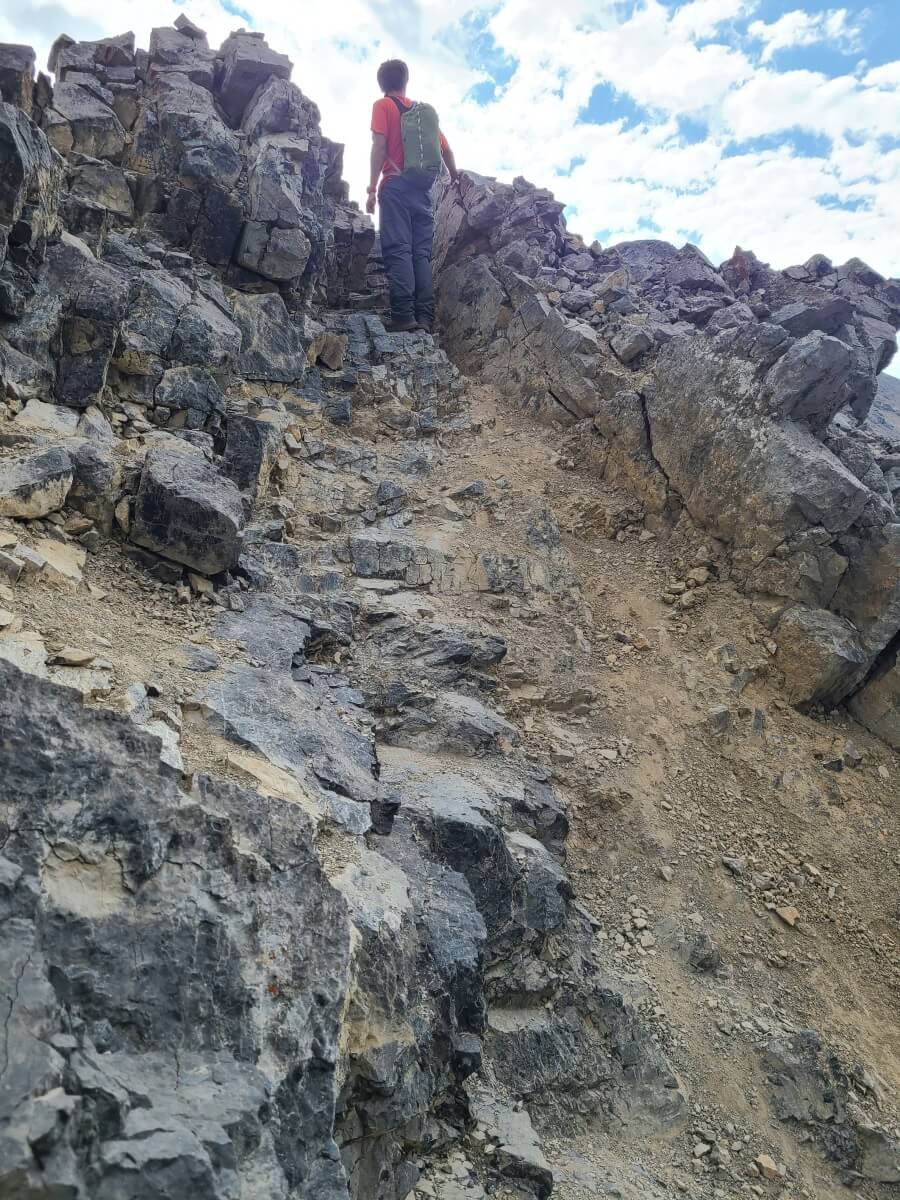
Kevin standing in the “chimney” along Tent Ridge
Looking back down at Melissa climbing up through the chimney part on the Tent Ridge hike. There’s no exposure here…just a short climb up through the rocks.
Then just past this part is more of an involved scramble. It’s short (maybe about ten feet tall), and there is a little bit of exposure to the left side of the climb. We thought this scramble was easy and we were able to walk right up. There were solid places to step with your feet and grab with your hands, and to be honest, I didn’t even notice the exposure on my side (as someone who has a healthy fear of heights, too!). We did see two girls here trying to detour around and below this part along the slope to the right, but it seemed like they were really just making it harder for themselves, although I guess this would be possible if you didn’t feel like making this scramble. Again, we are used to this kind of thing and think it’s fun, but not everyone does! So take a look at our pictures to give you an idea of what the Tent Ridge scrambles look like.
Kevin standing at the base of the short scramble on the Tent Ridge hike

Looking up the Tent Ridge scramble from the bottom
Kevin heading up the scramble on Tent Ridge

Looking back down on Melissa in the middle of the scramble on Tent Ridge
A pair of hikers navigating around the Tent Ridge scramble along the slope to the right- an option if the scramble looks too intimidating.
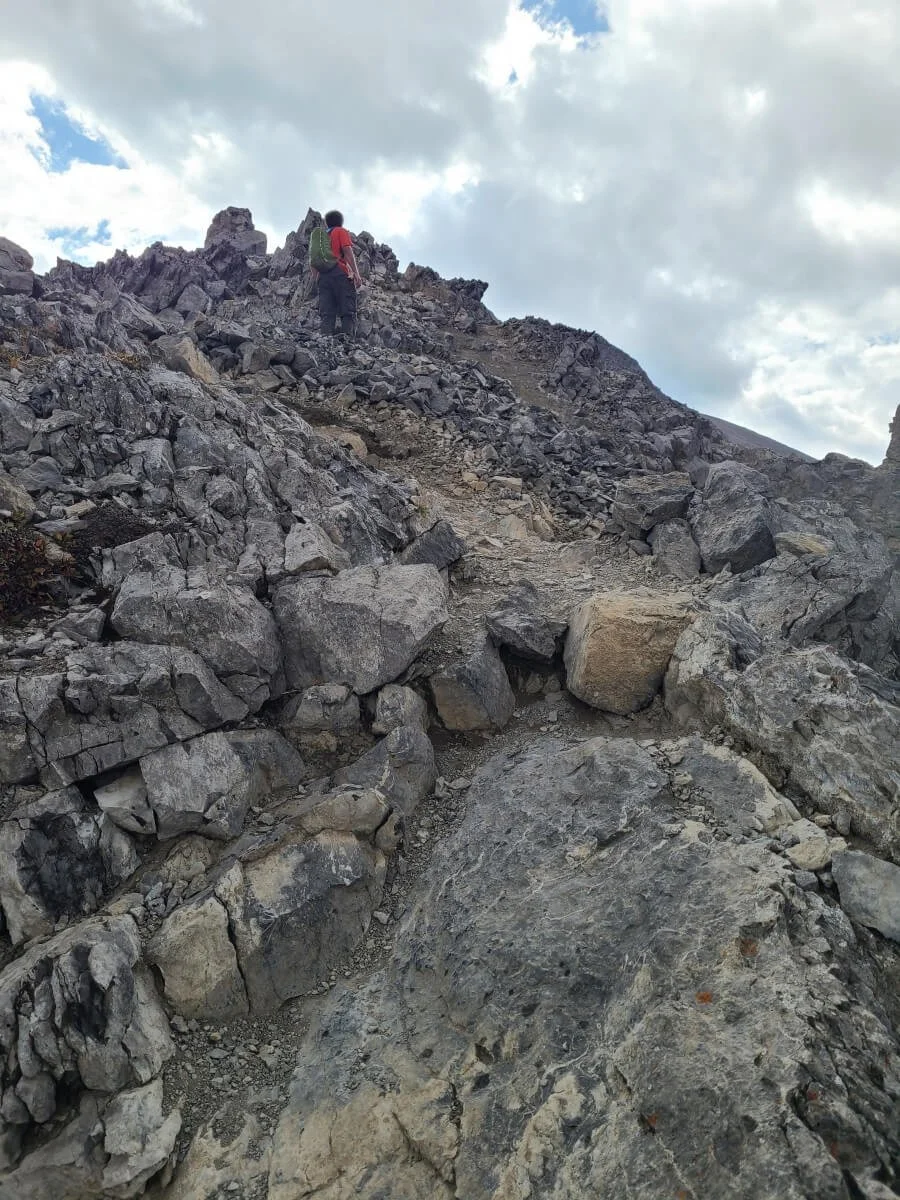
Once off this scramble, the path continues climbing along the rocky ridge. The mountains behind the far part of the ridge start peeking out and the views are starting to get really good in that direction!

Even after the scramble, the Tent Ridge hike continues to be steep and rocky

Epic views over Tent Ridge in Kananaskis
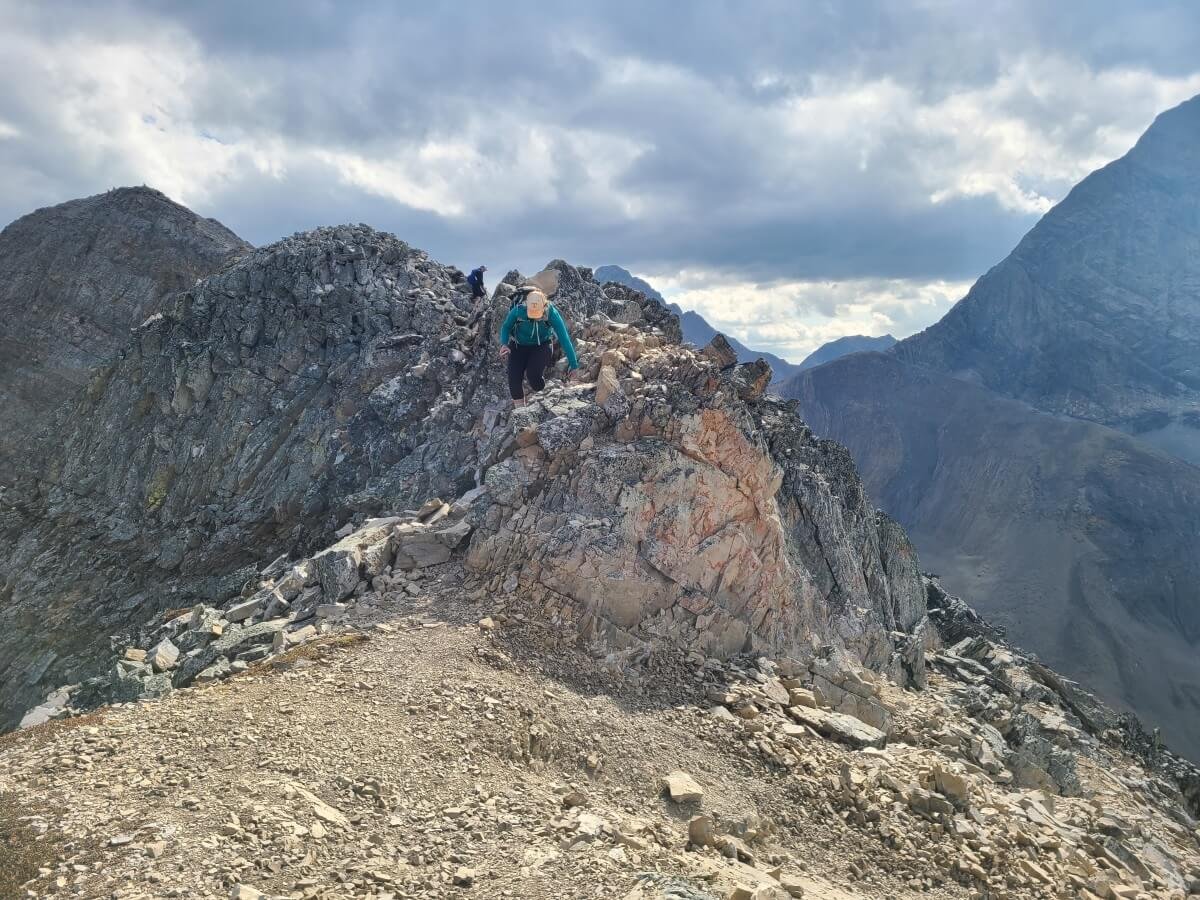
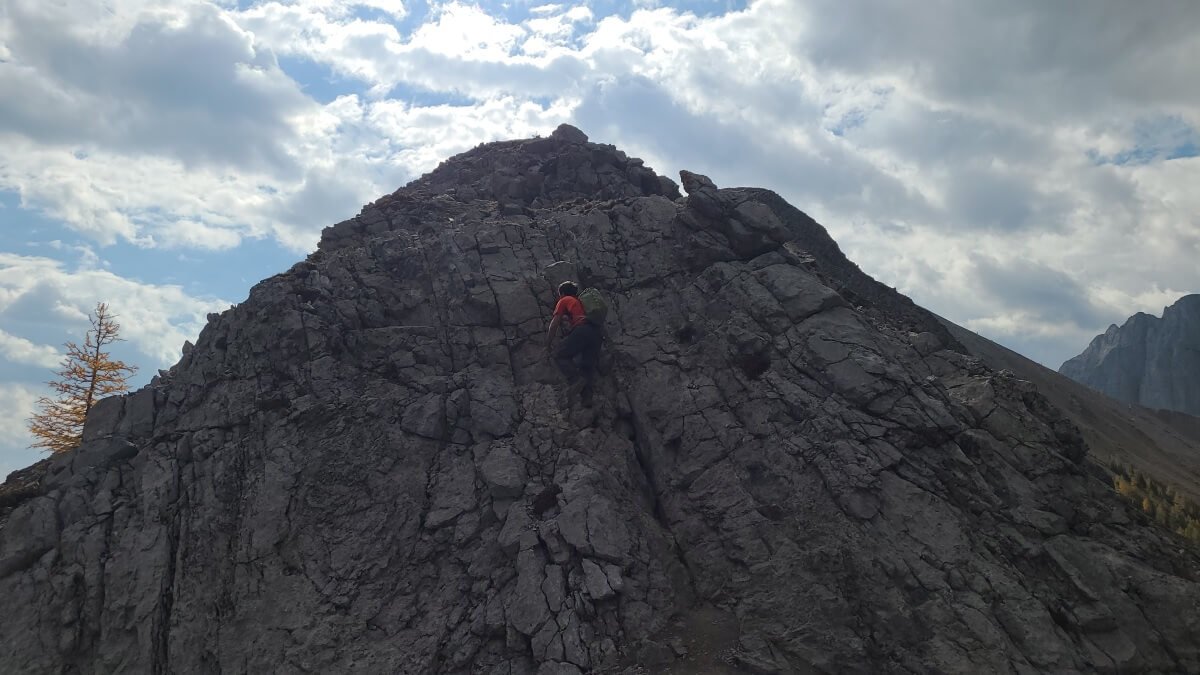
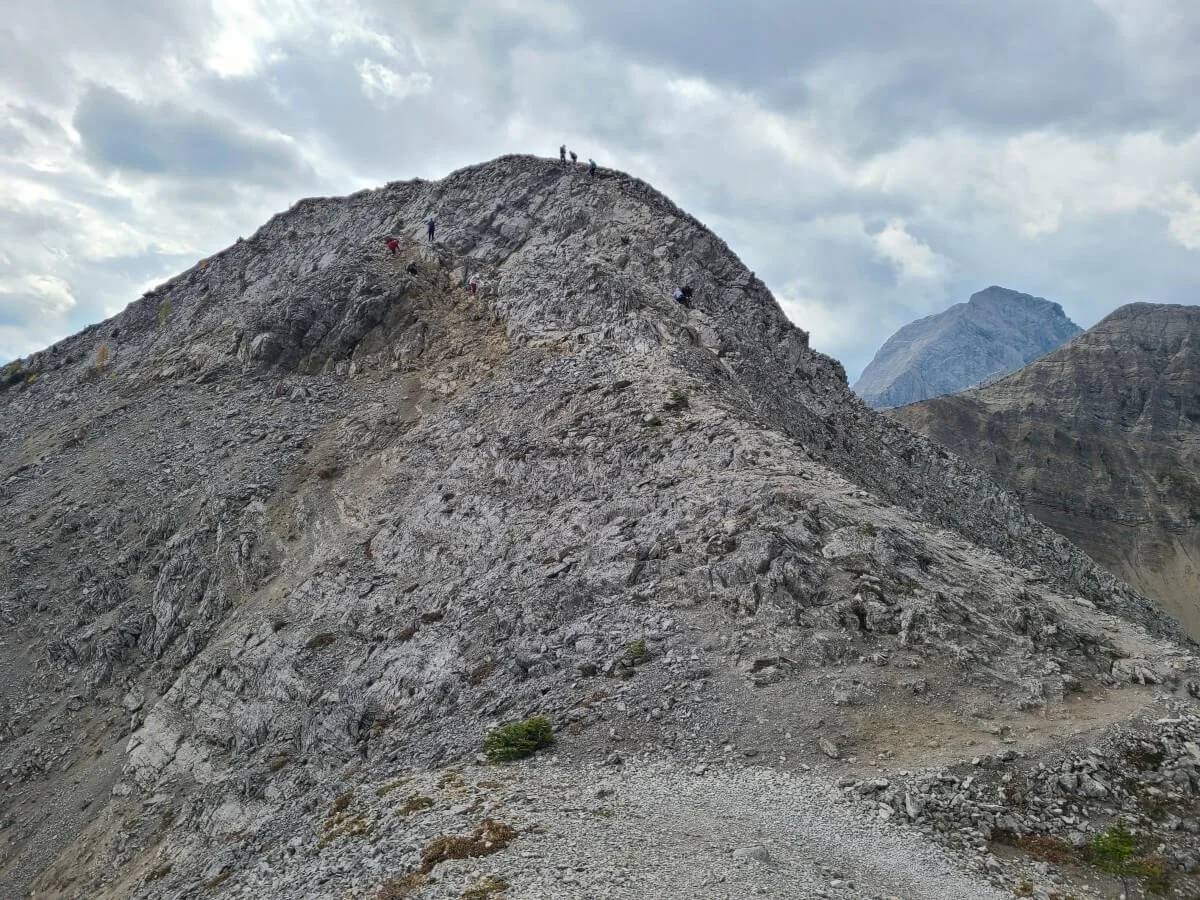
Shortly, you’ll come to the next scramble, which is the one I think everyone refers as “the scramble” in their reviews. It’s definitely the tallest scramble on the Tent Ridge hike, and there’s no getting around this one – only up it. We did see people struggling a bit here, as well as people backtracking down it because they went up it the wrong way (they went up it on the left side-the easier way is going up towards the right side of it).

A view of the scramble along Tent Ridge. You can see two groups of people on the scramble. The group to the right is on the better path up, while the group on the left has to backtrack down and come up the right.
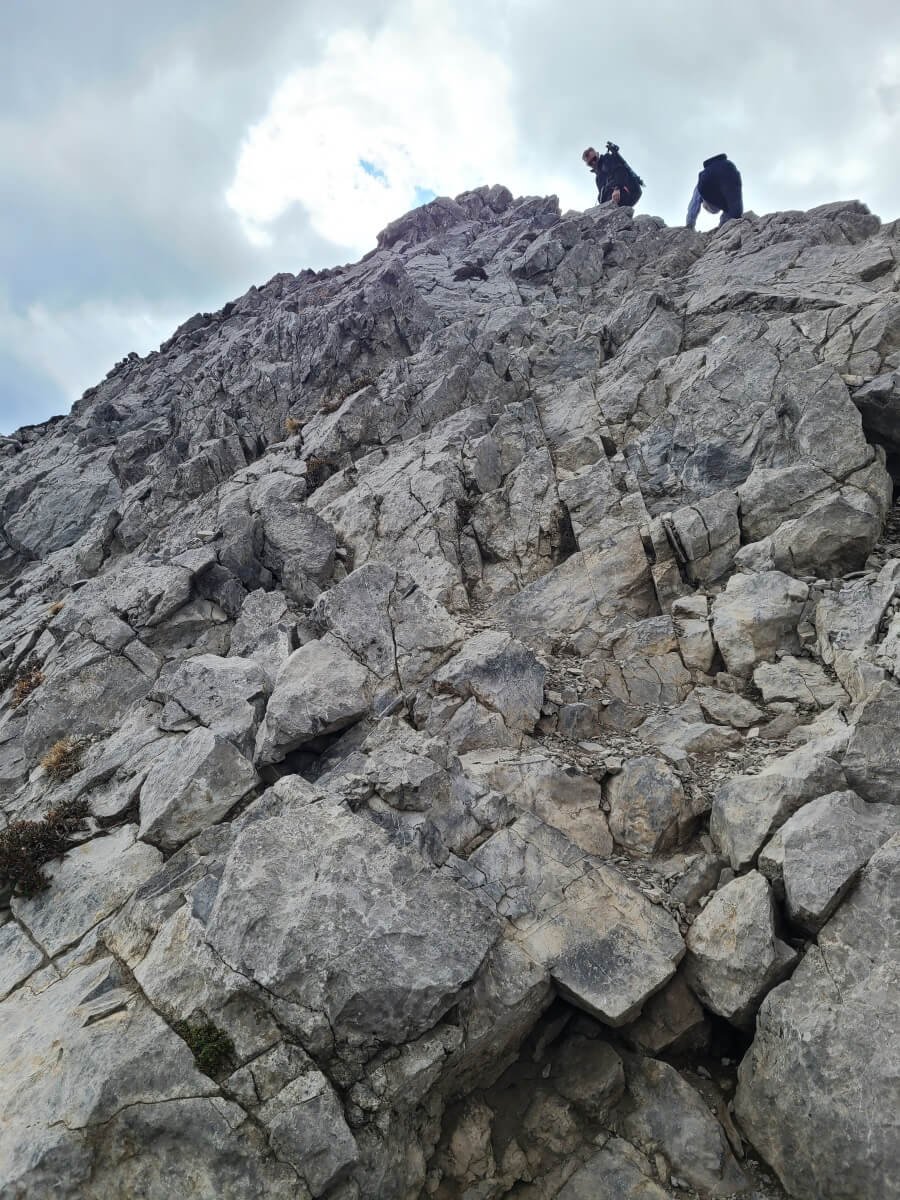
Another view of the Tent Ridge scramble, this time showing the exposure off the left side
Again, we walked right up it, and the exposure, if any, didn’t phase us. There were solid places to step up on and so it really felt more just like a particularly steep walk up than a sketchy scramble. It always felt solid to us and never felt like we’d fall or slip. But we could definitely see how if someone isn’t used to this or doesn’t have the confidence built up for it yet how it could definitely be a little challenging or scary, so again, take a look at the pictures to give you a better idea of what the scrambling looks like!

Kevin starting up the Tent Ridge scramble
A view up the Tent Ridge scramble
Looing back down on Melissa climbing up the Tent Ridge scramble
After this scramble, the trail continues upwards. From here, there are still spurts of steep climbing up rocky parts of the ridge, but there’s not really any technical scrambling involved. Keep looking behind you for awesome photo ops back over the ridge and out to Spray Lake!

There are still plenty of rocky portions left along the Tent Ridge trail!
Beautiful views over Spray Lake from the Tent Ridge trail in Kananaskis

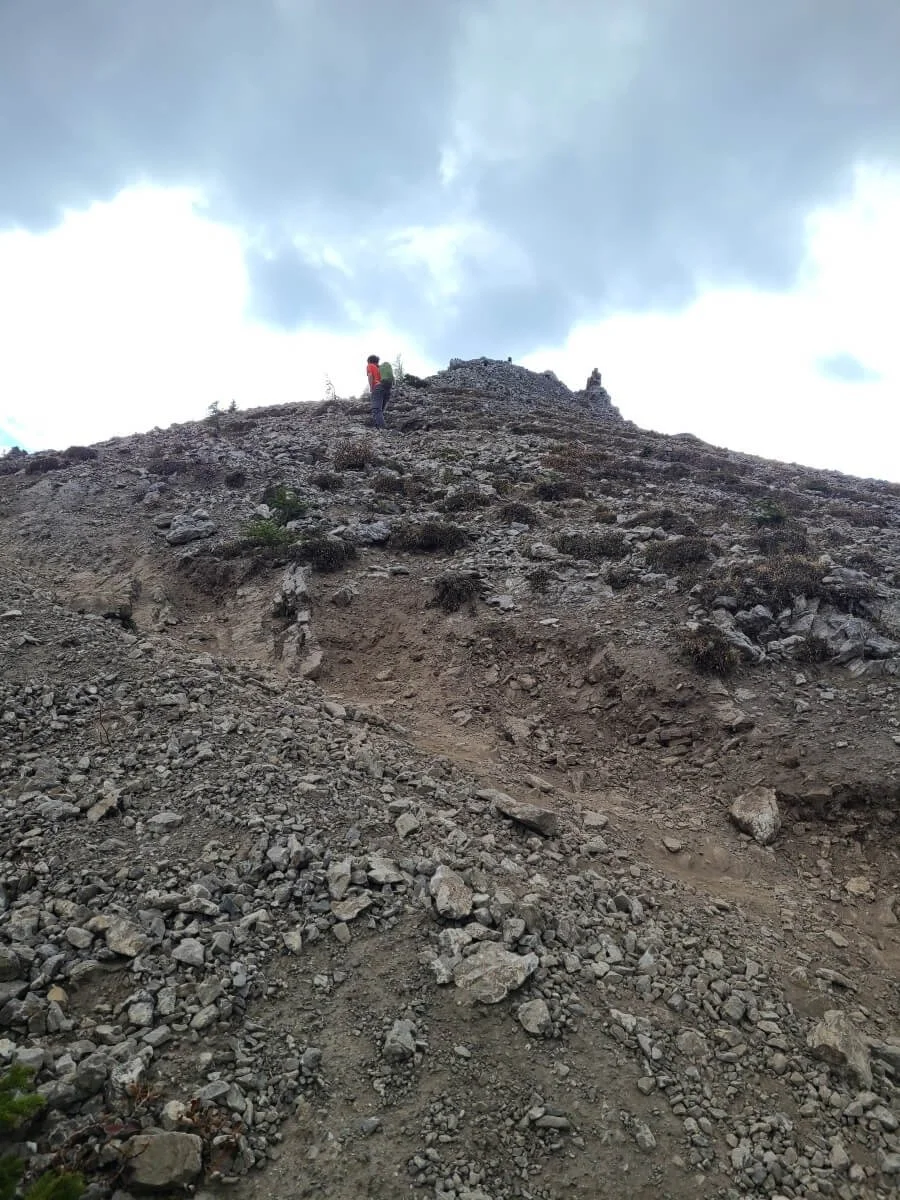
Eventually, the trail becomes a little bit more “path-like”, but you’ll still be climbing steeply with just a few rockier sections to maneuver for the final section up to the first peak where the Tent Ridge weather station is located.
The final push up to the first peak along the Tent Ridge trail
We arrived at the weather station after two hours of hiking. Up here, you’ll get really amazing views, so if you had been questioning your life decisions as you scrambled up the ridge, here is your answer! From this peak, your views are now opened up to the other side of the ridge out to a sea of epic and jagged mountain peaks. One of the things we kept saying is how we loved the “depth” of the mountains here in Kananaskis, and how they just seem to go on forever. Truly an amazing view!
Staring out over the dramatic Kananaskis mountains from the first peak on the Tent Ridge trail
Many people choose to take a break here and eat a snack, but we used this as our opportunity to break ahead of the crowds for a bit and continue on the Tent Ridge hike with some solitude, so off we went.
The trail off the first peak of Tent Ridge is a steep and very slick path that zigzags its way down along dirt and loose rock. You’ll really have to watch your footing here and hold yourself back a bit (and unfortunately, this is a sort of preview for what’s to come later!). The saving grace here is the epic views in front of you as you head down (if you’re able to take your eyes off of your feet without slipping here!). It took us a long time to make it down this part simply because I kept stopping to admire the views and take pictures! The mountains seem right in your face here.

Heading off the first peak of Tent Ridge with epic mountain views ahead
Looking back up the Tent Ridge trail back towards the first peak and weather station
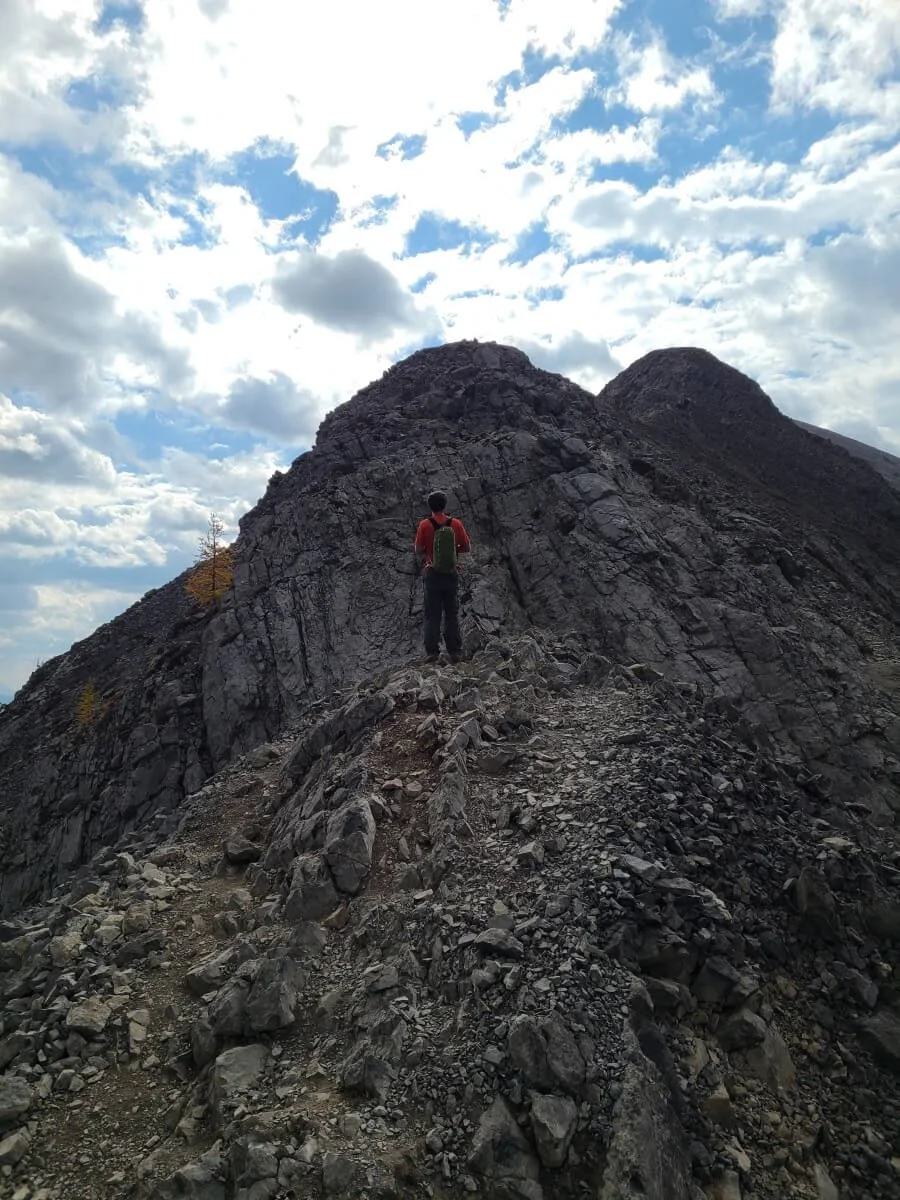
Once you reach the tiny saddle in between the peaks (and curse the path for erasing all the hard work you did to make the initial climb up…or is that just me?), you pretty much immediately start to head right back up.
The climb up to the summit peak of Tent Ridge was honestly just as brutal and steep as it looked from afar on the earlier part of the ridge. Luckily, you can see the top the entire time and there’s no false summit here…you can see your goal, which is good motivation to just keep going. This part of the Tent Ridge hike is just a slog. There’s luckily no scrambling here, just a steep path up through slick scree and dirt which seems to get steeper the higher you go.

Looking up to the summit of the Tent Ridge trail from the saddle between the two peaks

A steep path full of loose rock leads up to the Tent Ridge summit
More steepness!

Looking down the Tent Ridge trail to the summit, with the first peak and saddle behind us

Frequent breaks to enjoy the epic views (and catch my breath!)
Towards the top, the scree turns into more solid rock, and just below the summit you have to hike along a more exposed section along the slope of the ridge where you have to traverse across some rocky parts. Then you’ll turn to make a short final climb up to the summit. This part might require a tiny bit of a scrambling but nothing like the you’ve already done, so you got this!
The Tent Ridge trail gets steep towards the summit!

The last bit just before the Tent Ridge summit
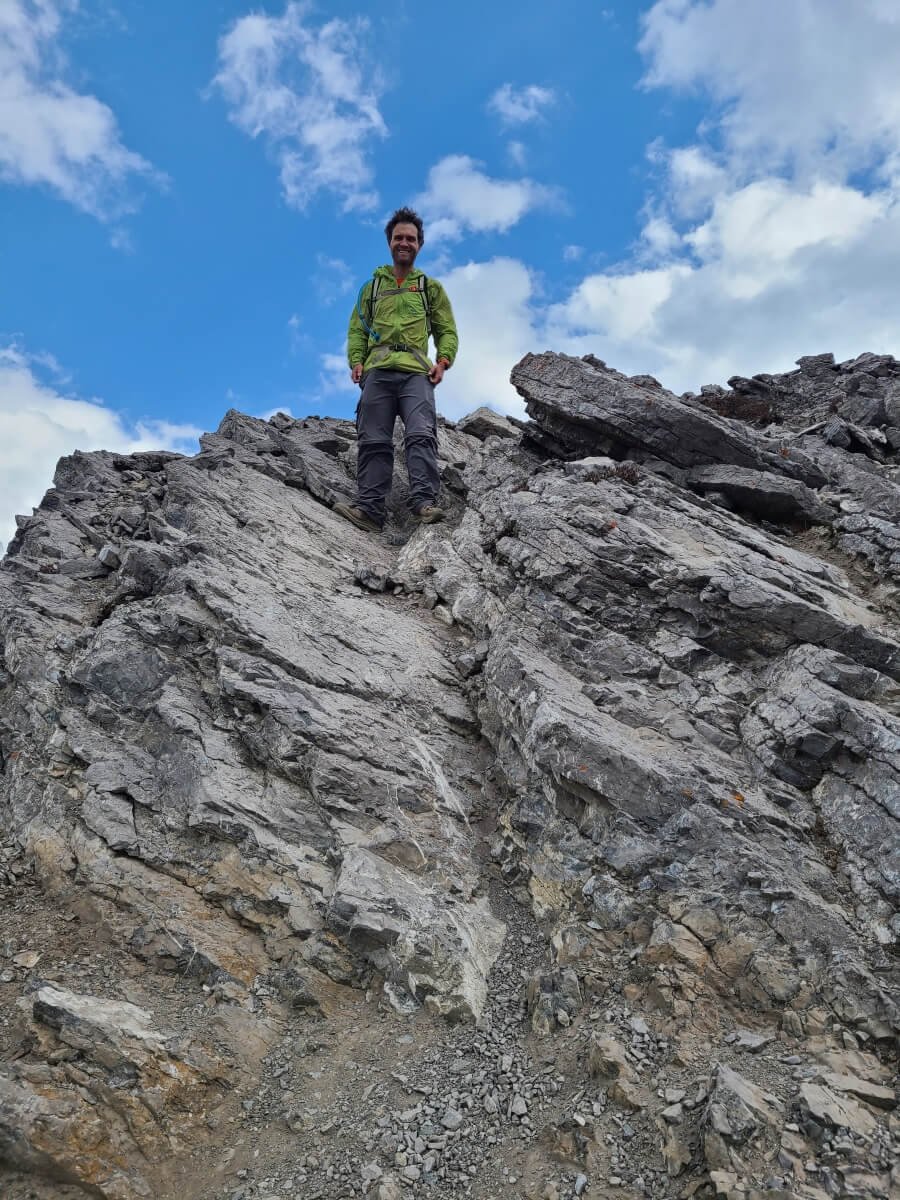
The Tent Ridge summit is a pretty small area, but the view is epic. The mountains now feel closer than ever and all around. The view really makes you feel like you’re in the thick of it, out on a remote mountain peak in the middle of nowhere…well, if it wasn’t for the crowds of people you’ve probably been hiking with…but crowds aside, it’s still an amazing view, and one we feel is more than worth the climb to get to.

Kevin exploring the summit of Tent Ridge

At the Tent Ridge summit, you’re right in the center of the Tent Ridge horseshoe. Here, you can look out over Spray Lake and see each side of the ridge. Between the two sides of the ridge is the forest and meadow that you hiked through on the approach to the ridge.
Most people use this as another chance to rest and eat while enjoying the views. Again, we passed through kind of quickly here, using it as another opportunity to break free from the crowds. Because Tent Ridge is a horseshoe, you’ll now be hiking along the other side of the ridge, with amazing views in the other direction out over Spray Lake and the surrounding larch forests, and you’ll have these amazing views for the entire rest of the ridge, so enjoy!
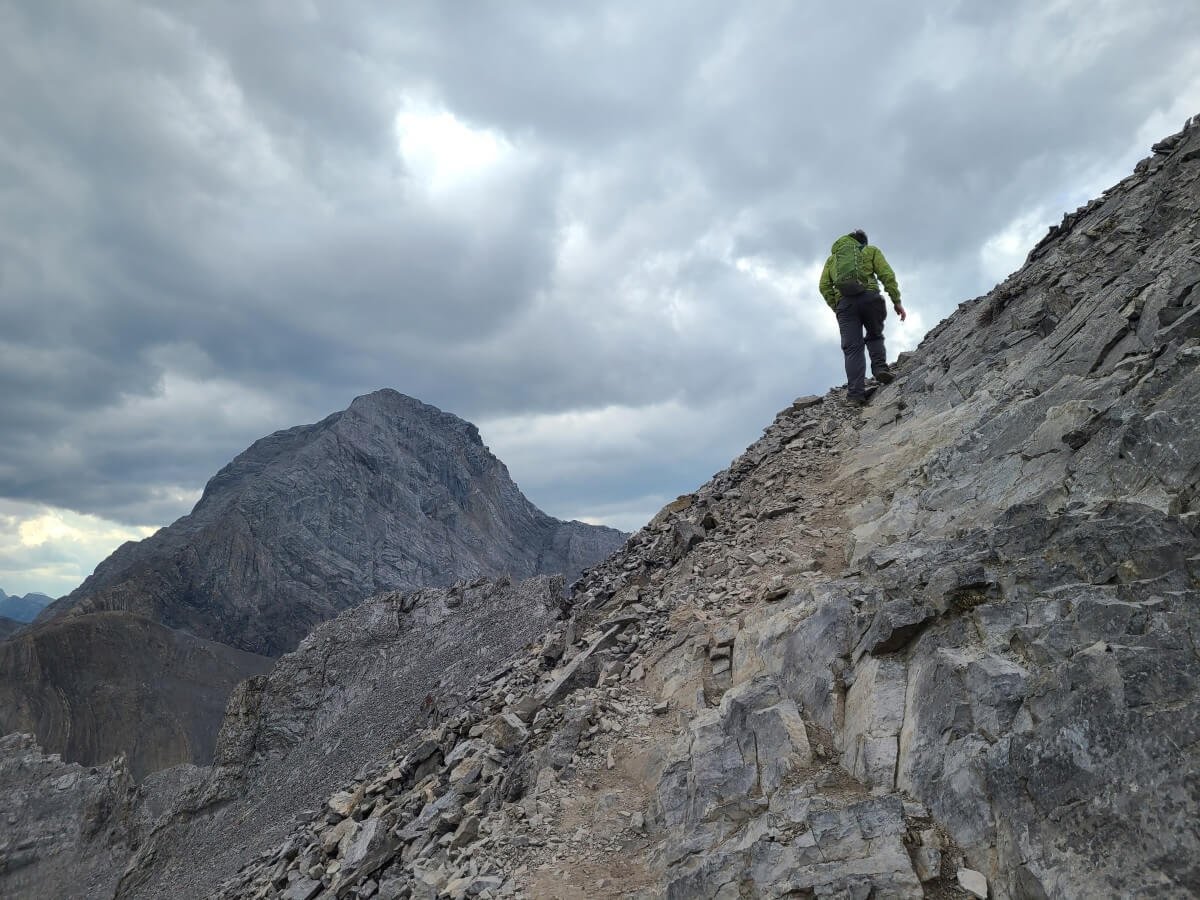
From the summit, the Tent Ridge trail heads gently downhill along the ridge at first. There is a very visible path here that hugs the left slope of the ridge. On the right of the ridge is a pretty sheer cliff drop, so just make sure to stay on the trail here and we promise, you won’t even notice it.

Heading off the summit and onto the western arm of Tent Ridge!
This shows to drop-off along one side of the Tent Ridge trail, with the first peak that you summitted earlier in the hike in the background!
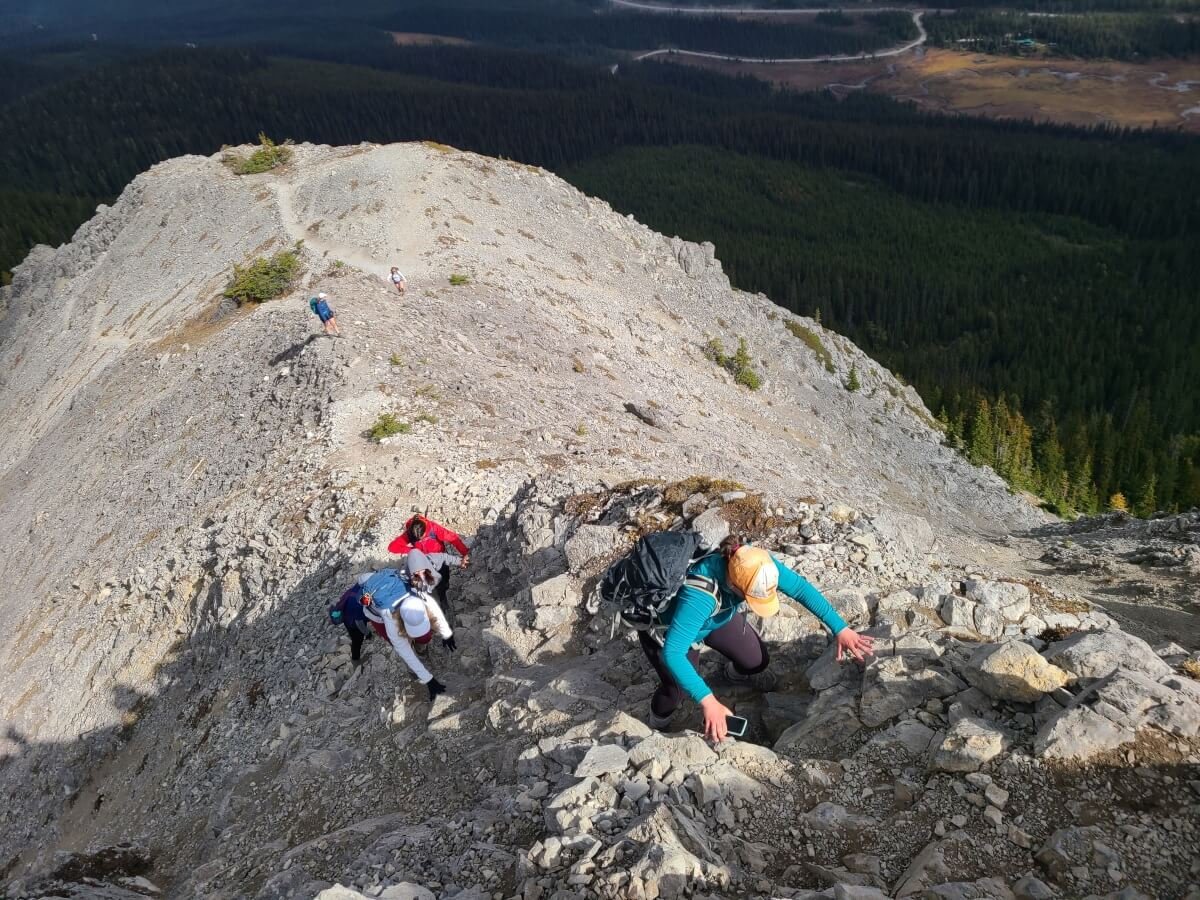
We did read many accounts and reviews of the Tent Ridge hike that describe this part of the ridge after the summit as an easy ridge walk and that it’s smooth sailing from here on out. We wouldn’t entirely say those statements are accurate and I think made us underestimate what the rest of the hike would be like. Although this side of the ridge is definitely easier than the other side that you’ve already climbed, in that it’s less technical and less steep, we wouldn’t say it’s a walk in the park just yet. There is still a bit of a challenge to it, especially if you’re already pretty tired from everything you’ve hiked at this point. And if you look out towards the ridge ahead, you’ll notice that there is still a bit of climbing that you have left to do!
Along this initial part of the ridge, there were still some downhill sections along the trail that were still a bit steep and slick underfoot and required careful footing. Sometimes after downclimbing a particularly rocky and sketchy section, we would look back and notice another path around it to the left that maybe would have been easier. So just take your time here and assess the different options of which way to navigate the ridge. There are some small sections where you’ll traverse across some very sloped rocky sections as well, which might seem sketchy to people.


Some of the rockier and steeper parts of the Tent Ridge hike after the summit
The views just get better and better along the Tent Ridge hike!
There was one particularly weird and rocky part along the ridge that I feel is worth mentioning here. At the end of the rocky part there was a bit of a drop off to continue along the ridge and we had to do a tough downhill down a scree section off the side of it to get down and around it. Once we got further along the ridge and looked back, we noticed this part seemed to be holding up the other groups behind us as well. This is just to say the tricky elements aren’t over yet and you will still be putting in some work on this side of the ridge.

Two hikers above the tricky spot along this part of the Tent Ridge hike

Looking back along Tent Ridge back toward the summit
The trail continues along a rocky section right along the top of the ridge. This is probably the narrowest part of the Tent Ridge that you’ll be walking along, so you might consider it to have some exposure, but it’s nothing like a knife edge or anything and we never felt unsafe (even with all the wind!).
Hiking along a narrow portion of the Tent Ridge trail

Looking off the side of the Tent Ridge trail along this narrow section
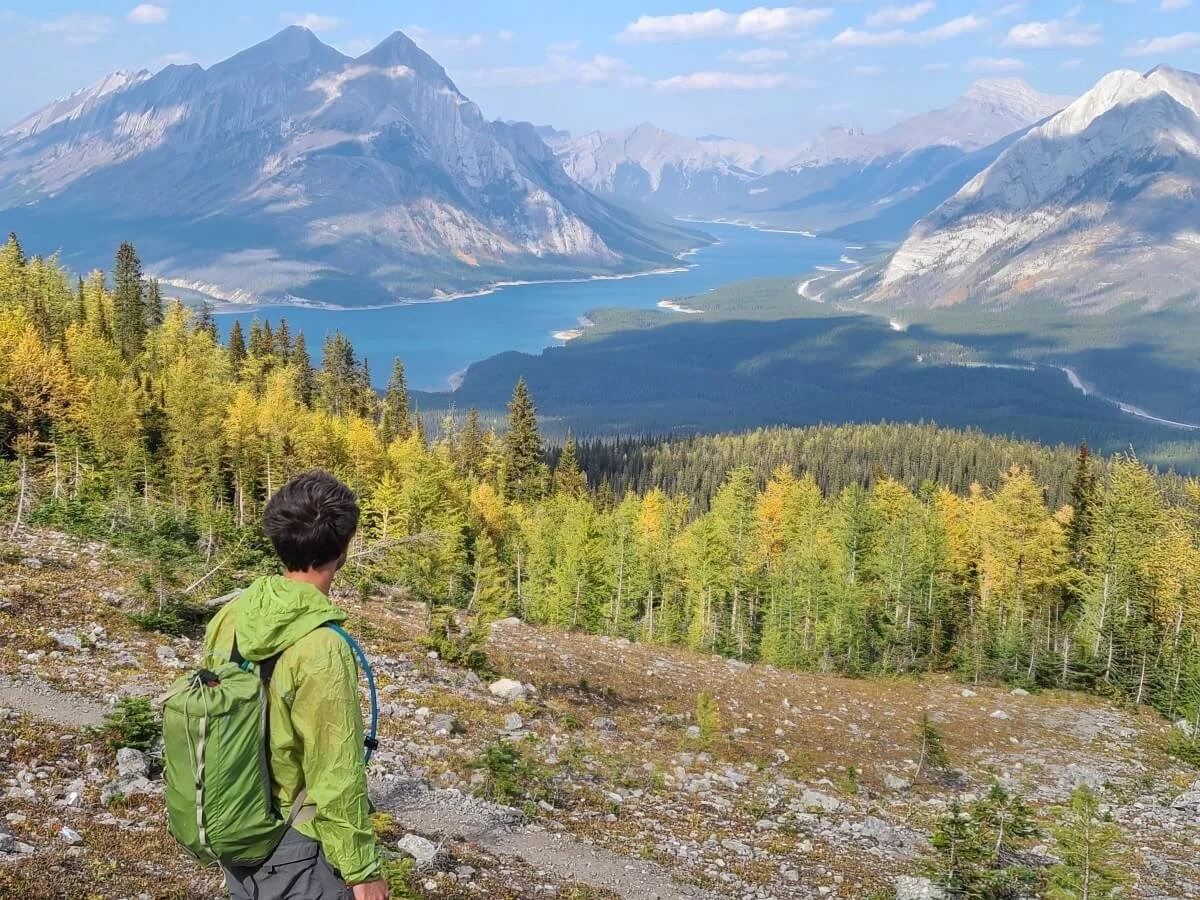
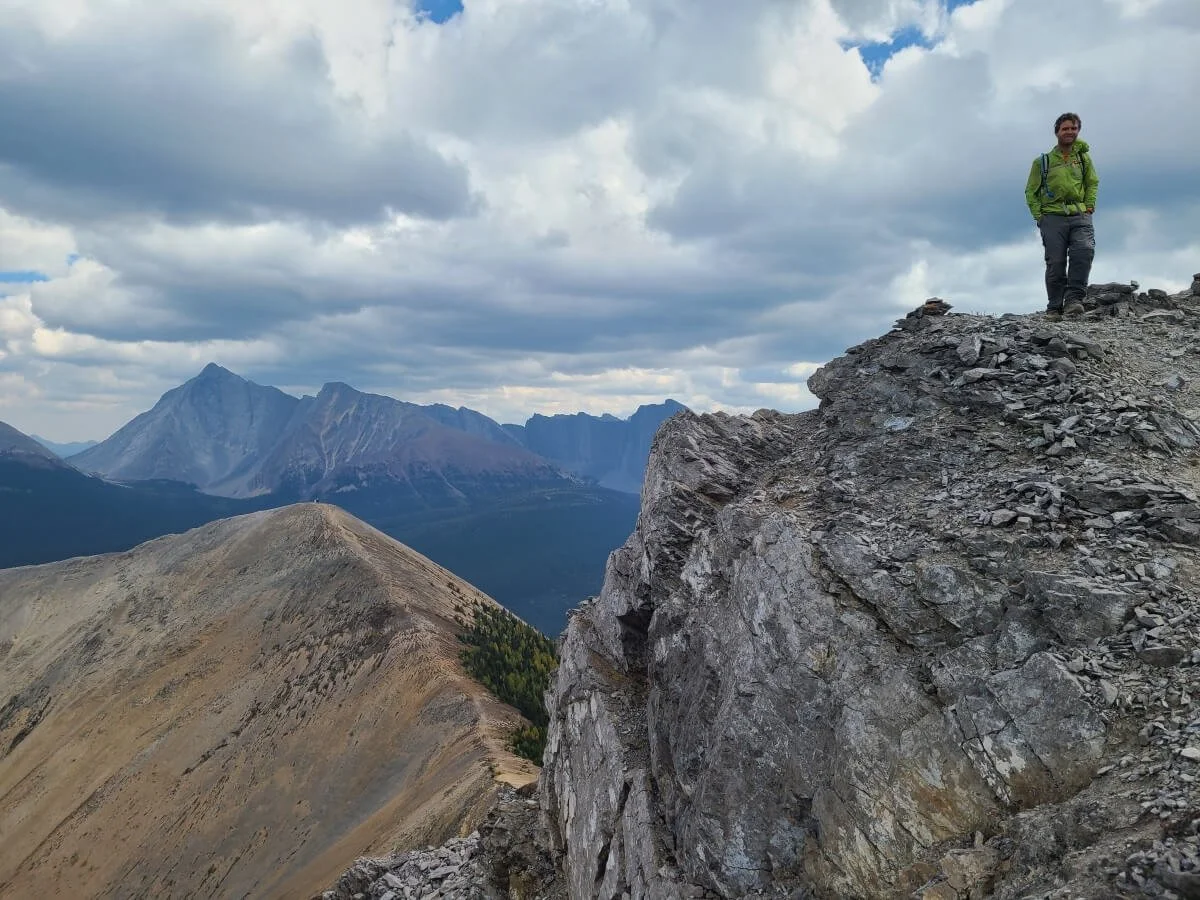
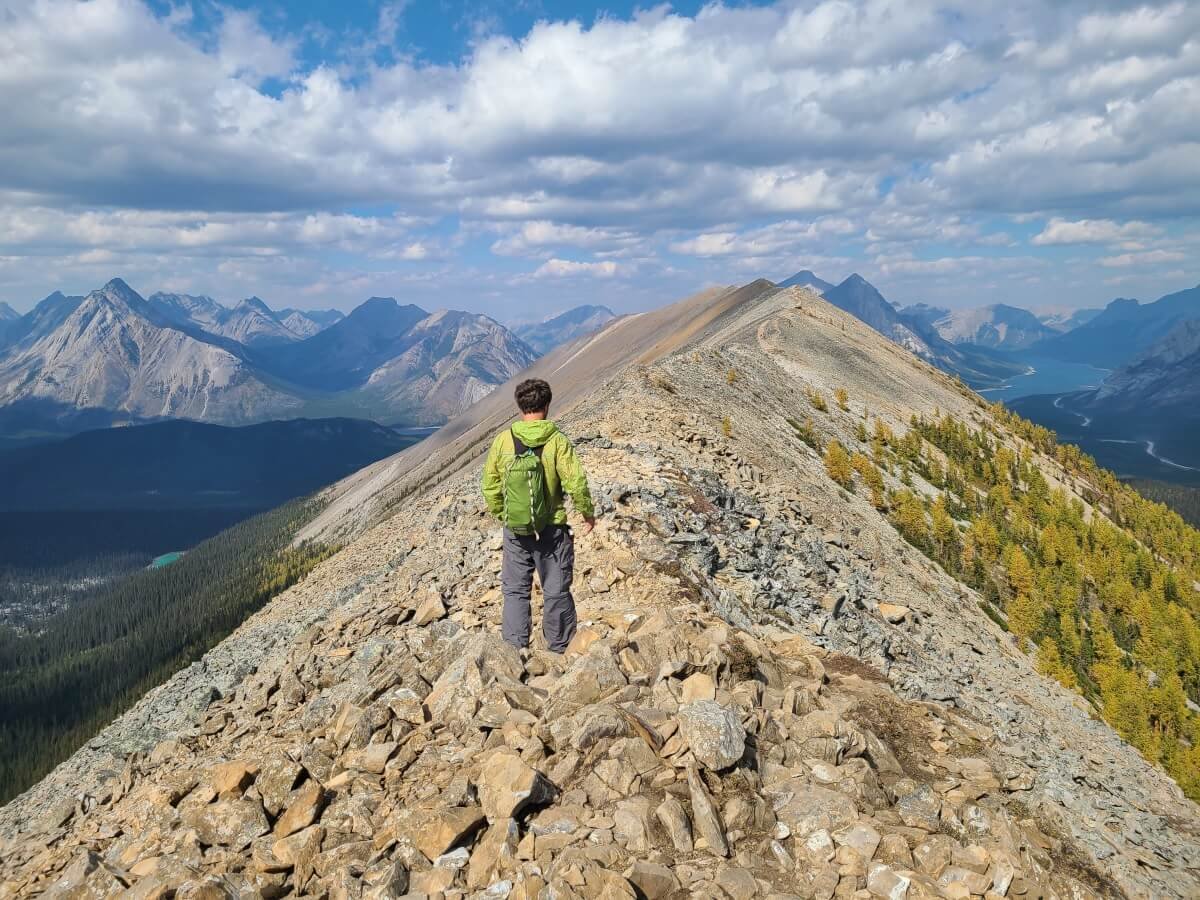
After a while (we’d say about halfway along this side of the ridge), the Tent Ridge trail finally becomes a bit more straightforward and more of what I was expecting the ridge to be based on what I had read in my research. Now a more clear and “normal” (aka less rocky) path forms and easily climbs up each successive bump along the ridge. Here we would official say it’s now smooth-sailing…there is no more scrambling or tricky slick downclimbs (for now!), so you can breathe easy for bit and just concentrate on enjoying the views. It’s incredibly picturesque up here in literally every direction! And don’t forget to look behind you as well as that sea of peaks rises above the ridge in all its epic glory. Another thing that was super cool for us was looking back over at the first part of the ridge that we had climbed up. From this perspective, it looked so intense and it felt so crazy to think that we had climbed that thing. It certainly didn’t feel we had done that much climbing along that intense looking of a ridge, but we did! And you will, too, so give yourself a pat on the back.

A very welcome easy section of trail along the Tent Ridge hike as you approach the final part of the ridge!
Looking back over the first peak of the Tent Ridge hike

Looking back at the sea of mountains in Kananaskis from the Tent Ridge trail!
The one caveat during this welcoming “easy” part of the hike was…the wind. Along this part of the ridge, it got incredibly windy. At times it felt like the infamous Patagonia-force winds! Sometimes the gusts made it hard to breathe, and one time when we were both climbing uphill, a gust of wind came through and literally knocked both of us off our feet! Make sure to have a wind breaker and hang onto your hat!

Hanging onto my hat along Tent Ridge!
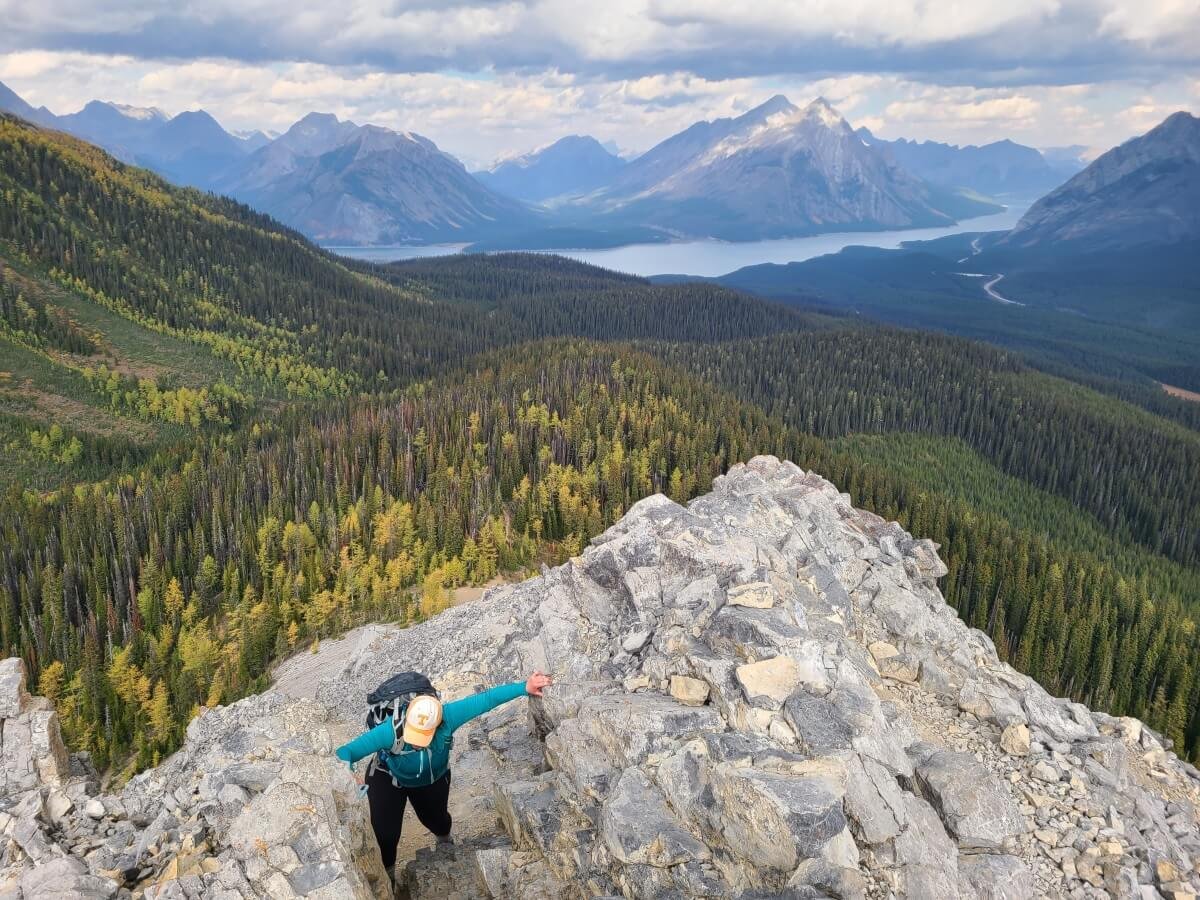
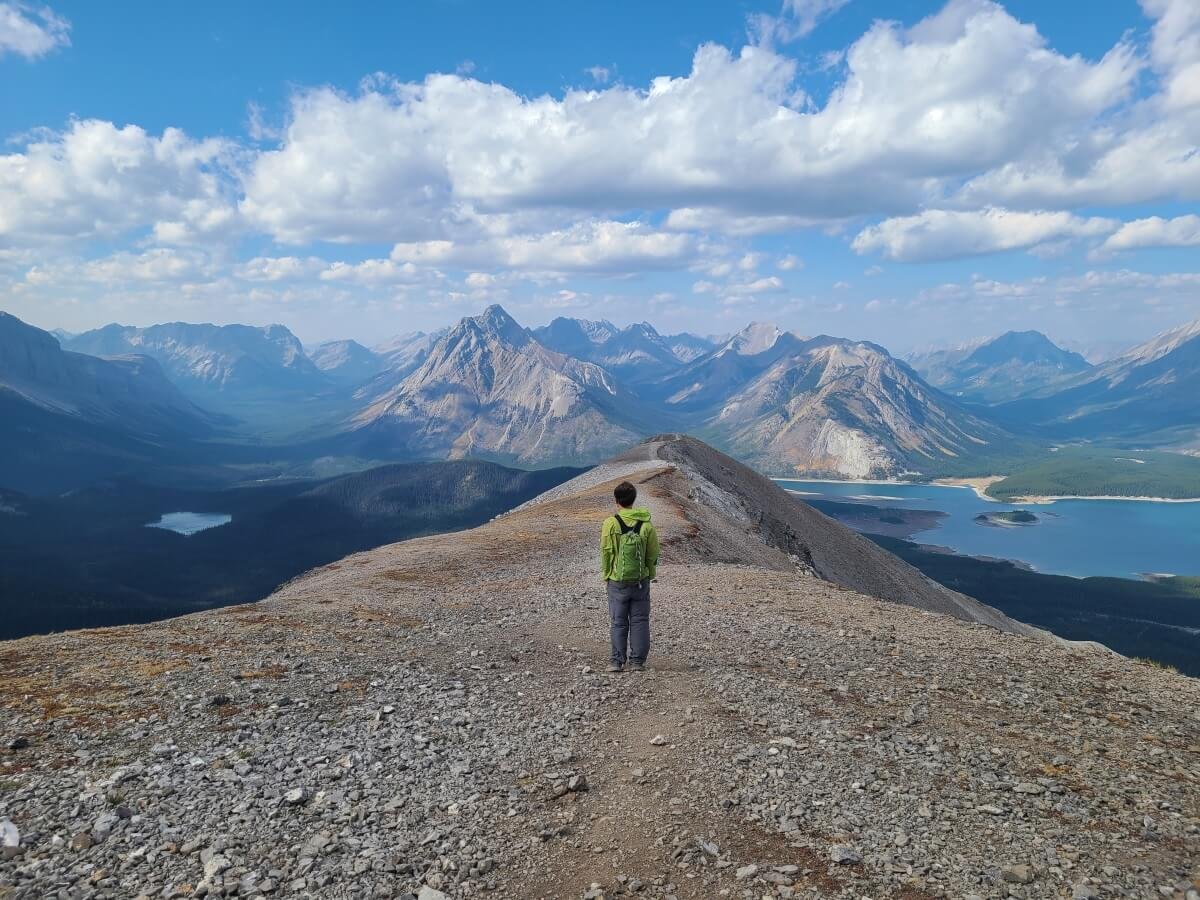
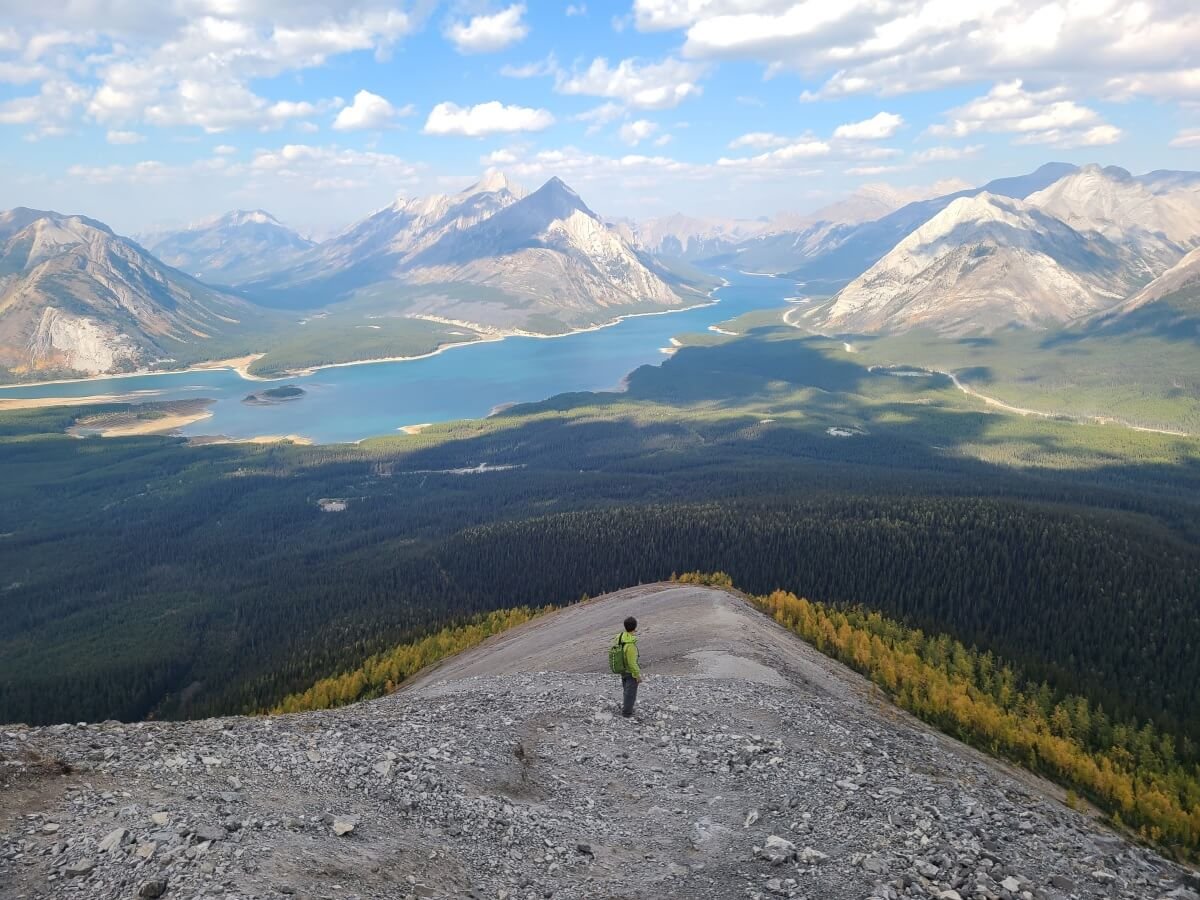
Cresting over the final bump at the end of Tent Ridge is truly epic, as the entire Spray Lake comes into view, and behind you get views of the entire ridge and back to the sea of peaks behind it. This is definitely the “grand finale” view that we’re glad was saved for the end. The changing larches in mid-September were an added bonus!

An incredible view over Spray Lake from the Tent Ridge trail
From here, it’s an easy downhill walk to the very end of the ridge with again, amazing views.
A beautiful walk to the end of Tent Ridge
At the end, you’ll see the trail zigzagging its way down from the ridge. We won’t lie…this part of the hike SUCKED. At this point, our legs were tired, but we still had a long and steep descent down this slippery path of loose rock, dirt, and scree. It was very slick and you really have to watch your step and hold yourself back from falling (which neither of us did successfully as we each were on our butts at least once between here and the car…). For us, we’d take the fun scrambles on the first part of the ridge any day over this stuff! The scree is exhausting and requires a lot of concentration.
Here’s the view back up the path that you’ll be coming down off of Tent Ridge…it’s pretty slick!
On our tired legs this late into the hike, the path seemed to go on for even longer than it looked from the top, probably because we were going to slow and stepping carefully. The saving grace, as always for this hike, were the incredible views over the lake and larches.
Look at that view as you come off of Tent Ridge!
At the bottom of this rocky slope we thought we were done with the slick stuff…but nope. The trail turns right and continues down what may be an even worse route of steep slick dirt! Nothing like saving the worst for last…

The slick dirt path towards the end of the Tent Ridge trail
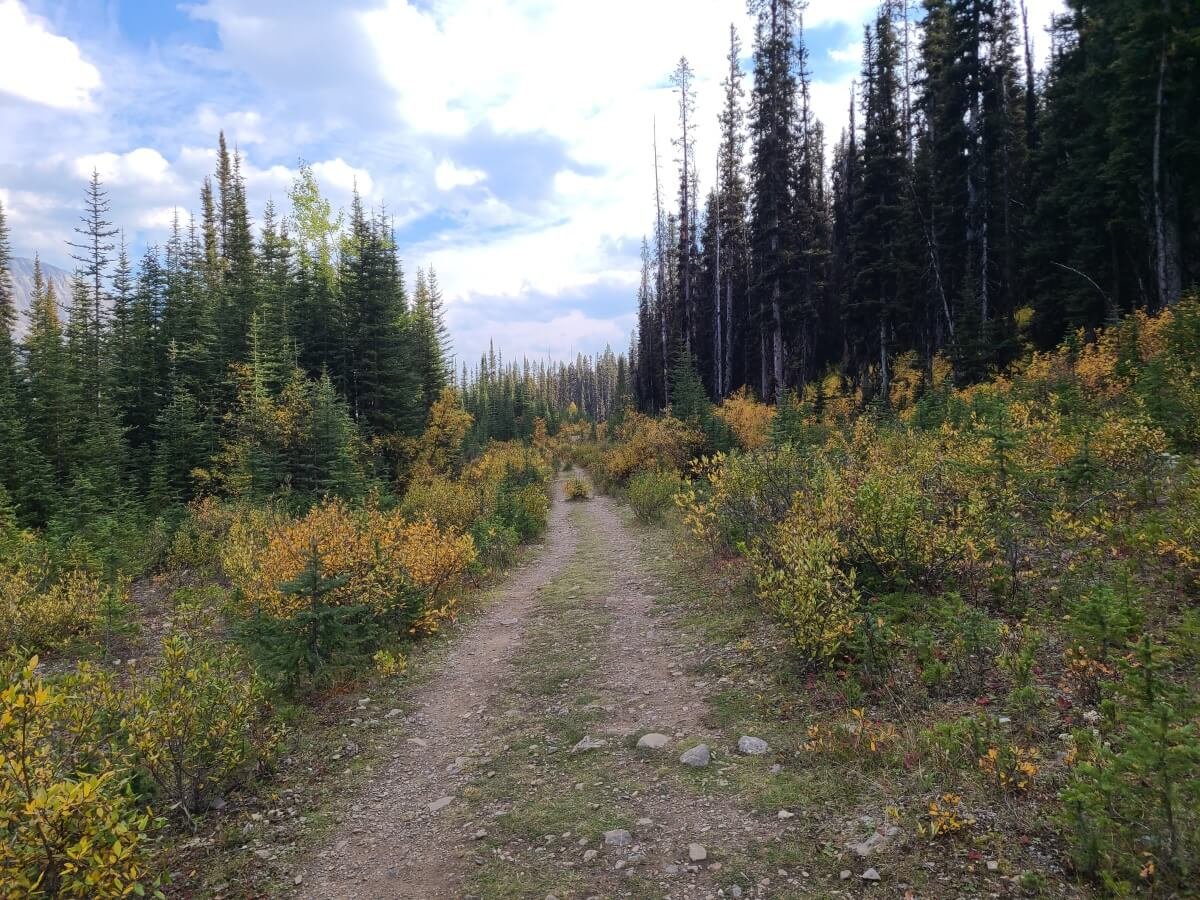
We got down to treeline and thought “Ok, surely we must be done with this slick stuff now, right?!”…nope. The trail continued through trees, still steeply, still slick. By this point, we were definitely over it. But eventually, you will finally reach more forgiving, gentle terrain. The last bit of hiking (around a mile) is easy hiking through the forest to get back to the car. Somewhat annoyingly, the trail aims left (away from the parking lot) until it meets up with an old logging road that will take a sharp right on to get all the way back to the parking lot.

Continuing down the slick dirt trail at the bottom of the Tent Ridge hike
Once you’re down off the slick stuff, it’s an easy walk out, and you can look back at Tent Ridge and feel a sense of pride at what you just accomplished!
The final stretch of the Tent Ridge hike down an old logging road
After 5.5 hours, we made it back to the car. We were tired, but we thought the Tent Ridge hike was so worth it. It was just challenging enough to be super rewarding, and the views along the entire length of the ridge were just phenomenal.
Want to Do a Shorter Version of the Tent Ridge Hike in Kananaskis?
So, you read our description of the Tent Ridge hike above and don’t think you’re quite up for the scrambling and ridge walks? Well, we have some good news! You can still get that amazing view over Spray Lake without having to deal with the ridge!
Start from the trailhead in the counterclockwise direction and head up to the part of the trail just above treeline and just before the trail becomes a dirt slide heading up the ridge. We saw quite a few people hanging out here just enjoying views over the larches and lake. It will be quite a steep climb to get to this point, but it’s nothing technical. You’ll just have to deal with a bit of slick dirt trail towards the end. If you do want to go further for a bit of a higher perspective over the lake, then you can continue up the slick trail that crosses the lower slope of the ridge. This will lead you to the amazing viewpoint that sits right at the bottom of the scree-filled part of the ridge descent. The total distance to get here will be about 1.8 miles (3.6 miles roundtrip).

You can still get this amazing view over Spray Lake without hiking the entire Tent Ridge trail!
Here you get amazing views without all the work of ascending the scrambles and descending the scree! This would be good to do particularly in late fall to see the larches, especially if the ridge is already covered in snow. Or, if you’re just short on time!
Things to Do Near the Tent Ridge Hike in Kananaskis
We’ve been to the Canadian Rockies twice. On our first visit, Kananaskis was on our radar but we simply ran out of time. So on our second visit, we made it a point to go, but sadly, weather considerations forced us to choose just one hike (and we’re happy with our choice!). Suffice it to say, when we inevitably return a third time, we will be prioritizing Kananaskis. This area is absolutely amazing! It’s jam-packed with so many amazing hikes, epic scenery, and beautiful roadside lakes for relaxing, picnicking, and sightseeing. As we drove to and from the Tent Ridge trailhead, we realized all the things we missed by not spending more time in the area. Plus, although this region has increased in popularity recently, it still remains a bit less crowded than the nearby tourist hub of Banff, so you can still find truly off-the-beaten-path places and hikes.
We would recommend spending your time in Kananaskis by traveling along the following loop: Start in Canmore and drive down the Smith-Dorrien/Spray Trail. This connects with route 40, which will bring you back up to the Trans-Canada Highway and back to Canmore. You can simply drive this loop as a sightseeing trip- the whole loop will take about 3 hours, but you’ll make enough stops to take up a good portion of the day. Or you can spend your day or days doing one of the many hikes found in this region of Kananaskis. Below, we list some of the best places in Kananaskis that can be found along this route in the order you’d find them driving the counter-clockwise direction of this loop. If you are only doing the Tent Ridge hike, we still recommend stopping along the way there or back at some of these pull-offs and lakes to enjoy the views in the area!
Grassi Lakes Trailhead: This is an easy 2 mile hike right outside of Canmore to two beautiful turquiose mountain lakes, with a waterfall along the way. It’s not quite off the beaten path, as these lakes sit just below the Smith-Dorrien/Spray Trail.
Roadside stops: Make a few consecutive sightseeing stops along the road. The first is called Roadside Viewpoint on GoogleMaps, and it overlooks the reservoir. The second is Grassi Lakes Vantage Point, and the third is Whitemans Pond viewpoint.
East End of Rundle: One of the most popular hikes near Canmore, this is a short but steep and challenging 3.5 mile scramble to the top of the east end of one of Banff’s most iconic mountains. On the top, you’ll get views overlooking Canmore, the reservoirs along the Smith-Dorrien/Spray Trail, and Ha Ling Peak.
Ha Ling Peak: Another popular short but steep hike up to a peak right outside of Canmore. Leg-burning staircases and scree climbs take you to views overlook town and the mountain range of the Bow Valley.
Goat Pond: Stop here for views or a stroll along the lake.
Three Sisters Viewpoint: Stop here on the North end of Spray Lakes for an awesome lakeside view.
Windtower Summit Trail: This looks like an amazing hike overlooking Spray Lake (from a completely different vantage point than Tent Ridge). This is definitely on our list for our next visit.
Mount Lougheed trail: An off the beaten path scree log up to a beautiful Kananaskis summit.
Sparrowhawk and Spray Lakes Day Use Areas: Found further along Spray Lake
Buller Mountain Day Use Area: Another relaxing spot along a picturesque lake
Rummel Lakes trailhead: A moderate to a beautiful alpine lake.
Mount Smutwood: This hike was high up on our list (we were down to choosing between this and Tent Ridge but felt that Tent Ridge had a little more bang for the buck overall). This looks like a long but amazing hike to an epic viewpoint over the Kananaskis mountains. To get the summit, it does involve a bit of an exposed ridge walk.
The Mount Shark trailhead and helipad: Found at the end of Mount Shark Road, this trailhead leads into Mount Assiniboine Provincial Park and is the start of an epic backpacking trip. Or, you can take the helicopter in and skip the one to two days of backpacking in.
Chester Lake trailhead: This leads to yet another alpine lake (there is no shortage of these in Kananaskis!).
Burstall Pass: A moderate hike to a beautiful pass.
Blackshale Creek Suspension Bridge: An easy 0.6 mile loop hike to a wobbly suspension bridge. There aren’t really many views here but walking across suspension bridges is always fun and it won’t take up too much of your day!
Lower Kananaskis Lake: There are a few day use areas, such as the Peninsula Day Use Area and Canyon Day Use Area. Nearby is the Peter Lougheed Parks Discovery Center.
Pocaterra Ridge: This hike is found further south down route 40 past the junction with the Dorrien-Smith/Spray Trail. It looks like another amazing ridge hike (kind of like Tent Ridge), but the tricky part is that it’s point to point, so you’ll need to have a plan for transportation between the two trailheads.
Lillian Lakes trailhead: A moderate hike to more beautiful mountain lakes.
Wedge Pond: A nice roadside pulloff for views of a mountainside lake.
Kananaskis Village and Golf Course (Kan Village viewpoint trail), Troll Falls
Boundary Ranch: An adventure center where you can book trail rides and white water rafting.
Wasootch Ridge Trailhead: Another option for a ridge hike.
Barrier Lake Picnic: A roadside lake that offers canoe rentals. The lake empties into a small stream that offers beautiful paddling.
See? We told you there are endless options to explore in Kananaskis! It’s seriously a hard task to choose between all the hikes and lakes.
Canadian Rockies Guides
If you’re looking to visit other places in the Canadian Rockies after your Tent Ridge hike, make sure to check out all our other guides!
EASY CANADIAN ROCKIES HIKES: Check out the easy hike to Boom Lake in Banff National Park, or hike the short and easy trail to Wapta Falls in Yoho National Park.
GLACIER NATIONAL PARK OF CANADA: The Hermit Trail and the Glacier Crest Trail are two challenging and steep hikes that lead to epic views over glaciers and jagged peaks and are just a few hours from Banff.
MOUNT REVELSTOKE: The Eva and Miller Lakes hike is the best hike in Mount Revelstoke National Park, showcasing alpine meadows and two beautiful alpine lakes.
MOUNT ASSINIBOINE: Learn everything you need to know about visiting Mount Assiniboine, from how to get there, where to stay, how to make important reservations, best places to see in the park, and more! We also highly recommend checking out the Nublet hike…the best hike in Mount Assiniboine!
HOW TO HIKE FROM SUNSHINE VILLAGE TO MOUNT ASSINIBOINE: Want to backpack into Mount Assiniboine? Learn all about the hike into Mount Assiniboine from Sunshine Village in Banff National Park.
We really hope this article helps you plan your Tent Ridge hike in Kananaskis. We tried our best to give an accurate representation of the hike to help you decide if you want to give it a try! Do you plan to hike Tent Ridge in Kananaskis? Let us know if you have any questions! We are always happy to help.