How to Hike the Besseggen Ridge Trail in Norway’s Jotunheimen National Park
The Besseggen Ridge hike is one of Norway’s best and most popular hiking trails, with gorgeous views over the lakes and mountains of Jotunheimen National Park. However, it’s a challenging point-to-point hike with steep climbs, rugged terrain, scrambling, and some exposure, and there are some key logistics to figure out before hitting the trail. In this guide, we go over everything you need to know to plan your Besseggen Ridge hike so you can have the best experience!
Jotunheimen National Park is a popular hiking spot located centrally within southern Norway. It’s a mountainous area with some of Northern Europe’s highest peaks and has lots of amazing hiking trails.
But one of the very best trails in Jotunheimen, and in all of Norway, is the Besseggen Ridge trail. While it might not be as well-known as some other Norwegian hikes such as Trolltunga or Preikestolen, Besseggen Ridge is actually one of Norway’s most popular hikes, and on a nice summer day, it’s common to find a train of hikers making the trek across this scenic ridge.
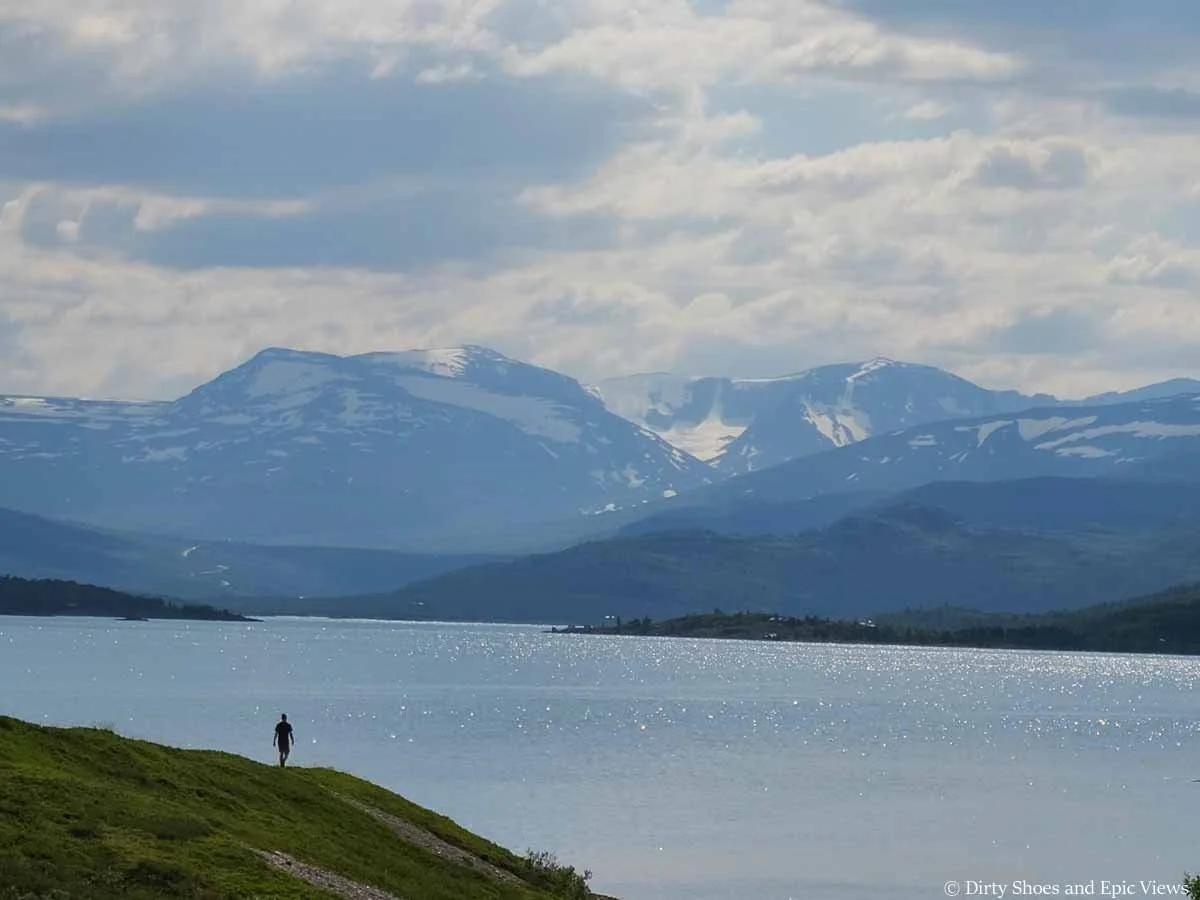
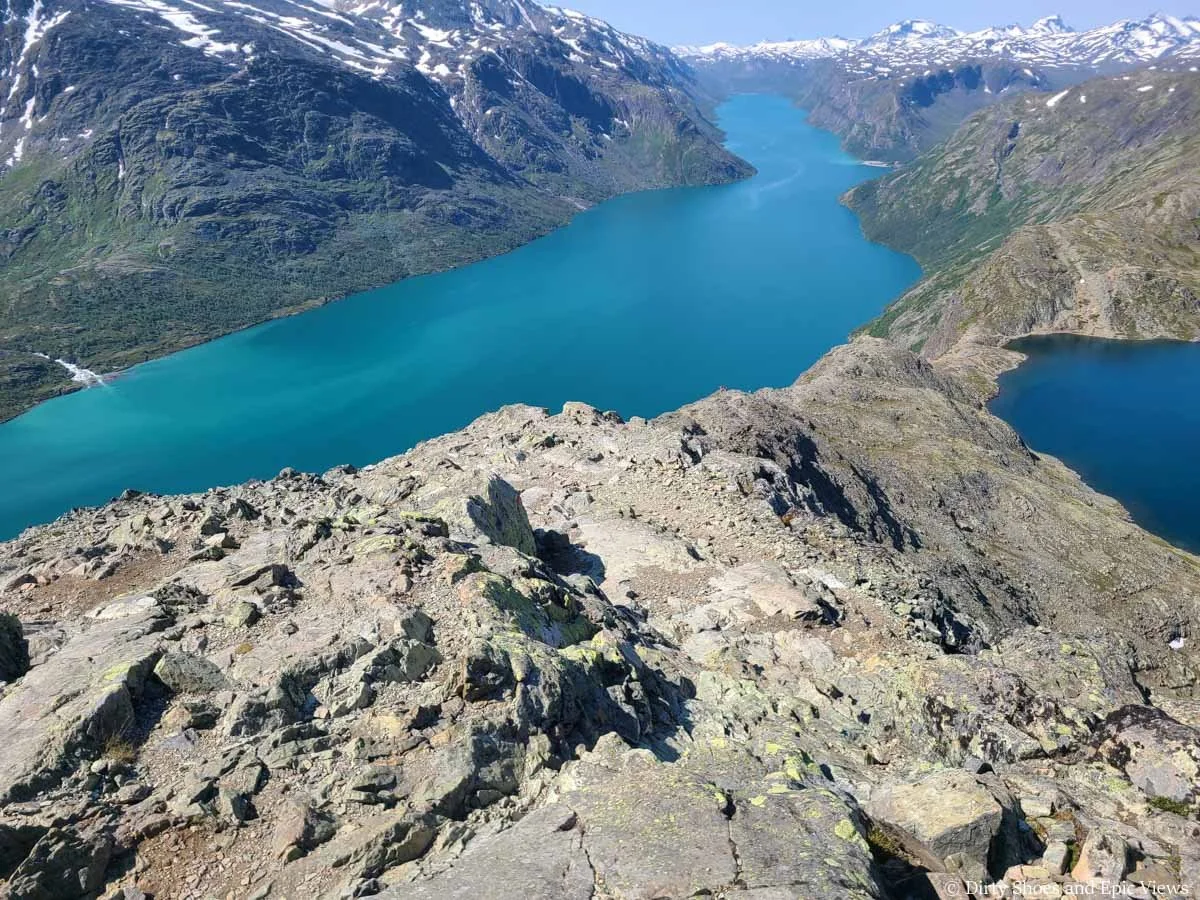
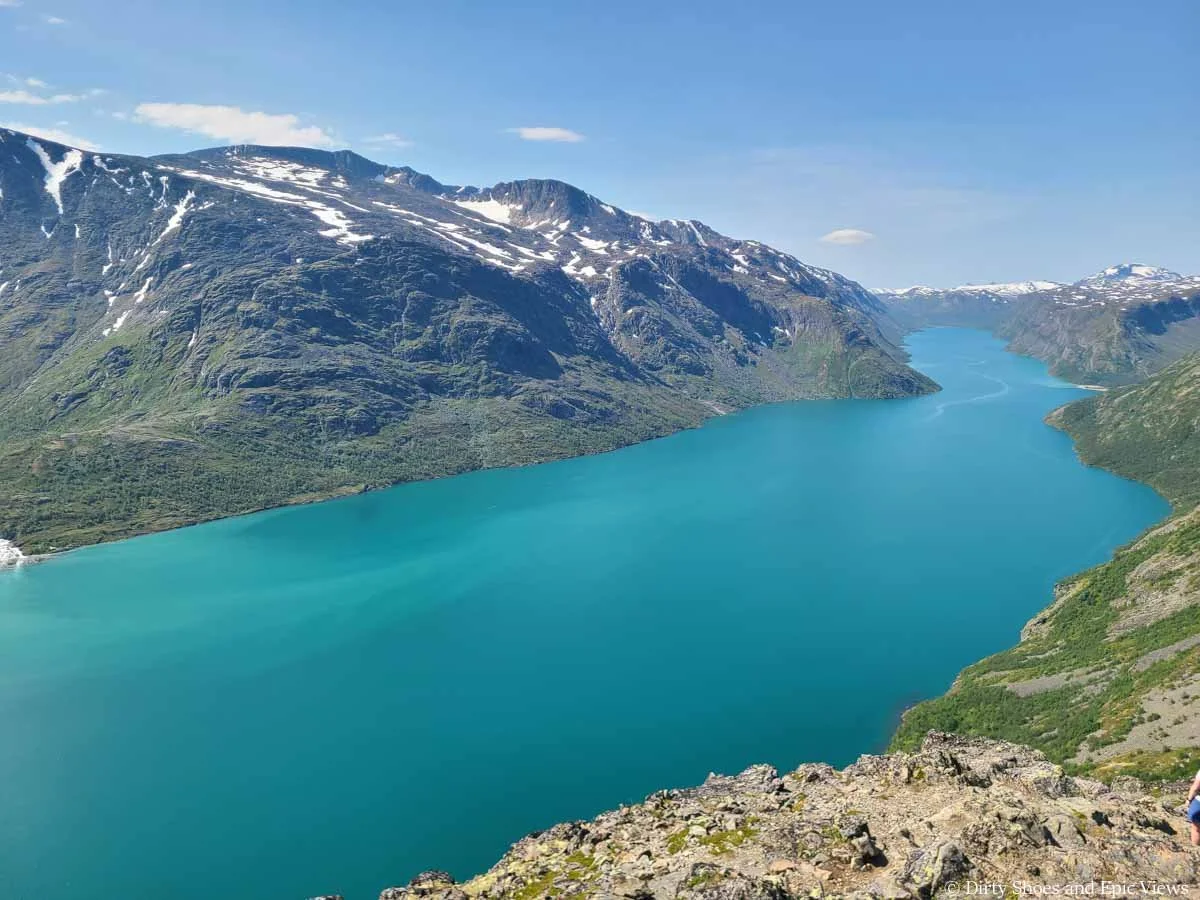
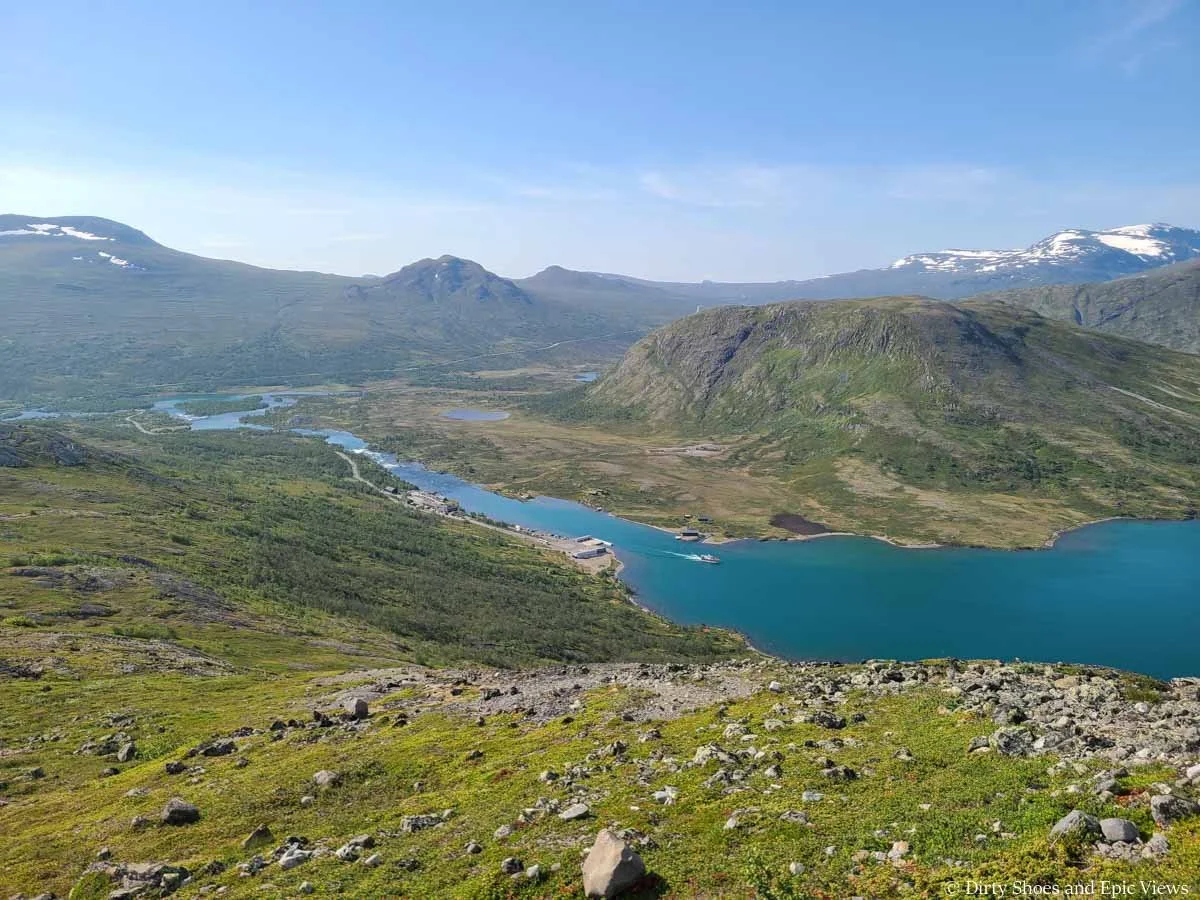
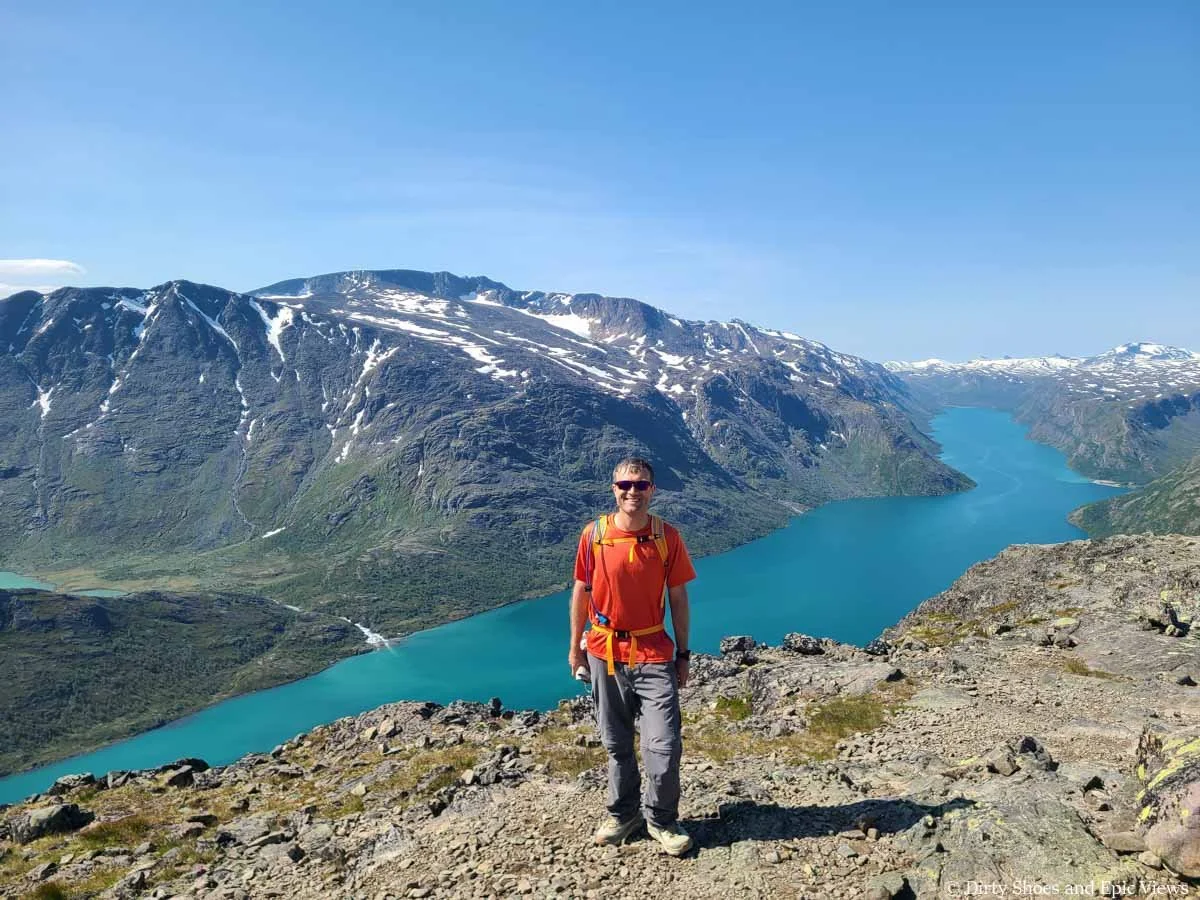
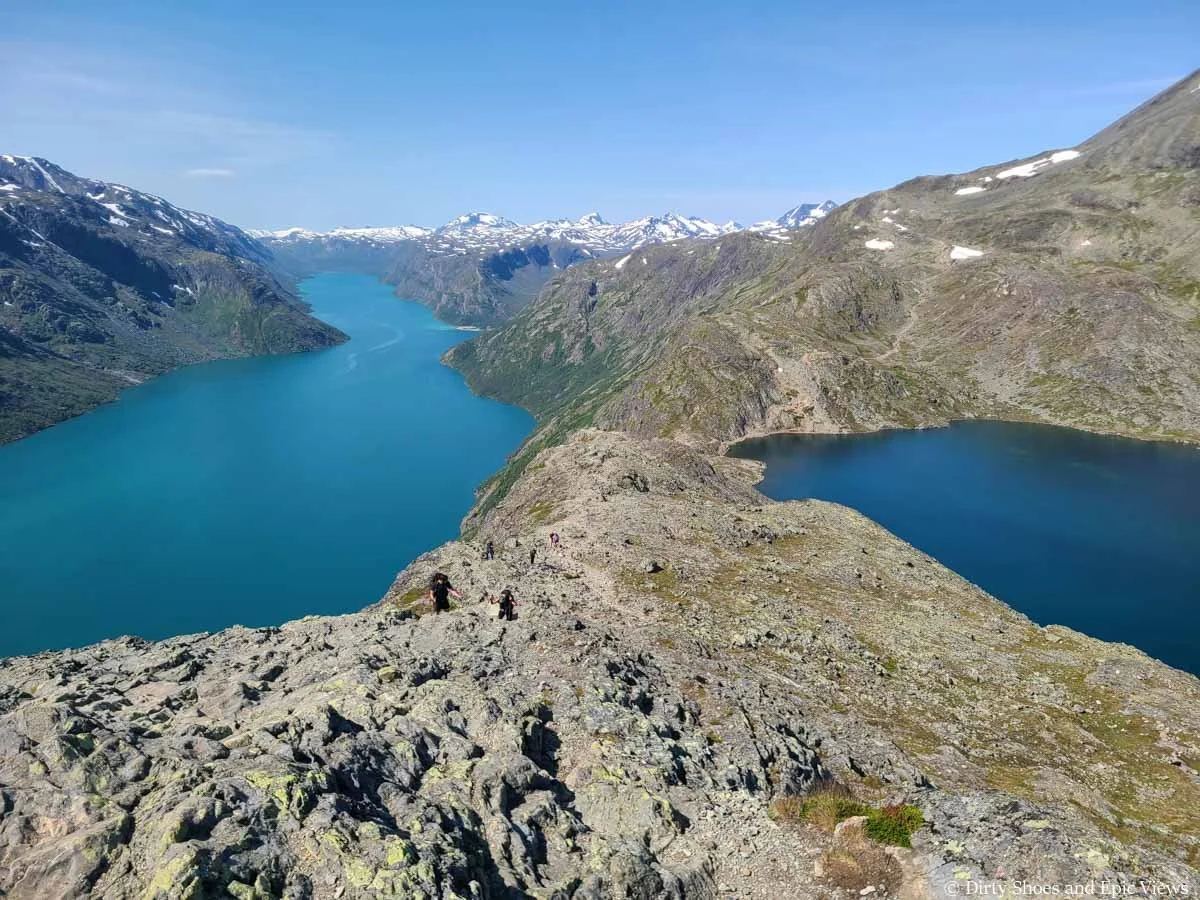
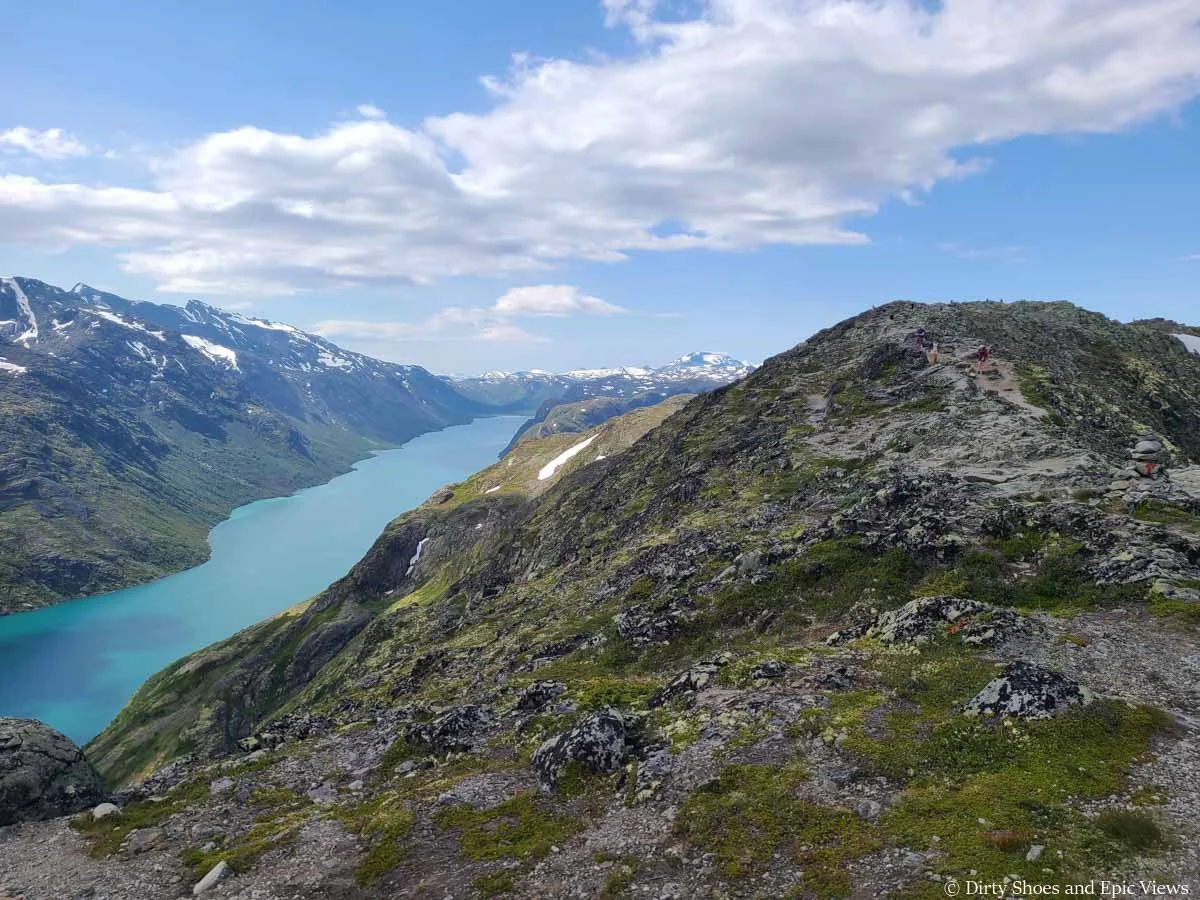
And it’s easy to see why. From Besseggen Ridge, you get stunning views over the mountains and lakes of Jotunheimen National Park, but it’s best known for its famous two lake view over both the bright turquoise Lake Gjende and the contrasting deep blue Bessvatnet.
However, before you strap on your hiking boots and hit the trail, there are a few important things to know about the Besseggen Ridge trail in Norway.
The first is that this is not an easy hike. The Besseggen Ridge trail is long, filled with steep climbs up rugged and tiring terrain, and even has some exposure and light scrambling, so this hike might not be for everyone.
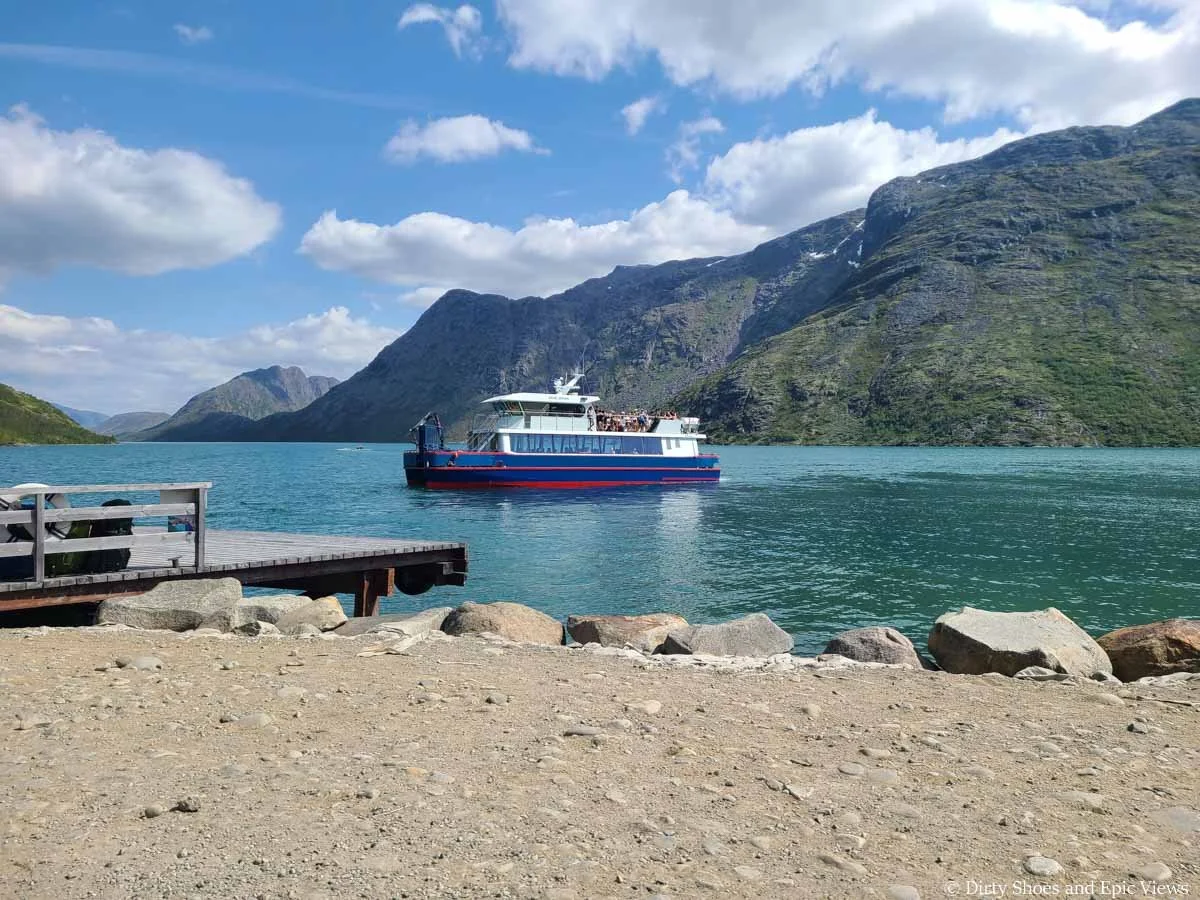
Second, you’ll have to do some advanced planning for your hike on Besseggen Ridge, especially if hiking in peak summer season. The Besseggen Ridge hike is a point-to-point trail, and a ferry is required to get between the two trailheads. Parking for this ferry and the ferry itself are paid and often require advanced booking to your secure your spots on the day you want.
But don’t worry- in this guide, we’ll go over everything you need to know to hike the Besseggen Ridge trail in Norway, including how to get there, how to book the Besseggen ferry and parking, the best time to hike and potentially avoid the crowds on Besseggen Ridge, what to expect on the trail, and all our best tips.
So, let’s get to it!
In this Besseggen Ridge hiking guide:
Where is Besseggen Ridge?
The Besseggen Ridge hike of Norway is located in Jotunheimen National Park, about a 4.5 hour drive from Oslo, 5.5 hours from Geiranger, and 3 hours from Olden.
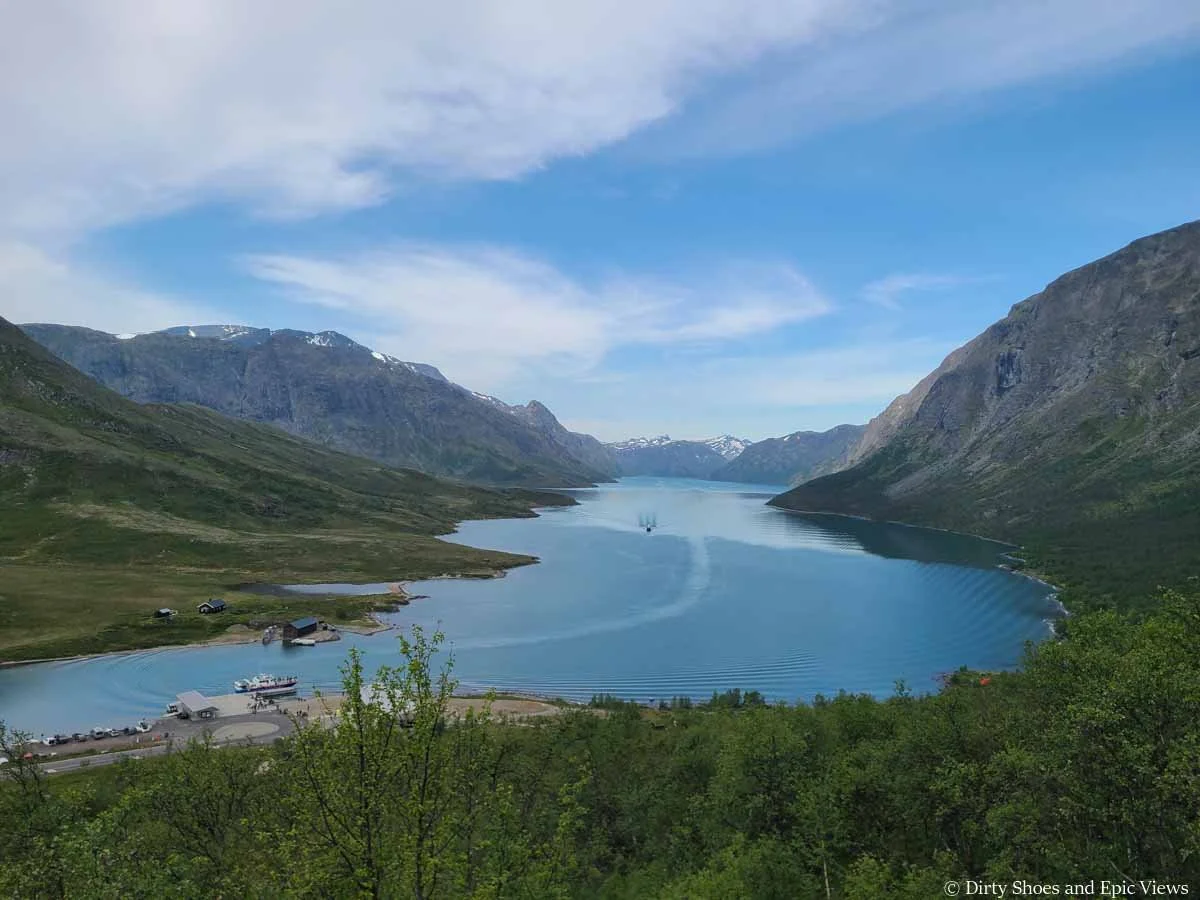
Besseggen Ridge is a point-to-point hike following the ridge that runs above the northern shore of the scenic Lake Gjende (known as the gateway to Jotunheim National Park).
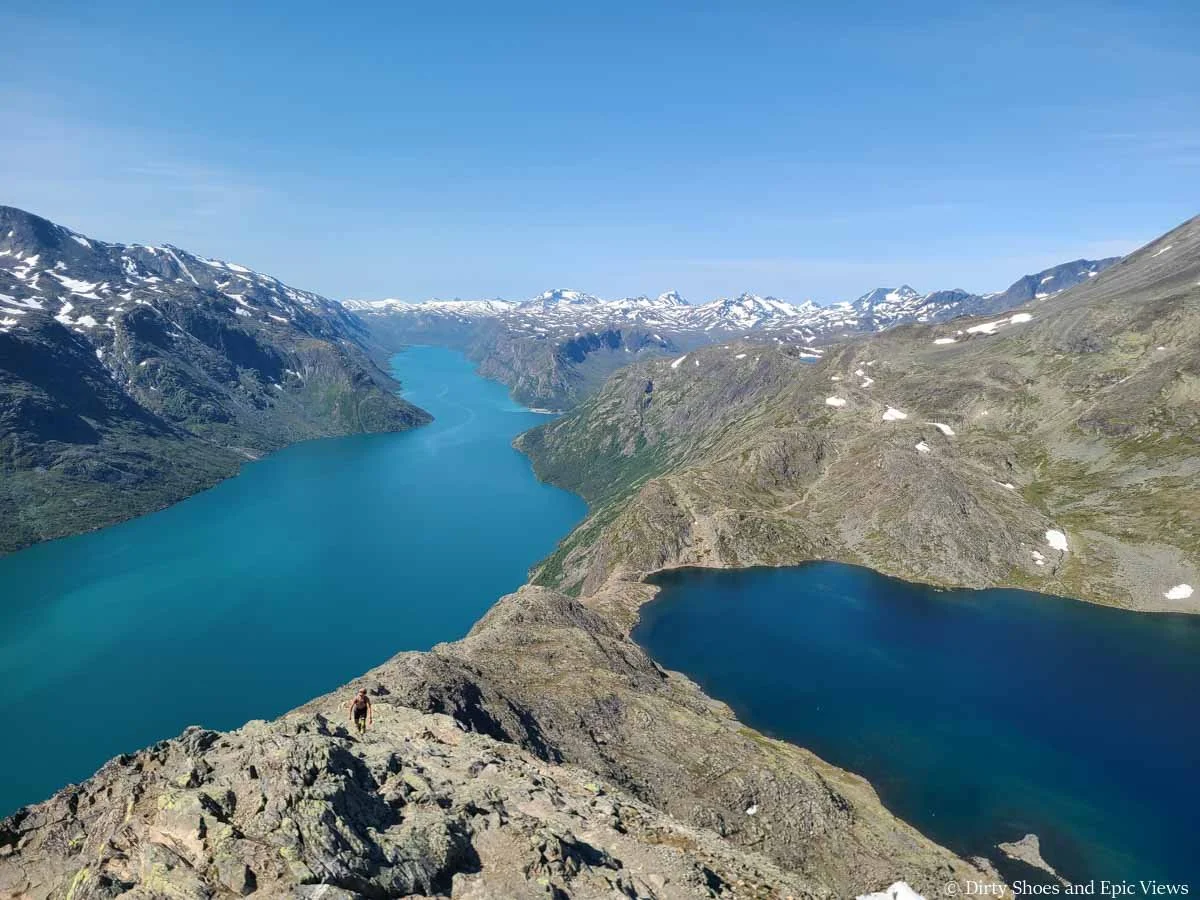
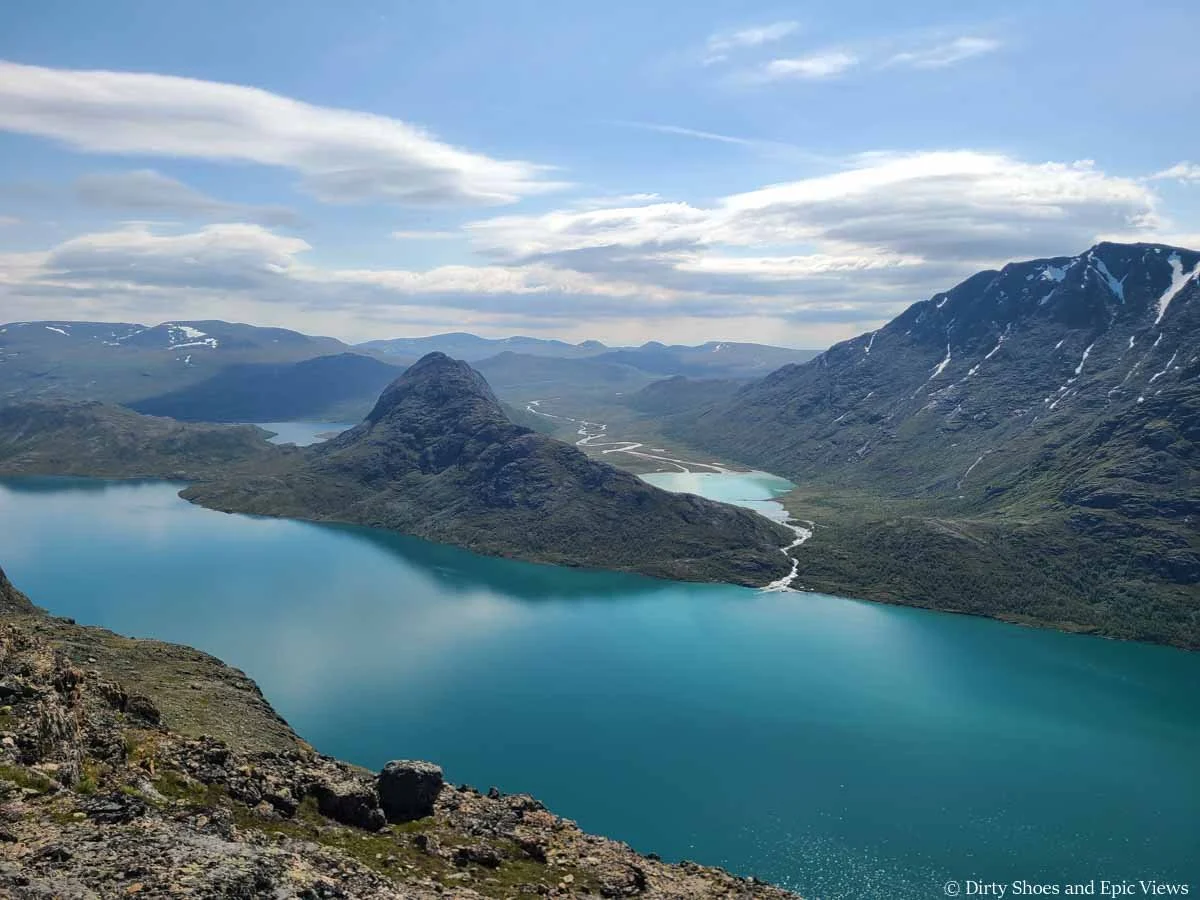
A view over Lake Gjende from Besseggen Ridge
The western end of the Besseggen Ridge hike is found at Memurubu, and the eastern end is at Gjendesheim. You can reach Gjendesheim by car, but the only way to get to Memurubu is by hiking across Besseggen Ridge or by taking a ferry there from Gjendesheim.
So, there are two ways to hike Besseggen Ridge. You can either:
Take the ferry from Gjendesheim to Memurubu and then hike Besseggen Ridge back to Gjendesheim (hike Besseggen Ridge from west to east)
Hike from Gjendesheim across Besseggen Ridge to Memurubu and then take the ferry back to Gjendesheim (hike Besseggen Ridge from east to west)
We’ll talk more about which direction you should hike Besseggen Ridge in just a little bit.
Gjendesheim
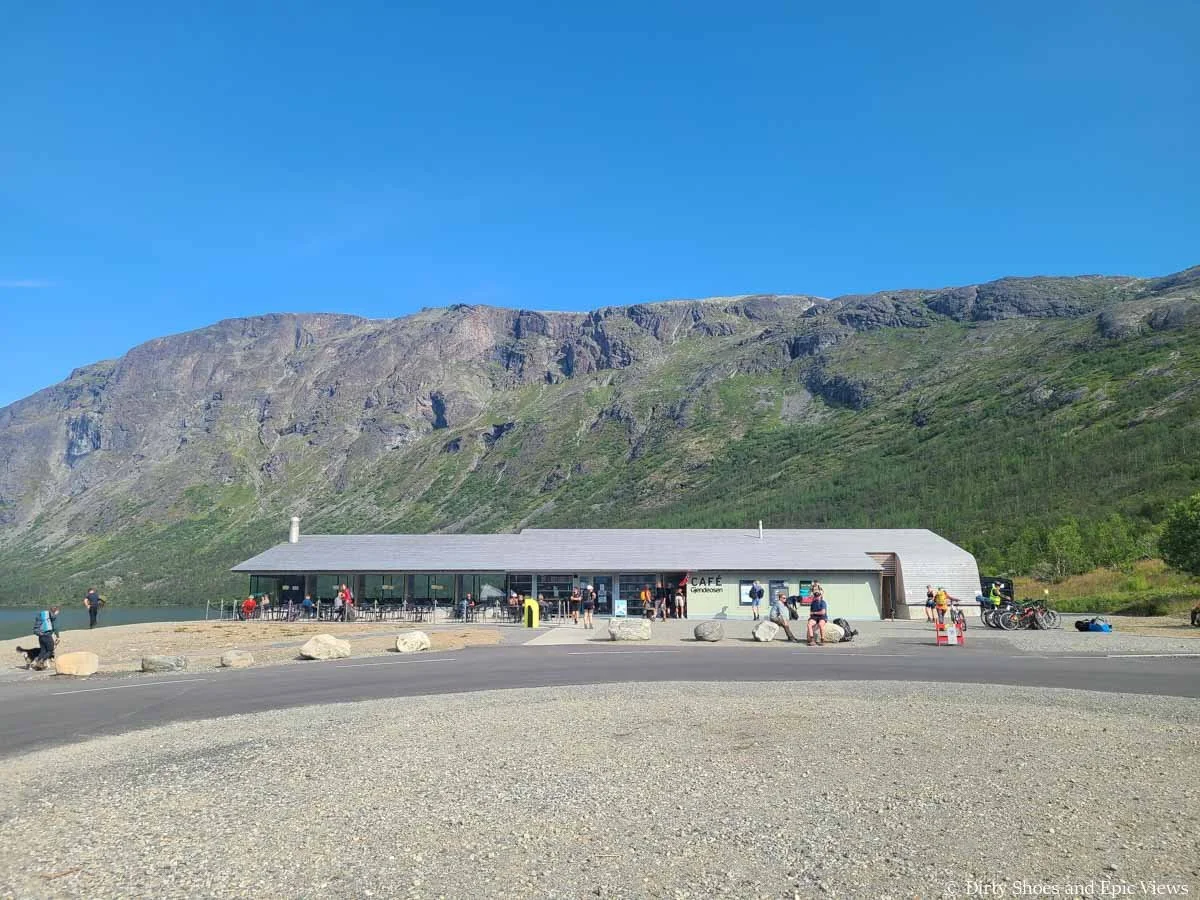
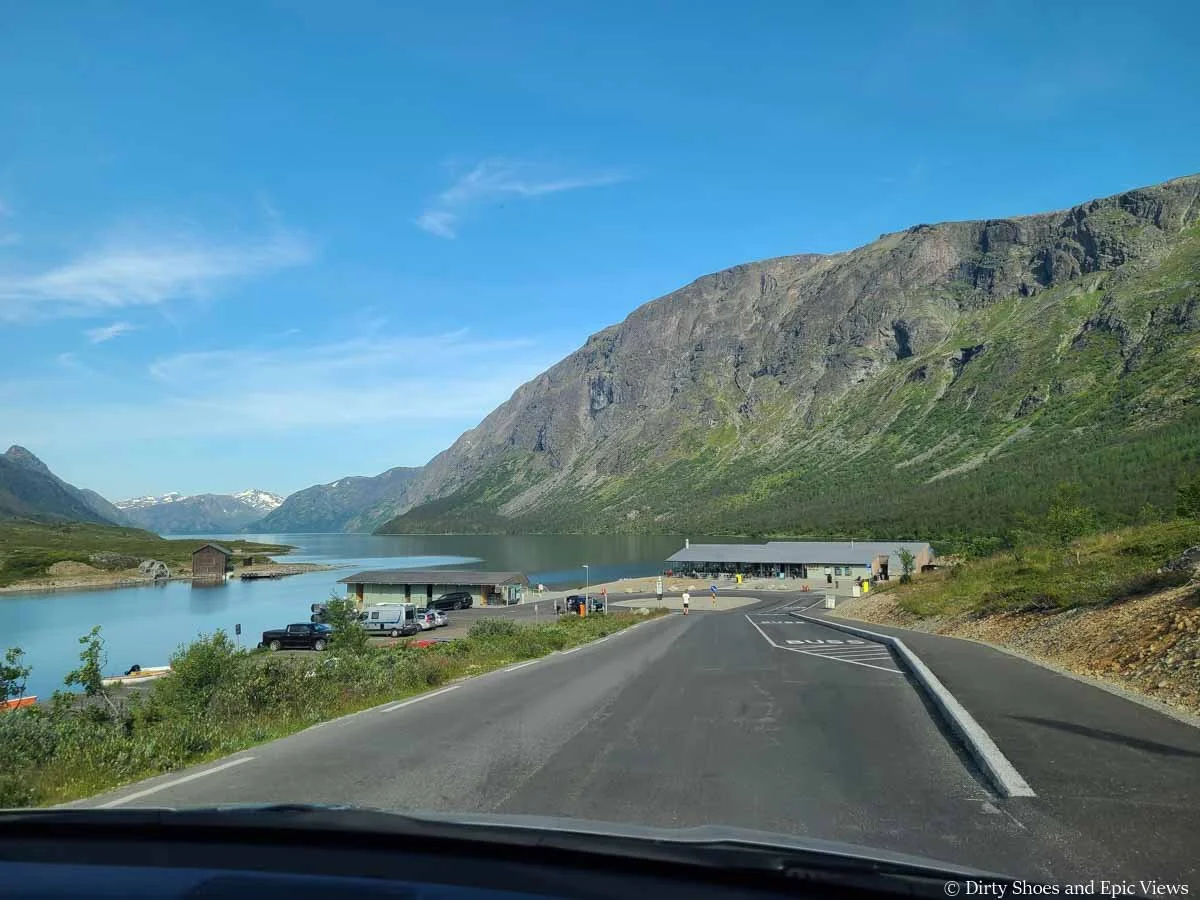
Gjendesheim is found at the end of the road on the eastern end of Lake Gjende. There are beautiful views here of the lake, and you can start the Besseggen Ridge hike here.
You’ll also find the ferry terminal here for the boat to Memurubu, as well as an overnight lodge, a café, bathroom, and information about the area.
Gjendesheim
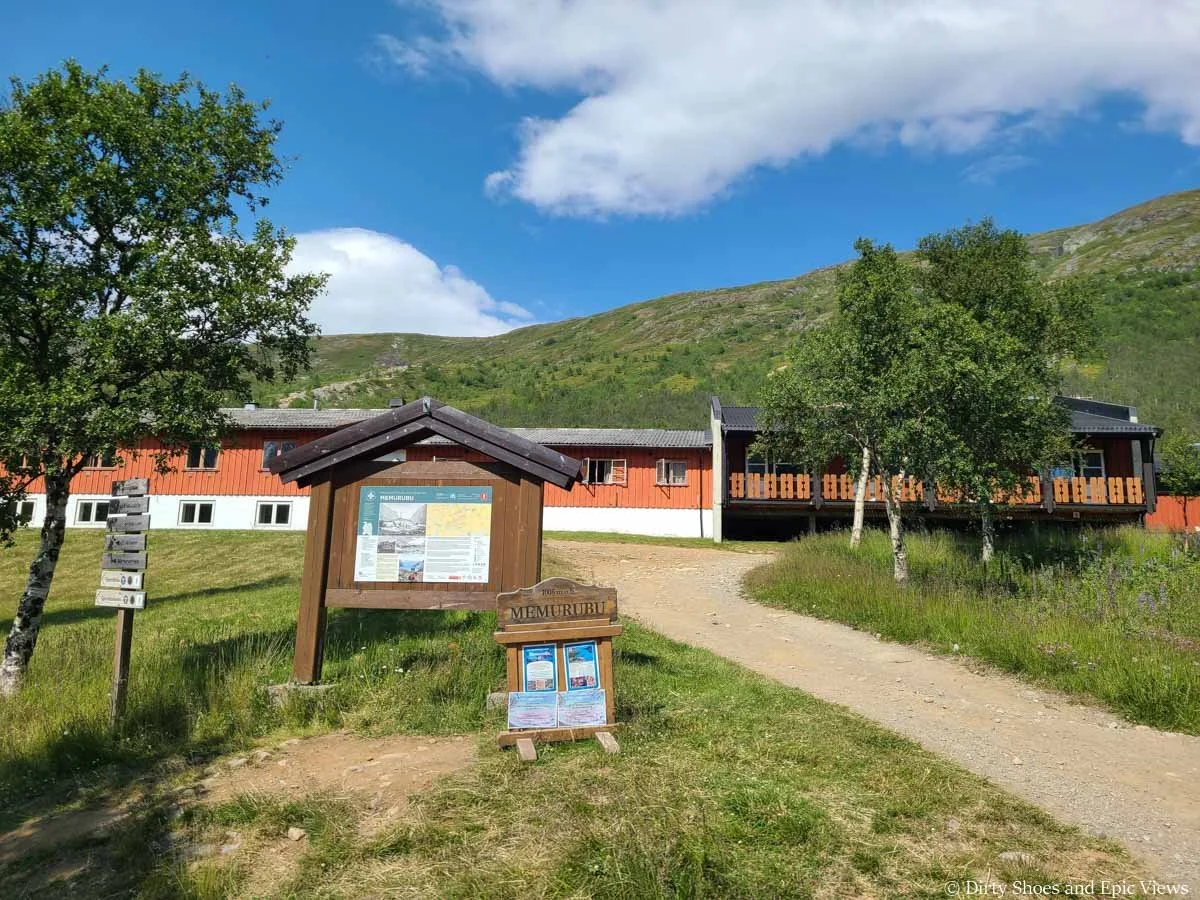
Memurubu
This is the western end of the Besseggen Ridge hike. Here, you’ll find an overnight lodge and campground, bathrooms, the ferry terminal for the boat to Gjendesheim, some picnic tables, and a small beach area by the lake.
The ferry dock at Memurubu
Views along the Valdresflye Scenic Drive near Besseggen Ridge
Map of the Besseggen Ridge hike
Here’s a map to give you a better idea of where the Besseggen Ridge hike is and how it’s oriented.
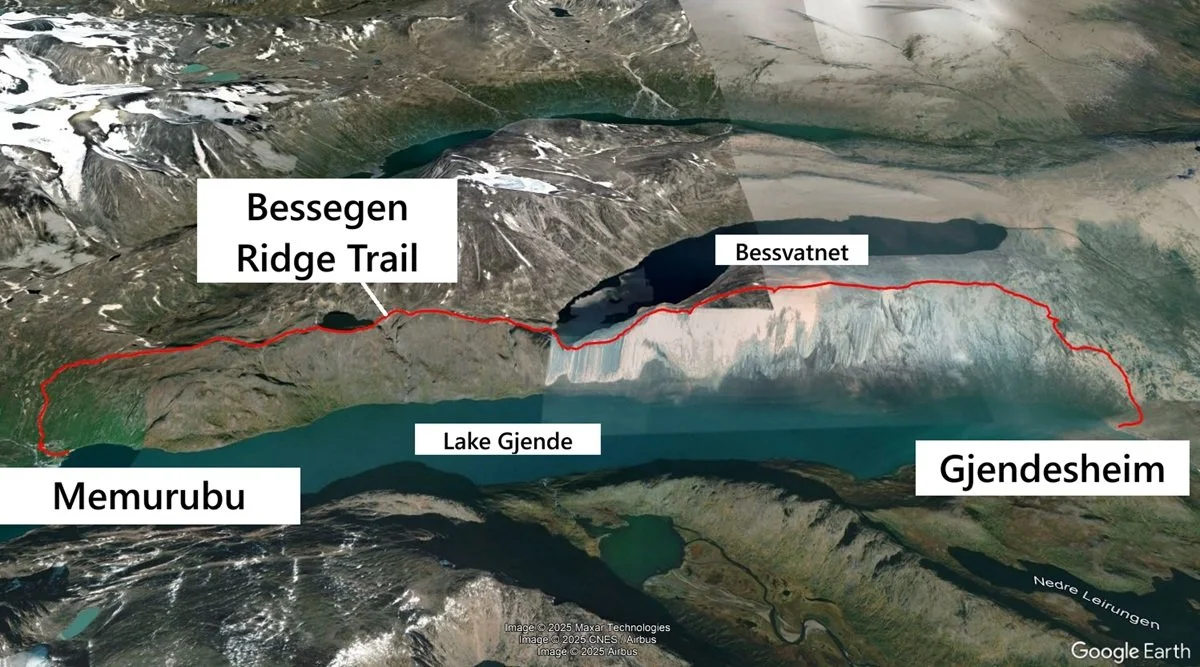
A satellite view of our Besseggen Ridge hike
Where to Park for the Besseggen Ridge Hike
No matter which direction you want to hike Besseggen Ridge, you’ll start your journey at Gjendesheim, which is located at the end of a 2.3 km road off of route 51.
There are two parking lots to know about here. The first is located right at the ferry terminal and lodge at the end of the road, found here on Google Maps. It’s free, but it has a two hour limit, so if you are hiking Besseggen Ridge, you can’t park here.
The short-term parking lot at Gjendesheim
The second lot is right at the beginning of the entry road into Gjendesheim. It’s call Reinsvangen and located here on Google Maps. This lot is paid and can be booked in advance, which we recommend doing.
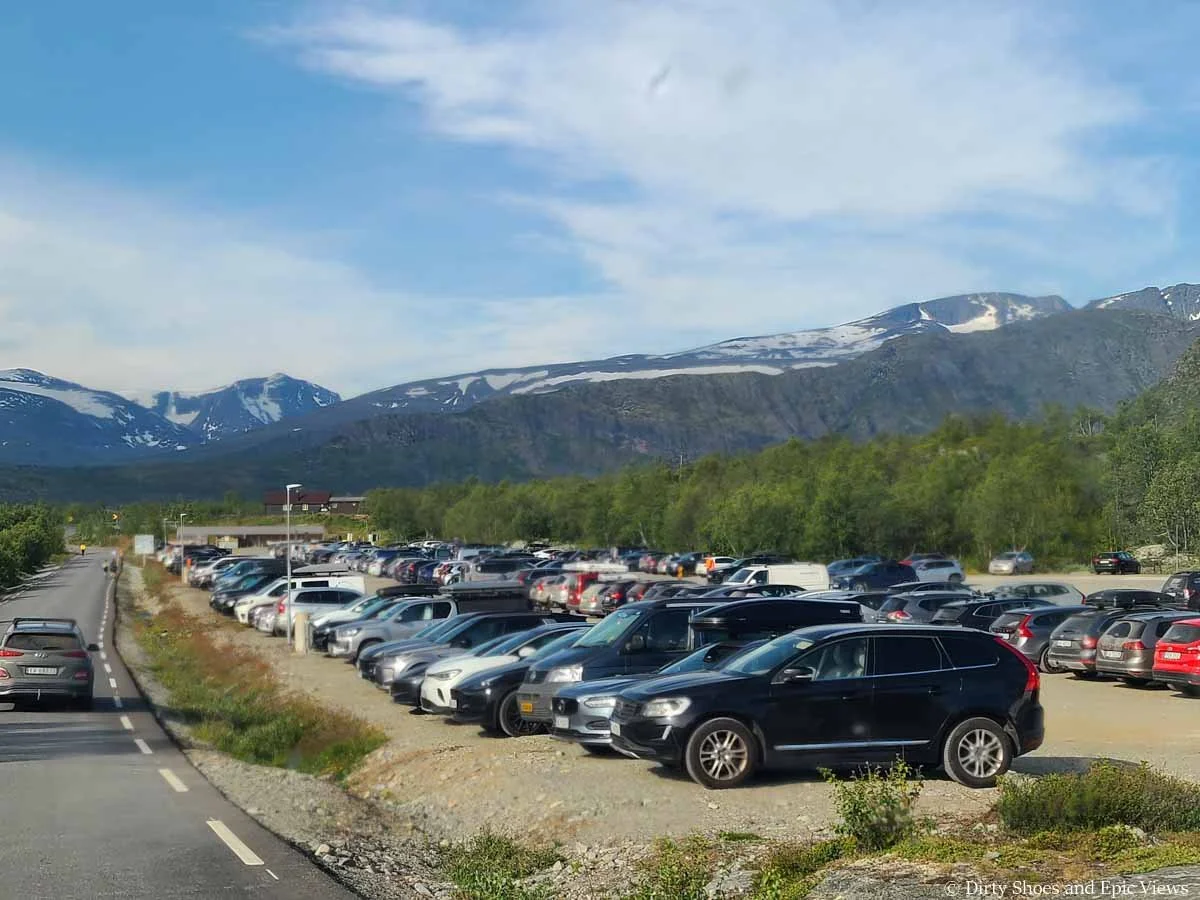
The Reinsvangen parking lot for Besseggen Ridge
It’s just under a 2 km walk from this parking lot to the Gjendesheim ferry terminal, or you can take a shuttle bus to Gjendesheim for a fee.
The buses start running from this lot up to one hour before the first ferry departure in the morning and then run continuously throughout the day, around every 30 minutes, until the last ferry departure. The buses for the return trip back from Gjendesheim to the parking lot start at 3 pm.
At the time of writing, the costs for the Besseggen parking lot and shuttle bus are:
Car parking: 140 NOK
Motorhome parking: 205 NOK
Roundtrip bus: 90 NOK
One-way bus: 50 NOK
Package deal parking + shuttle for 4 people: 299 NOK
Be sure to check the Visit Gjende website for the most up-to-date information and for booking.
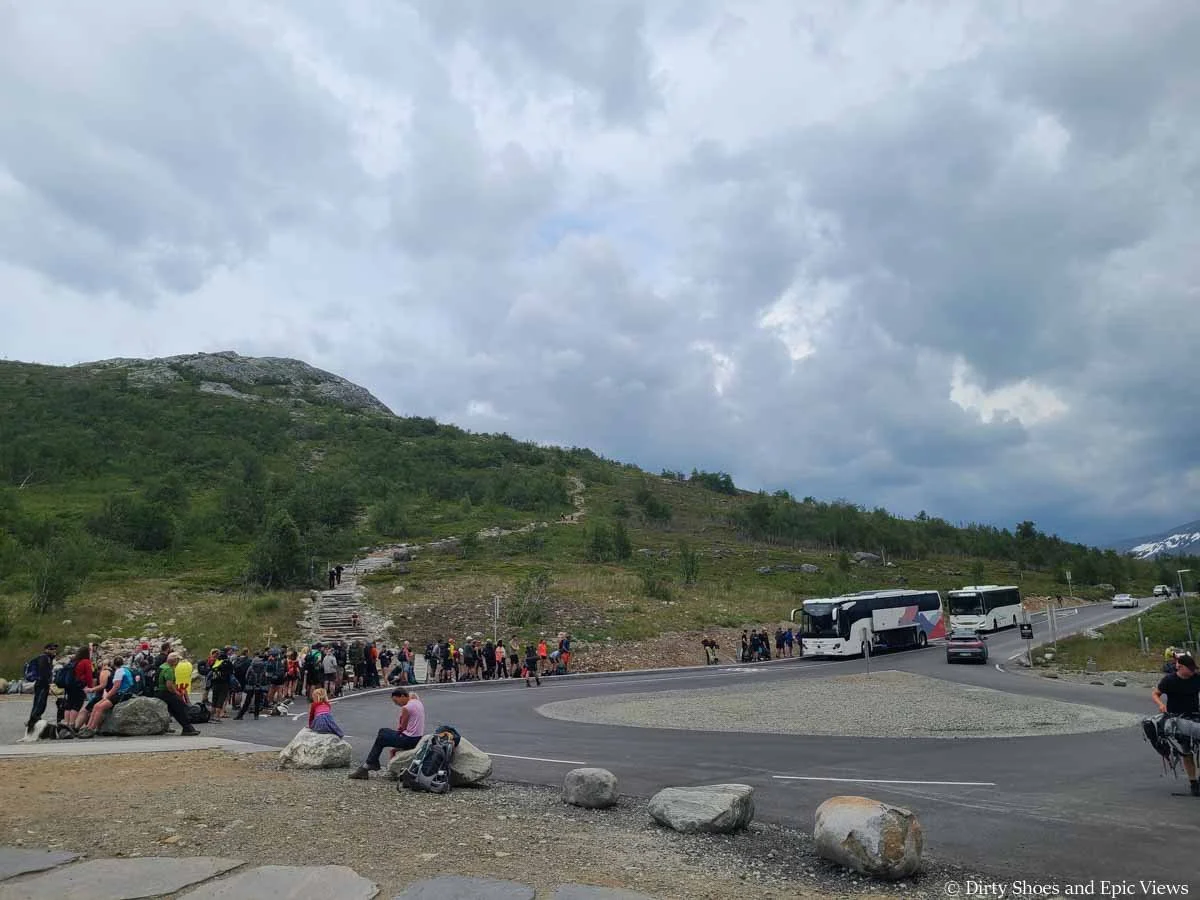
Hikers queue up to catch the bus back to the parking lot at the end of their hike in Gjendesheim
Also, be sure to give yourself plenty of time to find parking, wait in bus queues, and get to Gjendesheim in time for your scheduled ferry time if starting the Besseggen Ridge hike from Memurubu.
If you plan on walking the road to Gjendesheim and back to save some money, just note that it will add almost 4 km roundtrip to your hike. On the way to Gjendesheim, it will be a gradual uphill walk, but nothing too steep. The road is a little bit narrow, so just be sure to watch out for cars and buses.
Another good tip is that if you are hiking Besseggen Ridge with a group, have one person drive all the way to Gjendesheim to drop everyone off before driving back up to the lot and taking the shuttle down. This way, only one person has to pay for the bus.
The Besseggen Ridge Ferry
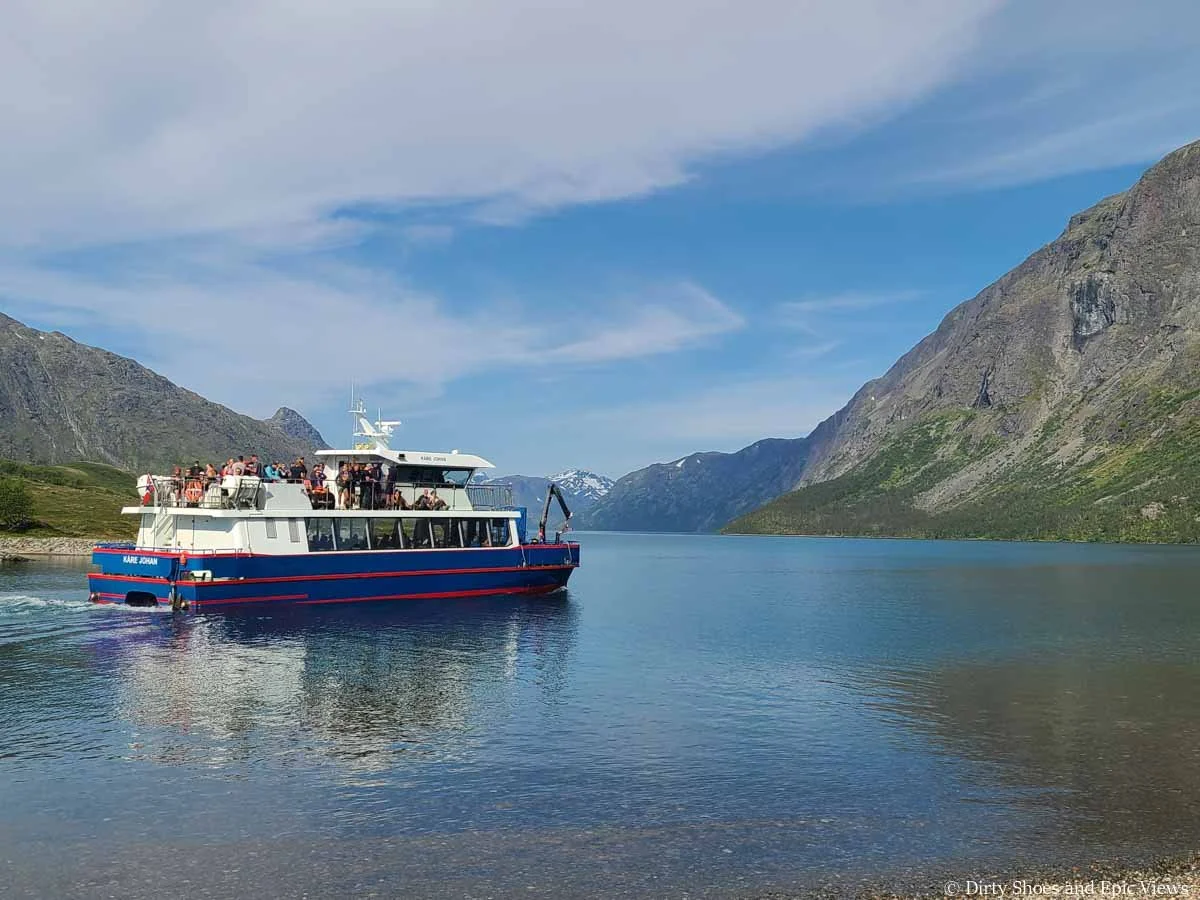
The ferry that runs between Gjendesheim and Memurubu is a paid service that gets you between trailheads. It’s a quick 20 minute but scenic trip that takes you across Lake Gjende.
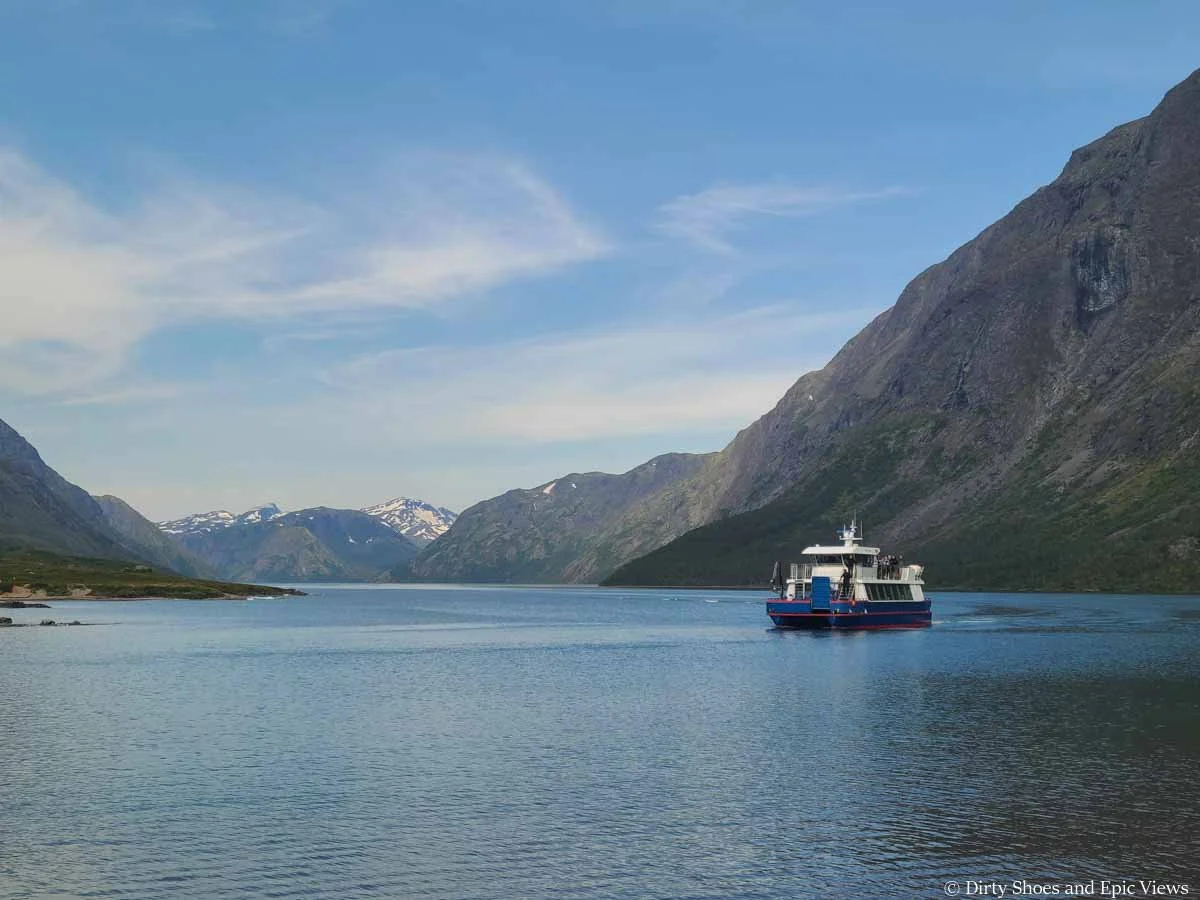
The Besseggen Ridge ferry as it crosses Lake Gjende
As we’ve mentioned earlier, you can start your hike by first taking the ferry to Memurubu and hiking back to Gjendesheim, or you can hike Besseggen Ridge from Gjendesheim and then book a ferry back from Memurubu.
Either way, you’ll need to book your ferry ticket in advance, especially in the peak summer season and especially if you want an early start.
We hiked Besseggen Ridge in mid-July, so right during peak season, and we were able to book a ferry ticket a day before our hike. We noticed that the early morning ferries from Gjendesheim to Memurubu had been sold out for several days in advance, but all the midday and afternoon ferries were still available, and all the ones leaving Memurubu to Gjendesheim were also still available (as that is the less popular direction).
To book the ferry and see timetables and current prices, head to the Gjende website.
When booking, be sure to book the correct locations and direction! The ferry also travels to a dock called Gjendebu, which is not relevant for the Besseggen Ridge hike. So be sure to select Gjendesheim and Memurubu!
The ferry typically runs daily between early to mid-June through to mid-September, and then less often into the fall months, depending on the year and conditions.
In the earlier and later parts of the hiking season, there are less daily ferries running- usually the first is at 7:45 am from Gjendesheim, and then one more morning ferry (9:30 am) and one afternoon ferry (3:25 pm).
In peak season (July to mid-August), there are typically 6 departures that look something like this:
From Gjendesheim: 7:45am, 9:30am, 10:20am, 2:15pm, 3:25pm, 5:30pm
From Memurubu: 8:55am, 9:55am, 10:45am, 2:35pm, 4:55pm, 5:55pm
At the time of writing, the price for a one-way ferry trip was 260 NOK, but again, check the Gjende website for the most current pricing and timetables.
When lining up for the ferry at the docks, be sure to stand in the right line! There should be clear indications of where each ferry is going (Memurubu vs Gjendebu vs Gjendesheim).

The line for one of the morning Besseggen Ridge ferries
Which Direction Should You Hike Besseggen Ridge?
Because it’s a point-to-point hike, you can hike Besseggen Ridge in either direction: from Gjendesheim to Memurubu or vice versa. So, let’s go over the pros and cons to each!
Bessegen Ridge from Memurubu to Gjendesheim (West to East)
Hiking from Memurubu to Gjendesheim is by far the most common way to hike Besseggen Ridge. This requires first taking the ferry from Gjendesheim to Memurubu, and then hiking the ridge back to Gjendesheim.
There are two main reasons most people prefer to hike Besseggen Ridge in this direction.
The first is because if you hike from West to East, you’ll be hiking up the hardest and steepest part of the Besseggen Ridge hike- the scramble. As you’ll see in just a bit, there is one significantly challenging section of the hike that requires scrambling up a narrow and very steep ridge between two lakes that has quite a bit of exposure on either side.
Many people, including us, often prefer to hike up the steepest part of a trail, rather than down, as going down can be really tough on the knees and legs. Especially on a scramble, it’s often easier to go up, as you can more easily see all the hand and footholds and pull yourself up rather than constantly taking large steps or sliding yourself down the rock.
Further, if you aren’t used to scrambling and some exposure, it’s easy to feel intimidated and a little nervous on this part of the Besseggen Ridge hike. If you’re hiking up and not really looking back behind you, it’s easier to ignore the bit of exposure along the ridge. Just keep looking up and taking it one step at a time. However, if you’re hiking down, it’s harder to ignore the exposure as it’s kind of right ahead of you the whole time and it looks more intimidating. So if you’re at all nervous about the scramble, we suggest hiking the Besseggen Ridge trail from Memurubu to Gjendesheim so you are hiking up this part.
Looking down the Besseggen Ridge scramble
The second reason to hike Besseggen Ridge in this direction is due to ferry considerations. If you take the ferry first, you can take your time and hike the ridge without worrying about ferry schedules and timing. You are simply hiking back to your car in this direction without rushing. If you take too long, you may miss the last shuttle buses that run back to the parking lot where your car is, but you can simply walk back if needed, and you’d never get stranded.
Besseggen Ridge from Gjendesheim to Memurubu (East to West)
This is the least common way to hike Besseggen Ridge, but this is actually the way Kevin hiked it, and despite the cons we mentioned above, there are some very good reasons to do the hike this way.
The first is that, at least for the first half of the Besseggen Ridge trail, you should have a pretty quiet hike. Most people take the ferry to Memurubu and so if you do that, you will be starting the hike with a literal boatload of other people, and as these boats come in throughout the day, it will be a bit hard to separate yourself from the pack. Especially on challenging parts of the hike like the scramble, there will likely be bunches of people to navigate around or get stuck behind, which can get frustrating.
By starting in Gjendesheim, there won’t be too many others starting in this direction. Between the trailhead and up to the high point of the ridge, Kevin only saw maybe a dozen or so other hikers. Then once he got to the scramble, he started seeing the first bolus of hikers from the other direction that had taken the early morning boats to Memurubu. But at least that first half of the hike was pretty quiet. And as he hiked, he did hit more pockets of solitude as the break between the morning and afternoon boats occurred.
If you can start the Besseggen Ridge hike from this direction super early, then it’s even better! The first boats to Memurubu don’t leave until 7:45 am. So if you can get an hour or so head start on this, then you can do the majority of the hike without the boat crowds, which is especially helpful on the scramble part. As someone going down the scramble and against the main flow of traffic, you’ll have to wait a lot for people to come up when it’s busy and it may take a while.
We wanted to get an earlier start on the trail for this reason, but it just didn’t happen for us that morning, and Kevin didn’t start on the hike until 9 am. But even starting that late, he had a good experience on the trail in terms of crowds by hiking in this direction.
Another great reason to hike Besseggen Ridge from Gjendesheim to Memurubu is for the views. When hiking in this direction, those famous two-lake views are ahead of you rather than behind you. As you approach the scramble and then hike your way down it, you won’t have to keep turning around to see the good stuff. But again, going down a scramble might be a little technically harder than climbing up it, as we mentioned above.
One minor con to hiking the trail in this direction is that you have to have good timing. Don’t start too late so that you don’t miss your scheduled boat back to Gjendesheim. Give yourself plenty of time, more than you’d think you’d need, just in case. In Kevin’s case, he hiked much faster than he anticipated so got to Memurubu early and had to wait for over an hour and a half for his boat. But he couldn’t complain- it’s really not a bad place to sit and wait and enjoy the views!
So, which direction is best?
Honestly, it’s just a matter of knowing your preferences and experience level with this kind of trail.
If you are an experienced hiker and comfortable on exposed scrambles, then we’d say to hike Besseggen Ridge from Gjendesheim to Memurubu to avoid some of the crowds and get great views.
However, if you know you’ll be nervous on the scramble, don’t want to rush through it, and don’t mind having lots of people around you while hiking, then start from Memurubu.
How Long is the Besseggen Ridge Hike?
Here are our stats for the Besseggen Ridge trail:
Distance: 9.5 mi / 15.3 km point-to-point
Elevation gain: 3600 ft / 1097 m
Time: Common estimates for Besseggen Ridge lie between 6 to 8 hours, which I think is pretty accurate. Kevin finished in under 5.5 hours with breaks as a fast and strong hiker.
Elevation profile (Gjendesheim to Memurubu)
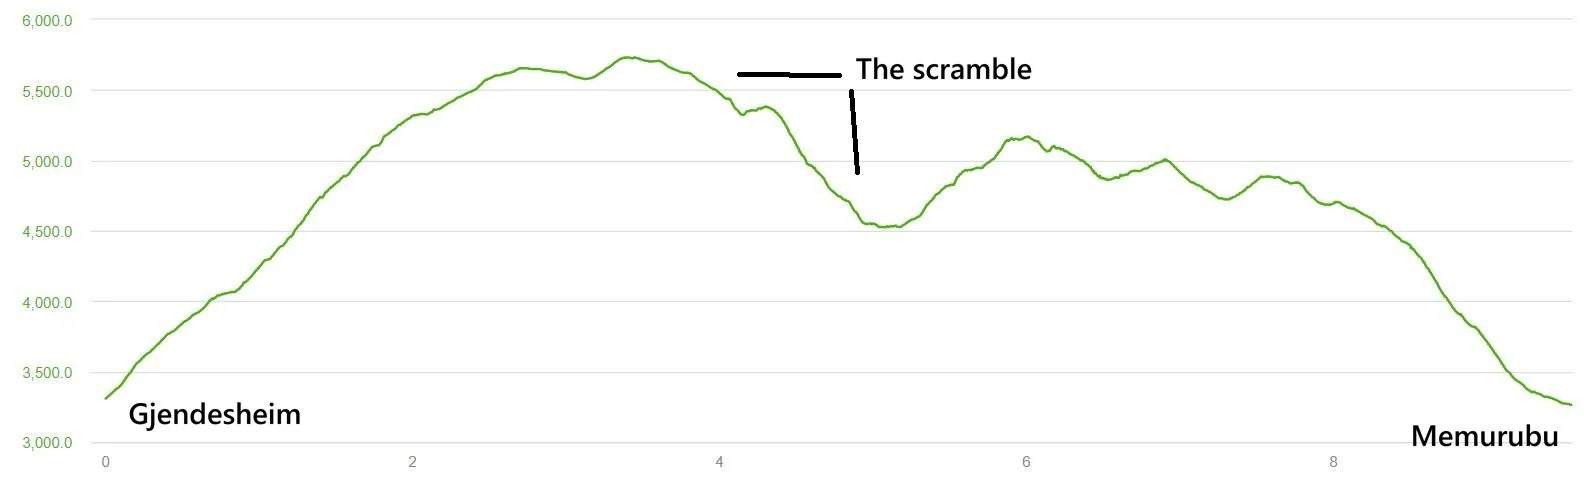
Our elevation profile of the Besseggen Ridge hike
How Hard is the Besseggen Ridge Hike?
We would consider the Besseggen Ridge hike to definitely be on the more challenging side, meant for more experienced hikers.
It’s a long hike that will take most of the day, has considerable elevation gain to it, and it’s often on steep, rocky, rugged terrain that requires concentration and careful footing and can be physically and mentally tiring. For large parts of the hike, the trail ascends or descends consistently at about 1,000 feet per mile, which is quite steep. Also, sometimes the trail runs along cliff edges that can be nervewracking for those afraid of heights.
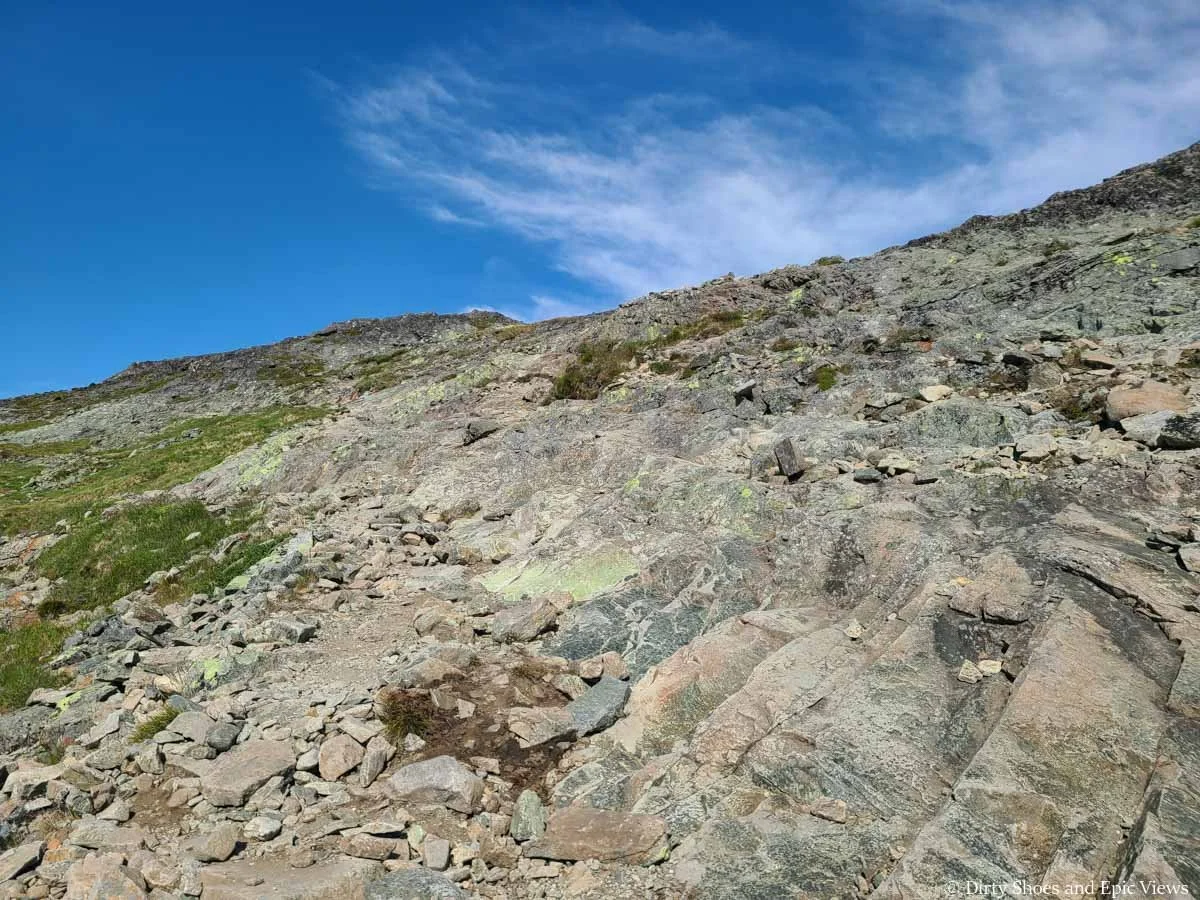
Typical rocky terrain along the Besseggen Ridge trail

The trail occasionally hugs the edge of the ridge
There is also one section of the Besseggen Ridge trail that requires scrambling (using your hands and feet) to climb steeply up a narrow rocky ridge that has a bit of exposure on either side. It’s a small part of the overall hike, but it is a significant part that can be intimidating or scary for those not used to this kind of thing.

A line of hikers ascending the scramble on Besseggen Ridge
For Kevin, he didn’t think the exposure was actually that bad, and it’s one of those things that look worse in pictures. The ridge is wider than it looks from afar once you’re on it, and you mostly stay in the middle of it and never really should be by any sheer drop-offs. There was mostly one main path through it that had easy to find hand and footholds, and the whole ridge is made of blocky rock that has good grip and isn’t slick. Overall, it seems you’d have to really try to put yourself in a spot where it would lead to an unsafe fall.
Looking down the Besseggen Ridge scramble
The typical terrain going up the Besseggen Ridge scramble
While hiking, Kevin noted that some people were having difficulty while climbing up the ridge, but it seemed more so just because of the sheer steepness of the climb rather than because of fear or nerves. He also saw lots of kids as well as some dogs on the trail, so it’s definitely doable for those with experience on this kind of thing.
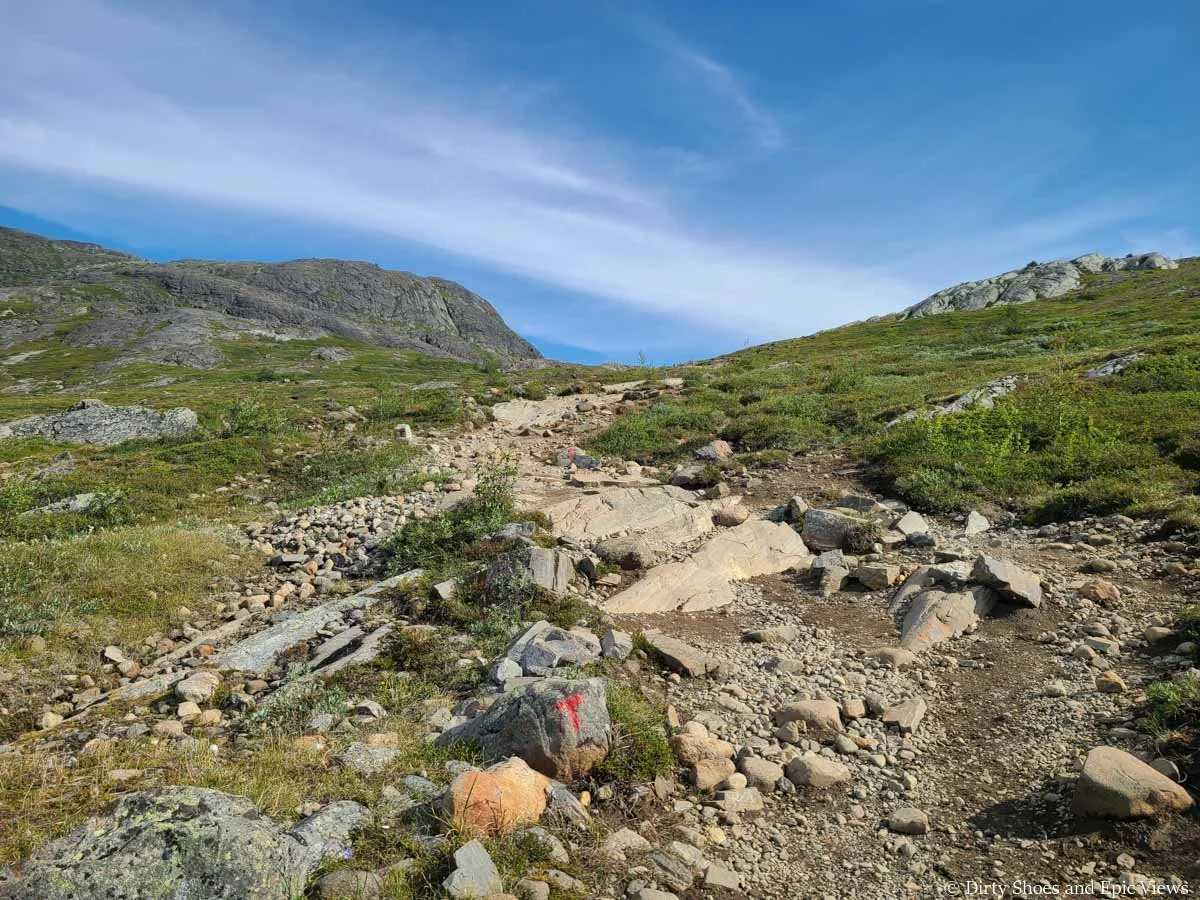
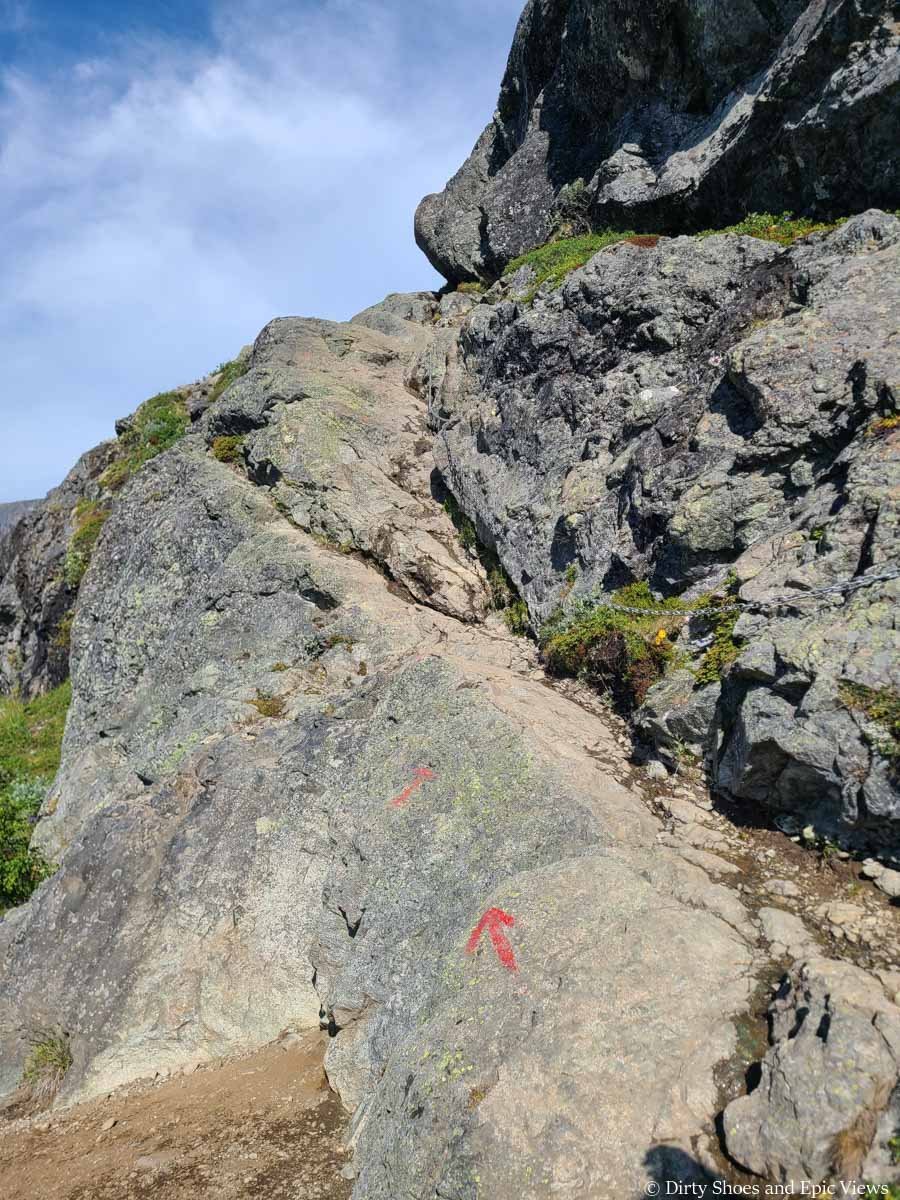
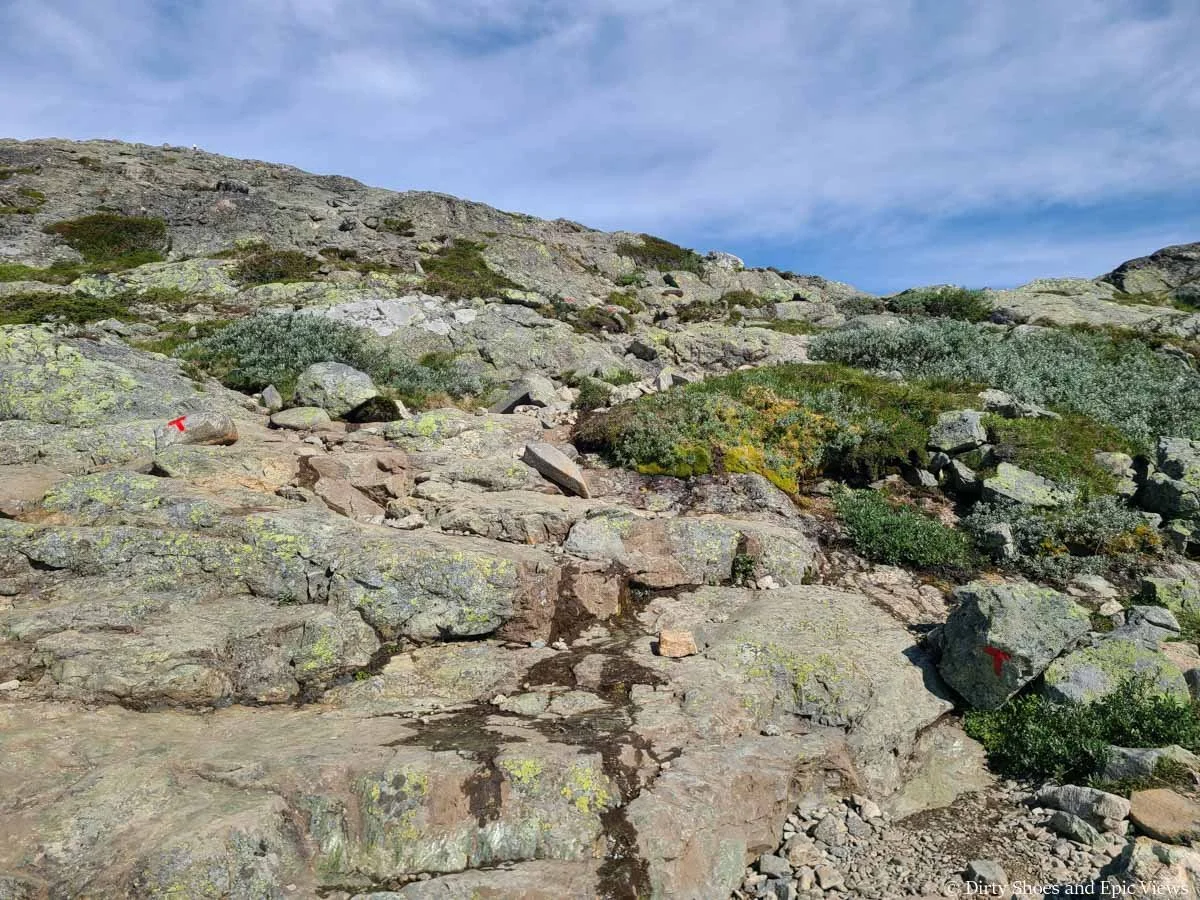
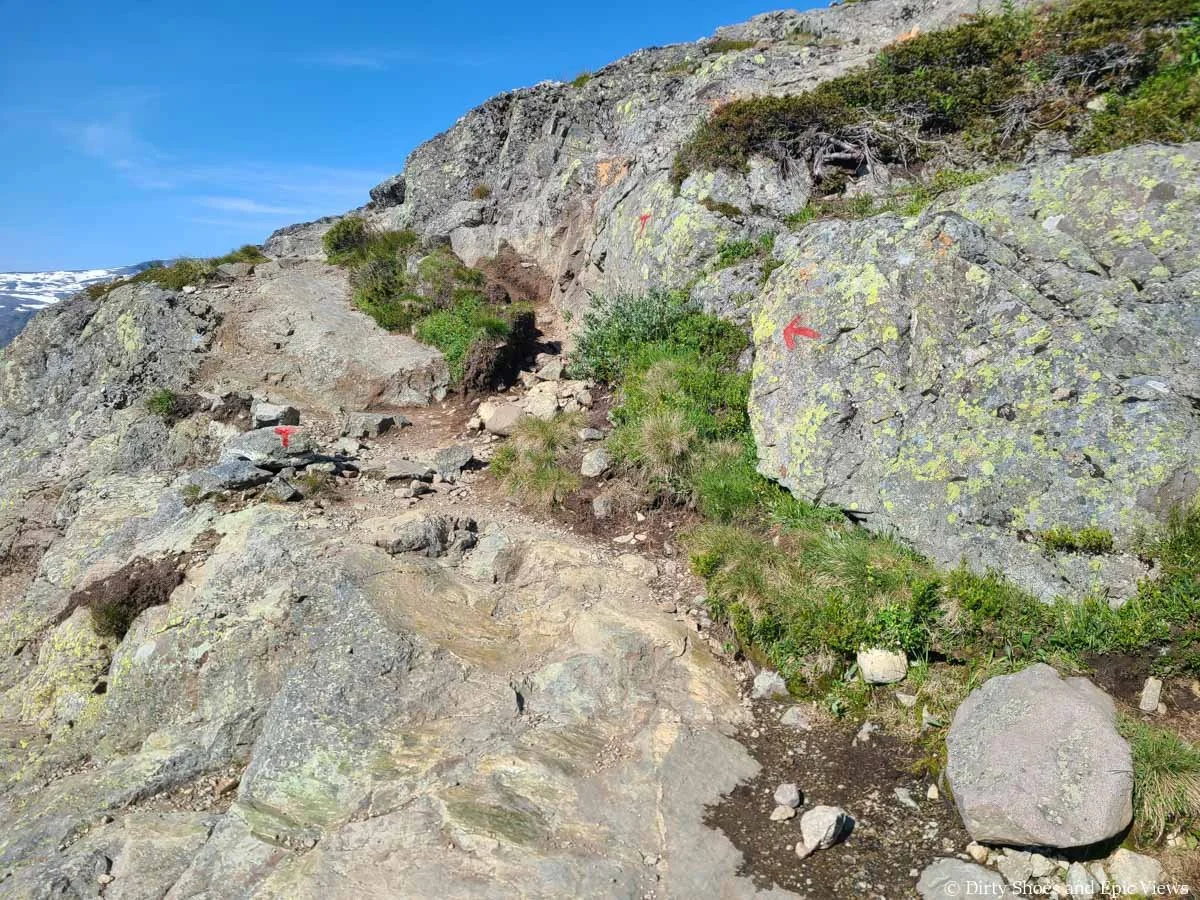
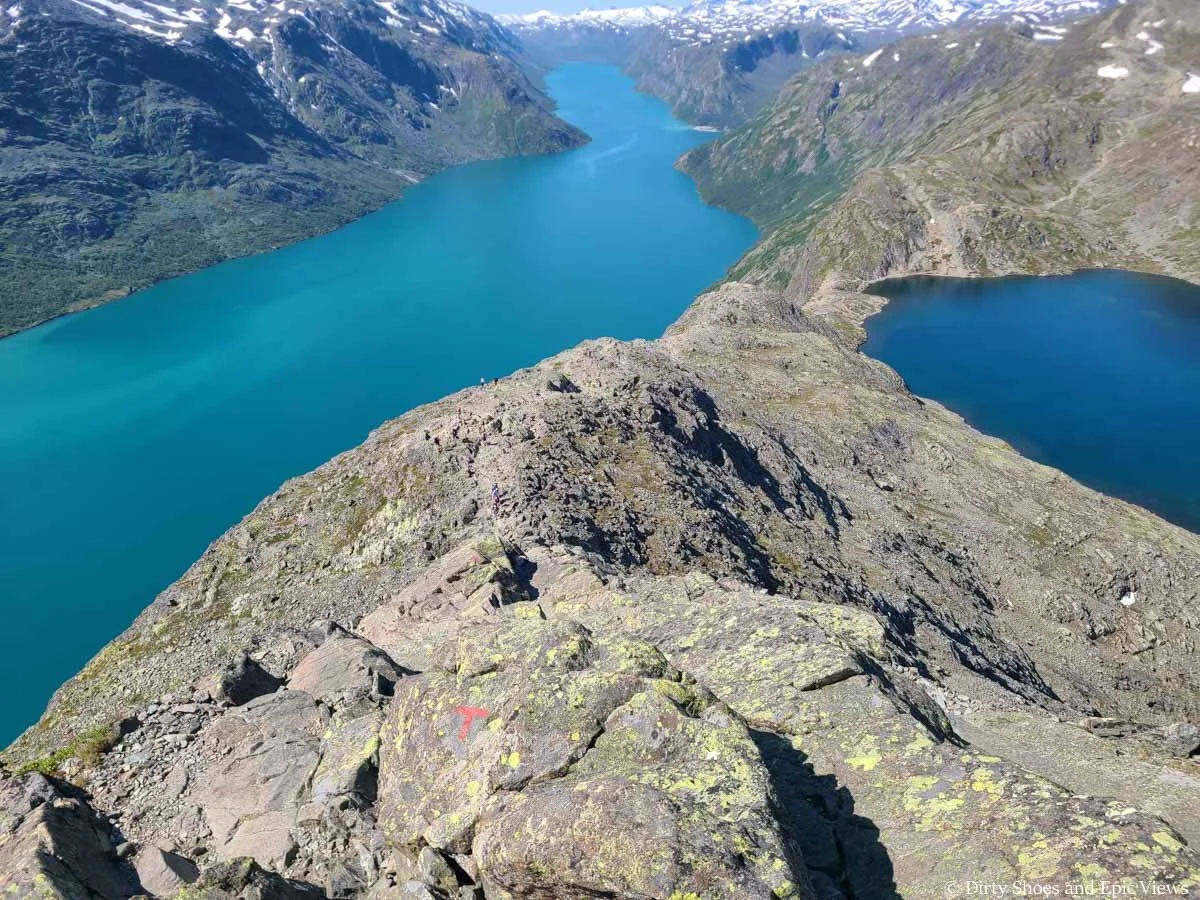
In terms of navigation on the Besseggen Ridge trail, the whole trail is well-marked with signs as well as red “T”s painted on rocks, and sometimes large rock cairns, so the trail is generally easy to follow.
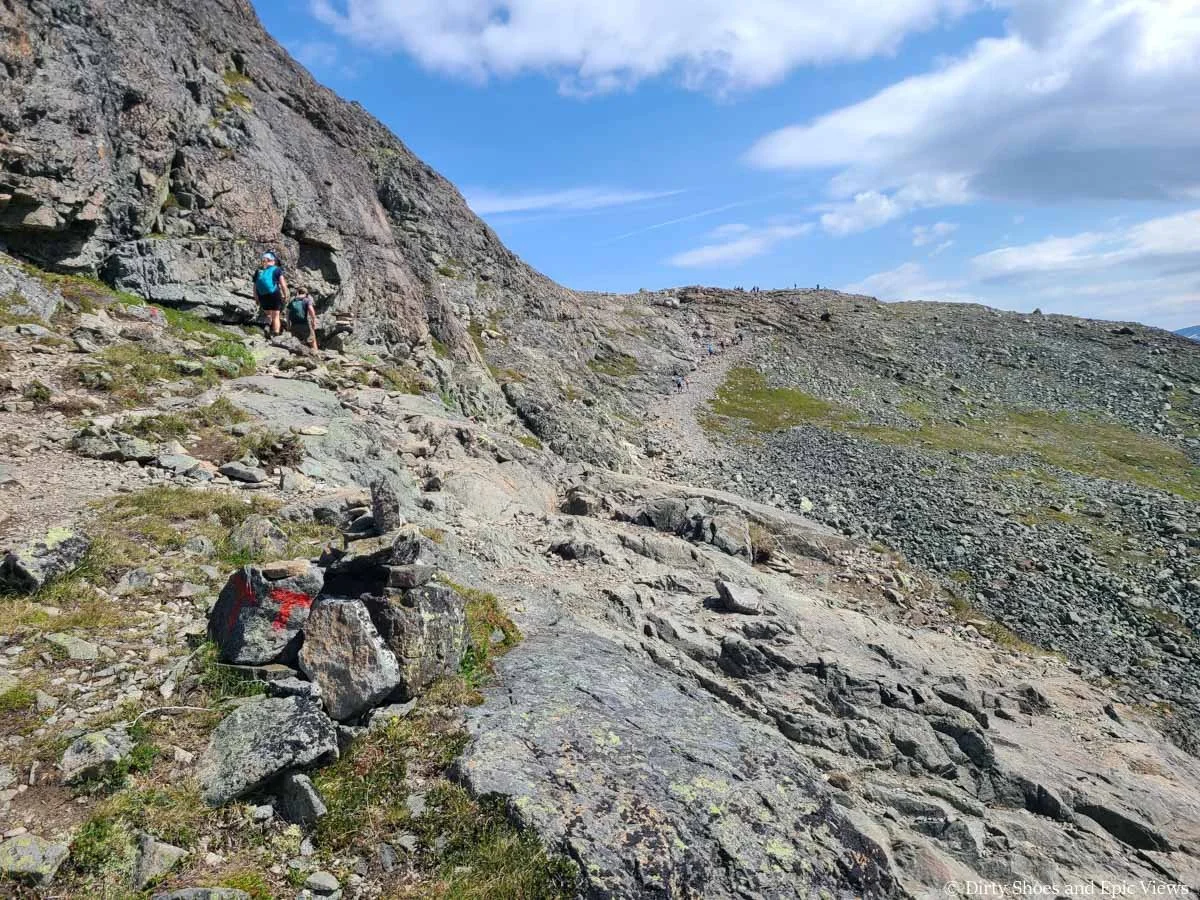
Keep your eye out for the Red Ts on the Besseggen Ridge trail
Most of the path is rocky and sometimes the trail isn’t too easy to distinguish, but if you just keep following the markings you will stay on track.
Similarly, sometimes there were herd paths that led off the main trail, but again, following the markings will keep you on the right path.
Best Time to Hike the Besseggen Ridge Trail
Summer is the best time to hike Besseggen Ridge, particularly between mid-June and mid-September when there is likely to be no, or minimal, snow along the trail. This is also when the Besseggen ferry makes daily runs, so access to both ends of the trailhead is easier.
June, July, and early August in particular typically have relatively stable weather (as stable as can be for mountains and fjords!). We visited Norway in July and had mostly clear weather and sunny skies, and several locals told us that this was increasingly the norm for Norwegian summers, which was great! Any rain we did see was typically just passing showers through the mountains. With that said, always be prepared for weather to be unpredictable and changing.
July and August in particular are peak season for hiking in Norway, so certainly don’t expect to find yourself alone on trails, and be sure to book things for the Besseggen Ridge hike in advance.
Beautiful summer views over Lake Gjende from Besseggen Ridge
By September, the weather can start to become a little more unpredictable and stormy, so waiting for the fall to hike Besseggen Ridge can be a gamble, but if you are in the area long enough, you are bound to find a good day to hike the trail, avoid the larger summer crowds, and maybe see some fall colors as well!
Another pro to hiking in Norway during the summer is that you’ll have maximal daylight, which is good to have on a long hike like Besseggen Ridge. Especially between mid-June to mid-july, you’ll experience nearly 24 hours of daylight due to the midnight sun. Though not in the Arctic Circle where the true midnight sun is, Joutunheimen lies close enough where during this time, the night is more of a twilight glow than total darkness, and actual daylight is long.
This can be helpful if you want to get a very early start on the Besseggen Ridge trail, need to get a later start and therefore will be hiking later into the evening, or are a slower hiker who needs lots of time.
Regardless of when you are hiking Besseggen Ridge, be sure to check the forecasts and conditions before heading out! Since weather can change unpredictably, the forecasts can be unstable and we found they were only reliable within a day or two. We recommend checking the weather the day before and then even the morning of your hike to make sure everything still looks good.
We especially recommend doing that for this trail because we do not recommend hiking Besseggen Ridge in poor conditions, including in rain, storms, high fog, low clouds covering the ridge, high winds, or wet terrain. The entire hike is exposed with really nowhere to seek shelter, and most of the terrain is rock that can become slick and difficult when wet. The scramble especially can become unsafe.
If you’re ever feeling uncomfortable or see the weather changing for the worse, don’t be afraid to turn around and try again another time.
Avoiding the crowds on the Besseggen Ridge hike
This is a popular hike. The official website says that up to 60,000 people hike this trail every year, and most of them come in the peak summer season. This can lead to bottlenecks on some of the more challenging parts of the trail (i.e. the scramble).
If you want to try to avoid some of the larger crowds on the Besseggen Ridge trail, here are a few of our ideas:
Hike more in the shoulder season (think mid to late June or after August). To do this, you may gamble with weather and trail conditions a bit more. Plan to be in the area for a few days to give yourself a good chance for an ideal weather window.
If starting at Memurubu, book the first ferry of the day. That way, you’ll start the hike with the first bolus of hikers and if you are a fast hiker, you can get ahead of most of the crowds for the day.
Alternatively, you can start a little later in the day, or hang back at the trailhead for a bit to let the bolus of hikers get ahead. You’ll still likely run into slower hikers eventually on the trail, but you can at least separate from the pack a bit. To do this, it’s best to hike Besseggen Ridge in peak summer when daylight is at its max so that you don’t run into hiking in the dark.
If hiking from Gjendesheim, you have some flexibility in terms of when you start, since you’re not relying on the ferry at the beginning. To avoid crowds, it’s a good idea to start super early before the first ferry heads out (typically at 7:45 am). This means you’ll probably have to walk the road down from the parking lot, making your wakeup call even earlier. However, if you do this, you’ll be rewarded with a mostly quiet trail before you meet up with the first boat’s crowds coming from the other direction. The earlier start, the better, so that you can get to the scramble before the crowds.
The Besseggen Ridge Trail: Trail Description and Our Experience
Now that we’ve gone over all the logistics, we want to share with you exactly what you can expect on the Besseggen Ridge trail so you know if it’s something you want to tackle.
This time, only Kevin did this hike and Melissa had to sit this one out. Kevin is a particularly strong and fast hiker, and exposure and scrambling don’t really phase him much, so this trail description is from that perspective.
Also note that Kevin did Besseggen Ridge from Gjendesheim to Memurubu so that is how we’ll describe the hike, but you can easily get an idea of what the hike will be like in the opposite direction as well. We’ll share pictures of each segment of the trail as seen from both directions to help give you an idea of what the hike looks like both ways.
At Gjendesheim, the Besseggen Ridge trail begins right by where the parking shuttles pick people up. You should see a signpost pointing towards Memurubu 14 km away.
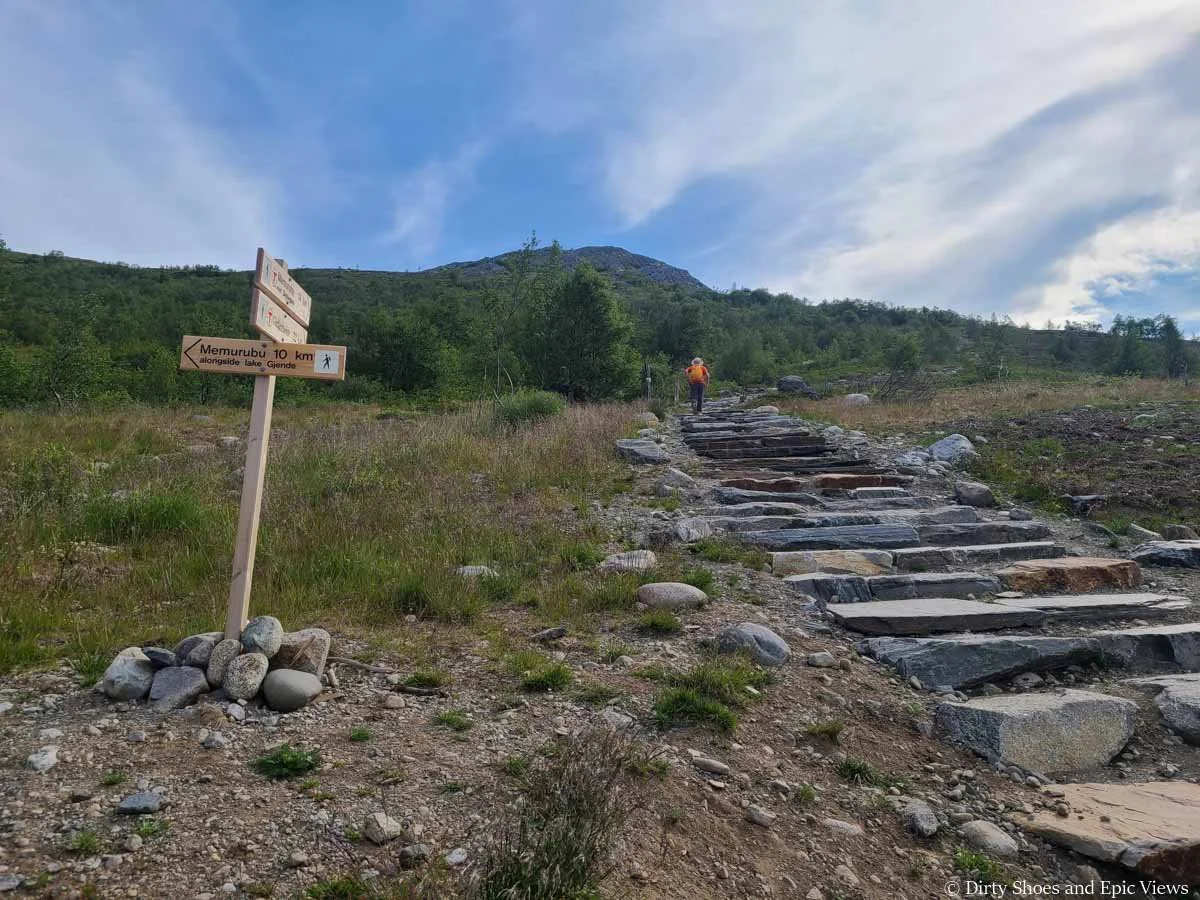
Starting the Besseggen Ridge trail from Gjendesheim
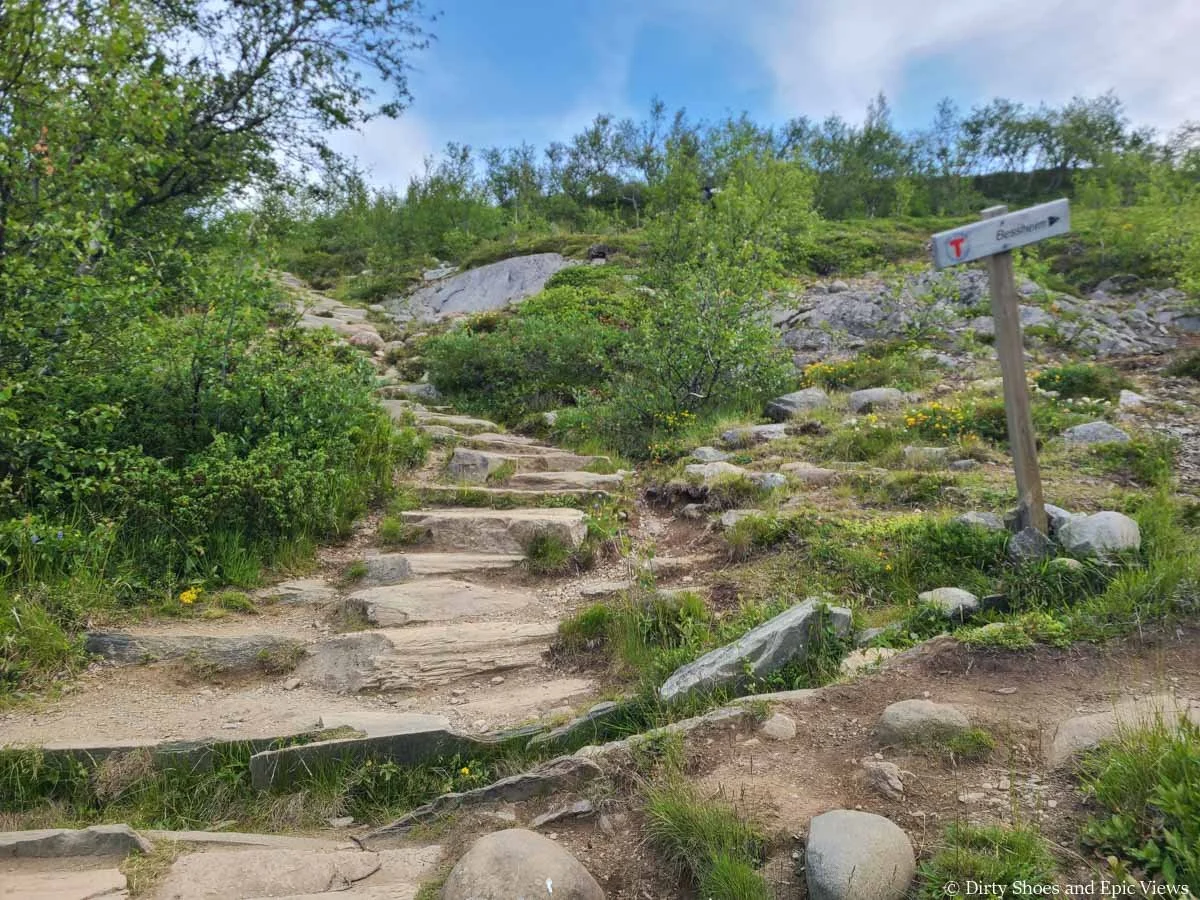
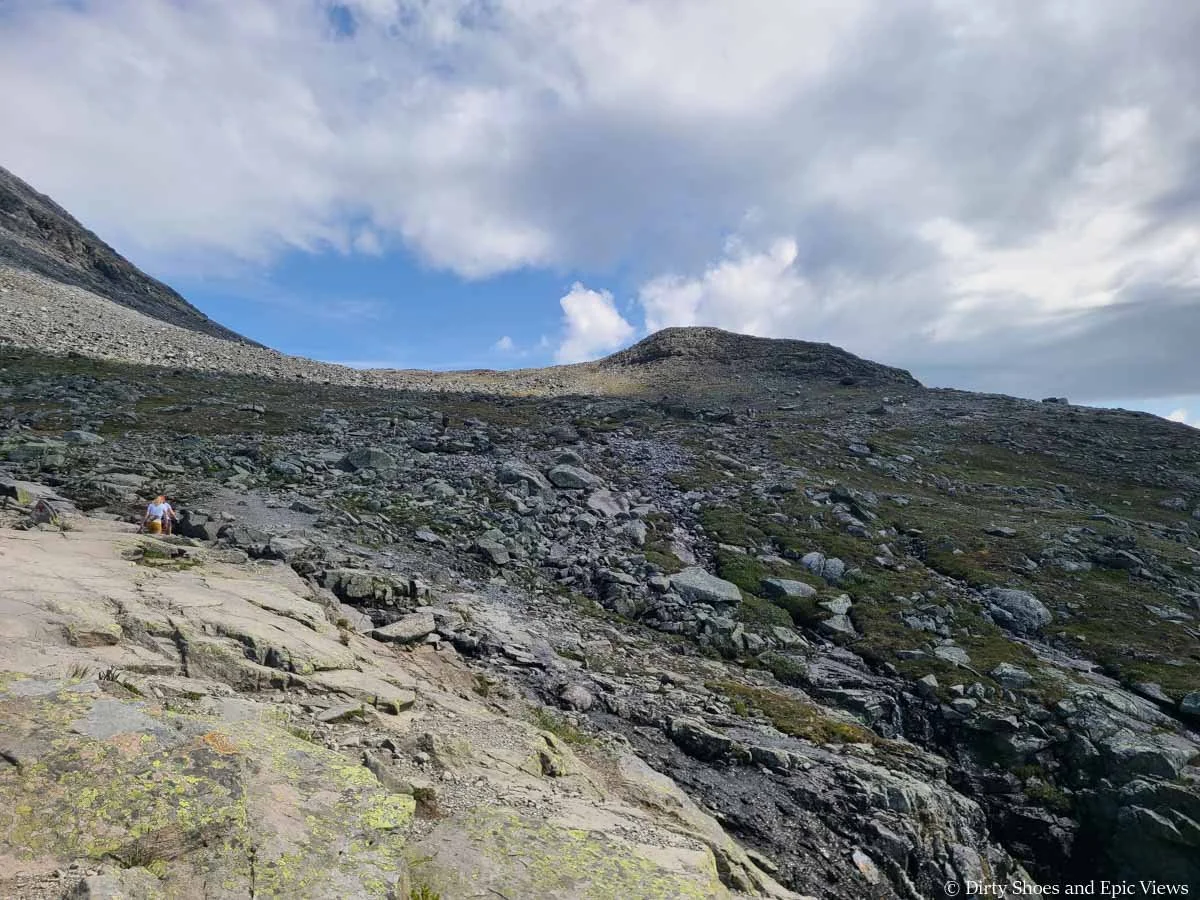
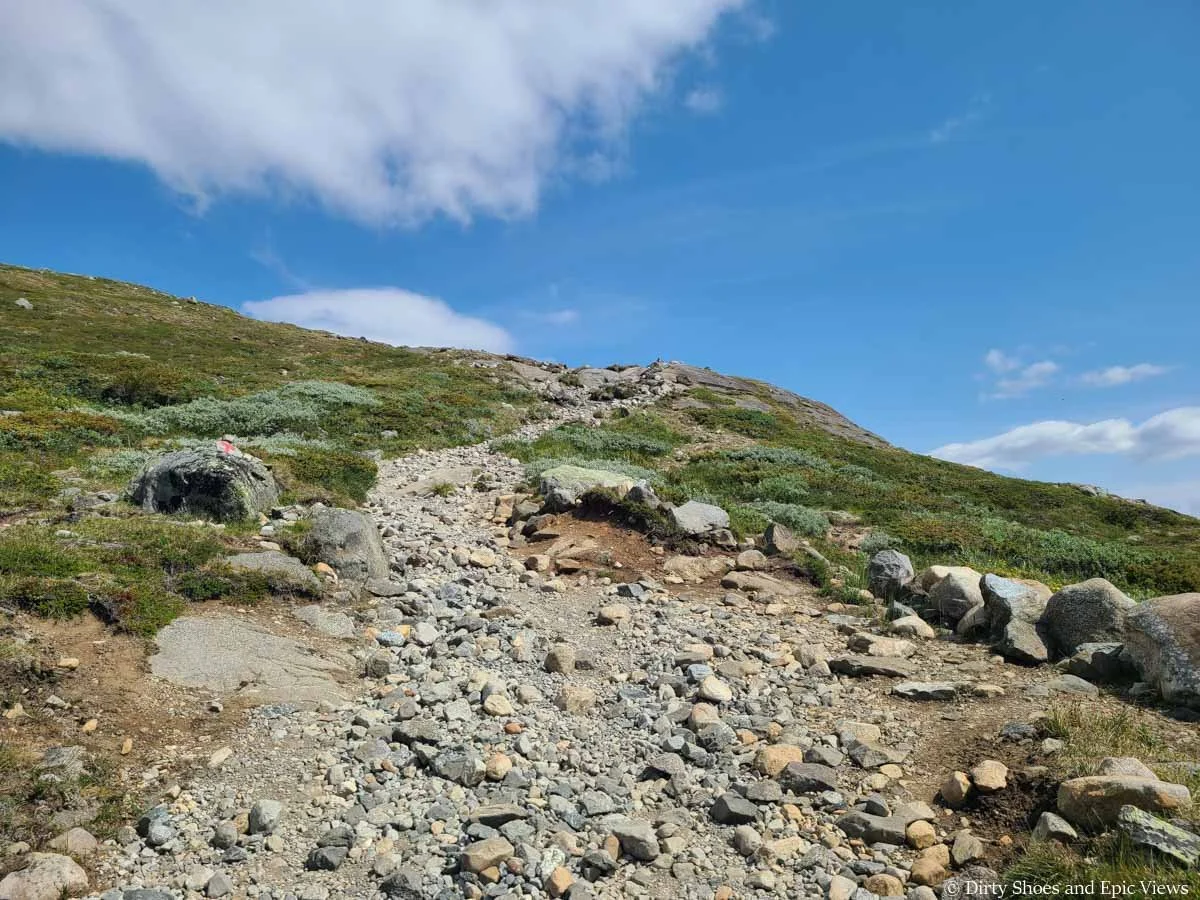
The trail starts immediately climbing up to the ridge with no warm up whatsoever. From here, you’ll climb steeply and steadily until you make it to the highpoint of the ridge over 3 miles away.
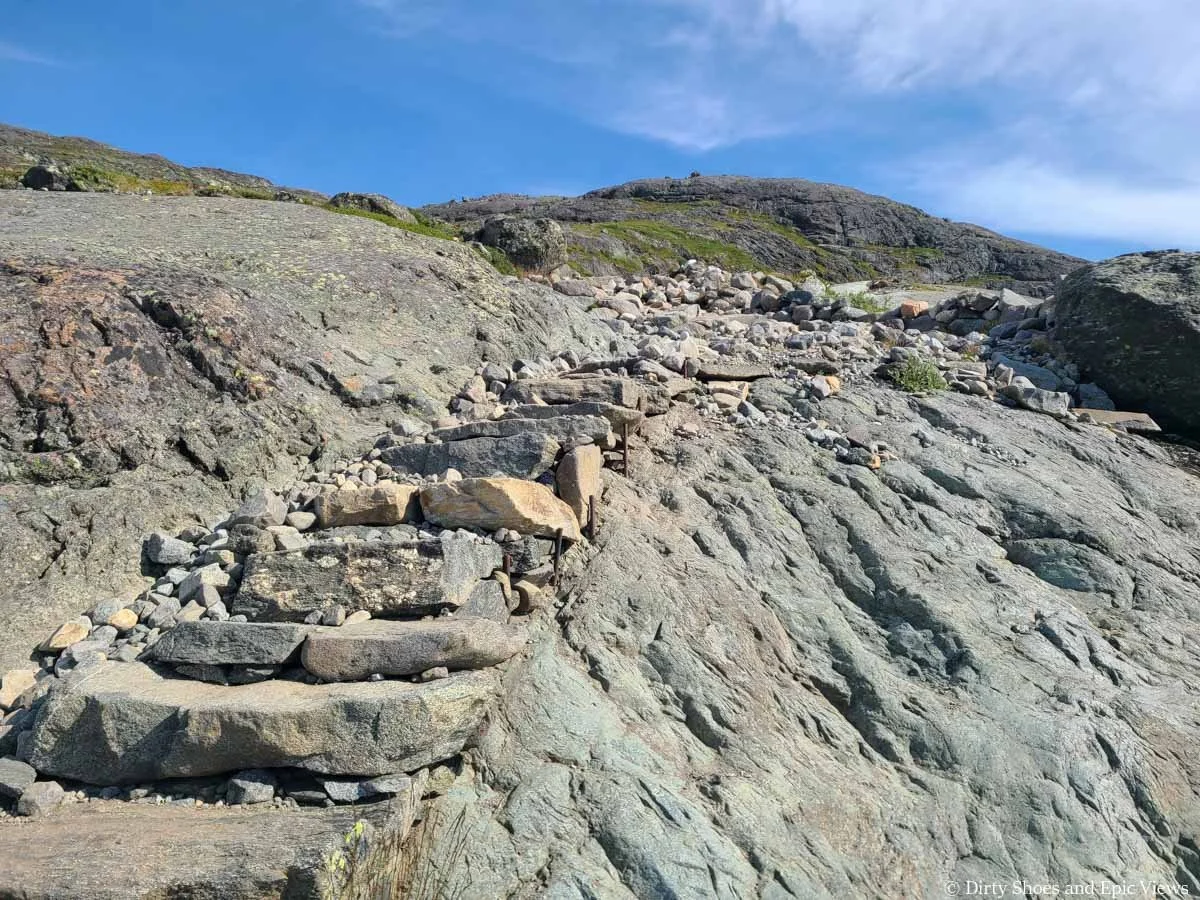
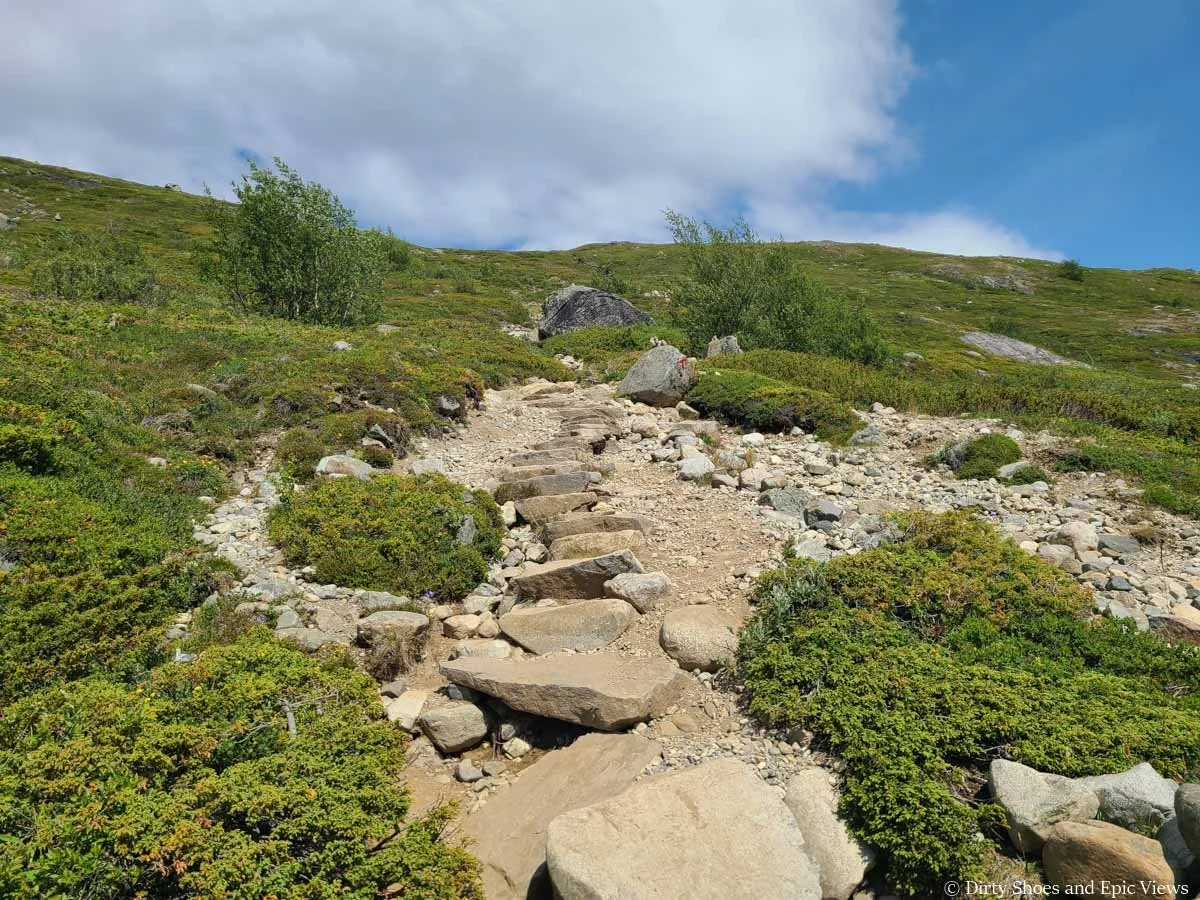
You’ll start the climb up the slopes beneath the ridge by heading up gravelly stone steps, and almost immediately you can turn around to increasingly better views of Lake Gjende appearing behind you.
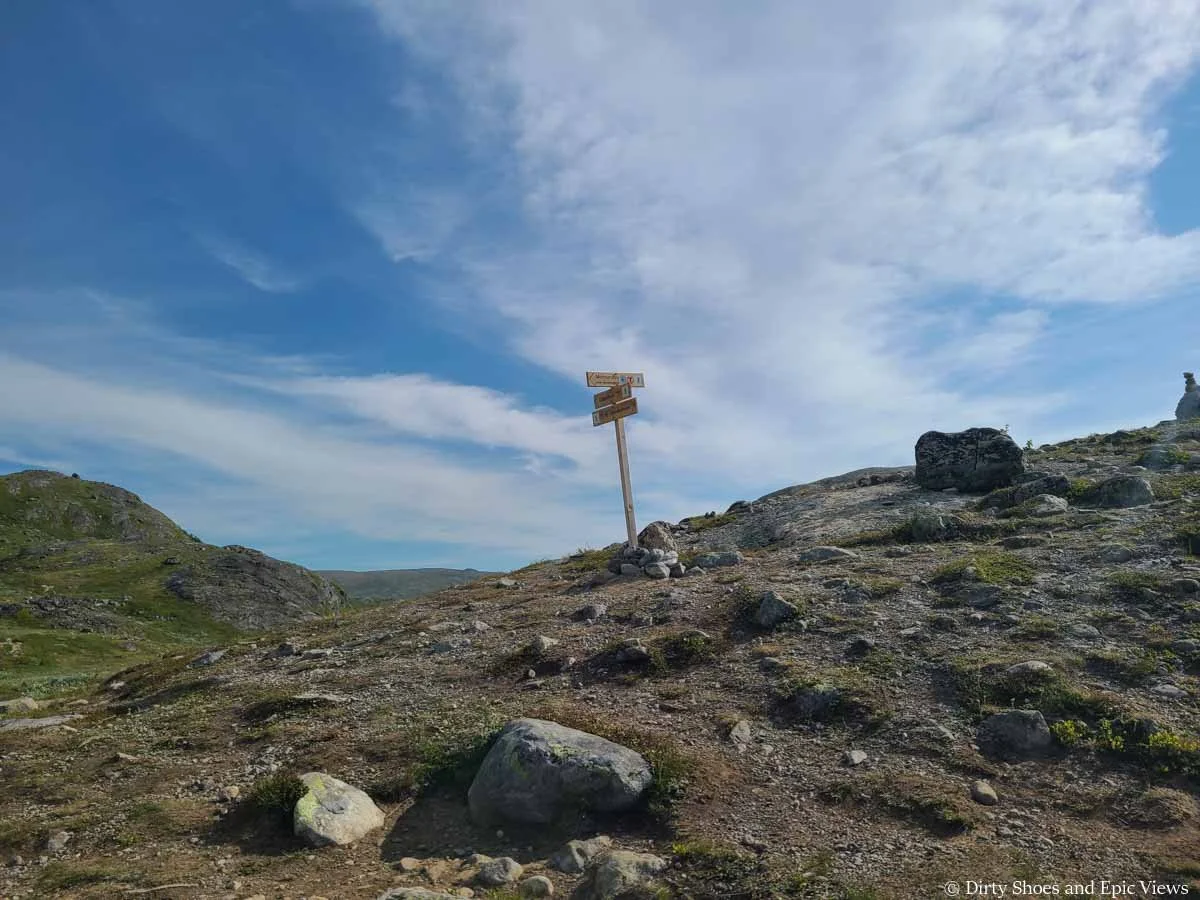
After not too long, you’ll pass by one of several junctions along the trail, but each is well-signed towards Memurubu.
The trail junctions along Besseggen Ridge are all well-signed
The view of Lake Gjende from the start of the Besseggen Ridge trail
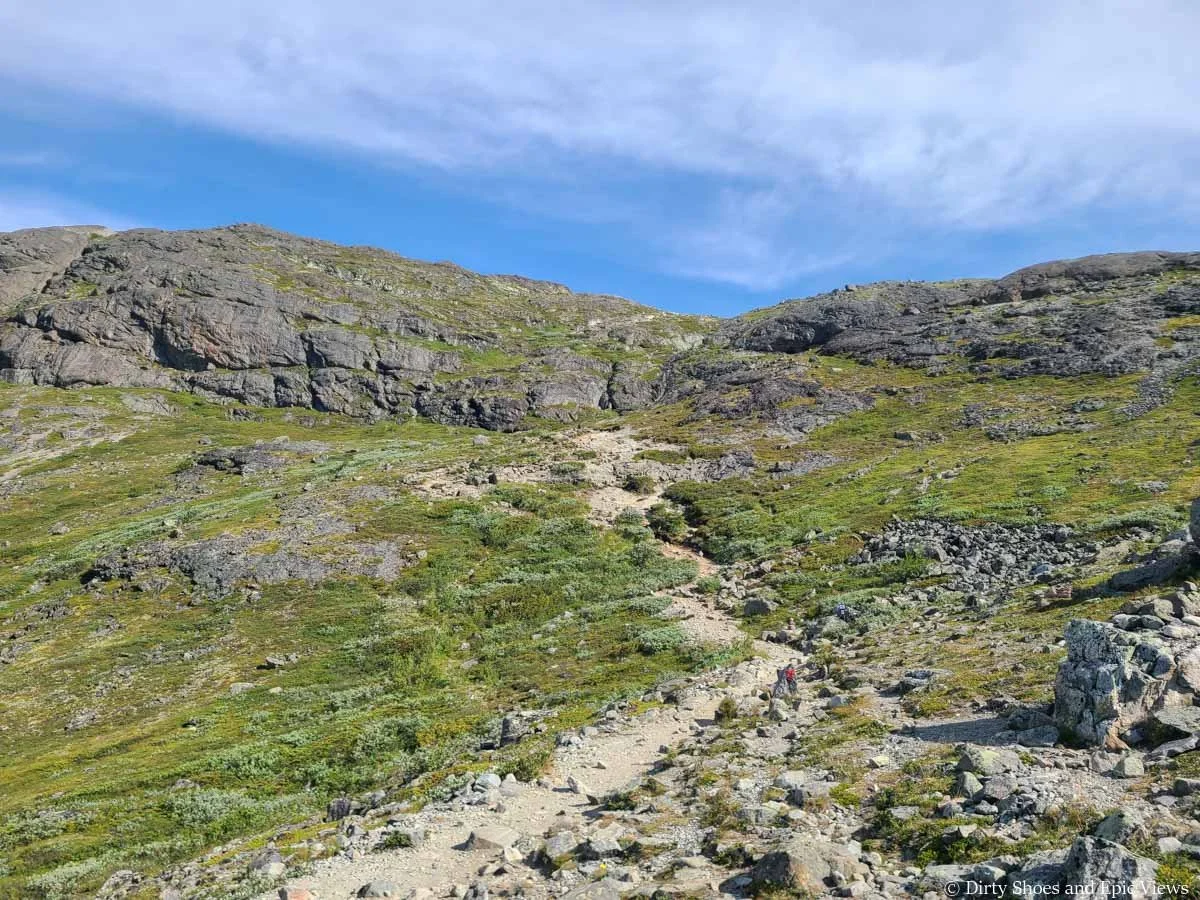
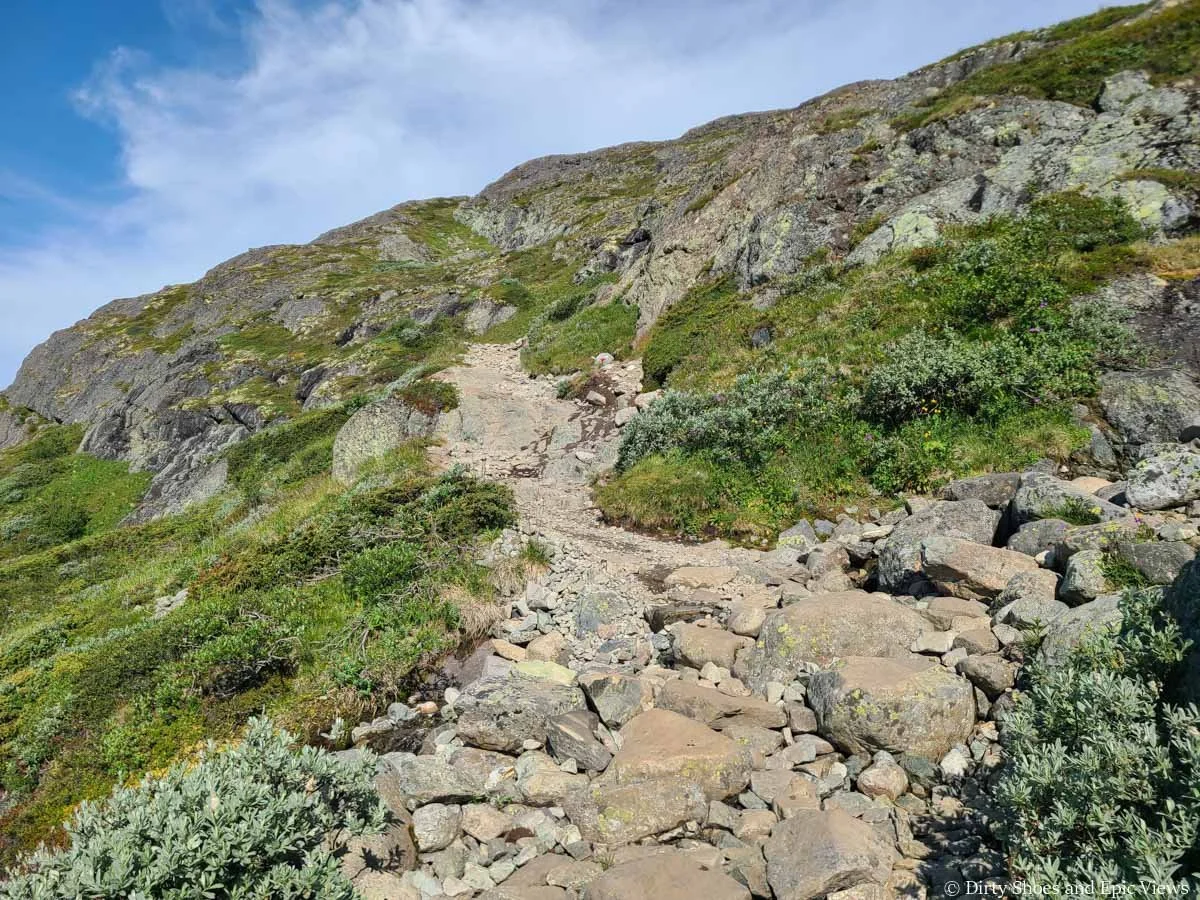
Once the rock stairs end, the trail becomes more of a dirt path with large and loose rock. The trail is still climbing steadily, but less steeply now as it heads towards the headwalls of the ridge, and you can really cruise along through here. It’s totally exposed up here, and you can enjoy awesome views over Lake Gjende.
This is the view looking back down the trail towards Gjendesheim
At 0.7 miles into the Besseggen Ridge hike, you’ll reach a junction for Bessheim. This junction marks one end of the alternate route that we described above that wraps around the shore of Bessvatnet Lake and skips most of the high ridge and the scramble entirely. We have no experience with this route but it’s just worth noting here that this is one of the places where you can potentially come out if you’re hiking Besseggen Ridge in the opposite direction and decide to skip the scramble. The other place is higher up on the ridge, which we’ll point out shortly.
It’s also worth noting that here, Kevin’s watch read 700 feet of elevation gain, so at this point he was climbing exactly 1000 feet per mile- pretty steep!
This junction at mile 0.7 marks the alternate route around the Besseggen Ridge scramble
As you pass by this trail junction, enjoy this all-too-brief flat piece of trail before the path makes a turn towards the ridge and continues its steep ascent to the top.
Here, you’ll start climbing up the rock face that makes up the head wall of Besseggen Ridge as you hike up rugged terrain, loose gravel, and stone steps. Keep your eyes peeled for the red Ts to stay on track through the rocky landscape, but for the most part, the trail is obvious through here.
Climbing up to Besseggen Ridge
Heading towards the headwall of Besseggen Ridge
The views behind you will open up even more now over Lake Gjende and the ferry dock, so don’t forget to take some breaks to turn around and enjoy them.
Views back over Lake Gjende and Gjendesheim
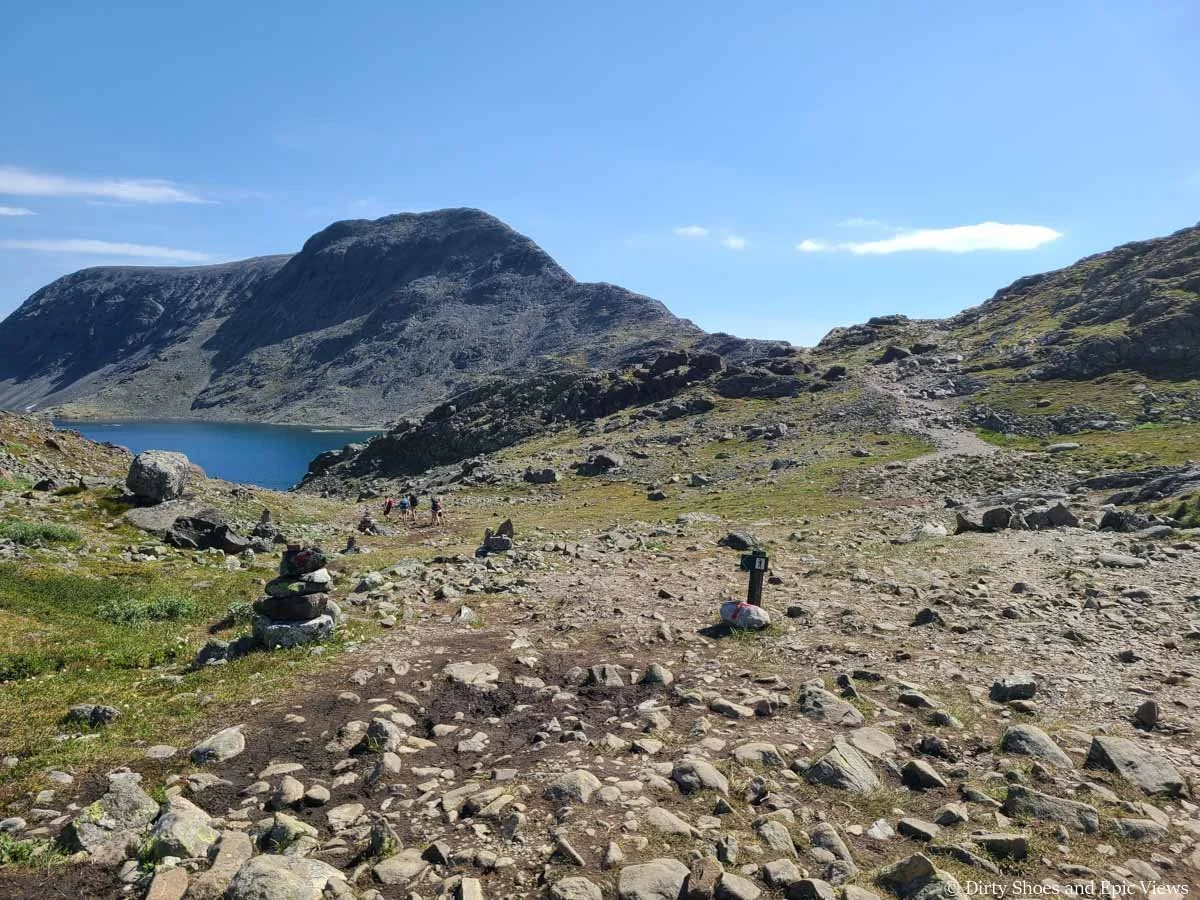
Of note, you’ll come across a handful of signs along the Besseggen Ridge trail that give you an idea of where you are, how far you’ve hiked, and how much you have left, and they also give general time estimates for how long it should have taken you to reach each of these points. If it took you longer than the estimate, they suggest turning around if you can. For example, they estimate it should take about 2 hours to get to the 2 km / 1.2 mile mark from Gjendesheim, so their timeframes are pretty generous.
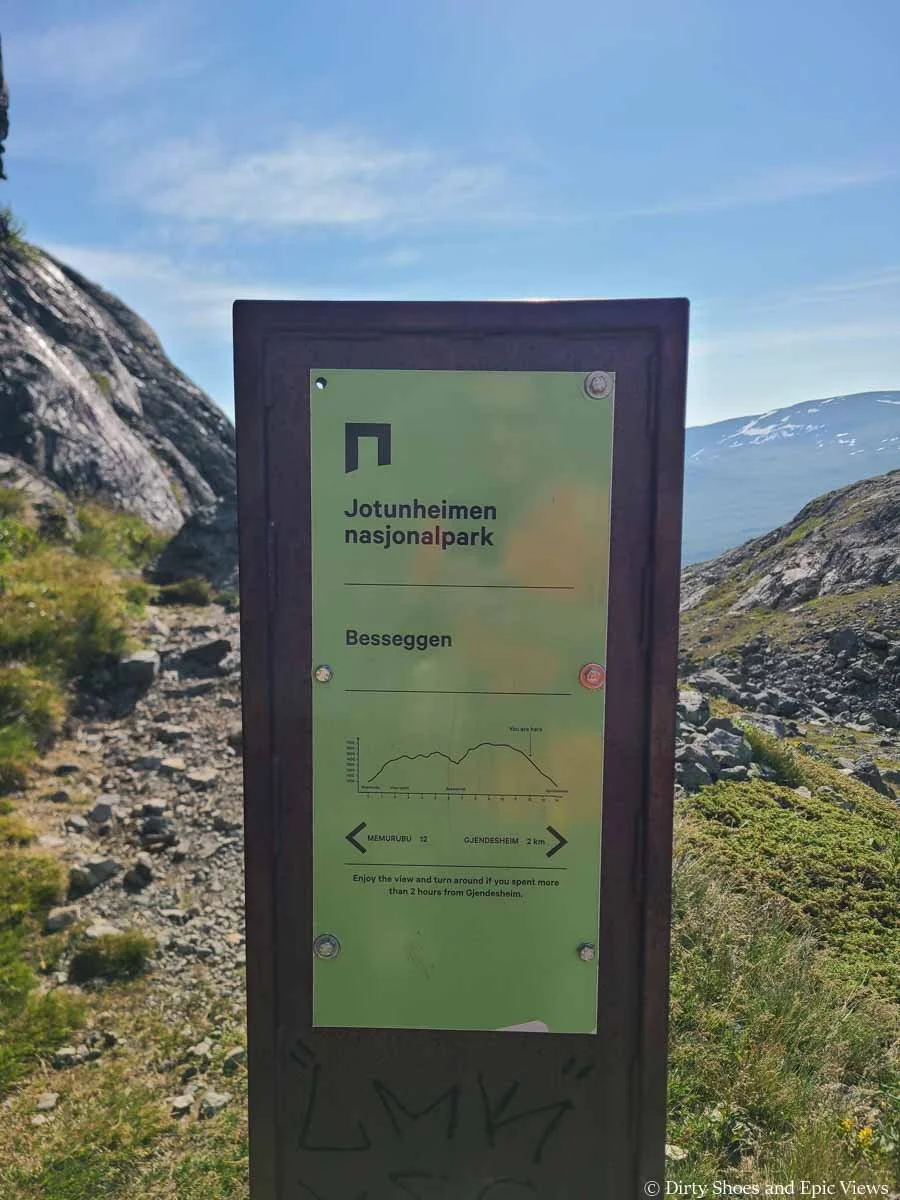
One of several progress signs along the Besseggen Ridge trail
Eventually, the trail veers away from views of the lake and hugs the rock walls of the ridge as it gets steeper.
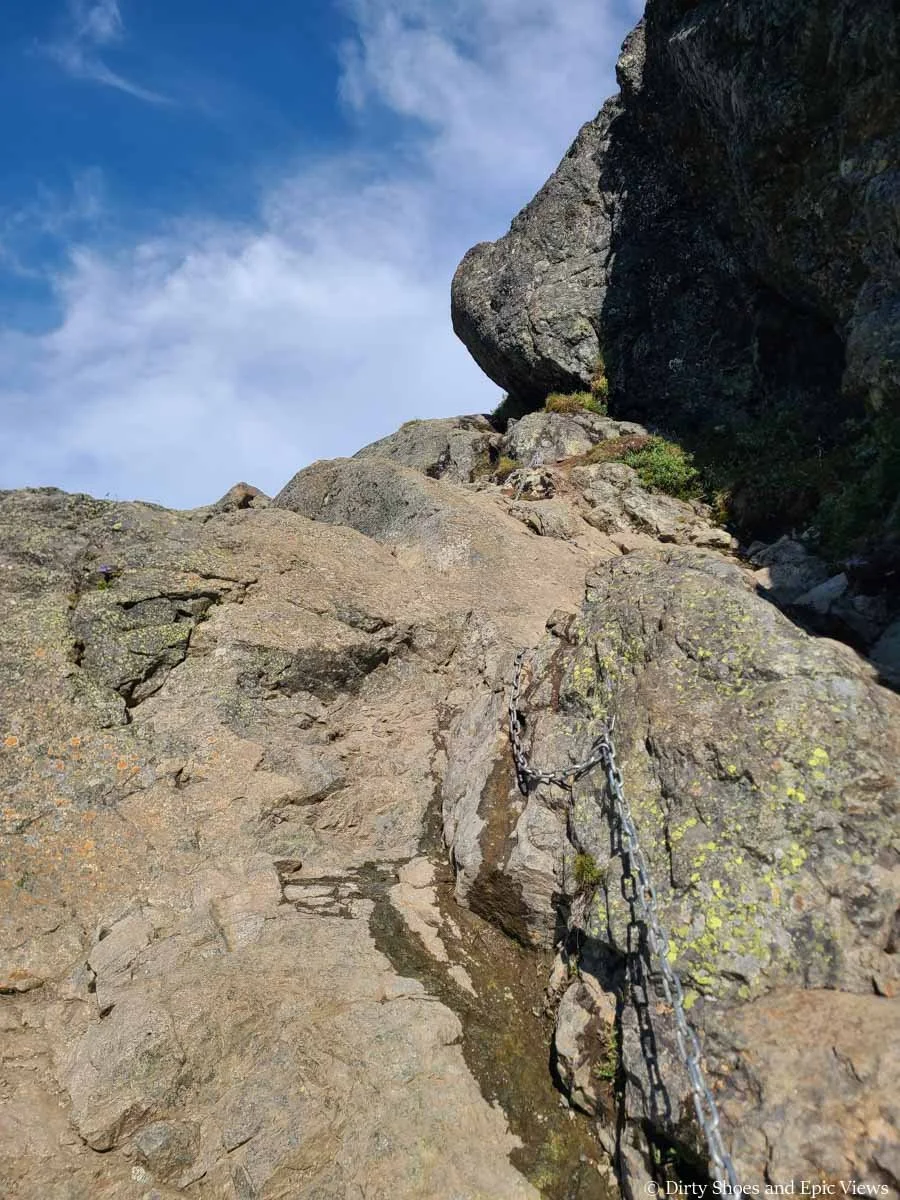
At one point during the climb up to the top of the ridge, you’ll reach a brief section where you’ll use a chain to guide you up a steep rock slab. The rock here is smooth and often wet and slippery so the chain here really helps.
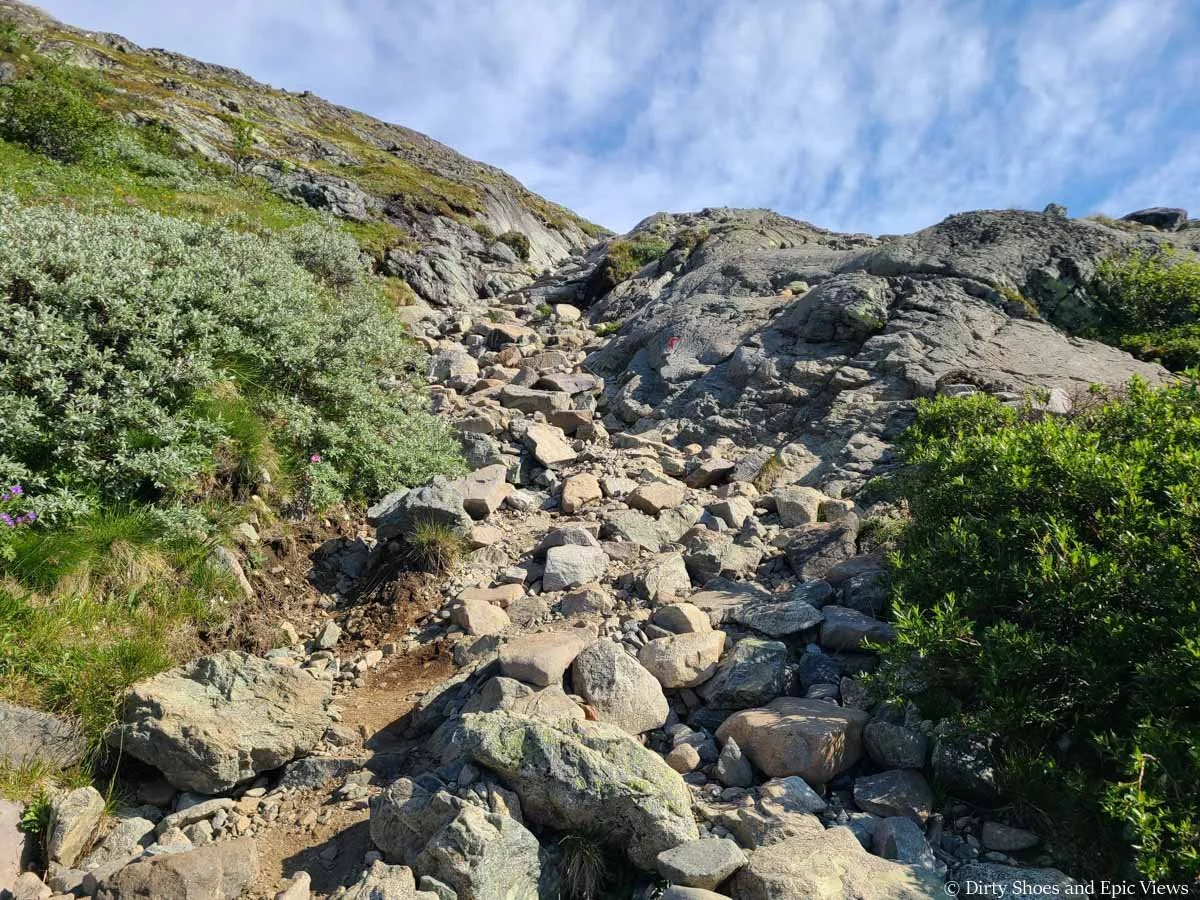
From here, you’ll continue zigzagging your way through the rocky landscape following the trail markers, and eventually the trail transition away from loose and bouldery rock to more of a granite slab. Large rock cairns can be seen now along the trail to mark the way up to the ridge.
Continuing up the rugged trail to Besseggen Ridge
Looking back down the trail

Again, we’ll stop to note here that at two different points Kevin’s watch was reading 1.44 miles in and 1446 feet gained, and then 1.74 miles in and 1782 feet gained, so we’re still maintaining that steep and steady 1000 foot per mile gain!
As the trail transitions back to steep loose gravel, be sure to keep your eyes out for the T markings as the trail can sometimes not be as obvious through the rugged landscape.
Keep your eyes out for the red Ts as the Besseggen Ridge trail may not be super obvious in various places!
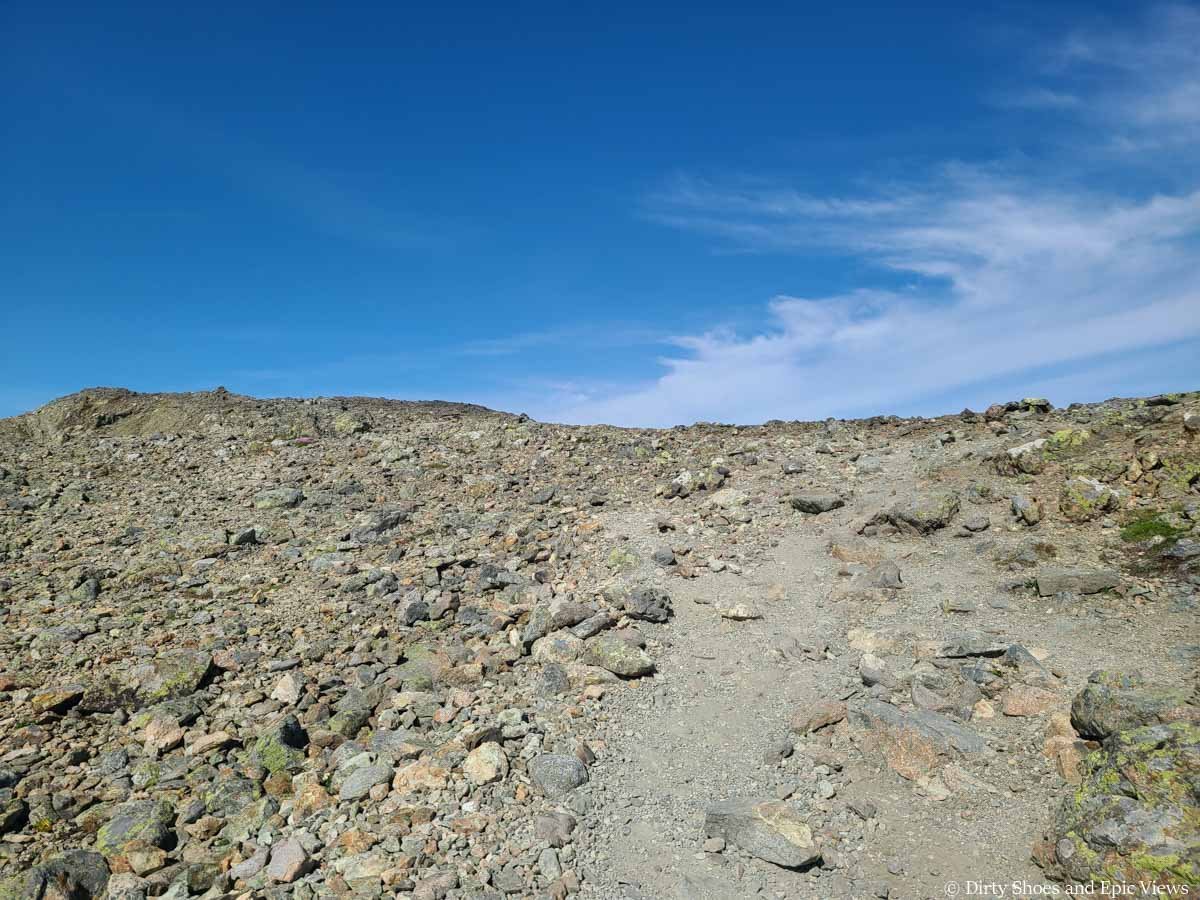
As you get higher, there will be some steeper rock faces to navigate over, but scrambling isn’t really necessary through here.
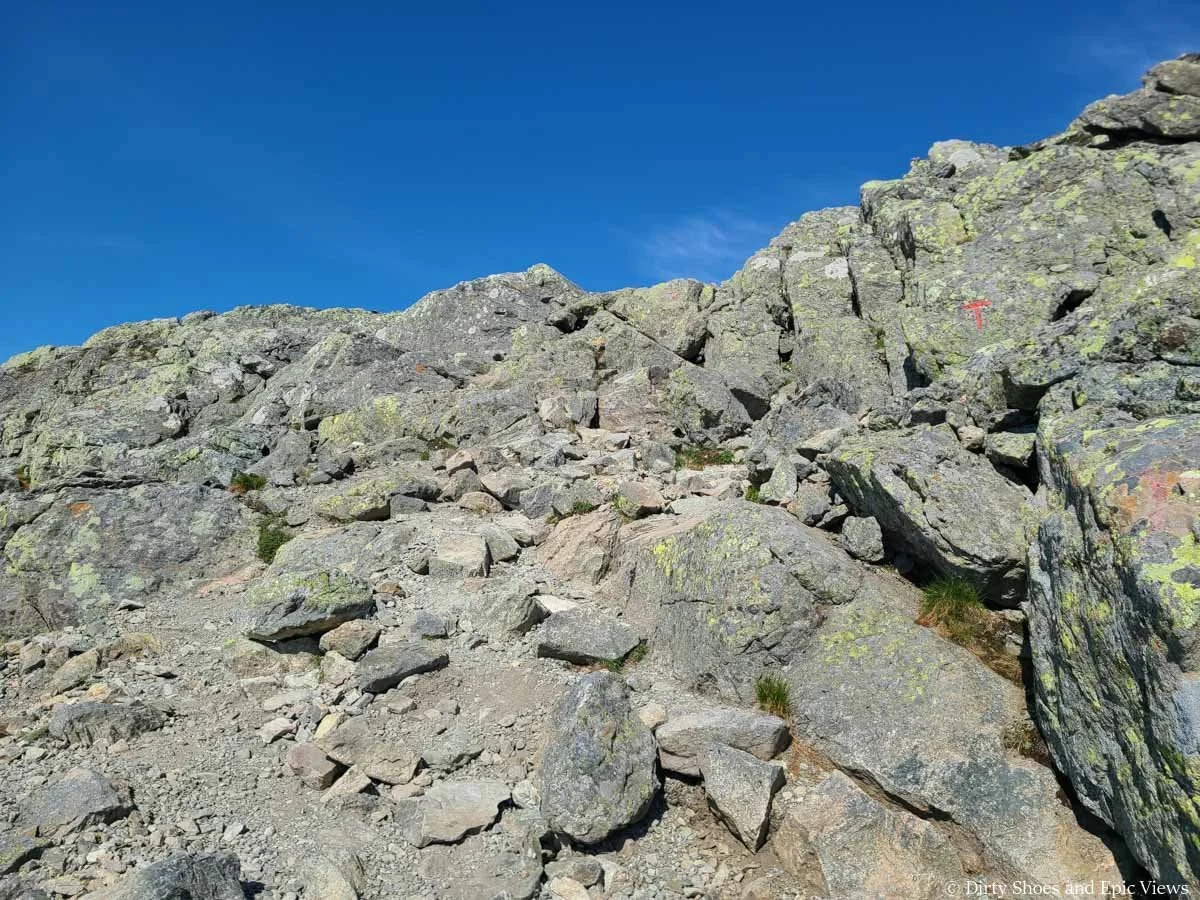
The Besseggen Ridge trail gets pretty rocky towards the top of the ridge
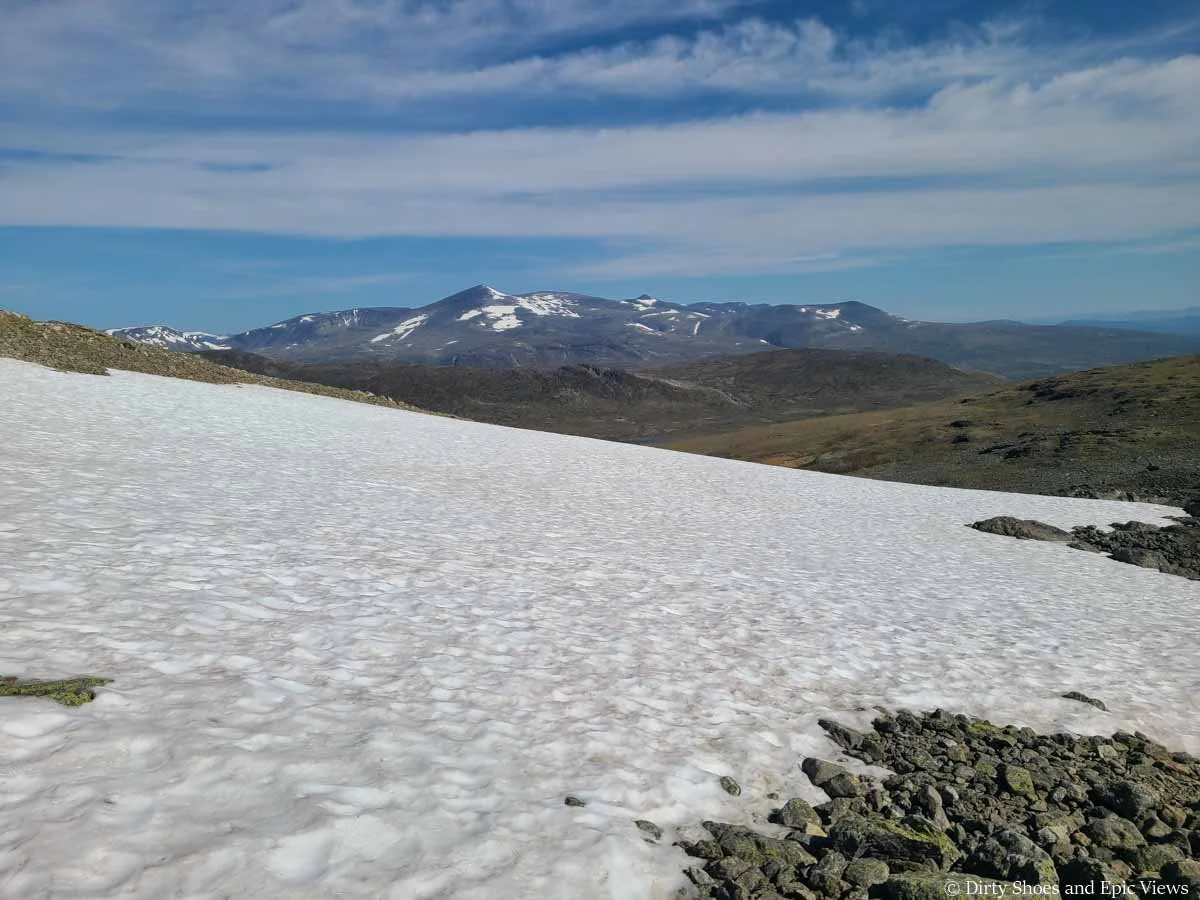
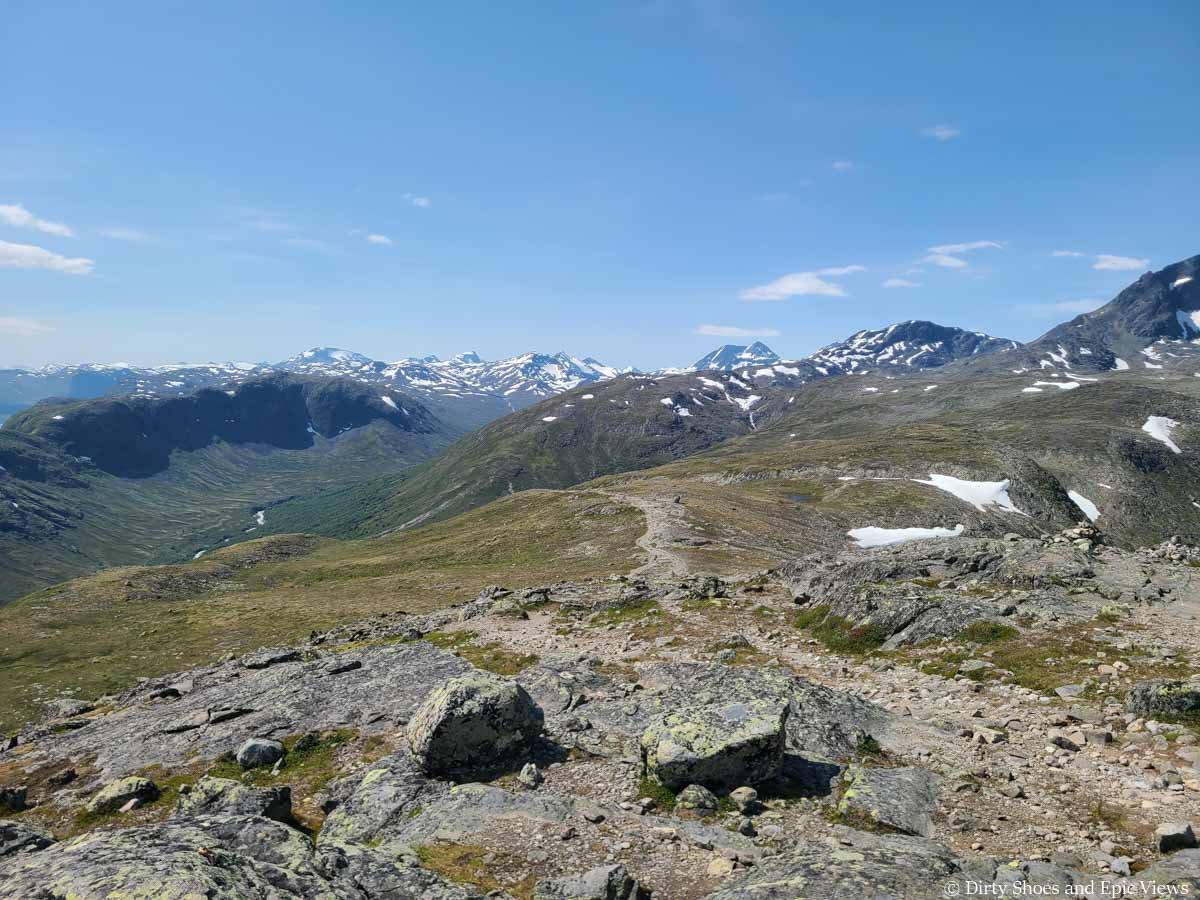
At around 1.7 miles in, the trail bears west as you are now on the early parts of the ridge. Views open up to the mountains of the other side of the ridge now, and some small snow patches lingered in the distance.
You still have a bit of climbing left to do to get to the highpoint of Besseggen Ridge, but it will start to become a bit more gradual now.
Views from near the top of Besseggen Ridge
Continuing the climb to the top of Besseggen Ridge
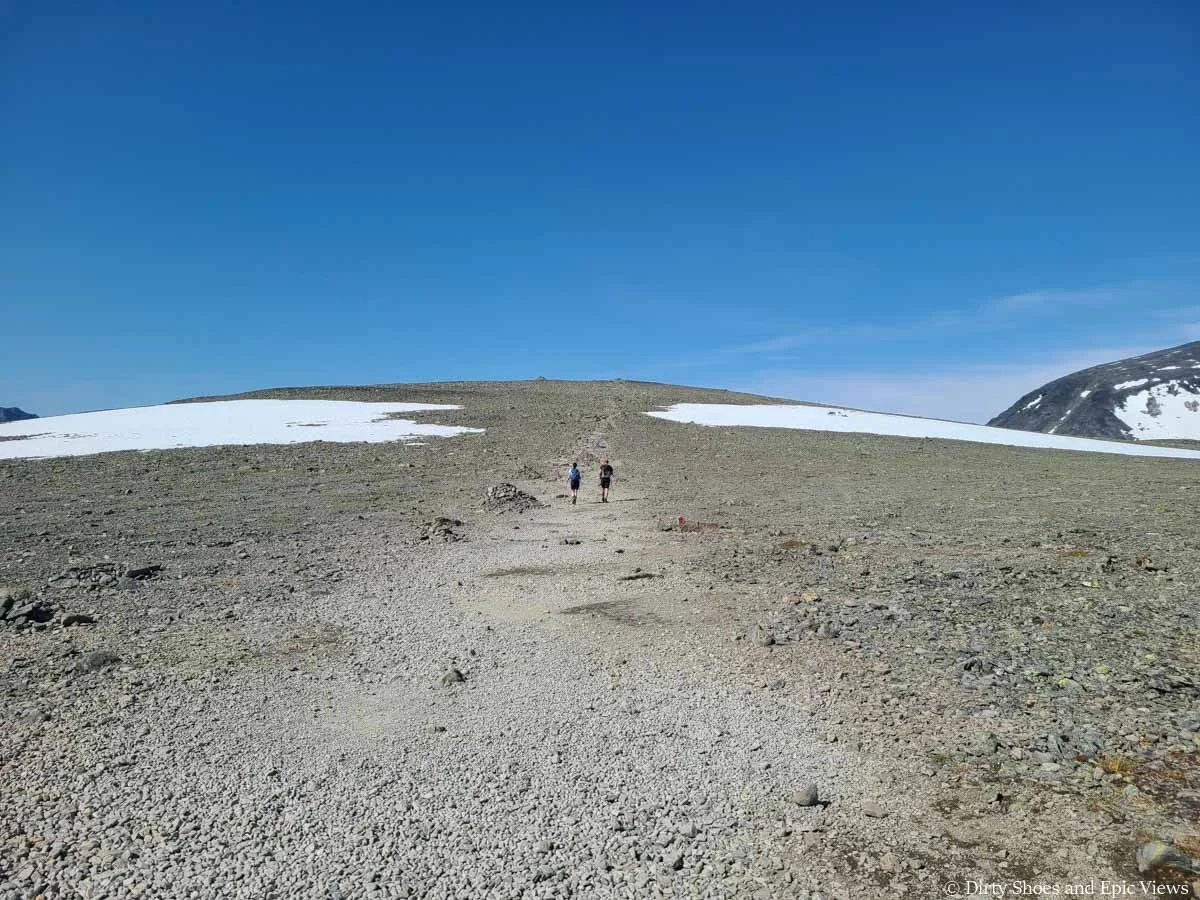
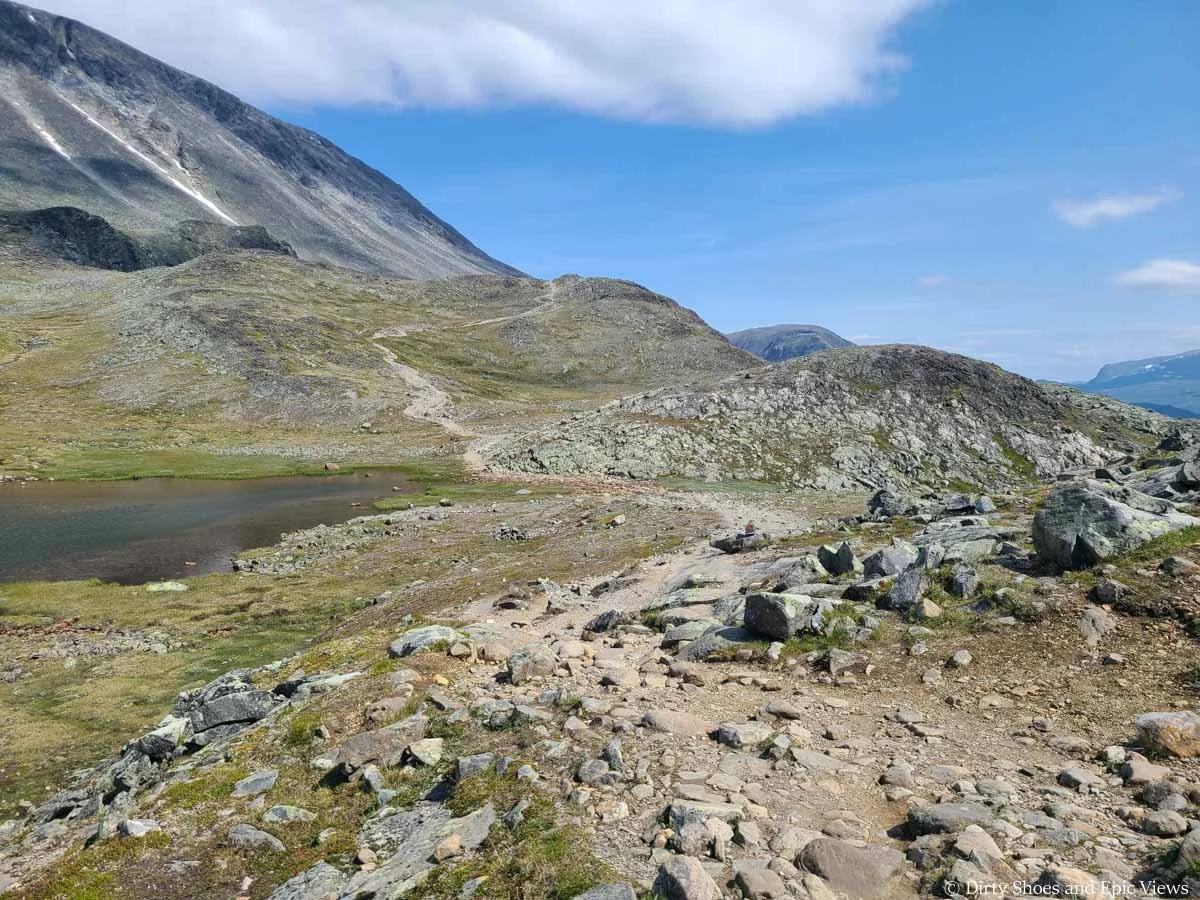
You’ll continue crossing the rocky landscape, and even in mid-July there was still a small snow patch along the trail.
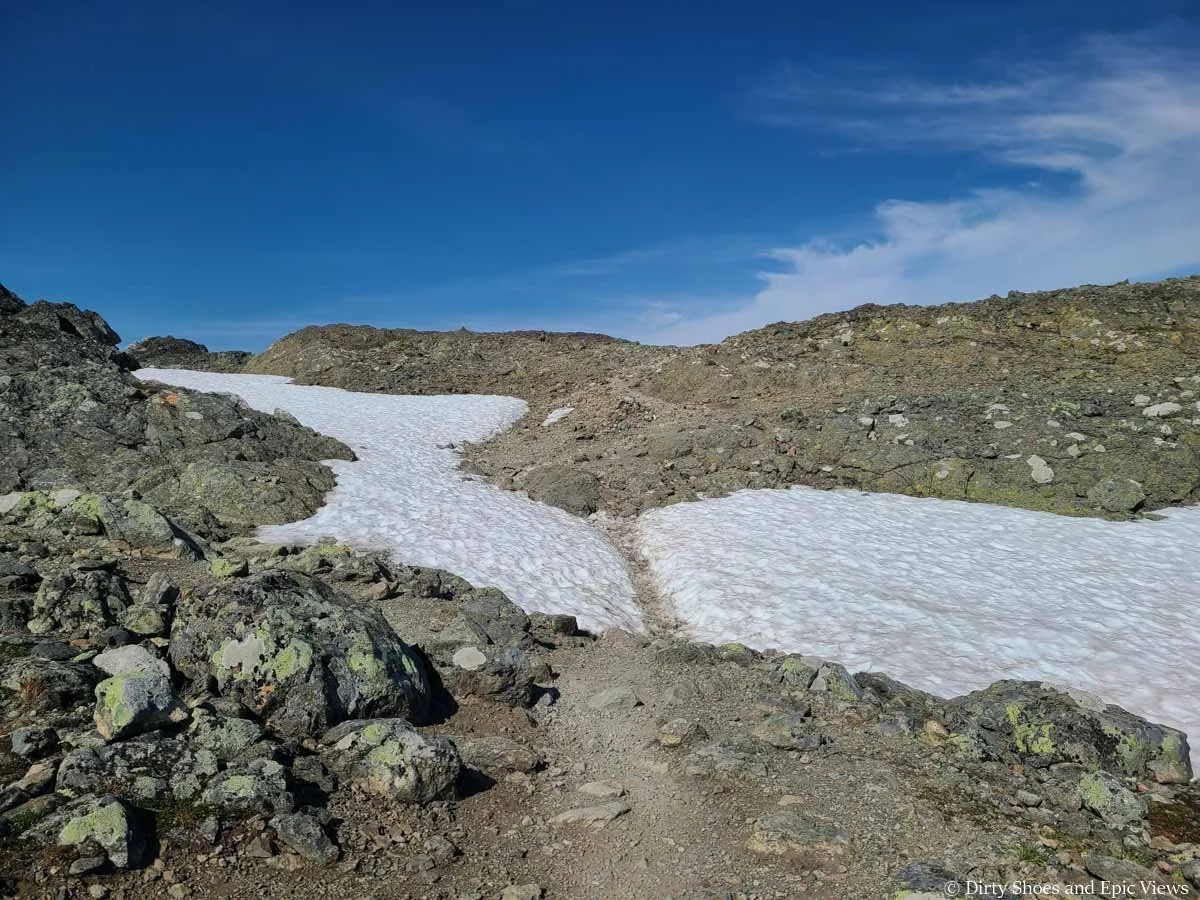
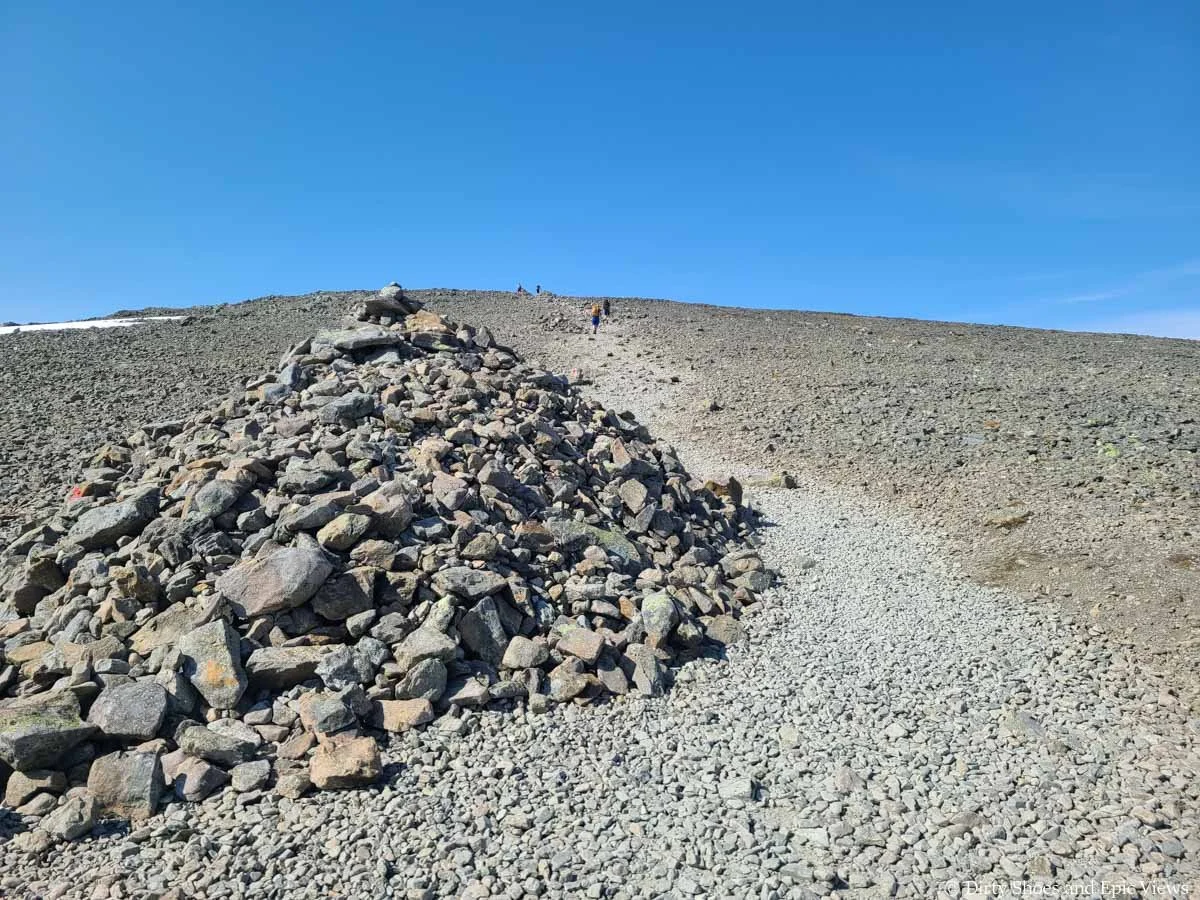
You might begin to see a large rock cairn at what looks like the top of the climb (but it’s not yet!). At this point, at around 2 miles in and 2000 feet climbed, the trail finally eases up as it heads up to the large rock cairn along a clear herd path for about a half mile.
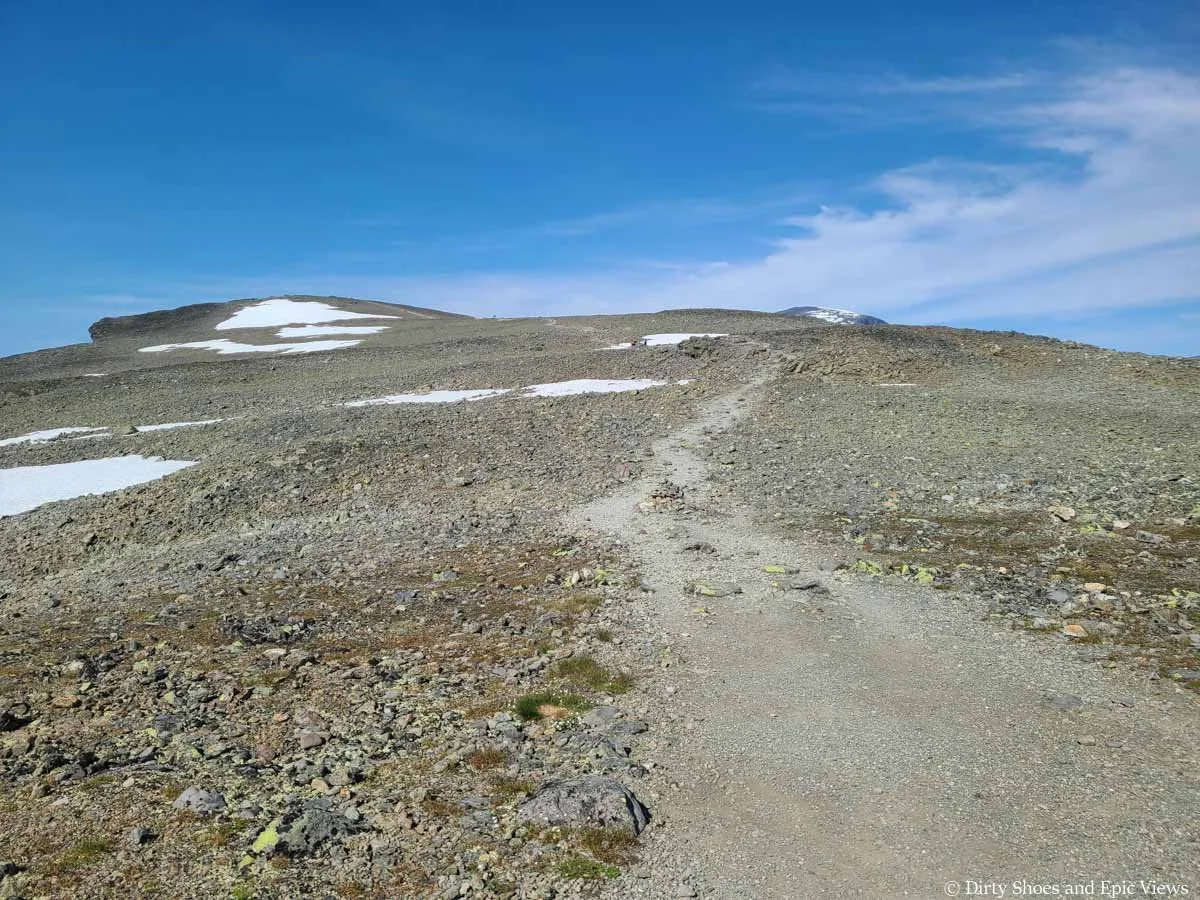
The climbing becomes more gradual as you near the top of the Besseggen Ridge hike
Looking back down the trail towards Gjendesheim
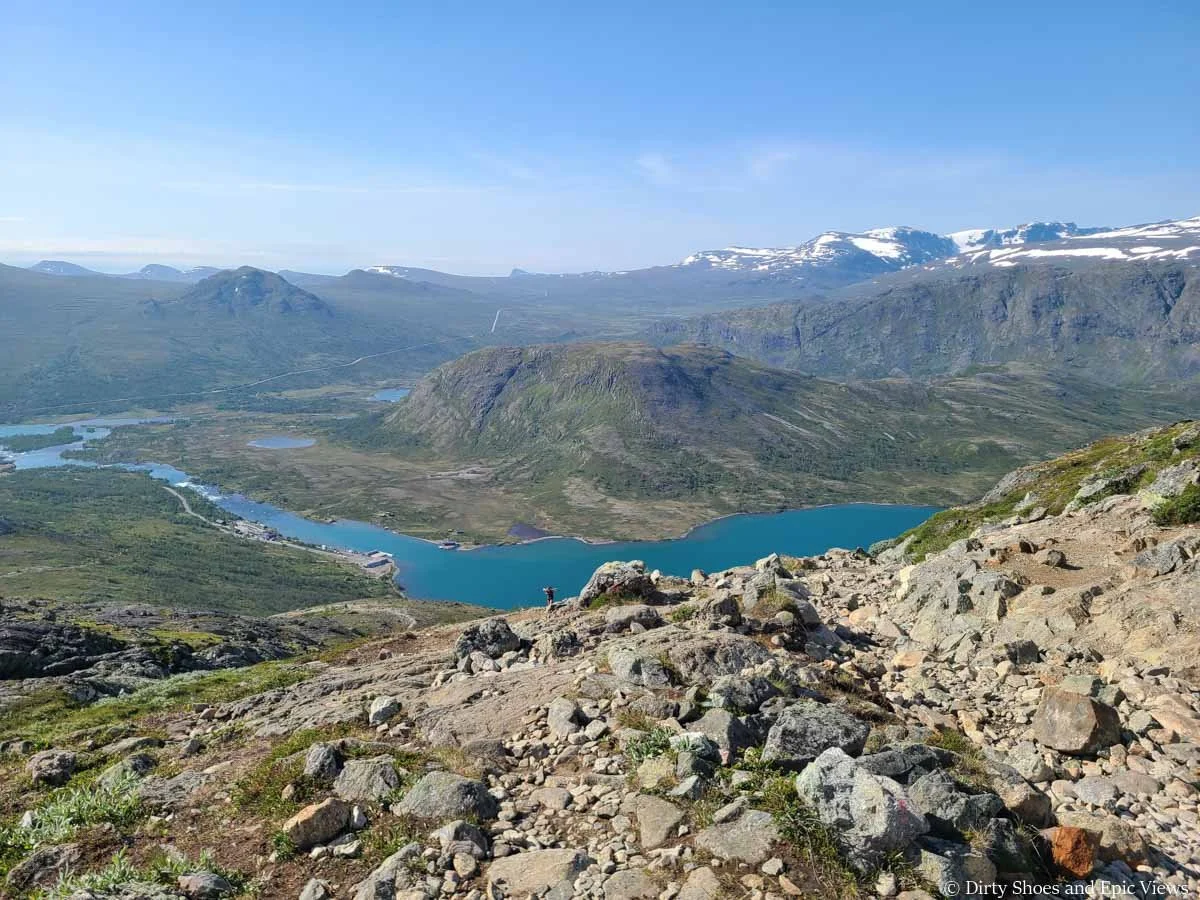
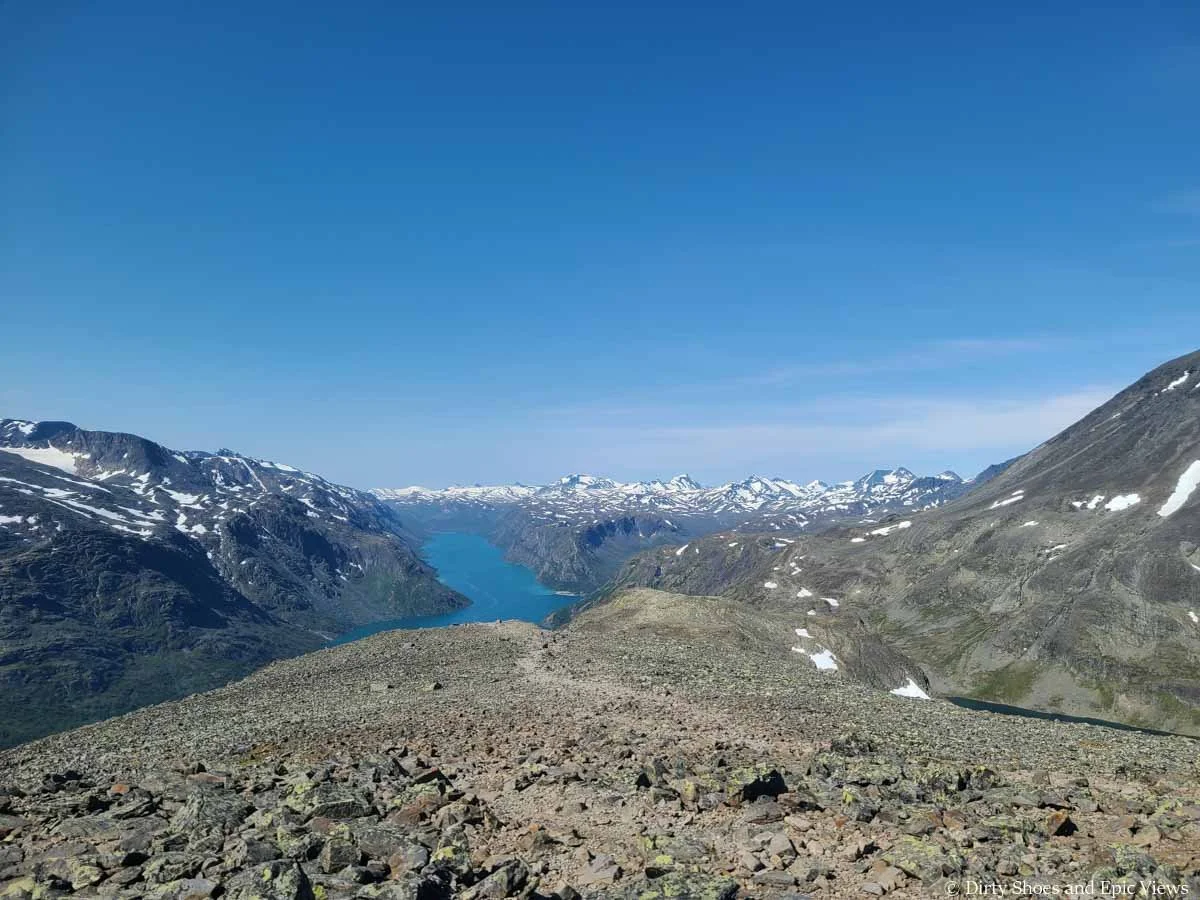
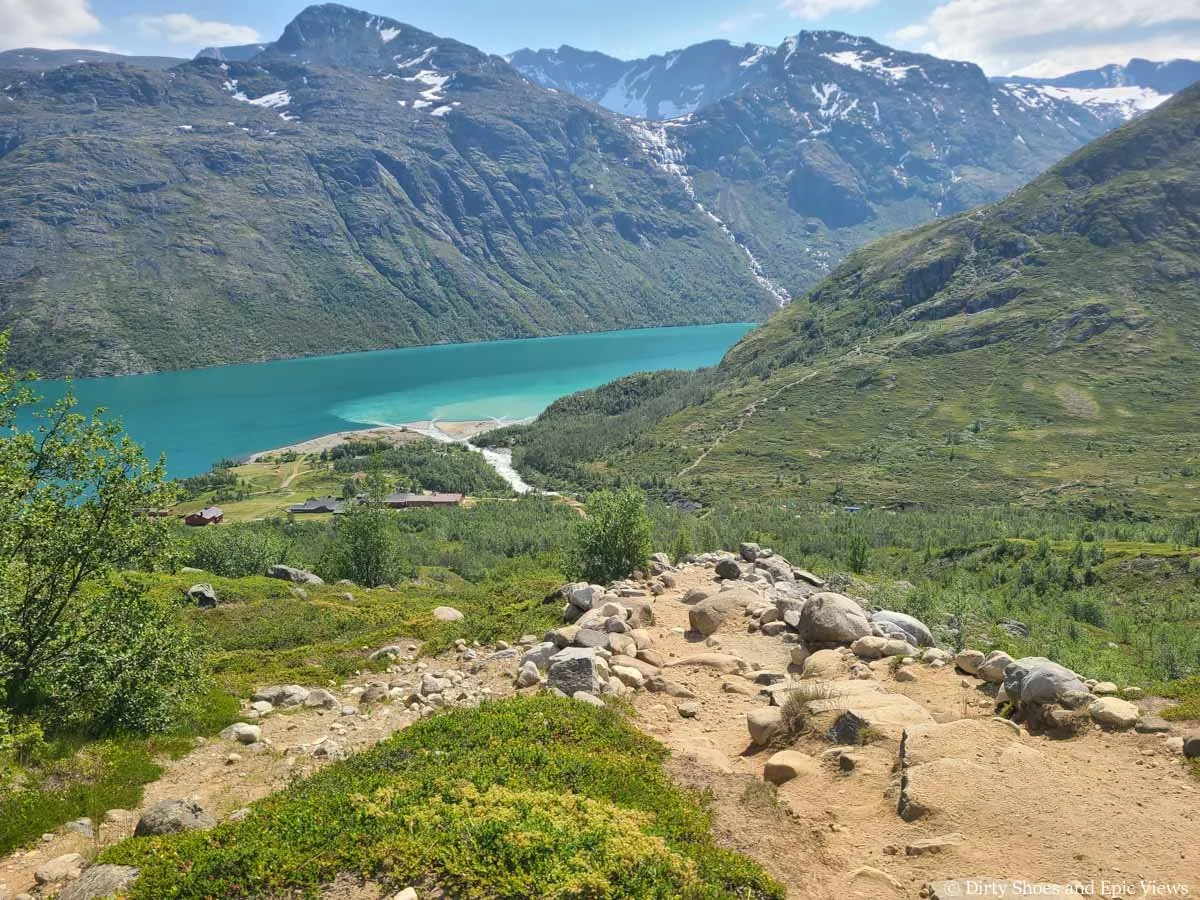
Then at the 2.5 mile point, you’ll top out above the head wall of the ridge. The trail will take you along the edge of the cliffs up here, introducing you to the first bit of exposure of the Besseggen Ridge hike. Be sure to watch your footing as you admire your first nice views over the expanse of Lake Gjende from this higher vantage point. From up here, you can really get a sense of the gorgeous turquoise blue color of the lake. Across the way, you can also see the small peak of Knutshoe, another scenic hike in Jotunheimen National Park.

Hiking along the cliff edges of Besseggen Ridge
Looking over the turquoise Lake Gjende
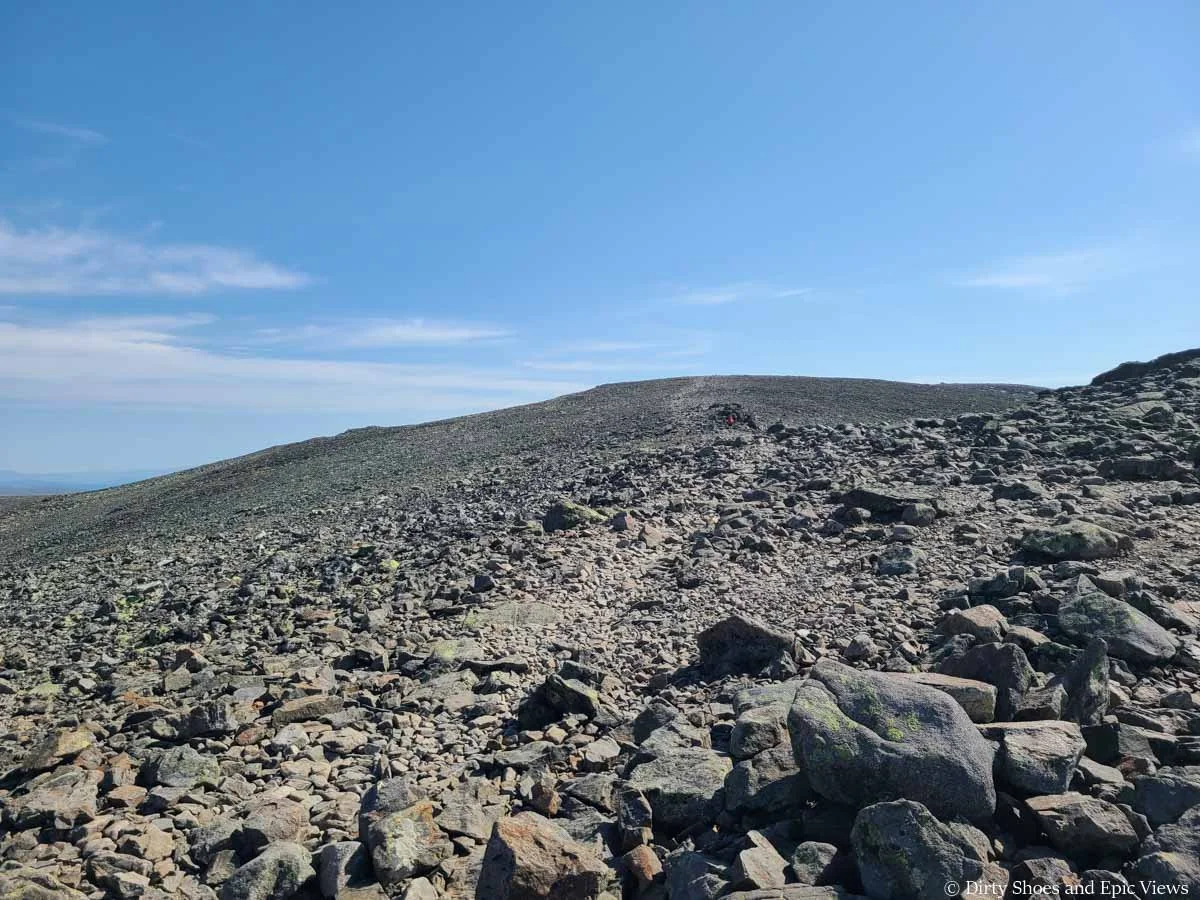
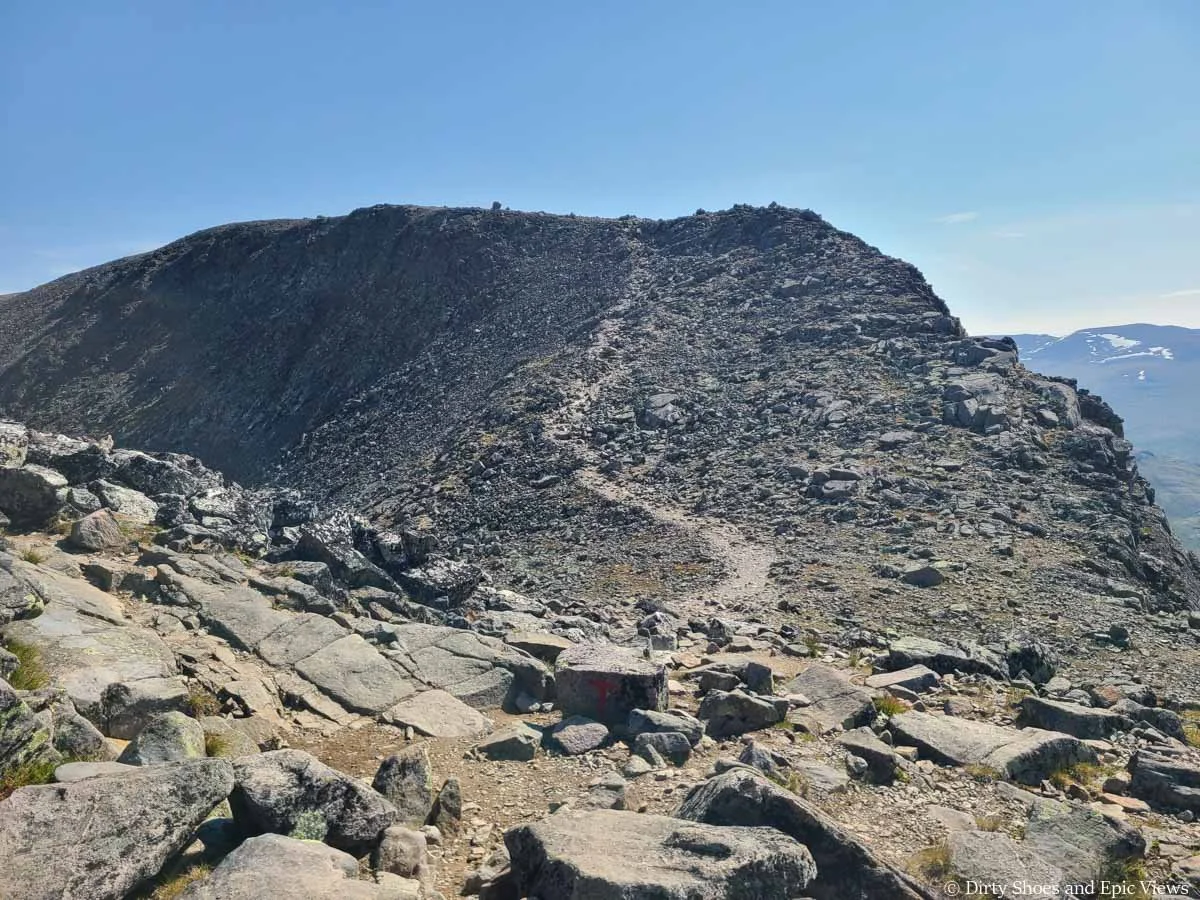
Ahead, you can now see the massive summit rock cairn, the high point of the Besseggen Ridge trail. From here, it’s a fairly flat walk followed by a very gentle climb to get to the summit, which feels nice after all the climbing you’ve just done!
The final climb to the highpoint of Besseggen Ridge
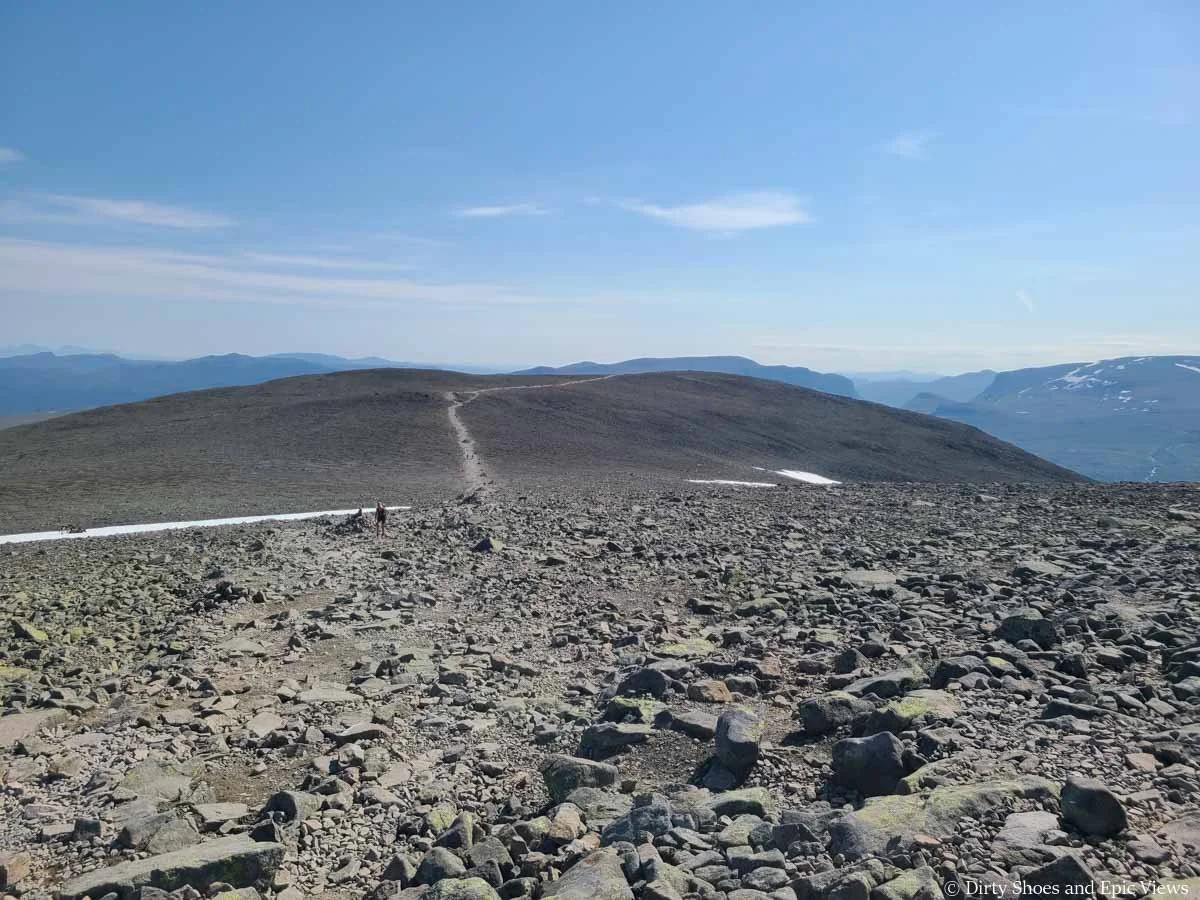
Looking back down the Besseggen Ridge trail towards Gjendesheim
Along the way at around mile 2.7, you’ll pass another junction from Bessheim. This is the other alternate way to wrap around Lake Bessvatnet and bypass the challenging scramble. We just wanted to note this here, because it is possible, if hiking in the other direction, to skip the scramble, wrap around the lake, and make the climb up the back side of this ridge to see the views from up here before heading back down towards Gjendesheim on the main trail. It will make for a long day, though!
Along this flat part of Besseggen Ridge, Kevin also saw reindeer! This was super unexpected (but I guess it is common!). They were just hanging out in the snow not too far from the trail. We had seen domesticated reindeer in Finland before, but this was our first wild reindeer sighting!
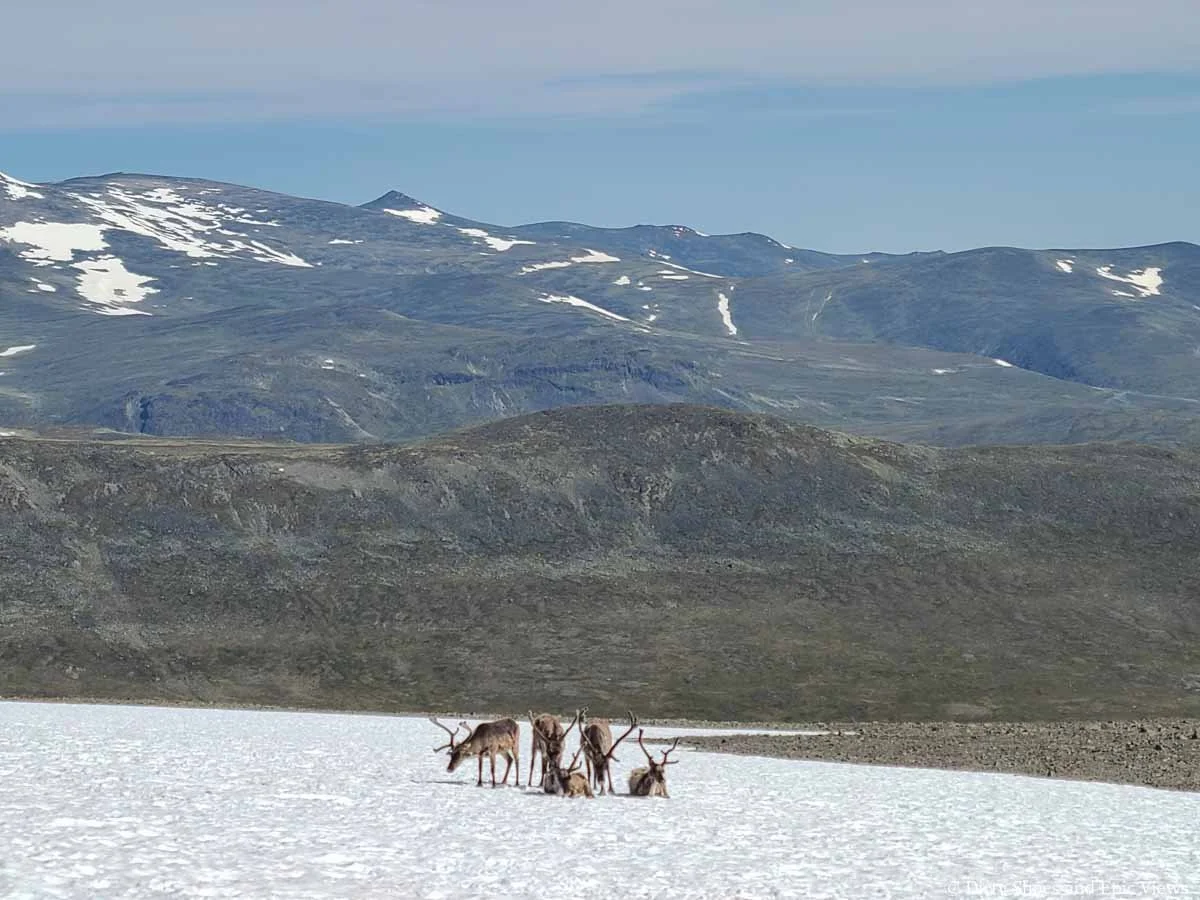
Reindeer on the Besseggen Ridge trail!
Finally, after 3.3 miles of hiking and 2500 feet of climbing, Kevin reached the highpoint of the Besseggen Ridge hike (and he did it in about an hour and 45 minutes!).
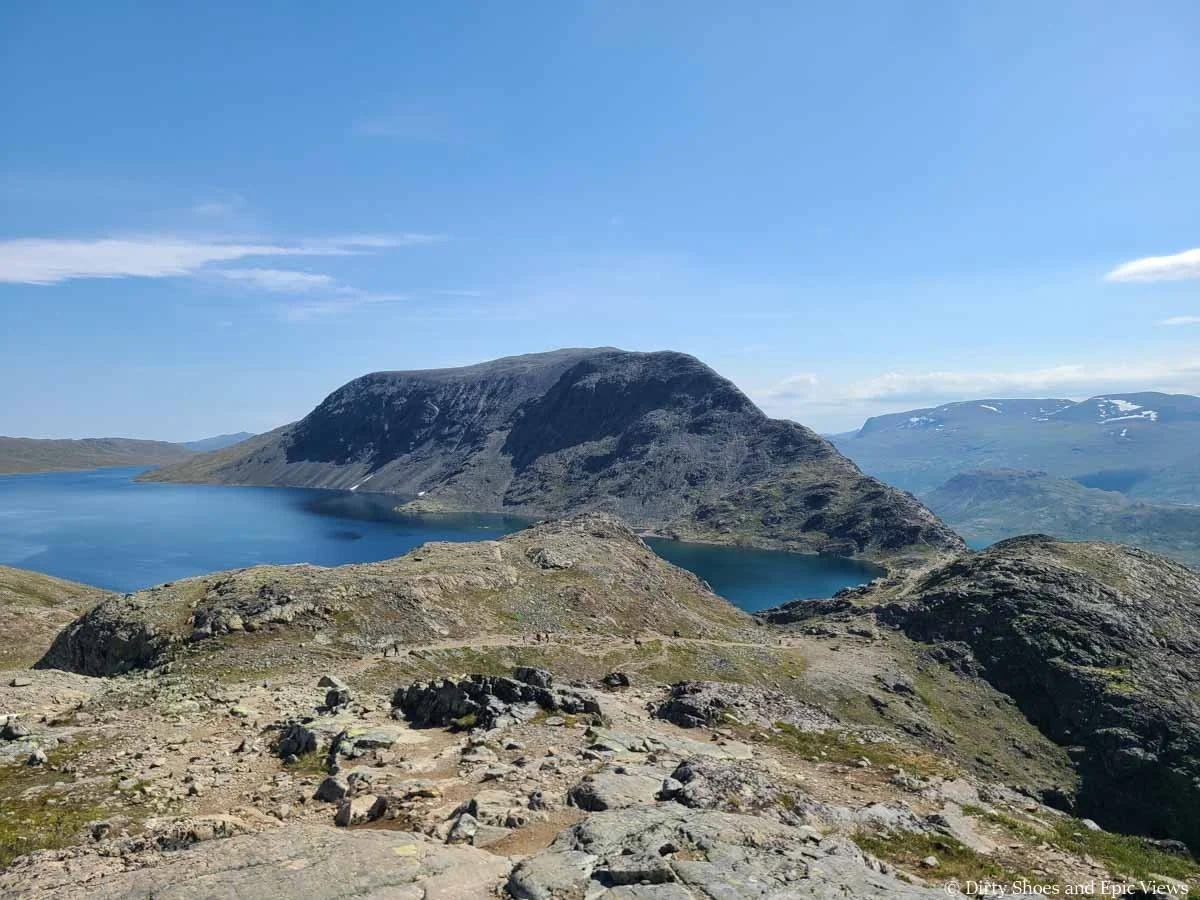
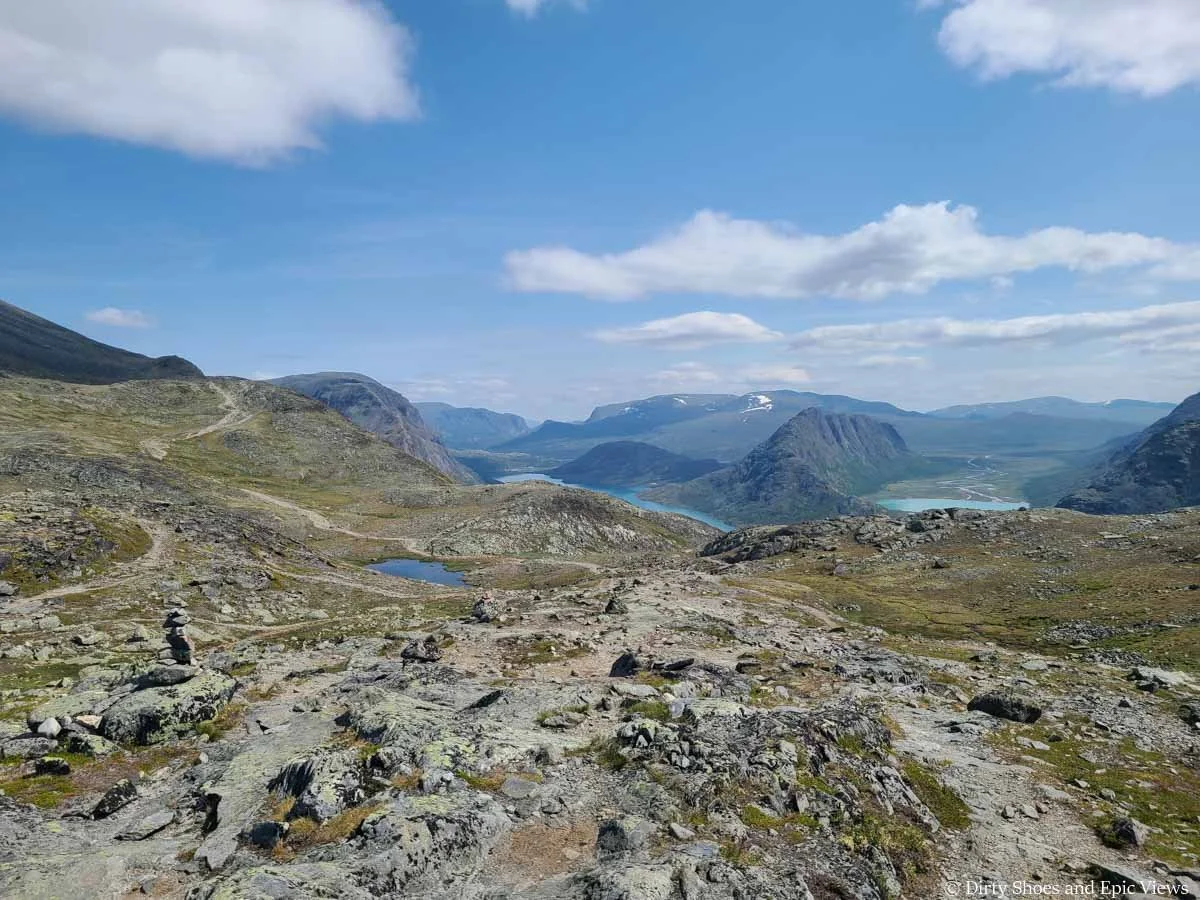
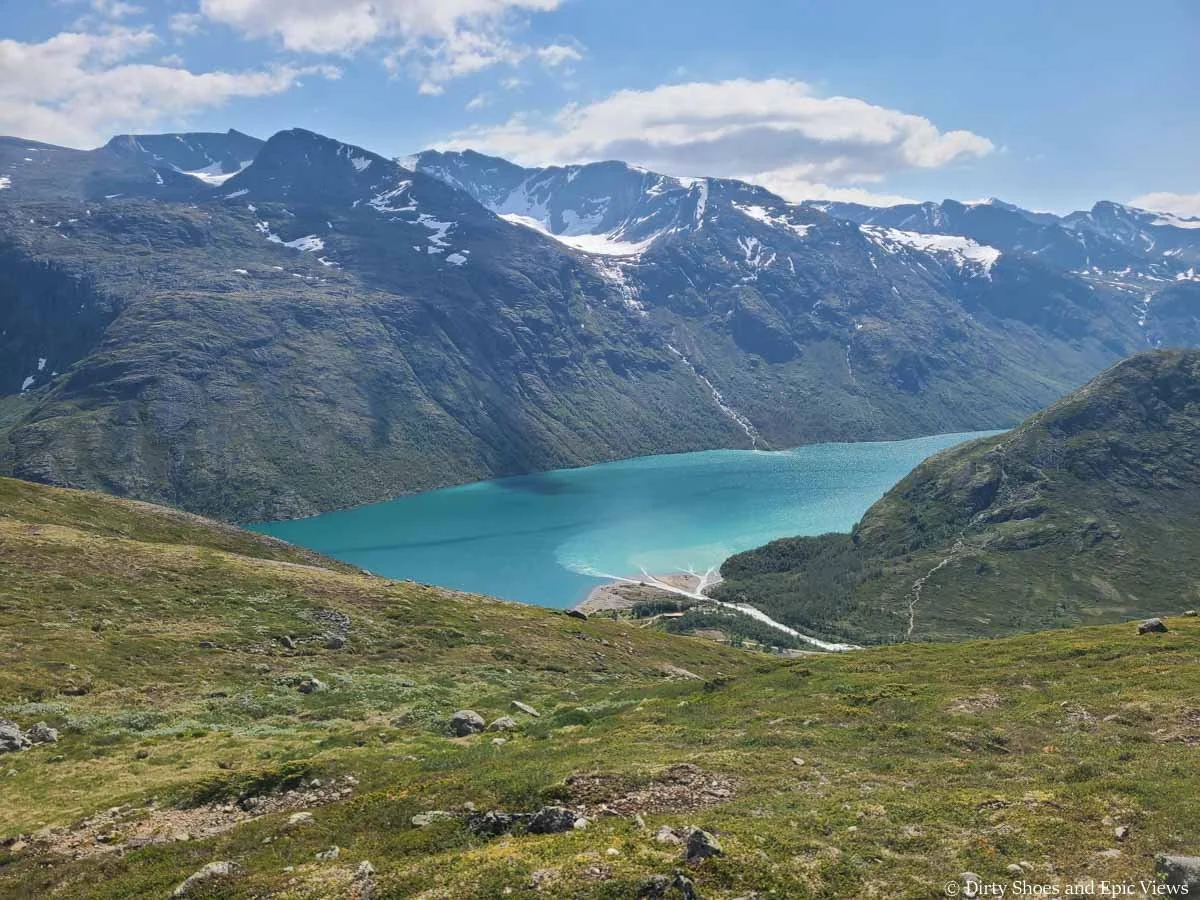
The summit is a fairly large area, with an amazing view of Lake Gjende and the snow-covered mountains of Jotunheimen National Park, so take a break here and enjoy your well-earned views!
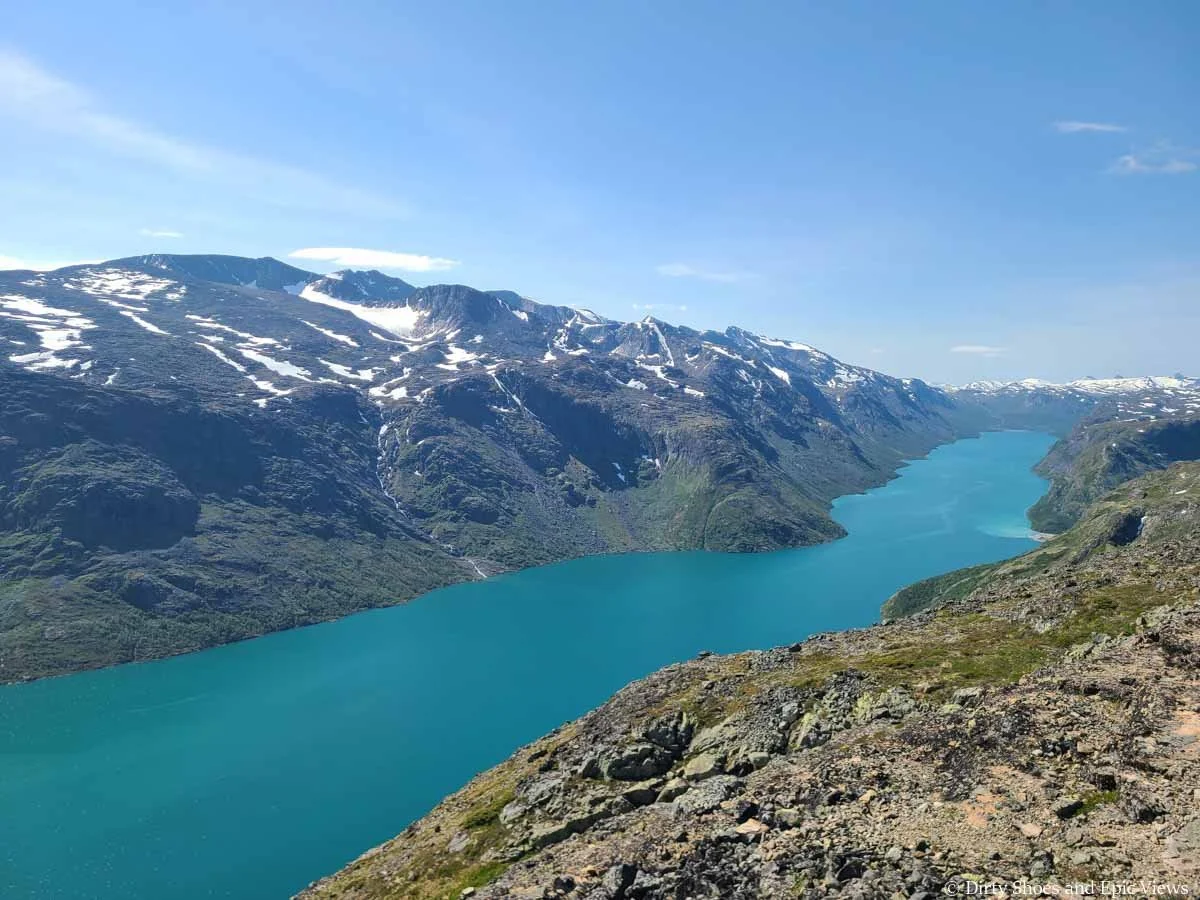
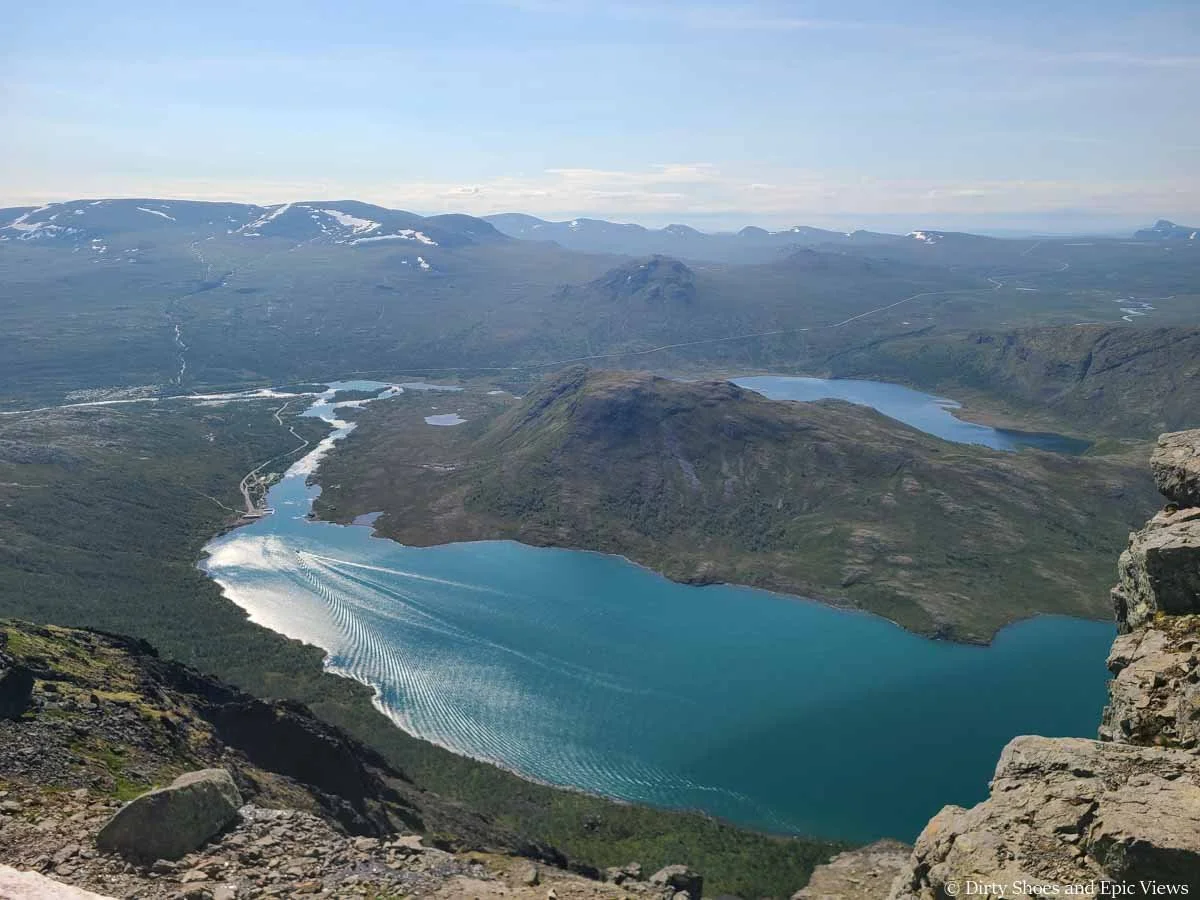
You’ll also now see Bessvatnet in the valley to the right of the ridge. This is the other lake that is seen in that famous two-lake view of the Besseggen Ridge hike, so you know you’re getting close now to the good stuff!
The view of Lake Gjende from near the high point of Besseggen Ridge
Bessvatnet Lake on the other side of Besseggen Ridge
We’ll note here that up to this point, the Besseggen Ridge trail was pretty quiet. Kevin saw maybe a dozen or so other people on his hike from Gjendesheim. As we mentioned earlier, hiking the ridge in this direction isn’t as common, and he hadn’t yet met up with the first wave of hikers coming from Memurubu off the early morning boats. But that was about to change…
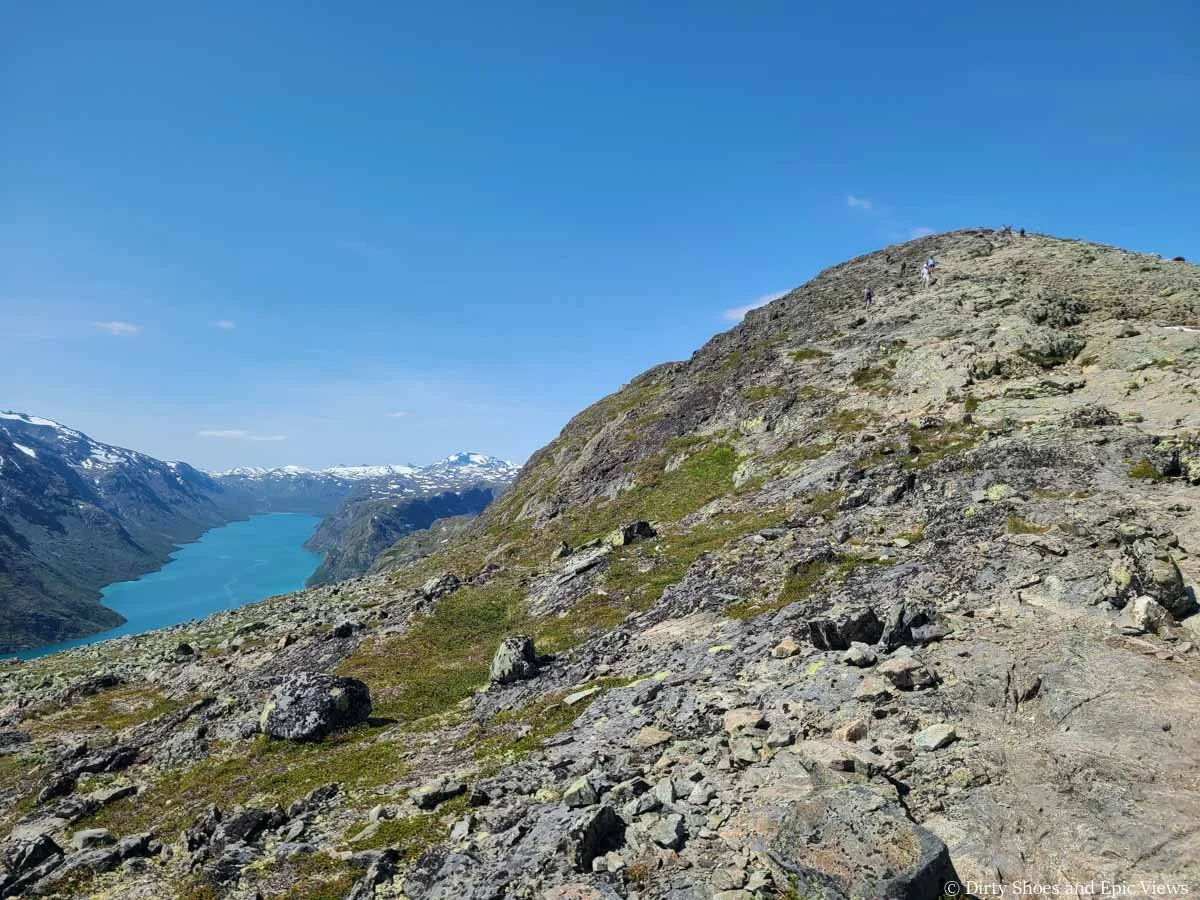
From the summit, the trail heads gradually downhill on an obvious path through the rocky terrain of loose and large rock, with some small pockets of tricker steep rocky sections. You’ll start noticing the iconic Besseggen Ridge two-lake view appearing ahead.
Hiking down from the Besseggen Ridge high point towards the top of the scramble
Looking back up the trail to the Besseggen Ridge high point

A steep portion of the trail is it continues down to the famous viewpoint and scramble of Besseggen Ridge
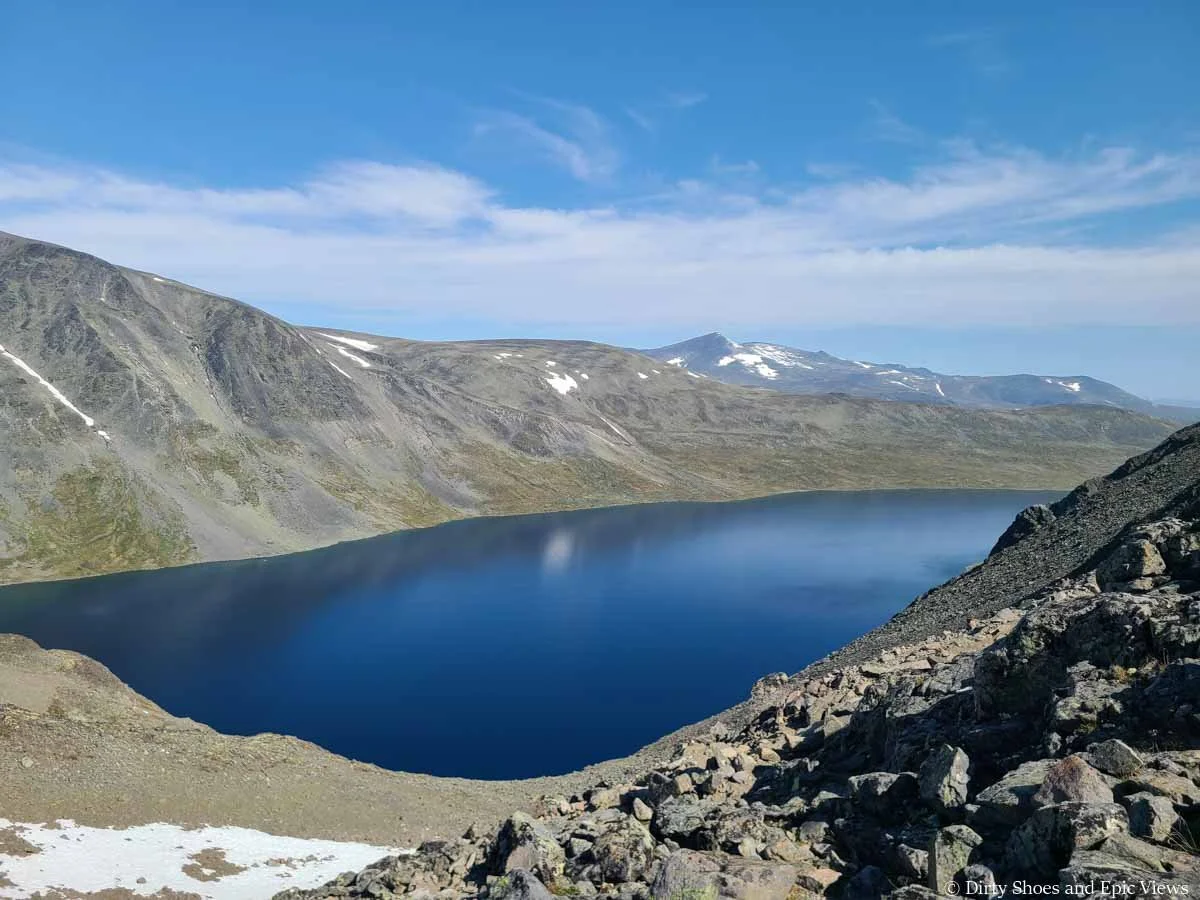
A view of Bessvatnet

Looking back up the trail
Looking back along the trail back towards the Besseggen Ridge high point
Enjoying the views over Lake Gjende from Besseggen Ridge
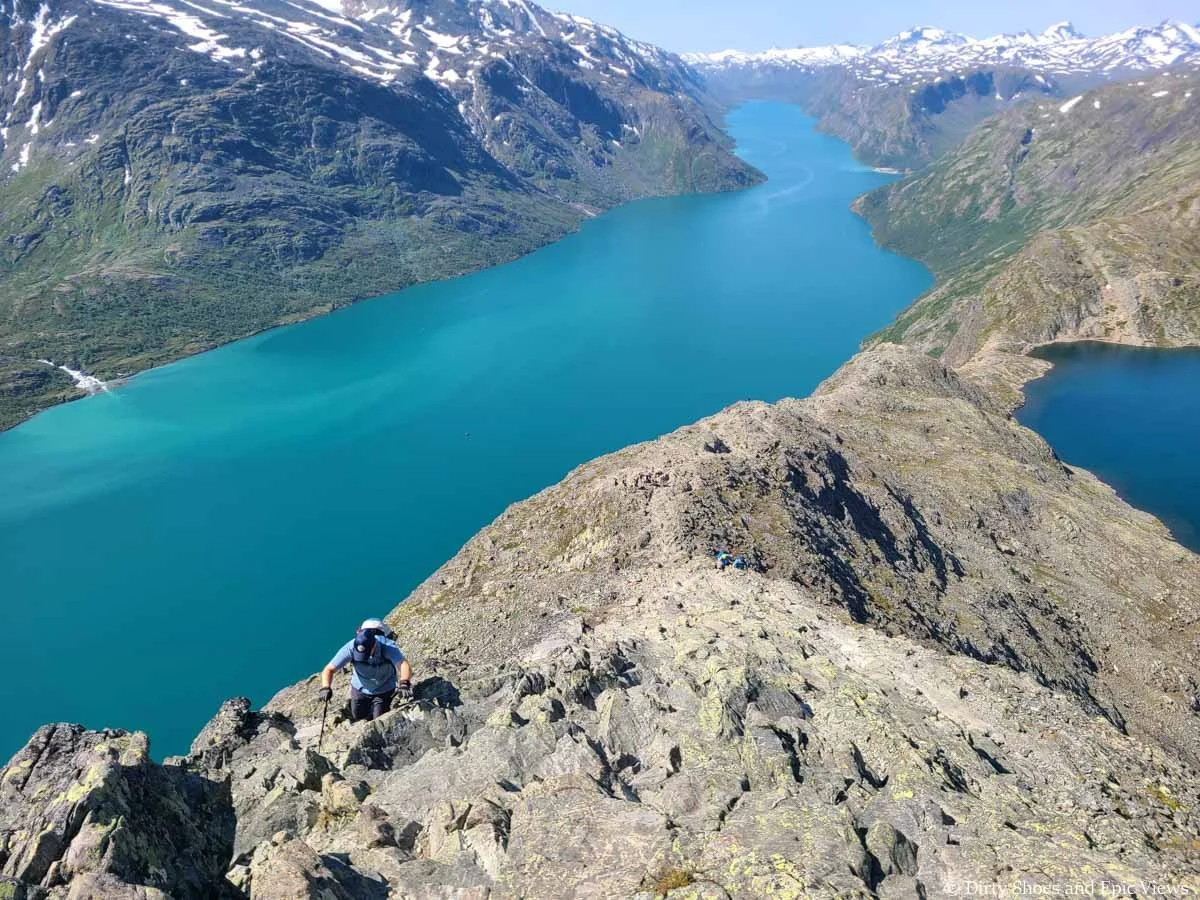
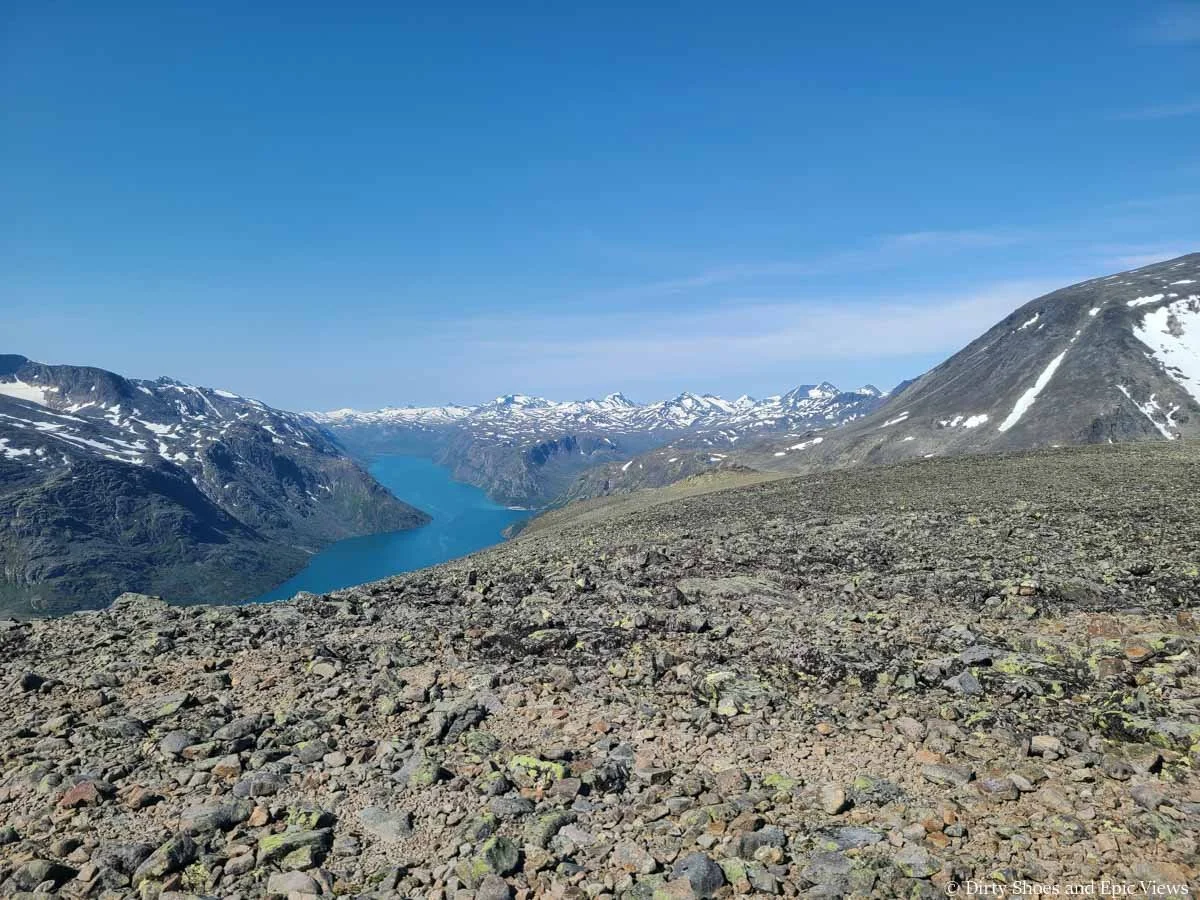
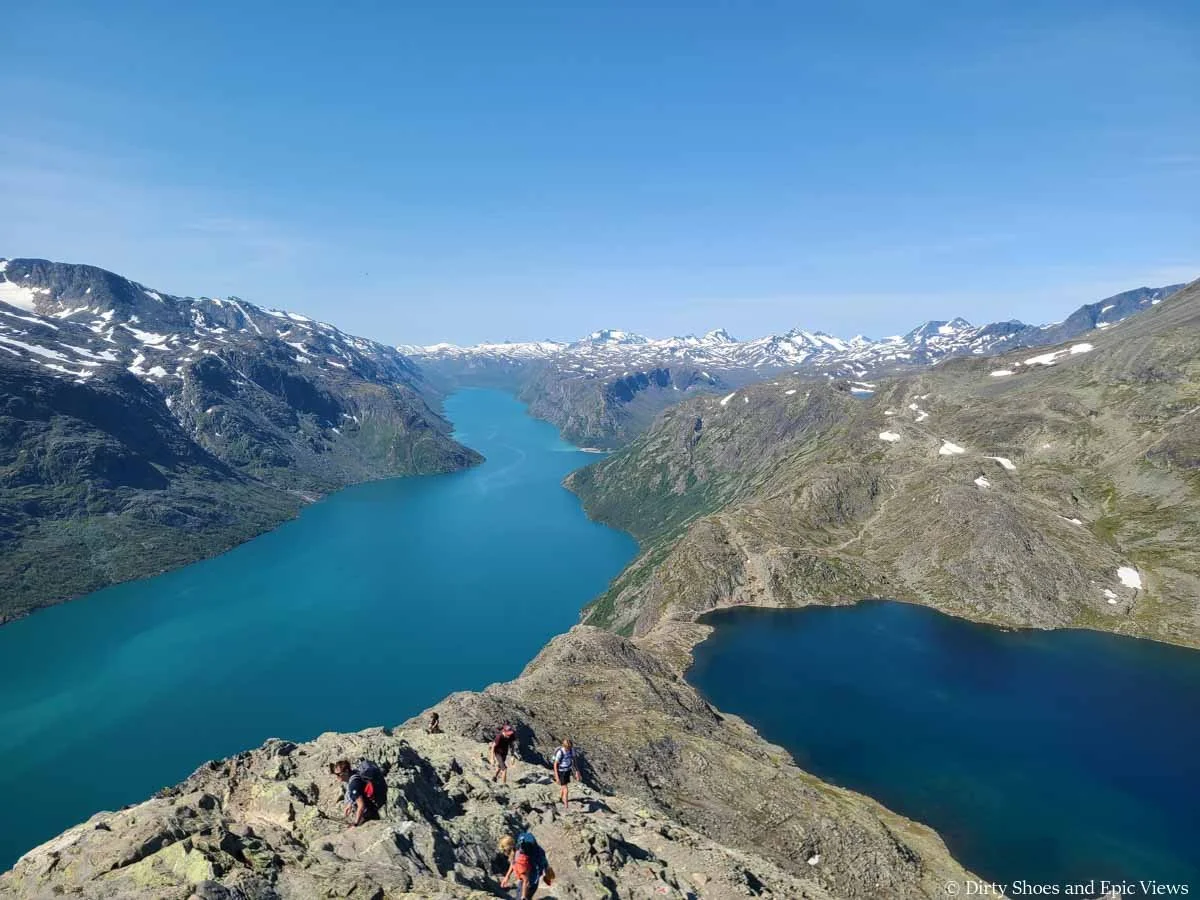
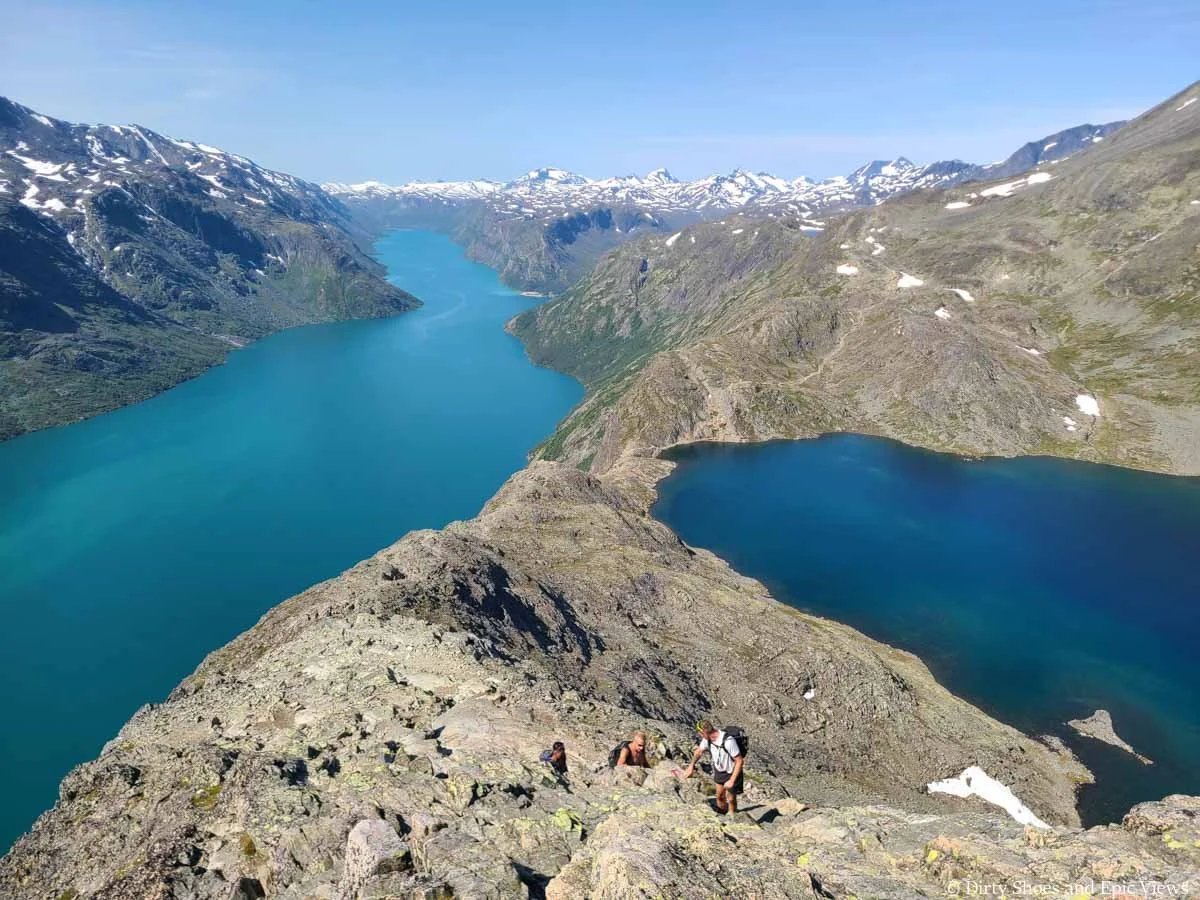
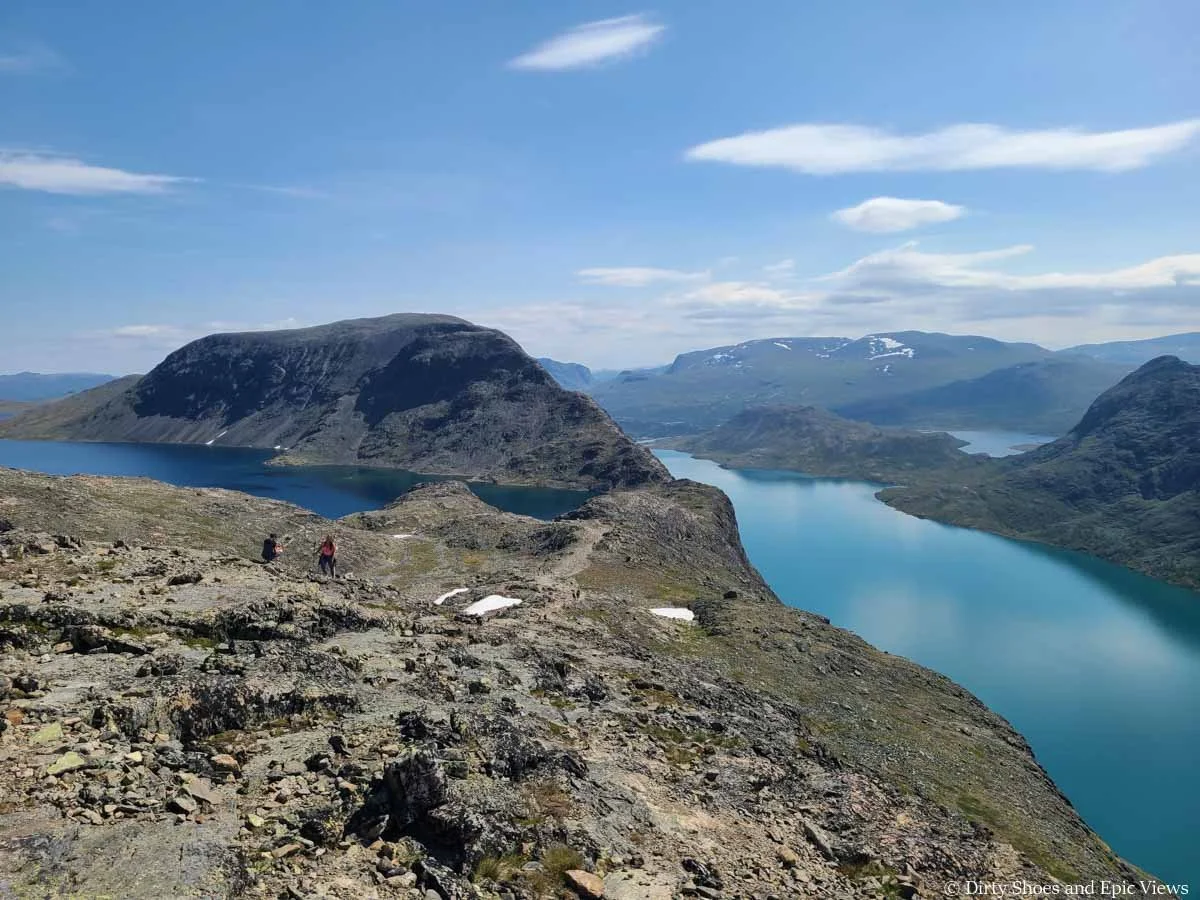
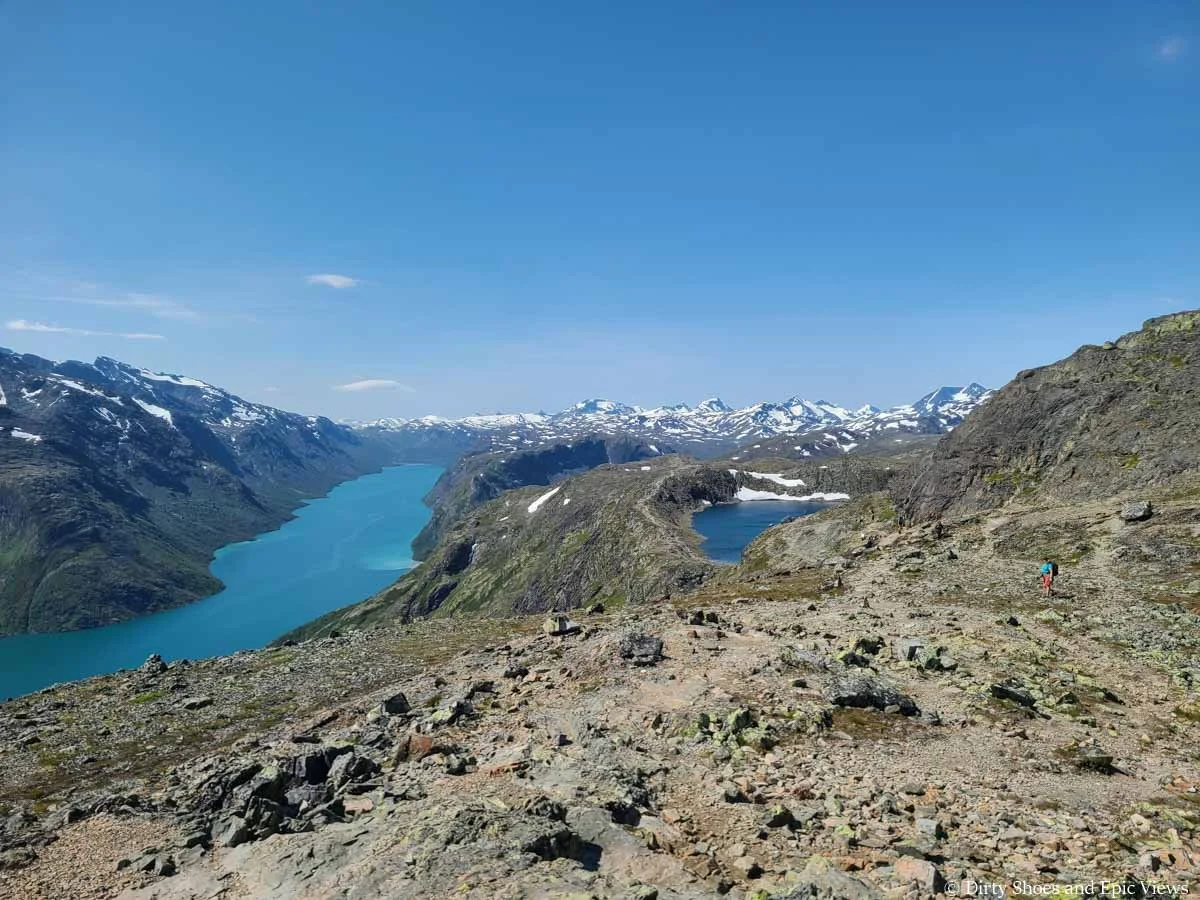
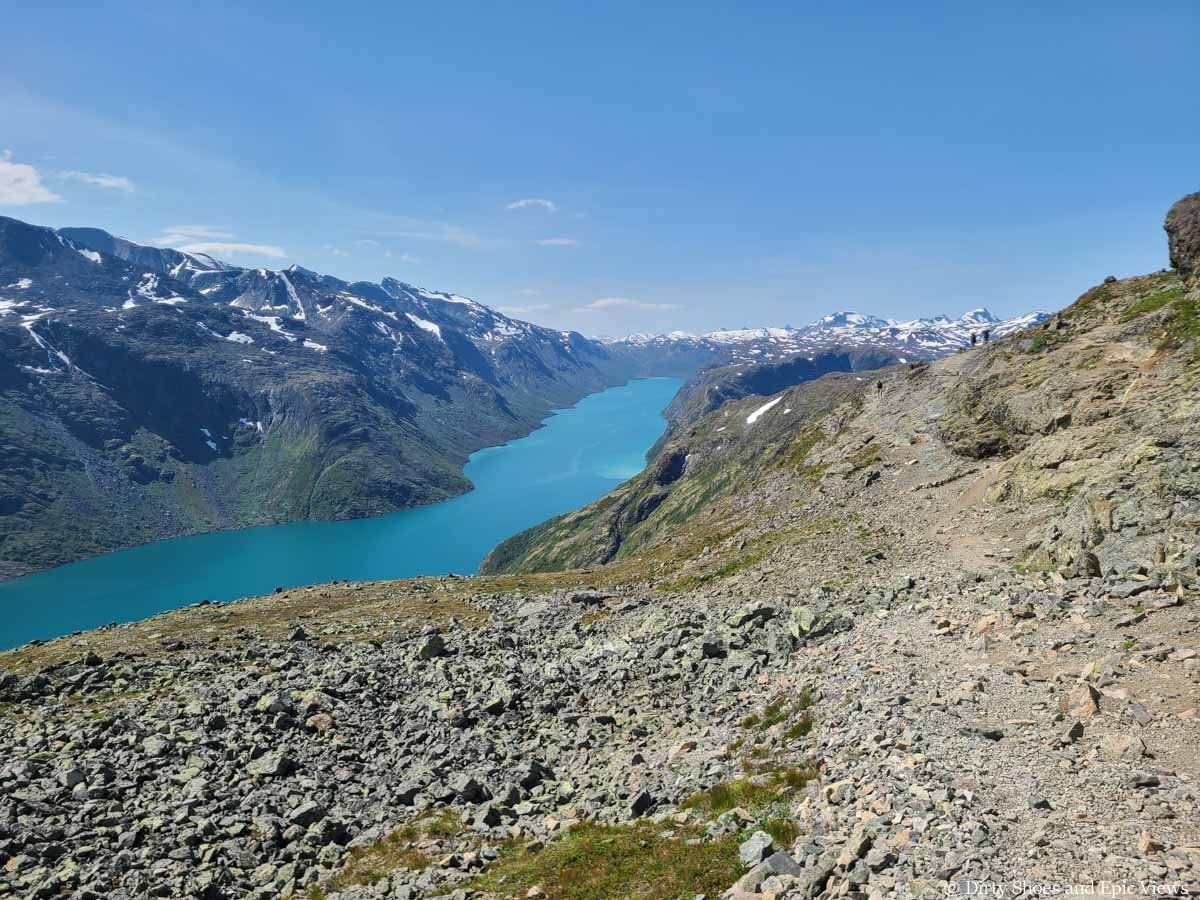
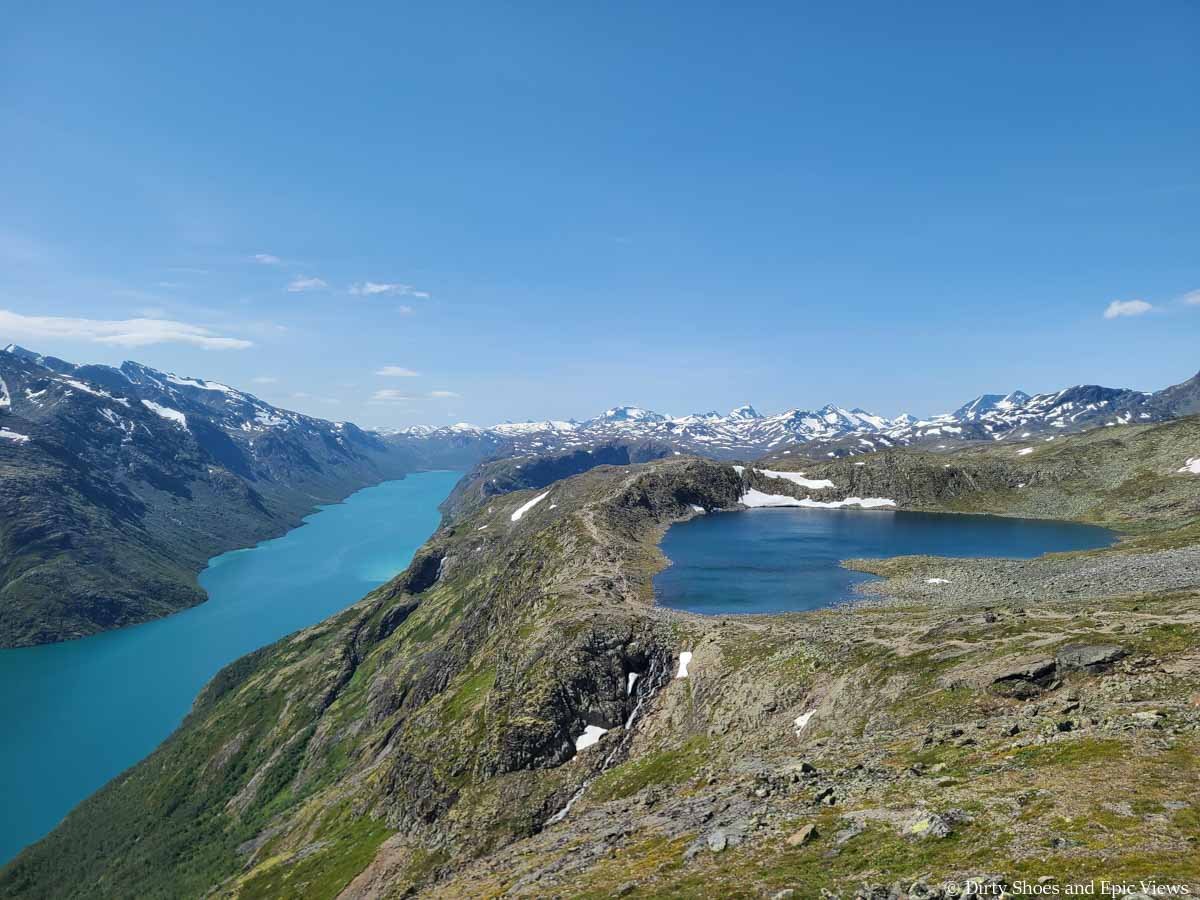
And then, right at the top of the scramble you’ll reach the unofficial famous viewpoint of the Besseggen Ridge hike. The deep blue Bessvatnet lake on the right contrasting with the brighter turquoise Lake Gjende on the left is quite a sight!
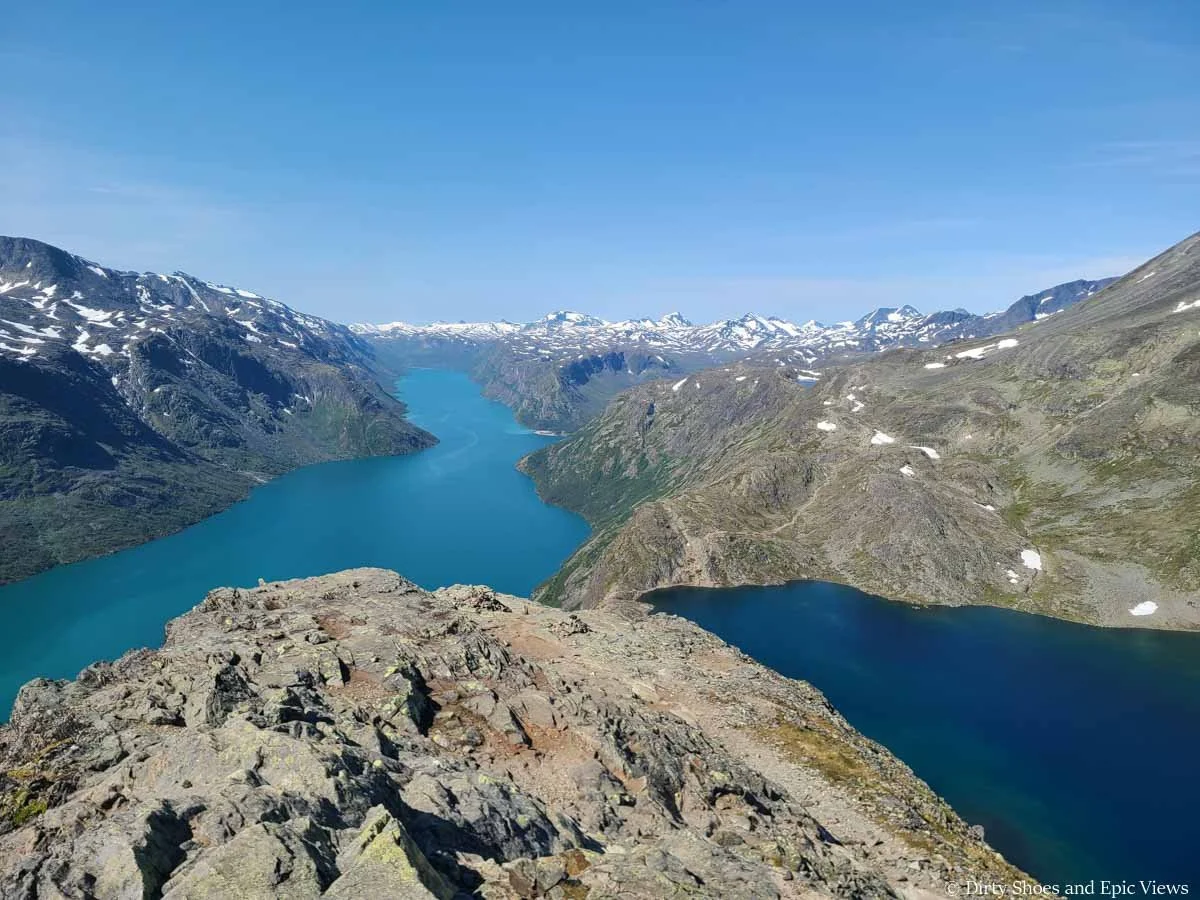
The iconic two lake view from the Besseggen Ridge trail
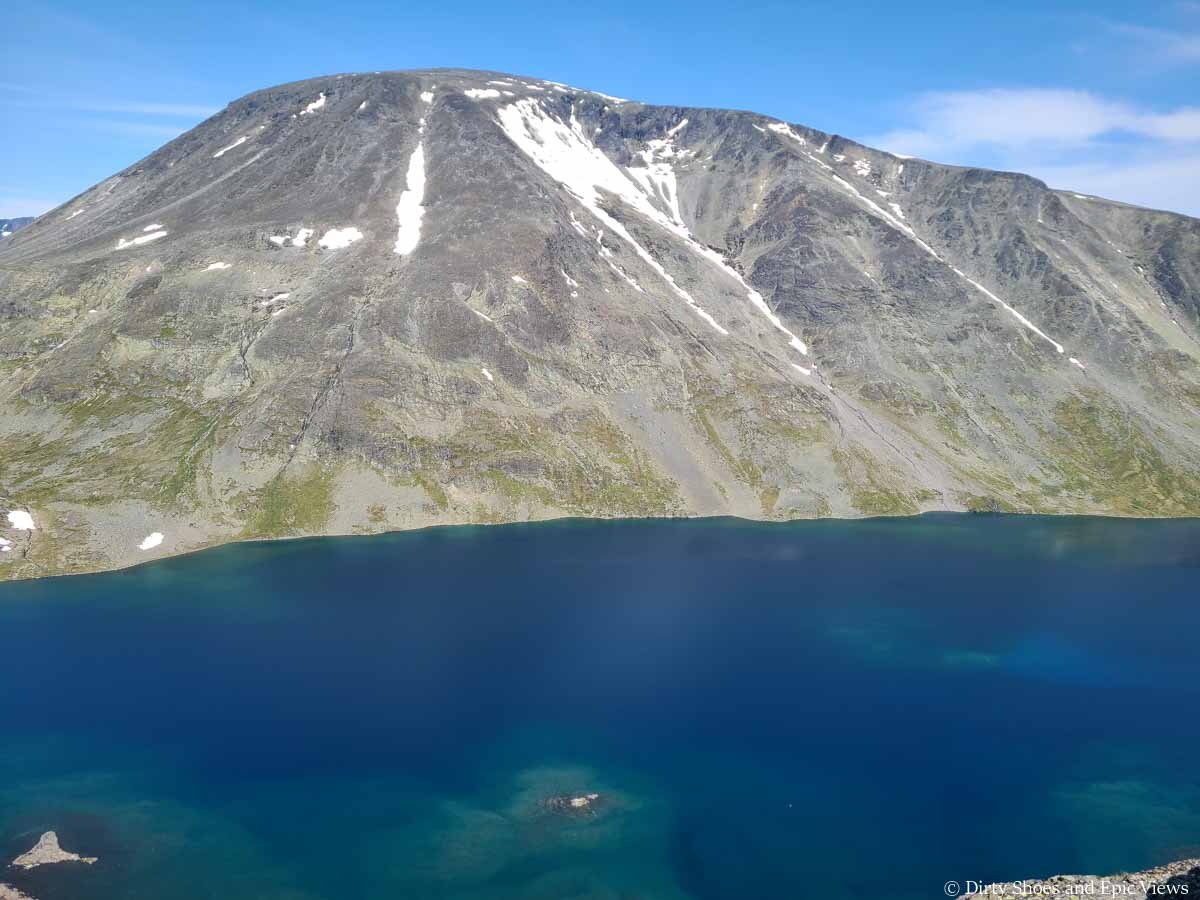
The view over Bessvatnet
It’s certainly an amazing view, and one that is more than worth the effort to get to this point. I can imagine that experiencing this view after tackling the challenging scramble from the other direction and getting to top out to this scene is definitely a very rewarding experience.
However, if you’re hiking towards Memurubu like Kevin, this view will be in your face for the whole next part of the Besseggen Ridge hike!
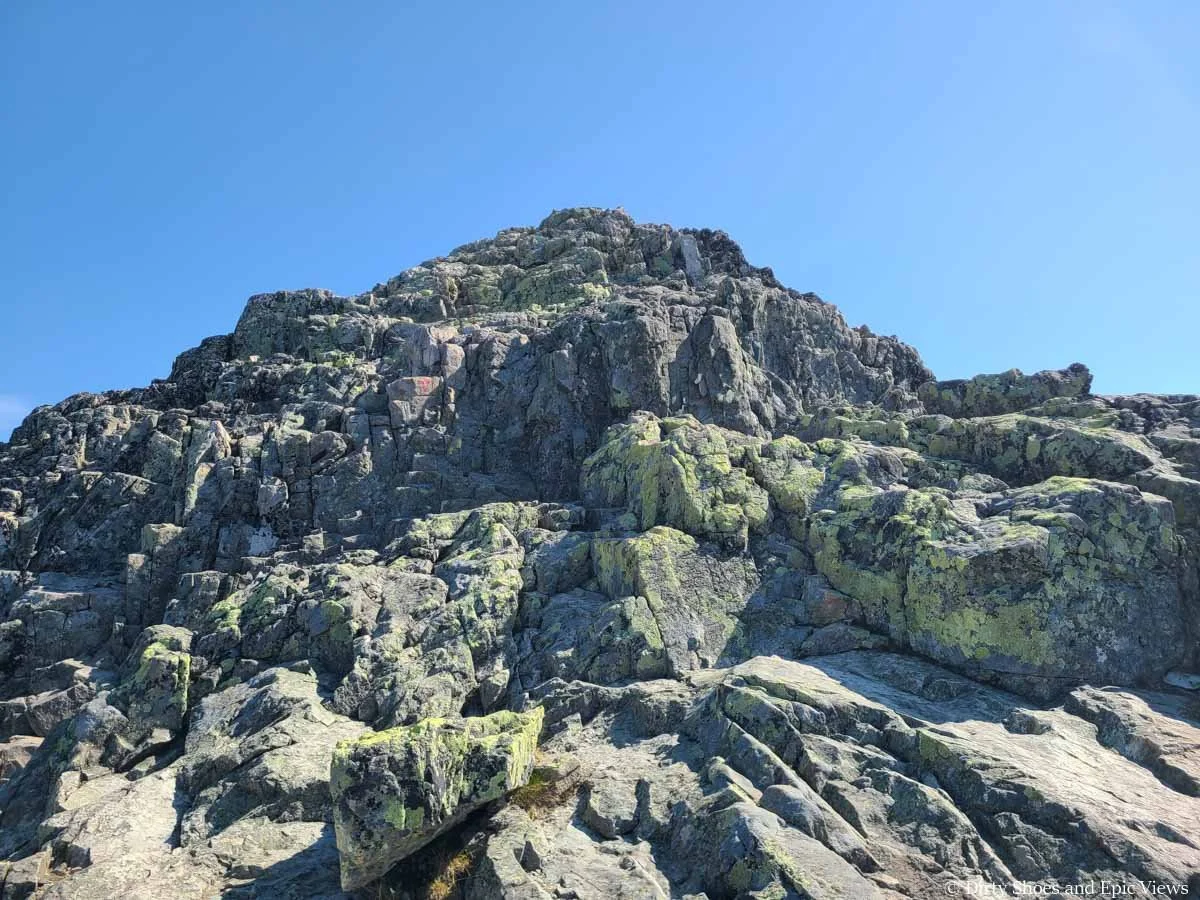
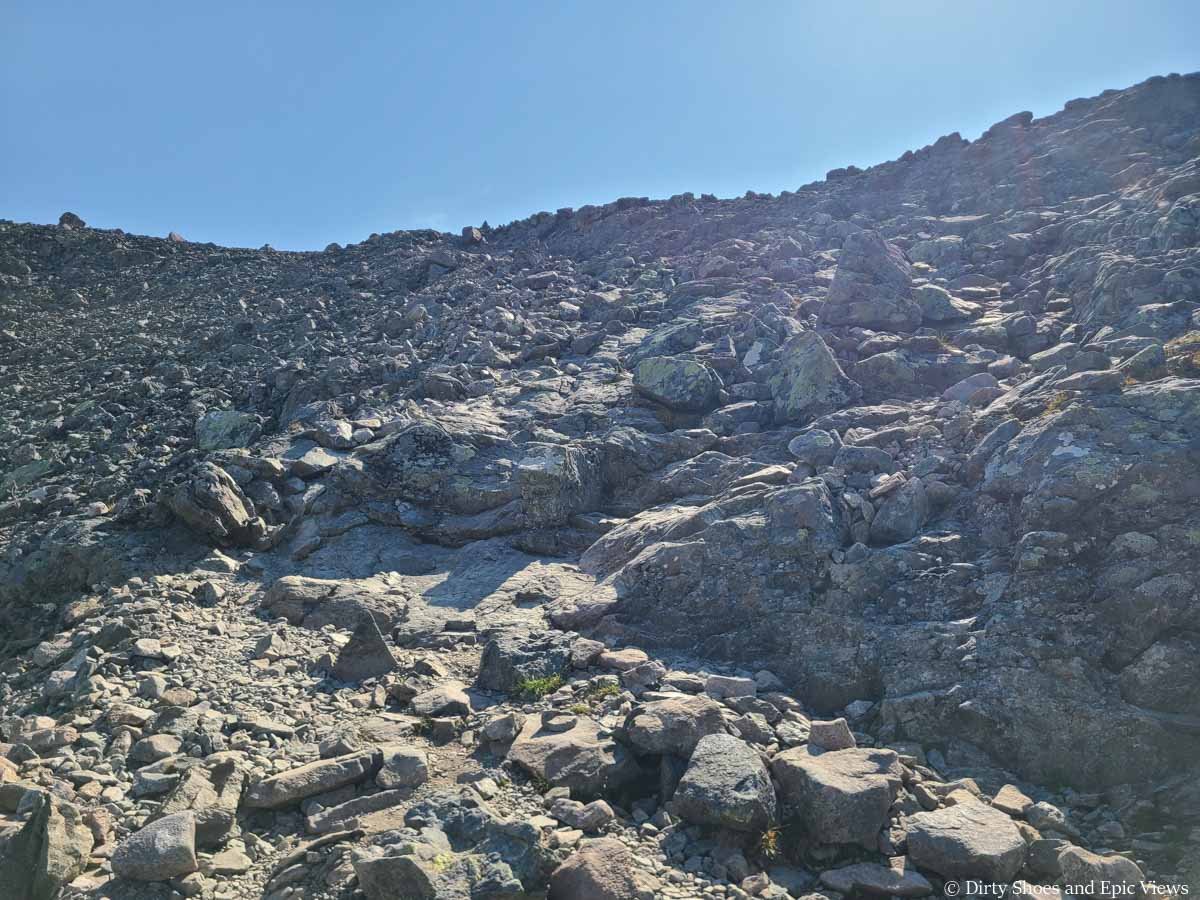
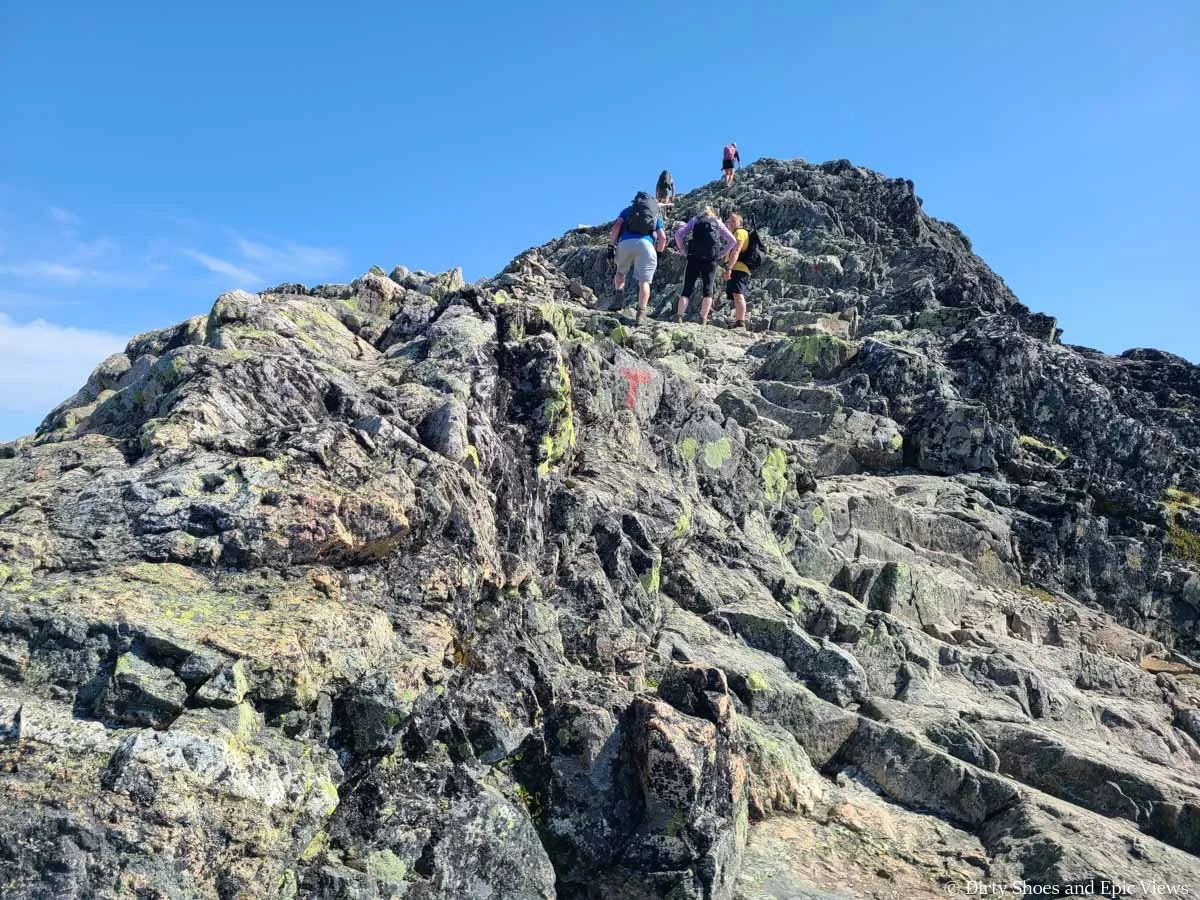
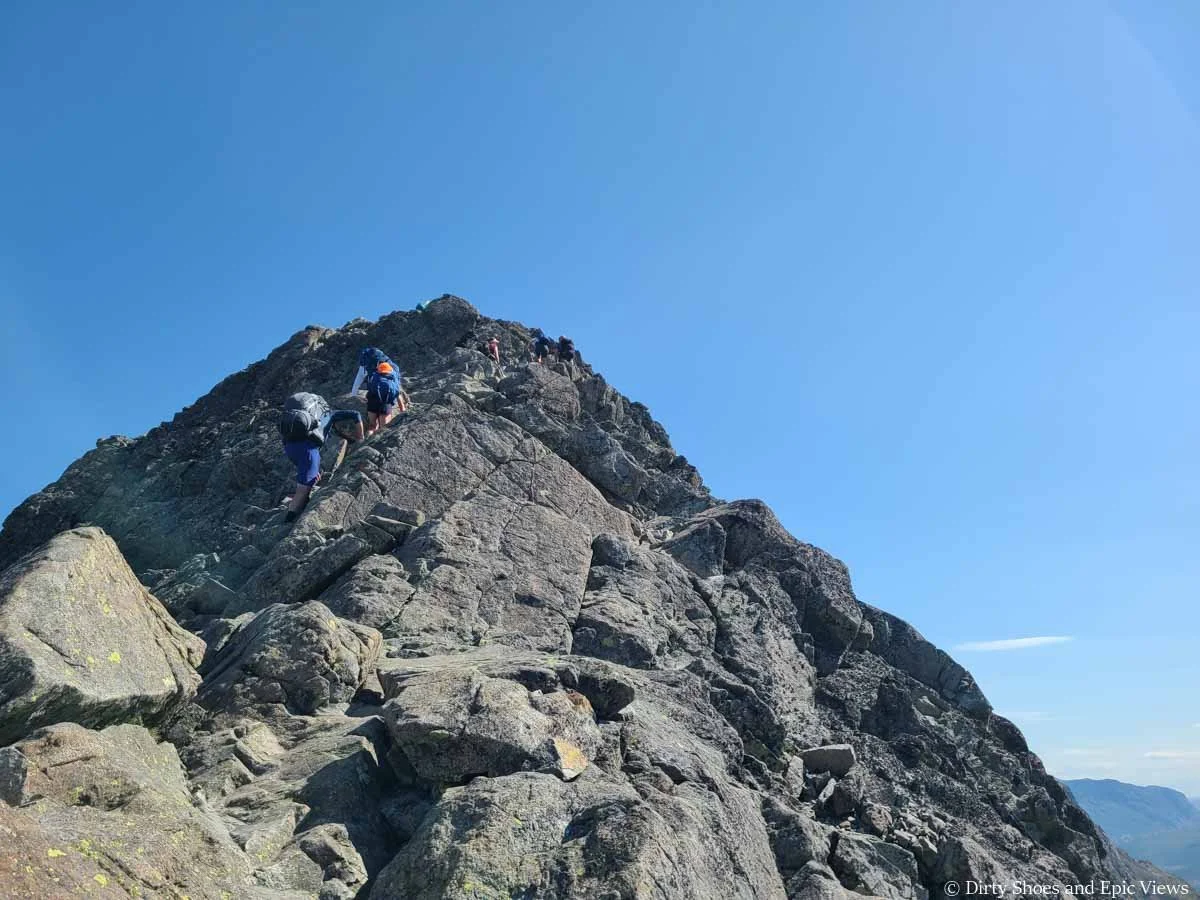
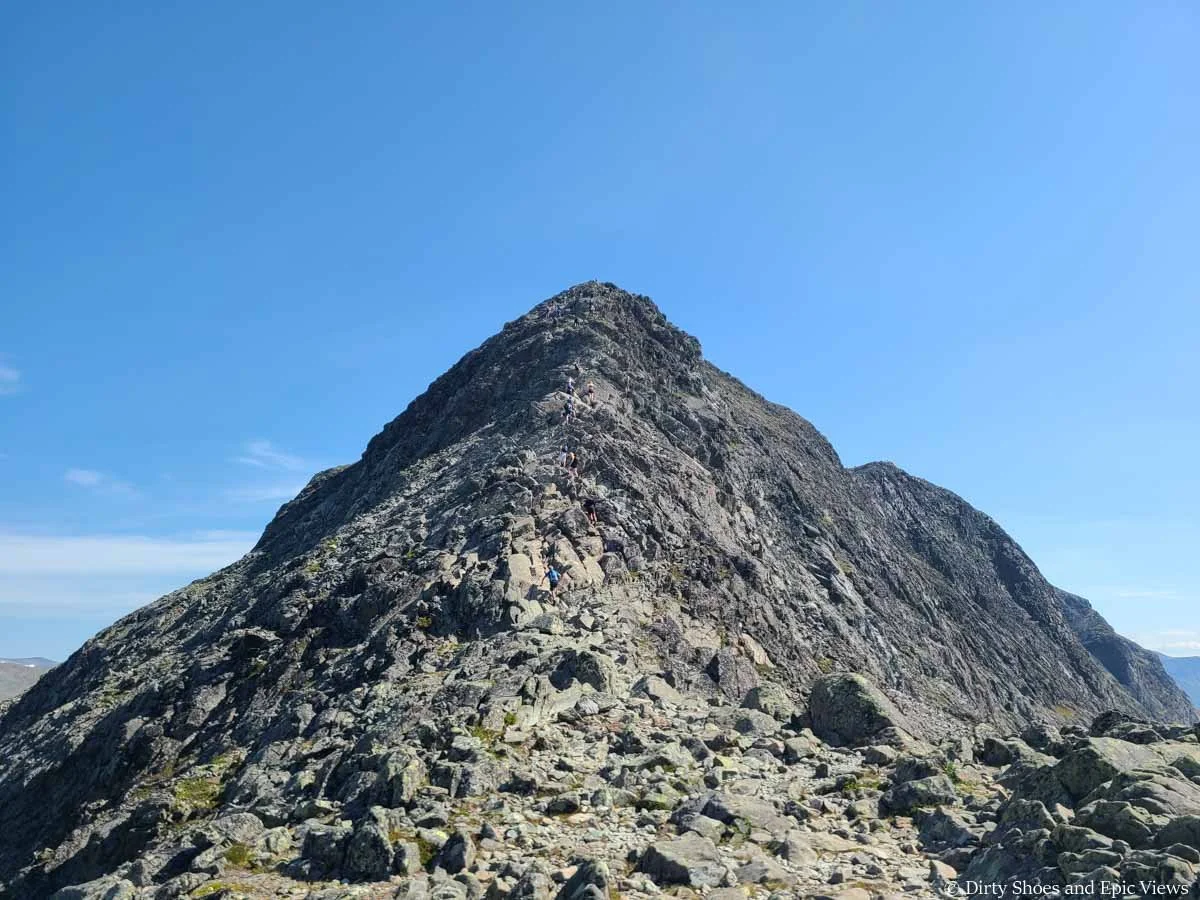
Once you’ve caught your breath and taken in the scenery, it’s now time to tackle the infamous scramble of Besseggen Ridge and the hardest part of the entire hike.
Looking down the spine, Kevin started to see the train of hikers heading up, as the first wave of hikers from Memurubu had reached the scramble.
Looking down the Besseggen Ridge scramble
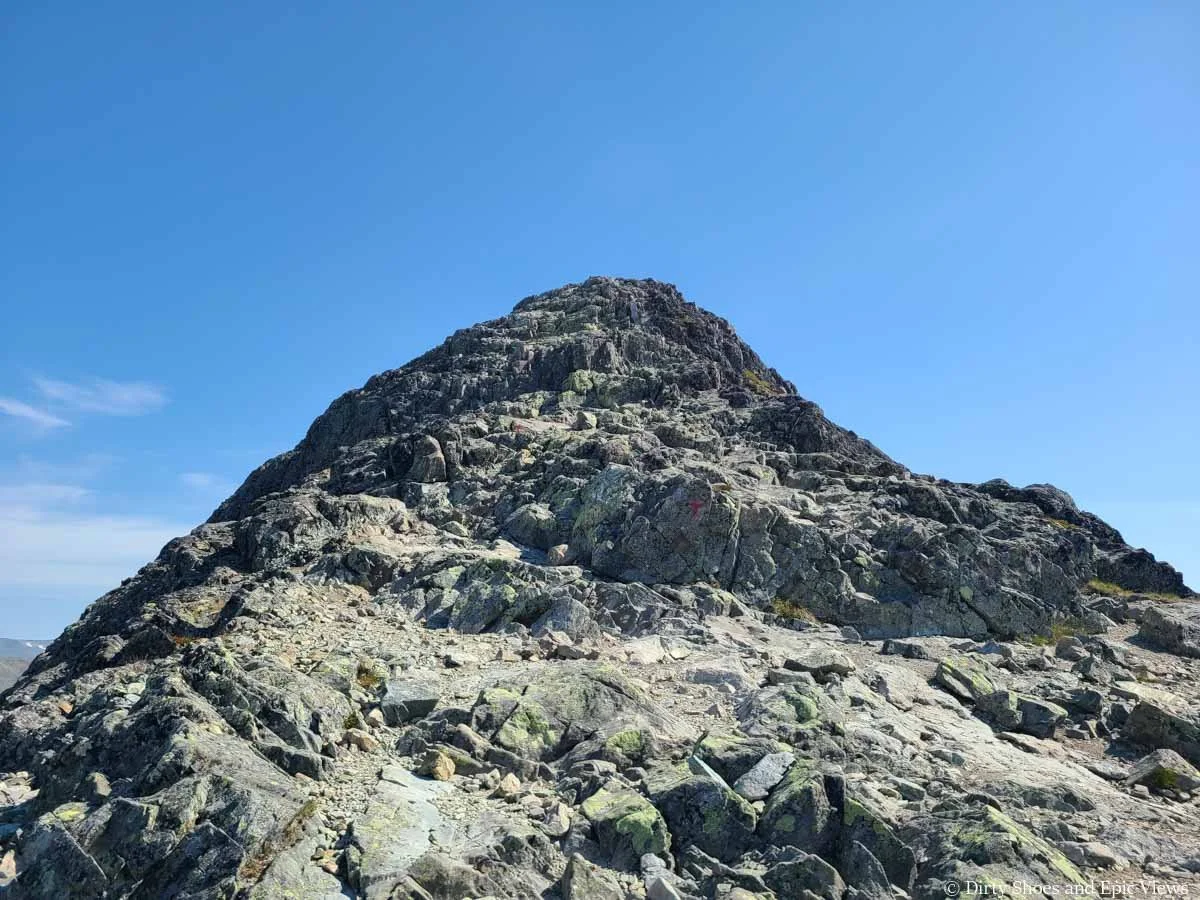
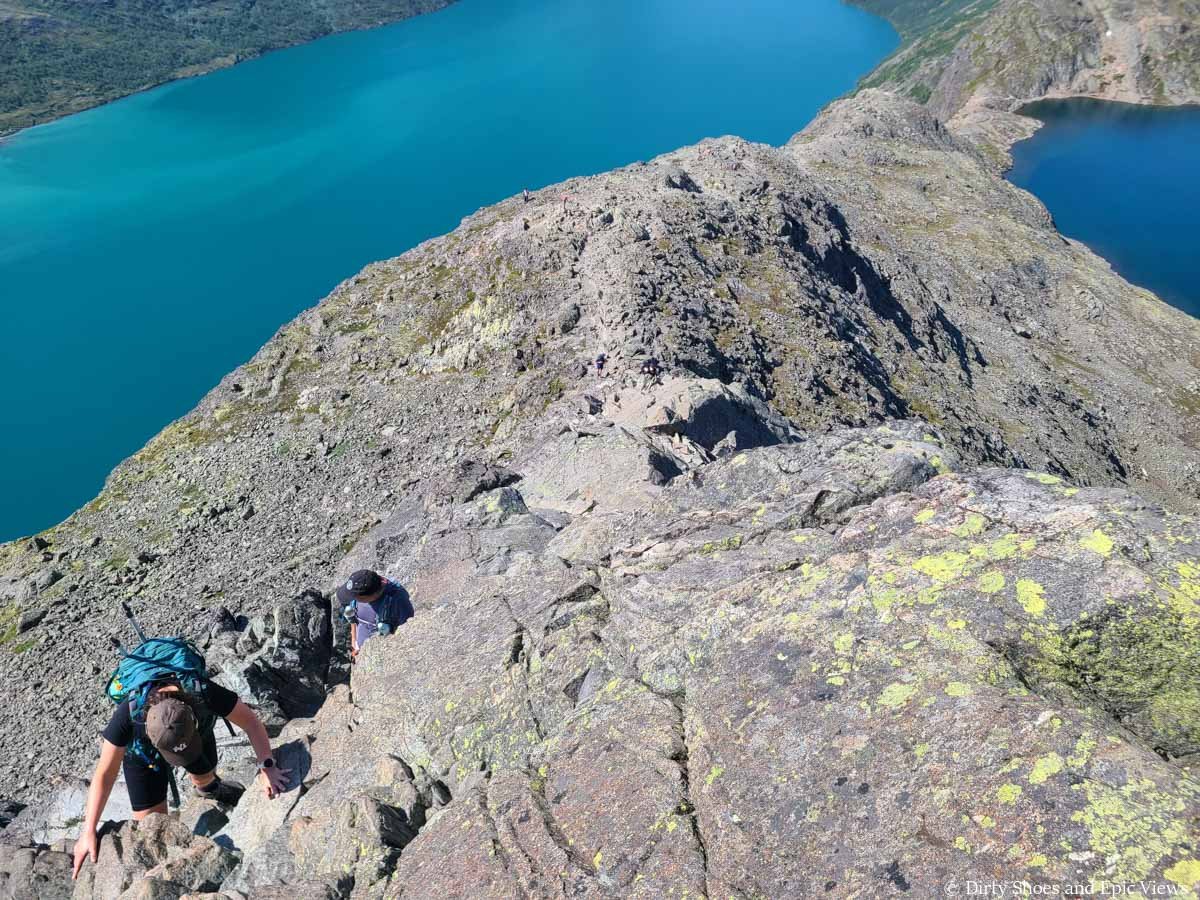
The scramble section is basically a narrow spine of rock that runs between Lake Gjende and Bessvatnet. It’s steep, lasts about 0.7 miles, and a good portion of it requires climbing with both hands and feet to navigate up and down the blocky rock. Because it’s a spine, there is exposure on either side, with drop offs down to the lakes below. We would definitely recommend having some experience on this type of terrain before tackling Besseggen Ridge, because it can be quite intimidating or scary for those not used to this.
If you’re hiking the trail from Memurubu, you’ll see this scramble from a distance, and it does look very steep, very intimidating, and very long.
This is the view of the scramble portion of the Besseggen Ridge trail as seen from the other direction (hiking towards Gjendesheim)
But here’s Kevin’s take on the Besseggen Ridge scramble:
When you’re on it, the ridge is wider than it looks from afar. There’s a pretty intuitive route up (or down) it and this path mostly stays in the middle of the spine. There are times where it might take you a little bit closer to one side, but it still felt like you’d have to make a very egregious error for something really bad to happen.
Looking down the Besseggen Ridge scramble
Typical terrain on the scramble
Now, on the other hand, if you were doing this in wet or high wind conditions, then it could become quite dangerous- so please don’t do that.
However, just the view of the exposure on either side is also why we say if you’re nervous about this, hike the Besseggen Ridge trail from Memurubu so that you’re going up the scramble and the exposure isn’t directly in your face. Just keep putting one hand and foot in front of the other and head up.
However, exposure aside, we would classify this as a pretty basic scramble, and not difficult. There’s no scree or loose rock, and it’s all just good blocky and grippy rock, so the path isn’t slick. You’re able to have good footing, and there are lots of options for hand holds to pull yourself up. Really, the hardest part about this scramble is just the sheer steepness.
A view back up the Besseggen Ridge scramble and the typical terrain found along it
A view up the scramble
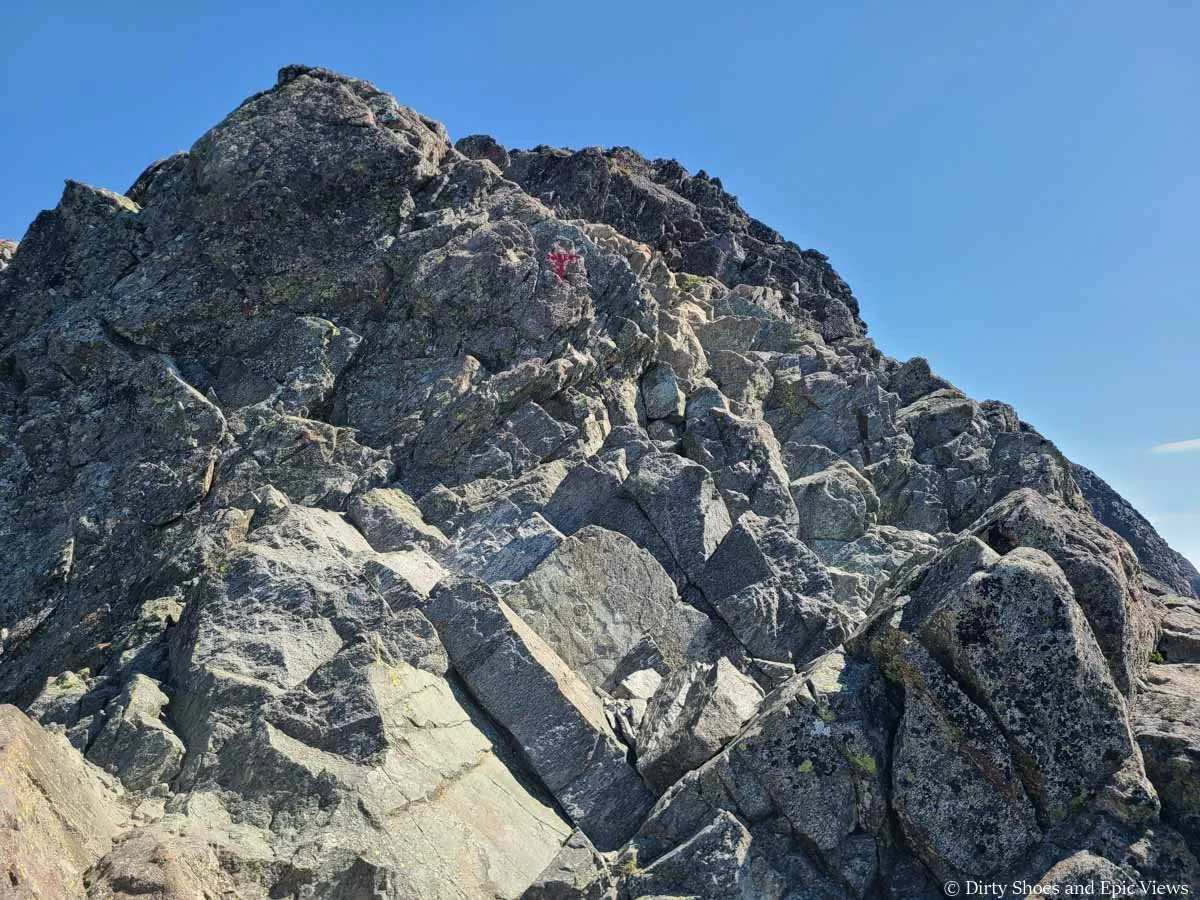
The Besseggen Ridge scramble has lots of good places for feet and hands as you scramble up
Ascending the scramble on Besseggen Ridge
The other part that can make the Besseggen Ridge scramble a bit difficult is if there’s a lot of people on it. If this is the case, just be patient and don’t try to rush anyone through it or put yourself in an unsafe spot by trying to navigate around people. Sometimes it’s not possible to go around others, especially in the more narrow parts of the ridge, and especially if you’re going down the scramble like Kevin, you’ll have to be even more patient as you wait for the flow of traffic going up to clear out.
This is looking back up at what is probably the narrowest portion of the Besseggen Ridge scramble
Looking down the narrow part of the scramble
The good news is that the top half of the scramble is the steepest and hardest part, so once you’re through that, this section of the hike becomes easier if you’re heading down it.
The bottom half of the spine transitions from a full on scramble to more of just a rocky downhill hike, with occasional scramble-like maneuvers required.
Looking down the bottom half of the Besseggen Ridge spine
This is the view up the spine from the bottom half of the scramble. The steep part in the distance is where the true scrambling begins.
The final bit of descent to the bottom of the scramble
Once you get to the bottom of this section, congratulate yourself, because the hardest parts of the Besseggen Ridge hike are now quite literally behind you!
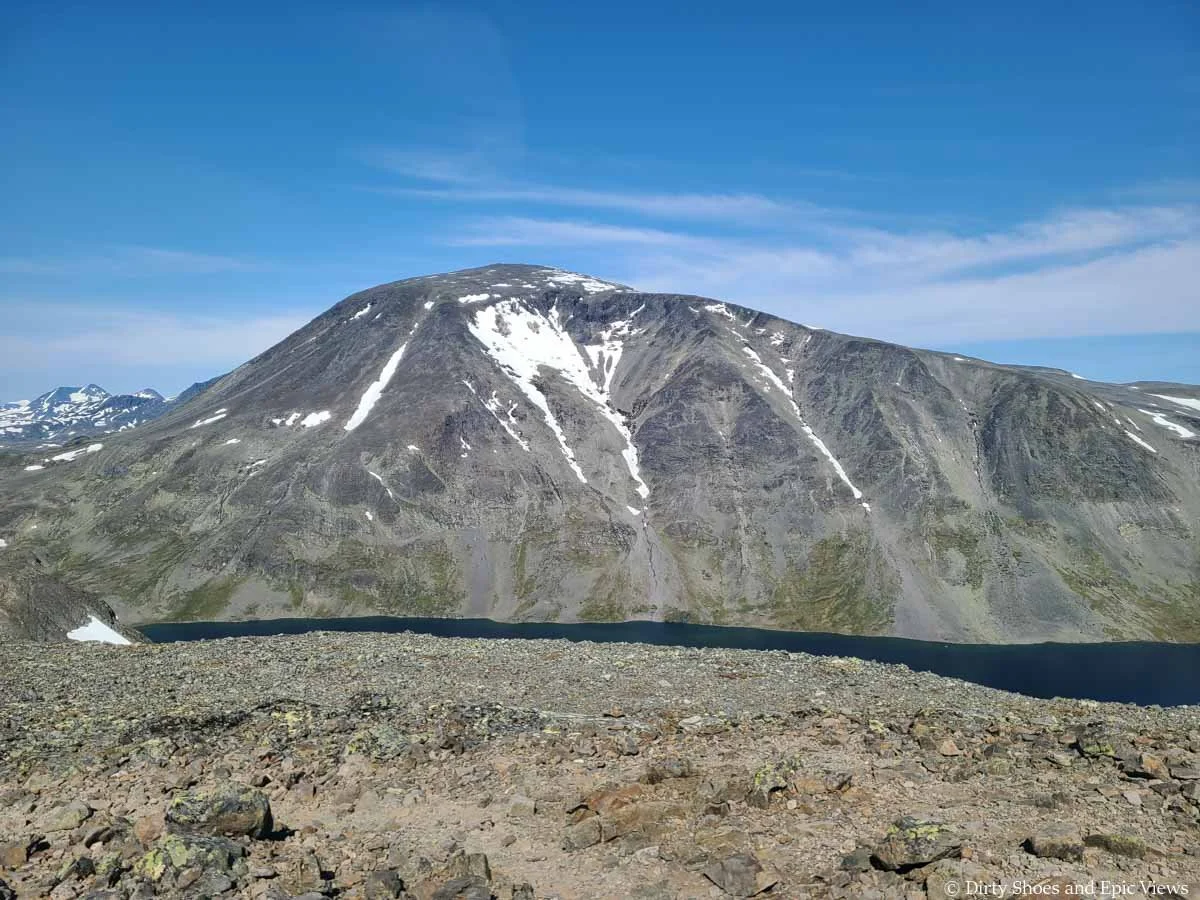
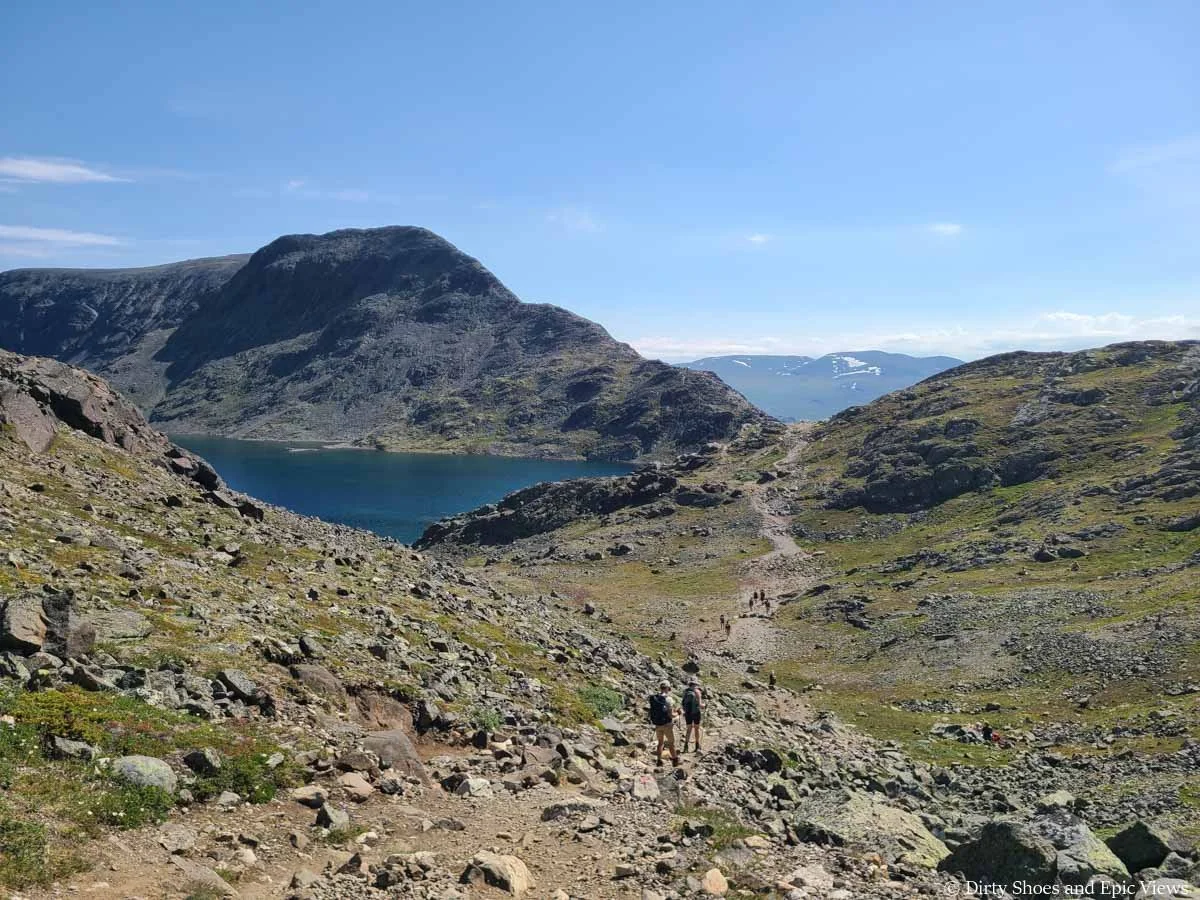
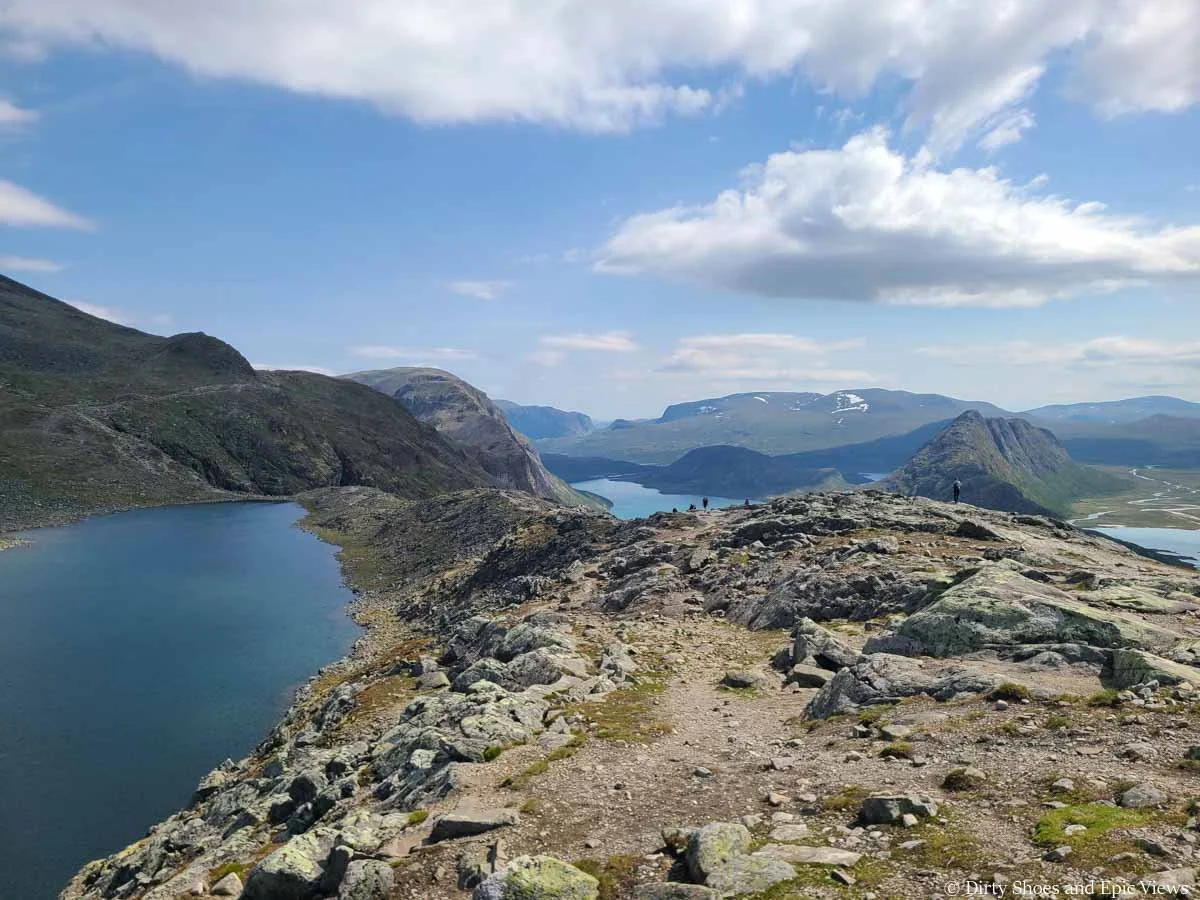
At the bottom of the spine, you’ll come to the shore of Bessvatnet, which you were just looking over from the top of the scramble. Overall, the entire descent from the summit to this lake is 1300 feet. At this point, you’re just about five miles into the hike and at the exact midpoint of the trail.Yes…you’re still only halfway done! But the hardest bit is now behind you. Kevin reached this point in just under 3 hours (but again, he’s fast…).
Once off the spine, the trail hugs the cliffs to the left of the ridge, with awesome views over Lake Gjende.
Views from the midway point on the Besseggen Ridge trail
You might notice a herd path going up a small hill here, but this isn’t the official trail. Continue following the trail markers around the shore of the lake. Here, you can see how clear the water is. It’s also good to note here that this is where you can continue to hike around the shore of Bessvatnet to bypass the scramble if hiking in the other direction.
Following the path around Bessvatnet
A look back out to the whole scramble section of Besseggen Ridge
The trail then turns away from this lake and gently climbs on a faint path through the rocky landscape. Just after leaving the lake, you’ll notice again a herd path heading up that small knob near the lake. If you’re coming from the other direction, be sure to follow the official trail down to the lake rather than up this knob (they both do go to the same place, so it probably doesn’t matter too much, but the knob seems to add some unnecessary climbing!).
If hiking towards Gjendesheim, stay left here and descend towards the lake to avoid the unnecessary climbing to the right!
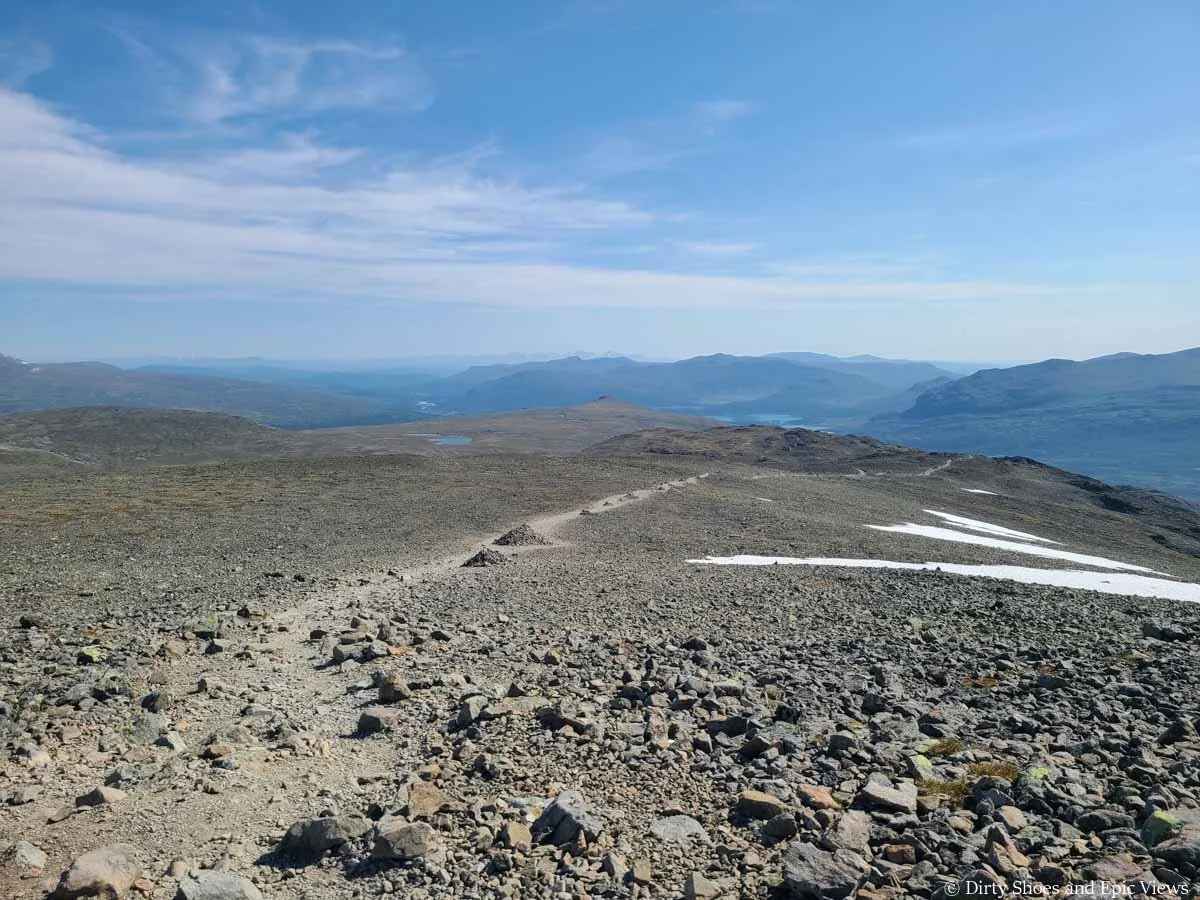
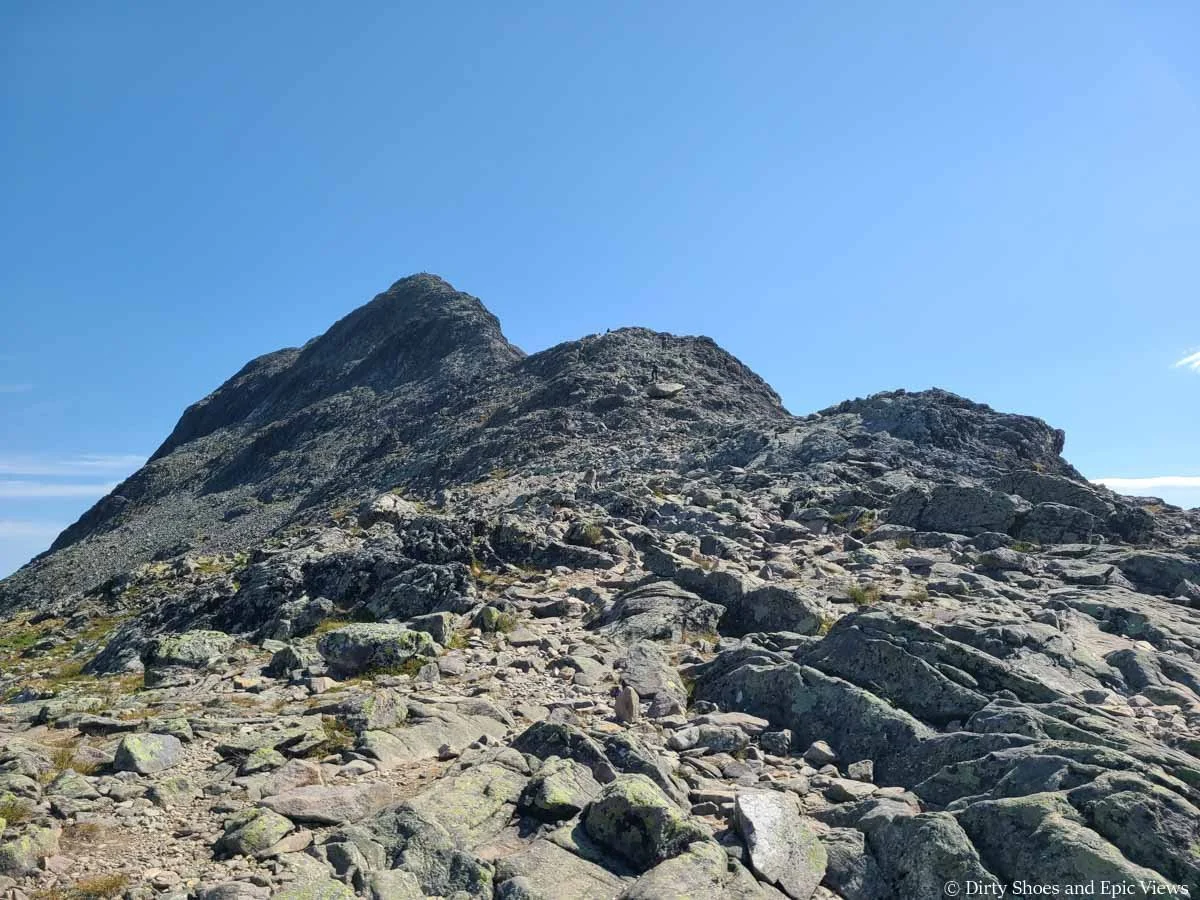
From this point, the Besseggen Ridge trail will be going up and over three smaller bumps along the ridge before it makes its final descent down to Memurubu. They are nothing like what you’ve already conquered, though, and the hardest climbs are behind you.
The climb up to the first of these three bumps is the longest and steepest, climbing about 600 feet in just under a mile, ascending up continuous terrain of loose rock and dirt, but with nice views still over Lake Gjende and Knutshoe Peak.

Looking up the trail climbing up to the first bump towards Memurubu
From the top of this hill, you can look back and see the massive scramble you just tackled, which definitely gives a nice feeling of accomplishment- from here that ridge looks quite intimidating!
Looking back down the path towards Bessvatnet and the scramble
Almost to the top of the first hill
Looking back down the trail towards Gjendesheim and the scramble
Knutshoe Peak and Lake Gjende
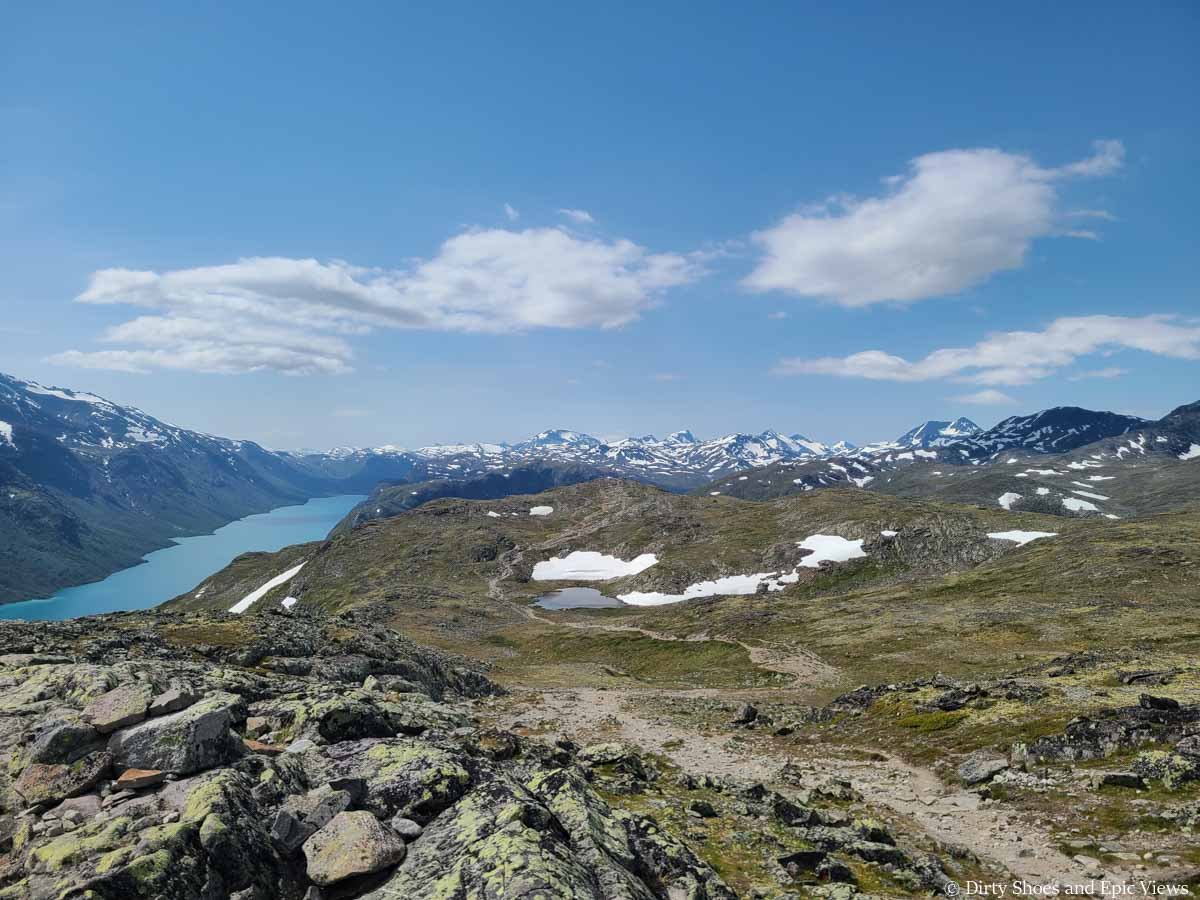
On the other side of the hill, towards Memurubu, a new smaller lake appears, creating a sight akin to that more famous two-lake view from above the scramble, so it’s cool you kind of get to see it again with a different lake!
Descending off the hill toward another two lake view!
The path down to this lake isn’t super steep, but it just continues to be rock and gravel, which can get a bit tiring at this point.
Beautiful Besseggen Ridge views
Looking back up the hill we just descended
Once at the shore of this small lake, you’re now 10 km / 6.2 miles into the hike with a total descent now of 1700 feet off the summit.
The next two hills along the Besseggen Ridge trail are gradual and short ups and down that take about 1 km each to traverse.
Gently climbing up the second hill
Looking back down the trail

A view over the small lake
Looking ahead on the Besseggen Ridge Trail as is drops off the second hill and then ascends the final hill in the distance
Looking back at the descent off the second hill
Views off the final hill
The final mile and half or so of the Besseggen Ridge hike is now simply a steady downhill until you reach Memurubu, which you’ll see in the distance as you descend. The descent starts off a bit gradual at first and then steepens the more you hike down, and as par for the course for the entire Besseggen Ridge hike, the trail here is made up of lots of loose rock and gravel, with some stone steps mixed in.
If you’re hiking Besseggen Ridge starting from Memurubu, this is the climb you’ll have to make right off the bat, and it’s a steep and long one.
Starting the final and long descent to Memurubu
Looking down at the shores of Memurubu along Lake Gjende
Looking back up the trail and how steeply it climbs
Memurubu is in sight!
Eventually, the trail enters a greener landscape with shrubs and then trees, and you’ll pop out to the trailhead at Memurubu.
From the Besseggen Ridge trailhead, follow the dirt road to the left towards the lodge (there will be signs here guiding you on where to go). There are some picnic tables here where you can stop for a snack or late lunch, as well as bathrooms.

The Besseggen Ridge trailhead at Memurubu
You can continue to follow the road down to the lake (it’s just a slight downhill from the lodge area to get to the lake shore) where you’ll find the ferry terminal.
Kevin had to hang out down here for about an hour and half before his ferry came, but it’s not a bad place to relax and enjoy the view after a long and challenging hike!

Views of Lake Gjende from Memurubu!
Where to Stay Near the Besseggen Ridge Trail
Since Besseggen Ridge is a pretty long hike, you won’t want to stay too far away from the trailhead the night before.
And in fact, there are options to stay right at either of the trailheads.
Gjendesheim has a DNT hut located right by the ferry terminal at the end of the road. It offers accommodations within a dorm or room and full board. See here for more information and for booking a stay. Note that it does require a DNT membership to stay here.
In terms of camping around Gjendesheim, while you cannot park a campervan or motorhome here, you can tent camp in the area using the “Right to Roam” principals and making sure to set up at least 150 meters from any building. You can use the facilities of the lodge on a daily basis for a fee.
The Memurubu trailhead also has a private lodge (not run by the DNT) that offers rooms and dorms as well as tent sites. Staying here (either before or after your hike) would require backpacking over the ridge, which seems to be common, as Kevin saw lots of backpackers while hiking Besseggen Ridge.
The Memurubu Lodge
If you’re looking to camp near Besseggen Ridge, there is also an established lodge and campground just across the way from Lake Gjende called Besseggen Fjellpark, as well as lodging and camping at Bessheim a little further up the main road.
There are a few additional accommodation options all along the main route 51.
We actually stayed in the town of Fossbergom before our Besseggen Ridge hike, which was a little over an hour away. It’s not the most ideal place to stay before the hike, especially if you are trying to get an early start on Besseggen Ridge, but for us, it was a nice farm stay in the countryside and it put us in the middle of Jotunheimen, Geiranger, and Dovrejfell National Park so that we could have a home base for a few days with less moving around. It required more driving each day, which was a tradeoff we were willing to make.
What to Pack for the Besseggen Ridge Hike
In addition to all the usual day hiking essentials, here are some things we specifically want to recommend for the Besseggen Ridge hike:
Good hiking boots: Make sure to wear boots with good traction, good ankle support, and waterproofing as most of the terrain on Besseggen Ridge is rocky and rugged.
Layers and rain gear: Weather can be unpredictable, and the ridge can be cool and windy, so come prepared with warm and dry layers.
Trekking poles: Because of the steep ascents and descents and the rocky terrain of the Besseggen Ridge trail, trekking poles can be useful on this hike if you are used to hiking with them.
Plenty of food and water: It’s a long hike so make sure you have lots of snacks and enough water. There’s a café at Gjendesheim that sells snacks and drinks. If you want to keep your pack light, you can carry a water filter and filter from the several lakes along the trail as you go.
Sun protection: Most of the Besseggen Ridge hike is exposed to the sun and elements, so bring sunscreen, glasses, a hat, or anything else you might need for sun protection.
First aid kit: Just in case. This trail is rugged so you want to be prepared.
Your ferry ticket: Have your prebooked ferry ticket downloaded to your phone ahead of time. It’s a good idea to have a battery pack on you to charge your phone in case it dies along the hike and you need to show your ferry ticket at Memurubu for your boat ride back.
More Norway Guides
Heading to Norway and looking for more things to do after your Besseggen Ridge hike? Be sure to check out the rest of our Norway guides to help you plan your trip!
We hope our Besseggen Ridge guide helps you plan an epic day on the trails. Let us know if you have any questions in the comments below. Happy hiking!