How to Hike to the Austerdalsbreen Glacier in Norway
The hike to the Austerdalsbreen Glacier is an amazing day hike in Norway’s Jostedalsbreen National Park. It’s relatively easy, has stunning views the entire way, but doesn’t see the crowds as a lot of other popular Norway hikes. In this guide, we’ll go over everything you need to know about the Austerdalsbreen hike, including how to get there, what to expect on the trail, and all our best tips!
Right in the heart of the southern fjords of Norway lies the epic Jostedalsbreen National Park, home to mainland Europe’s largest icecap. The entire area around Jostedalsbreen National Park is quite well-known for its stunning fjords, idyllic valleys, deep blue glacial lakes, beautiful mountain views, and, of course, the chance to see the park’s namesake, the Jostedalsbreen Glacier.
The Jostedalsbreen icecap has dozens of picturesque glacier arms that cascade down the mountain sides and some are quite accessible to the average hiker and/or sightseer. Some of these glaciers are quite popular to visit and see a lot of daily visitors, such as the Briksdalsbreen Glacier on the west side of the park. While these glaciers are popular for a reason and worth a visit, sometimes you just want to escape the crowds and find a little bit more peace and solitude on the hiking trails- we get it!
And that’s where the Austerdalsbreen Glacier comes in. The Austerdalsbreen Glacier in Norway is a stunning glacial arm of the Jostedalsbreen Glacier, found on the east side of the park. The glacier consists of three converging ice falls that cascade down into the incredibly scenic Austerdalen Valley.
The most amazing part about Austerdalsbreen is just how accessible this glacier is! On a relatively easy half day hike, you can get incredible views of Austerdalsbreen, explore its glacial lagoon (often filled with small icebergs!), and walk along a rushing glacial stream through the fairytale-like Austerdalen Valley filled with stunning panoramic mountain views practically the entire way. And, you get all this without the crowds of other more popular hikes in Jostedalsbreen National Park!
Sounds pretty amazing, right?
In this guide, we’ll go over everything you need to know to hike to the Austerdalsbreen Glacier in Norway, including how to get there and where to park, when to go, what the trail is like and what to expect, and all of our best tips!
So, let’s get to it…
In this Austerdalsbreen Glacier guide:
Where is the Austerdalsbreen Glacier hike?
The Austerdalsbreen Glacier is found in Jostedalsbreen National Park, in the heart of Norway’s southern fjords.
The glacier is one of many glacial arms of the Jostedalsbreen icecap that cascades down into the valley below, and is relatively accessible via a beautiful half day hike through the Austerdalen Valley.
Here is a map showing the general location of Austerdalsbreen in relation to other nearby attractions around Jostedalsbreen National Park.
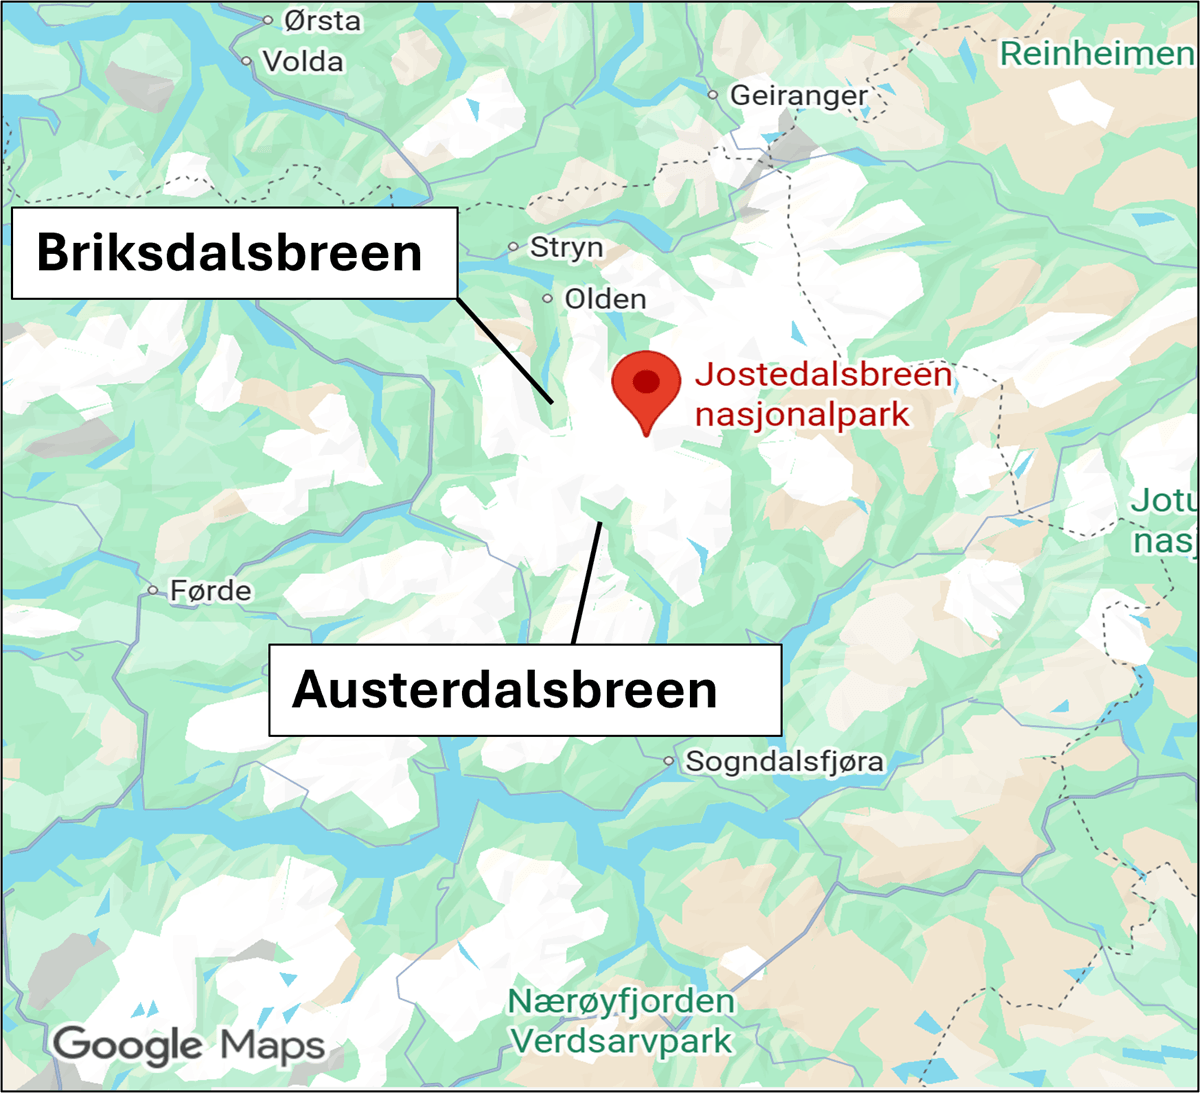
Austerdalsbreen lies on the eastern side of Jostedalsbreen National Park, opposite from the more famous Briksdalsbreen Glacier
Here are the driving distances to the Austerdalsbreen Glacier trailhead from popular spots around southern Norway:
From Geiranger: 5.5 hours / 260 km
From Olden: 3 hours / 175 km
From Sogndalsfjora: 1.5 hours / 55 km
From Flam: 2.5 hours / 125 km
From Odda: 5 hours / 275 km
From Bergen: 5 hours / 290 km
From Oslo: 6 hours / 365 km
How to get to the Austerdalsbreen trailhead
Regardless of where you are coming from, all roads to Austerdalsbreen first lead to Hafslo.
From route F55 that travels along the west side of Lustrafjorden, you’ll make a turn onto Fv337 towards Hafslo and Veitastrond. You’ll follow this road for nearly 40 km until it ends in the parking lot for the Austerdalsbreen hike. Be sure to put the “Tungestolen Parkering” into your GPS.
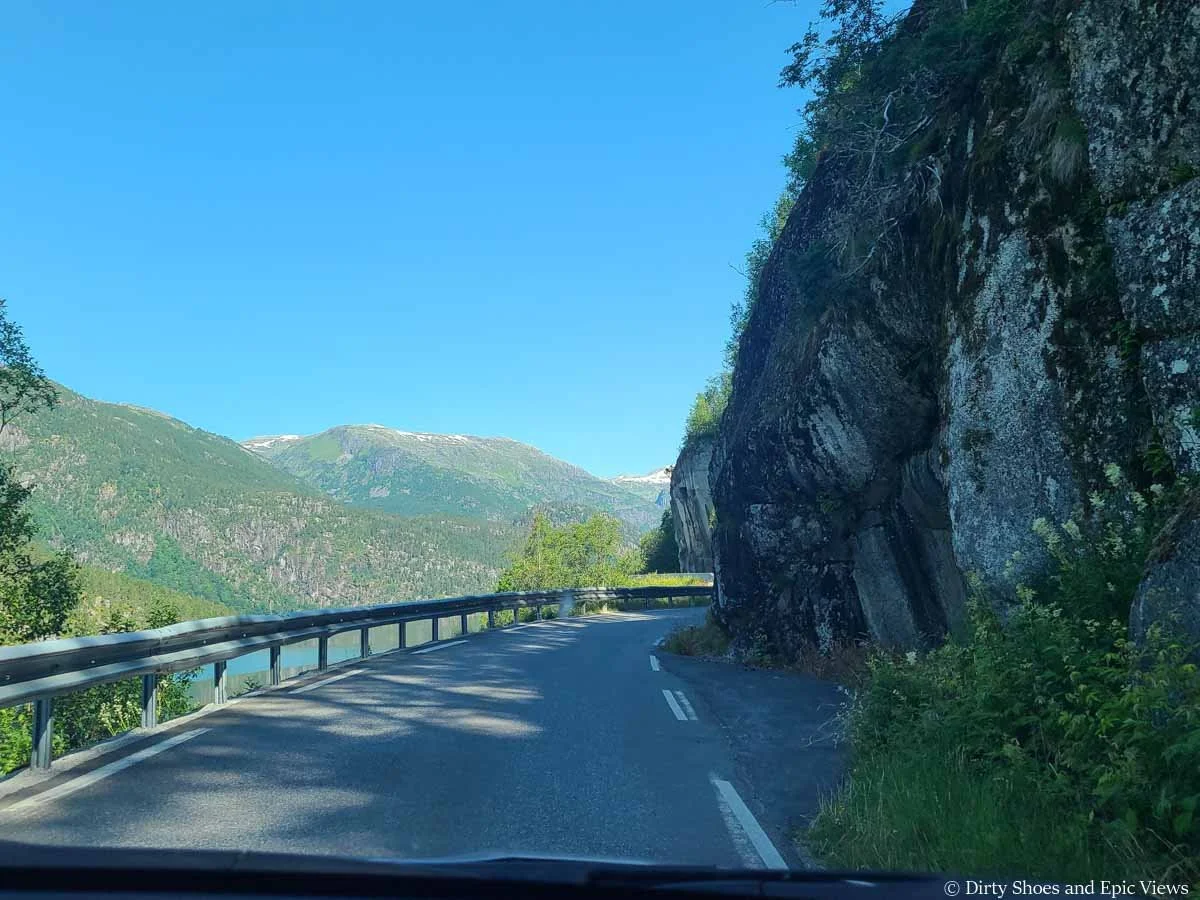
This road to Austerdalsbreen is a flat paved road through scenic countryside that starts off simple and just wide enough for two-way traffic.
After passing through Hafslo, you’ll continue driving along the scenic shores of Hafslovatnet, and the road begins to quickly narrow into basically a one-way road (but still has two-way traffic!).
The road to the Austerdalsbreen trailhead took us about 50 minutes to drive, and it was one of the most stressful roads we drove on in Norway. We drove on lots of twisty narrow roads around the fjords, but I think this one just felt more exhausting because of how long it was.
Basically, you’ll be driving on a one-lane road that has a lot of blind turns in it, so you always want to be looking far ahead to monitor for oncoming traffic, and always be prepared for fast stops and to back up when needed. There are frequent pull-off areas along the road, so if you see a car coming, pull off into one of these, or if you come upon an oncoming car unexpectedly, you may have to back up to the closest pull off to let the other car pass (we had to do this a couple of times).

Blind turns like this are found all along the road to Austerdalsbreen
Make note of these pullover spots as you drive
We basically held our breaths at every blind turn and had mini heart attacks when a car surprised us around the corner! But we made it through. You just have to drive slowly and cautiously. Fortunately, the road wasn’t too busy when we drove it, but we did run into enough cars to make it stressful.
An added bonus to this road were the handful of unlit single lane tunnels! It’s hard to know if cars are already coming through from the other side, but there are sometimes pull-offs inside the tunnel itself, and other times the road was just wide enough where two cards could squeak by each other. Again, just don’t go speeding through these.
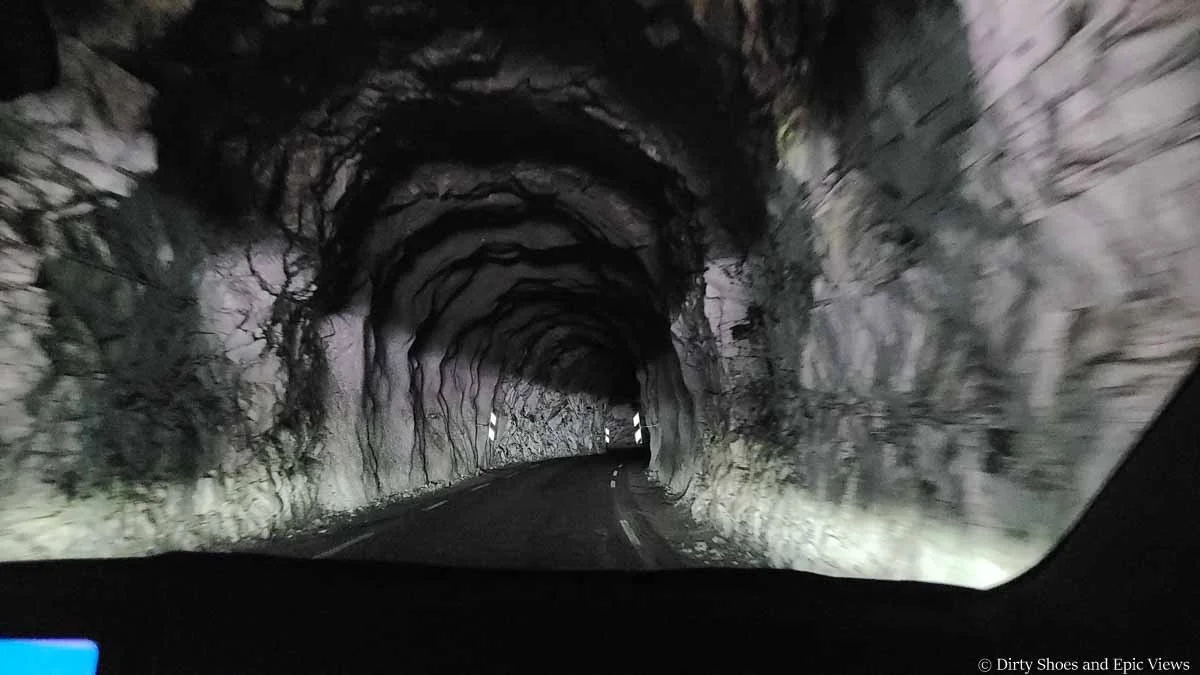
Driving through a tunnel on the way to Austerdalsbreen
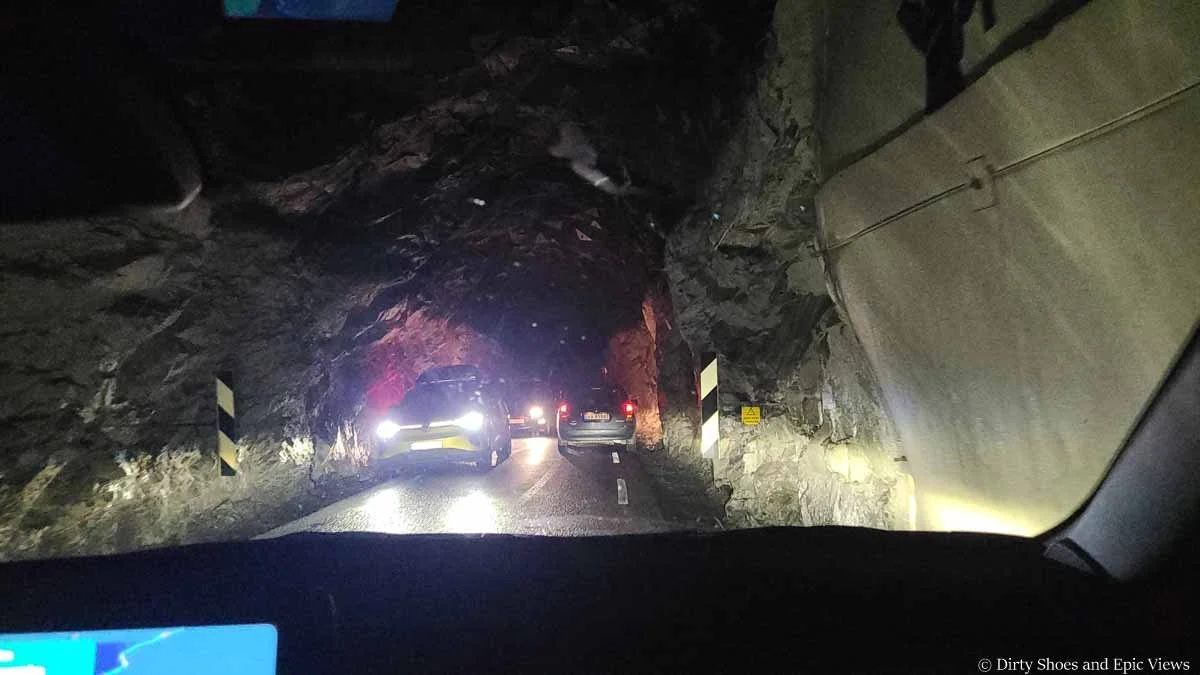
Some traffic in one of the tunnels
And of course, you often emerge from the other side of these tunnels straight into a blind turn, making them all the more “fun”.
Yea, I won’t lie- it can be a stressful drive.
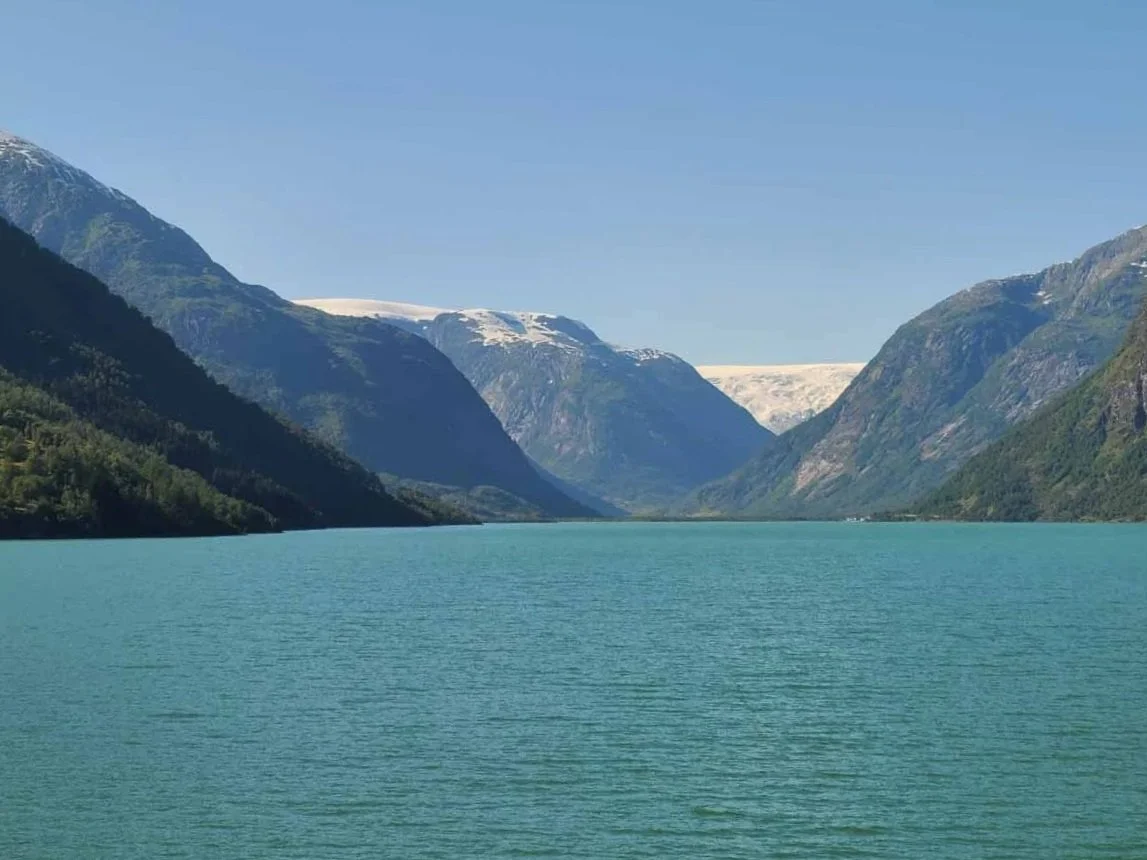
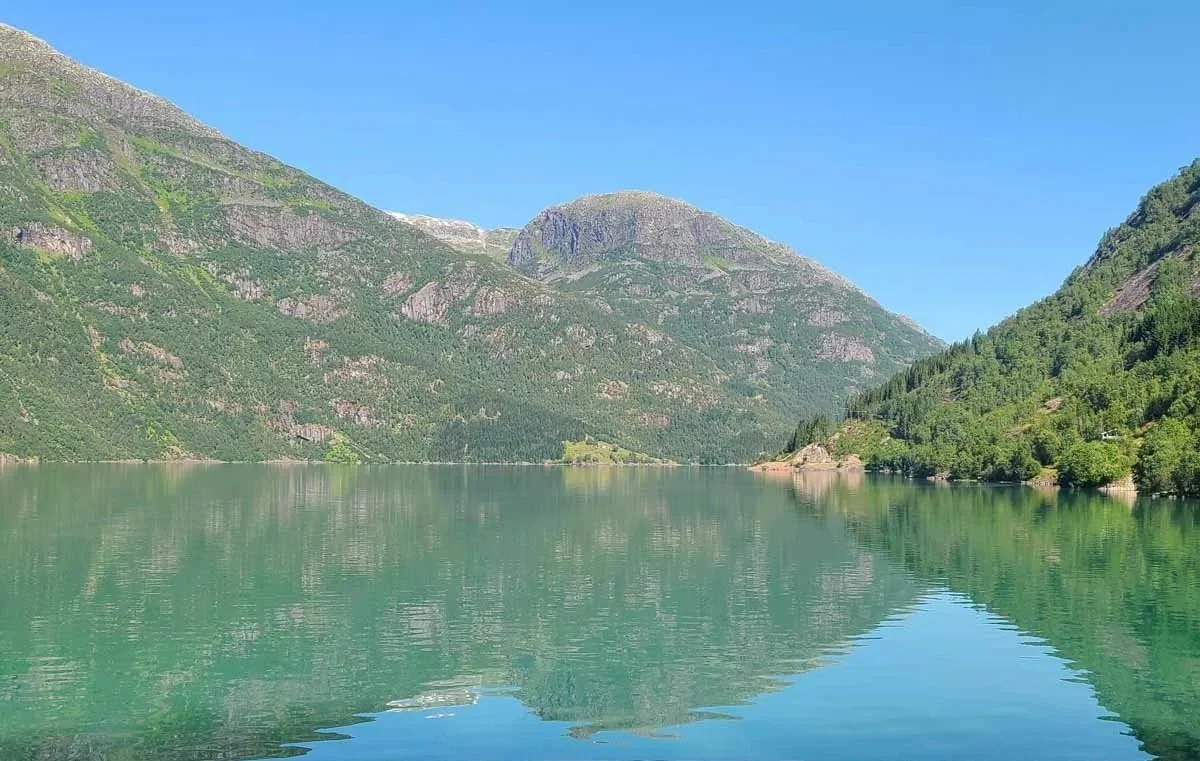
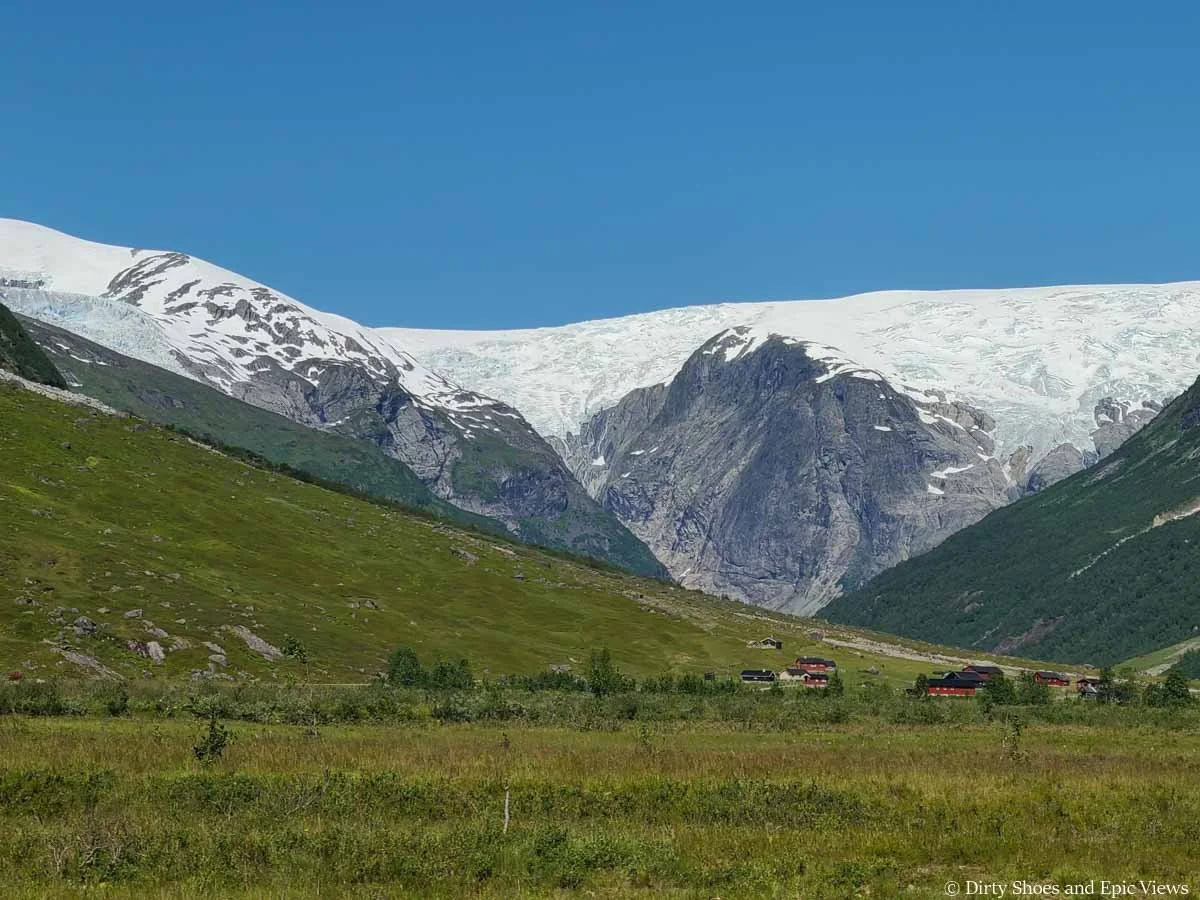
However, if you are often the passenger princess who can sit back and relax (Melissa here- raising my hand), then you’re in luck here because the views along the drive to the Austerdalsbreen Glacier trailhead are beautiful. Once past Hafslovatnet, you’ll then drive along the shores of the next lake, Veitastrondnet. The water here had a deep emerald color to it, and was quite still and reflective of the gorgeous mountains surrounding it. Many of the mountains were still snow-capped, and handfuls of waterfalls streamed down the cliffsides. At one point in the drive, you even get your first glimpses at the Jostedalsbreen ice cap hiding deep in the valley ahead.
Views from the road to Austerdalsbreen
After about 40 minutes of driving, you’ll reach a gate, and to drive further, you’ll have to stop and pay a toll to continue to Austerdalsbreen. There is a kiosk here where you can get out and pay using either cash or card (we recommend having cash just in case). When we were here, it was 70 NOK for a regular car and more for larger vehicles like campervans. Once you pay, you have to manually open the gate, drive through, and then close the gate behind you before continuing on.
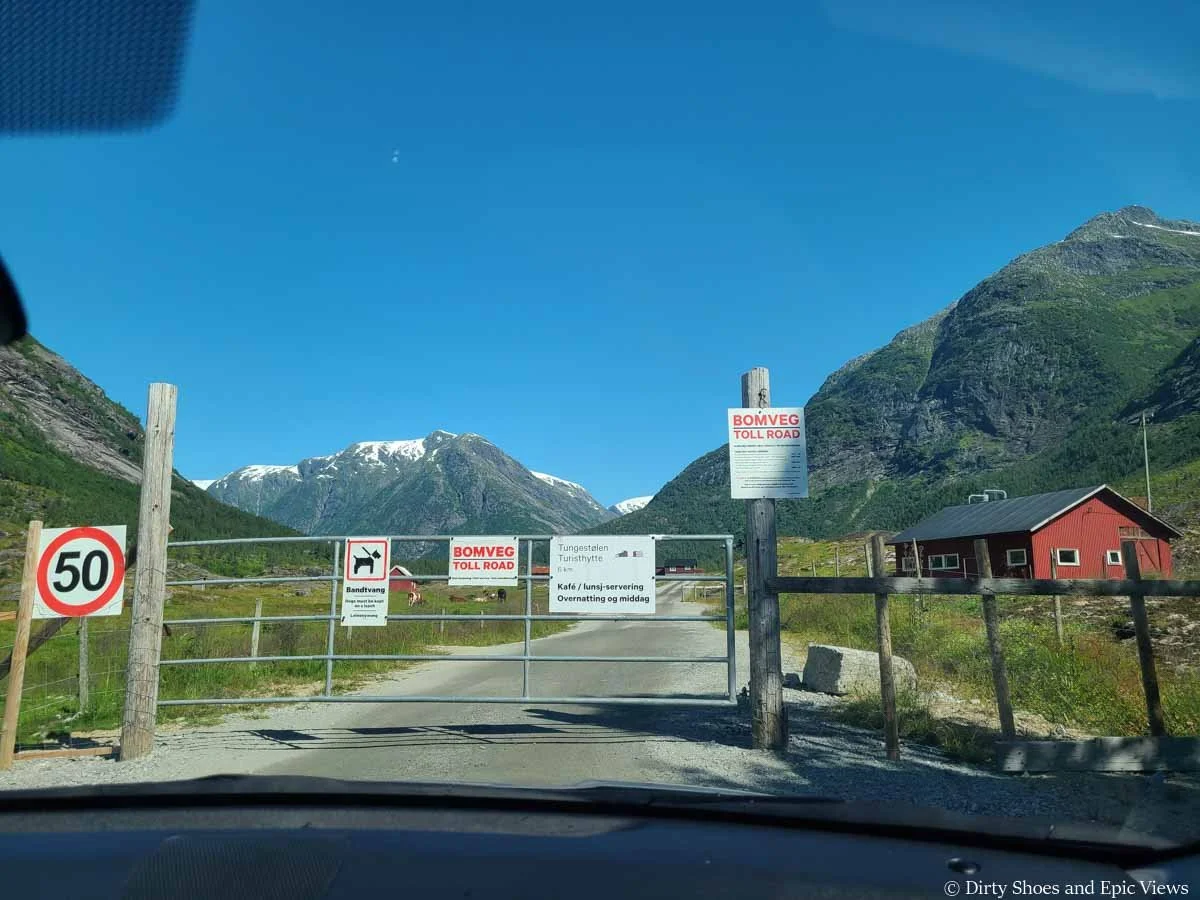
The start of the Austerdalsbreen toll road
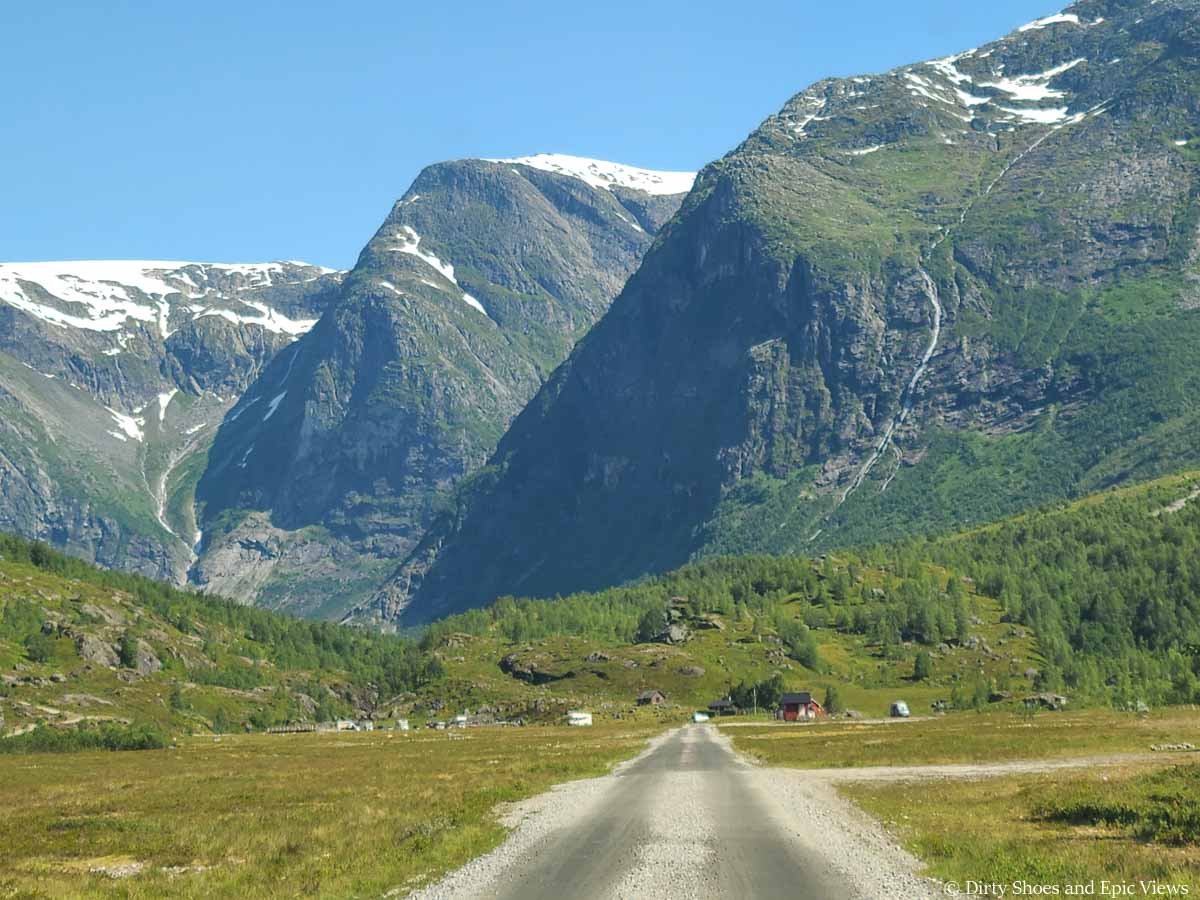
From here, the road is a well-maintained gravel road and goes for another 6 km (about ten minutes) until the Austerdalsbreen parking lot. It’s a flat drive through a green valley with now amazing views of the Jostedalsbreen ice cap just ahead. There are no blind turns here, but just keep your eyes peeled for sheep who might be roaming the roads!
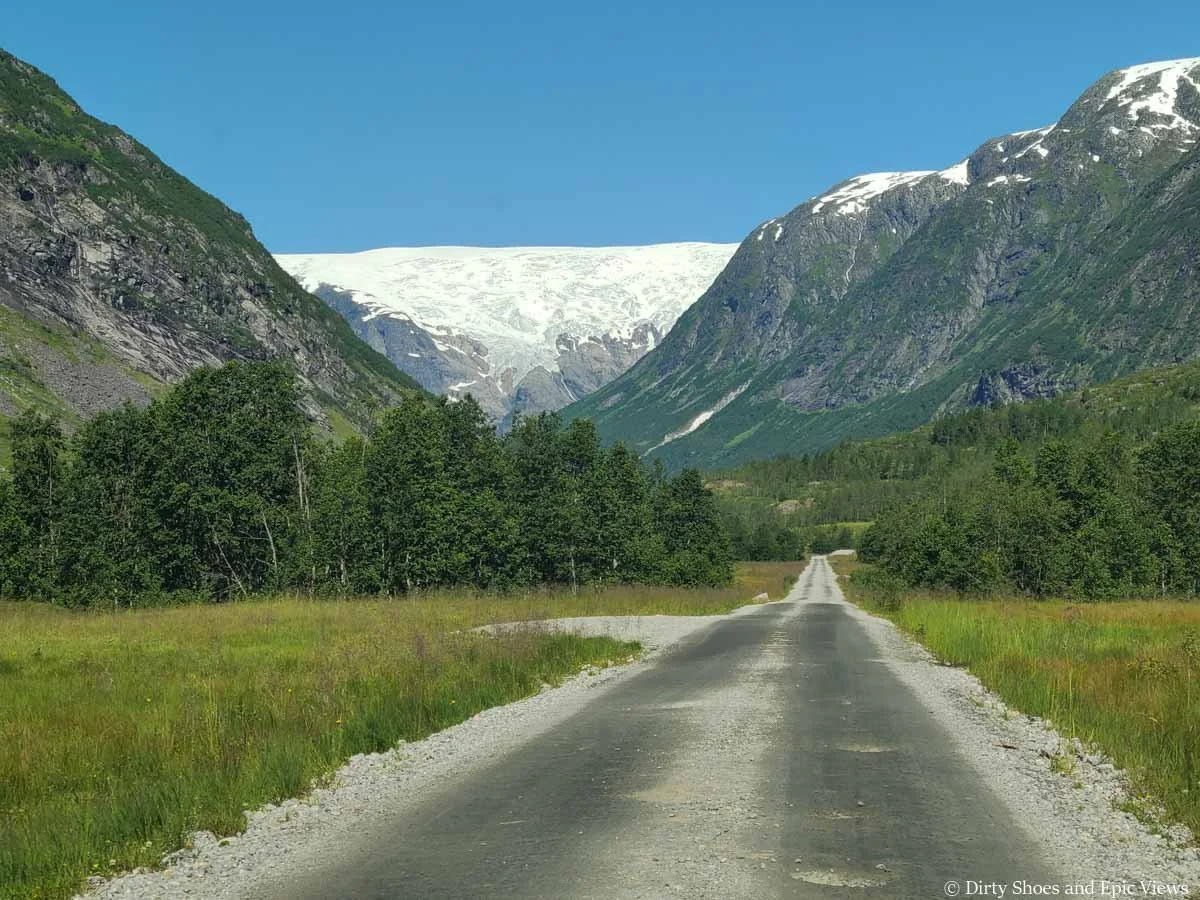
Views of the ice cap from the Austerdalsbreen toll road
Stunning views of the Jostedalsbreen ice cap
Views just before the Austerdalsbreen parking lot
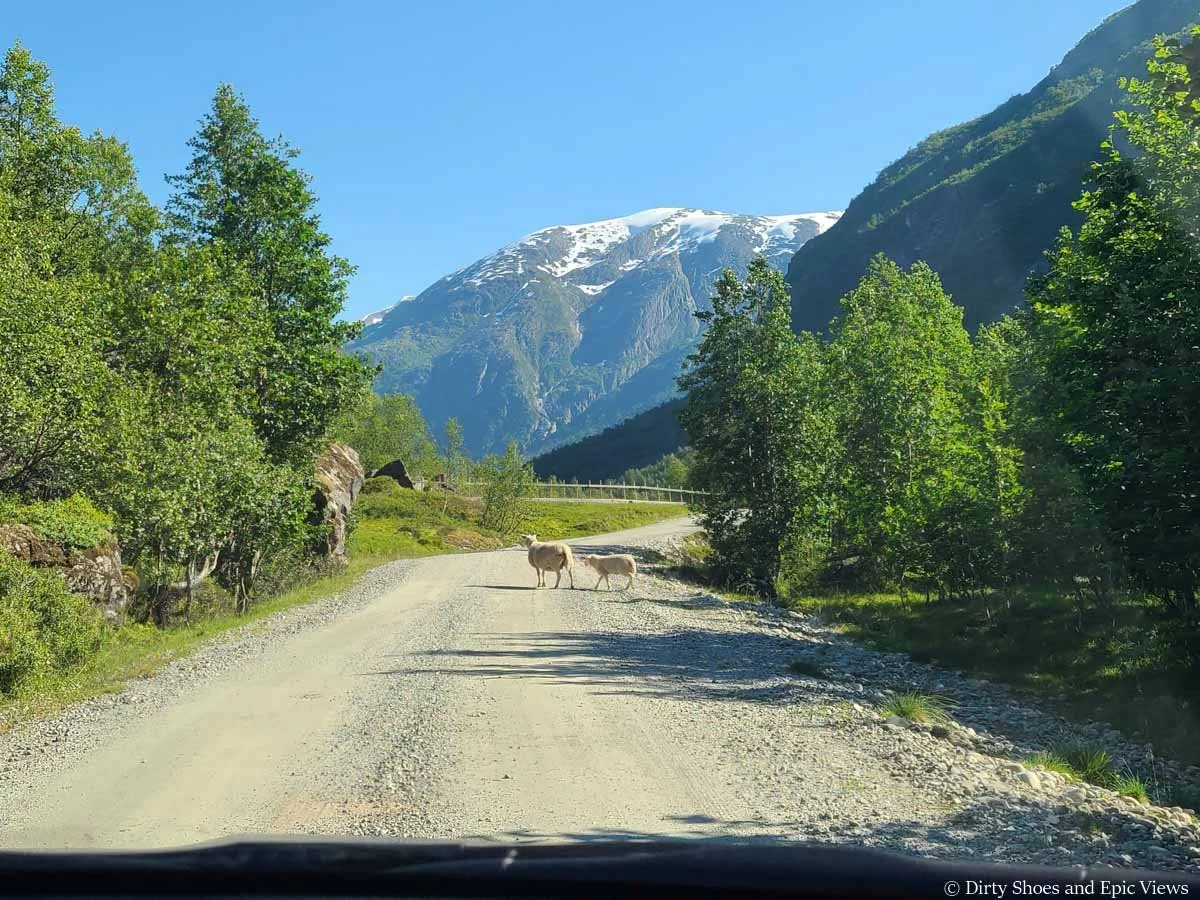
Watch out for sheep along the road!
Just before a short wooden bridge, the parking lot for the Austerdalsbreen hike will be on the right. It’s a small lot, but there should be plenty of space available. We did the Austerdalsbreen hike midday on a perfectly sunny Saturday in mid-July, and there were plenty of spots to park.
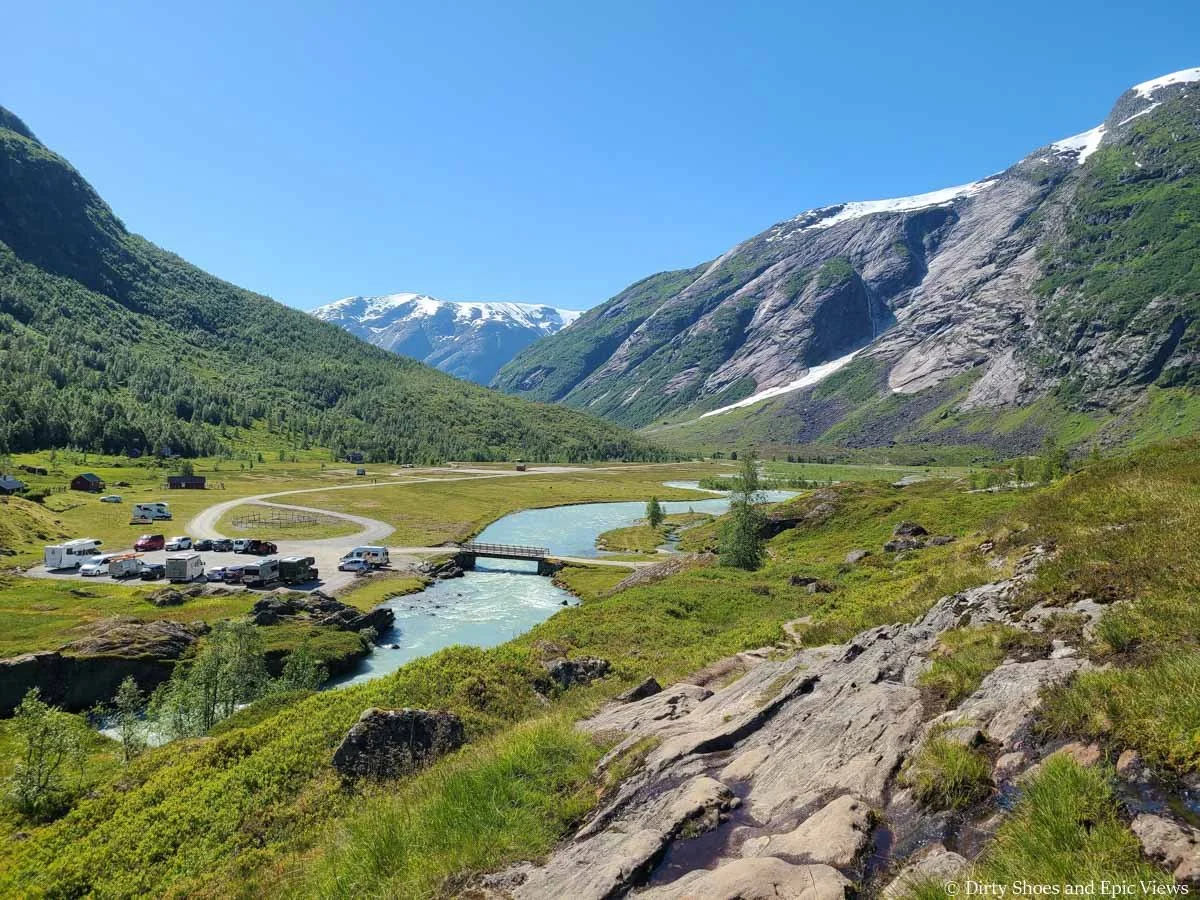
A view of the Austerdalsbreen parking lot
From here, you’ll see some cabins up on a hillside in the distance. These belong to the Tungestolen DNT hut where you can grab a bite to eat, or stay the night! We hear it has amazing views but we regrettably didn’t venture up there.
From the parking lot, cross over the wooden bridge, and you’ll see a sign for Austerdalsbreen. Follow the trail on the right to head into the valley to start the hike!
The Austerdalsbreen trailhead
How long is the Austerdalsbreen Hike in Norway?
The Austerdalsbreen Glacier is a perfect half-day hike. Here are our stats from our time on the Austerdalsbreen trail.
Distance: 8.25 mi / 13.3 km roundtrip
Elevation gain: 1054 ft / 321 m
Time: It will take around 4 hours roundtrip for the hike, plus any time you spend hanging out at the glacier viewpoint
Elevation profile:
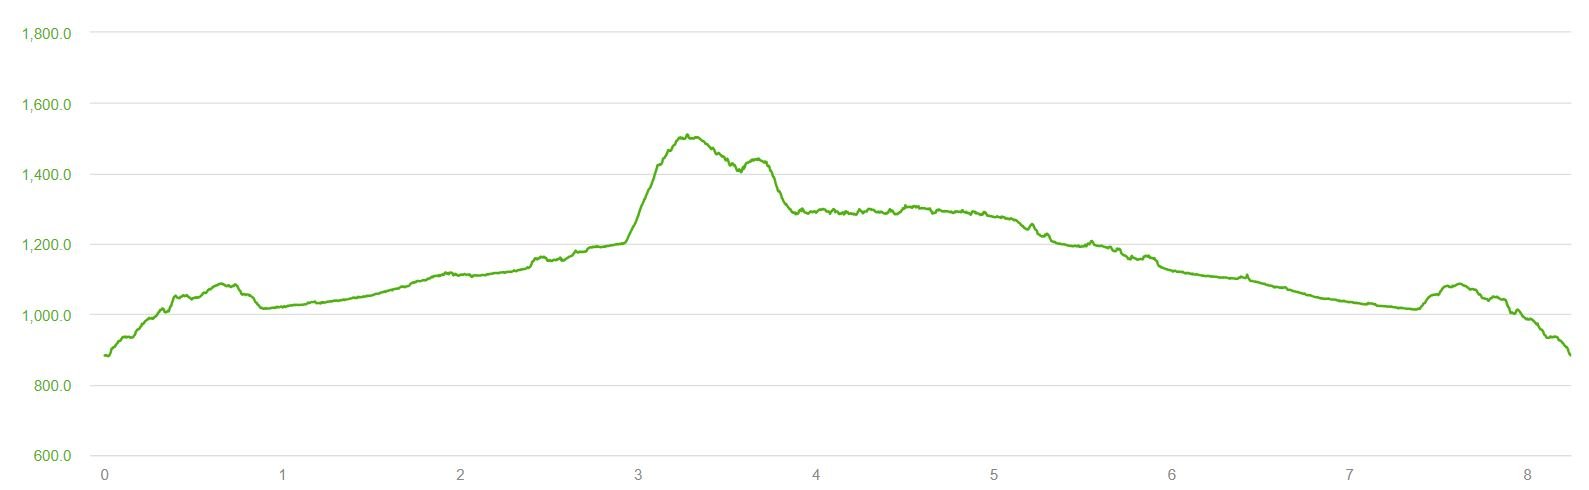
Our elevation profile of the Austerdalsbreen hike
Map of the Austerdalsbreen Glacier hike in Norway

A satellite view of our hike to Austerdalsbreen
How Hard is the Austerdalsbreen Hike in Norway?
The trail to the Austerdalsbreen Glacier is what we’d call a low effort / high reward hike. You really are able to access stunning alpine views on a relatively easy hike. But let’s go over some of the important things you’ll have to keep in mind when hiking this trail.
Elevation gain
The beginning and end of the hike are really the hardest parts of the trail, but they really are short sections of the overall hike, and we wouldn’t say they are particularly challenging.
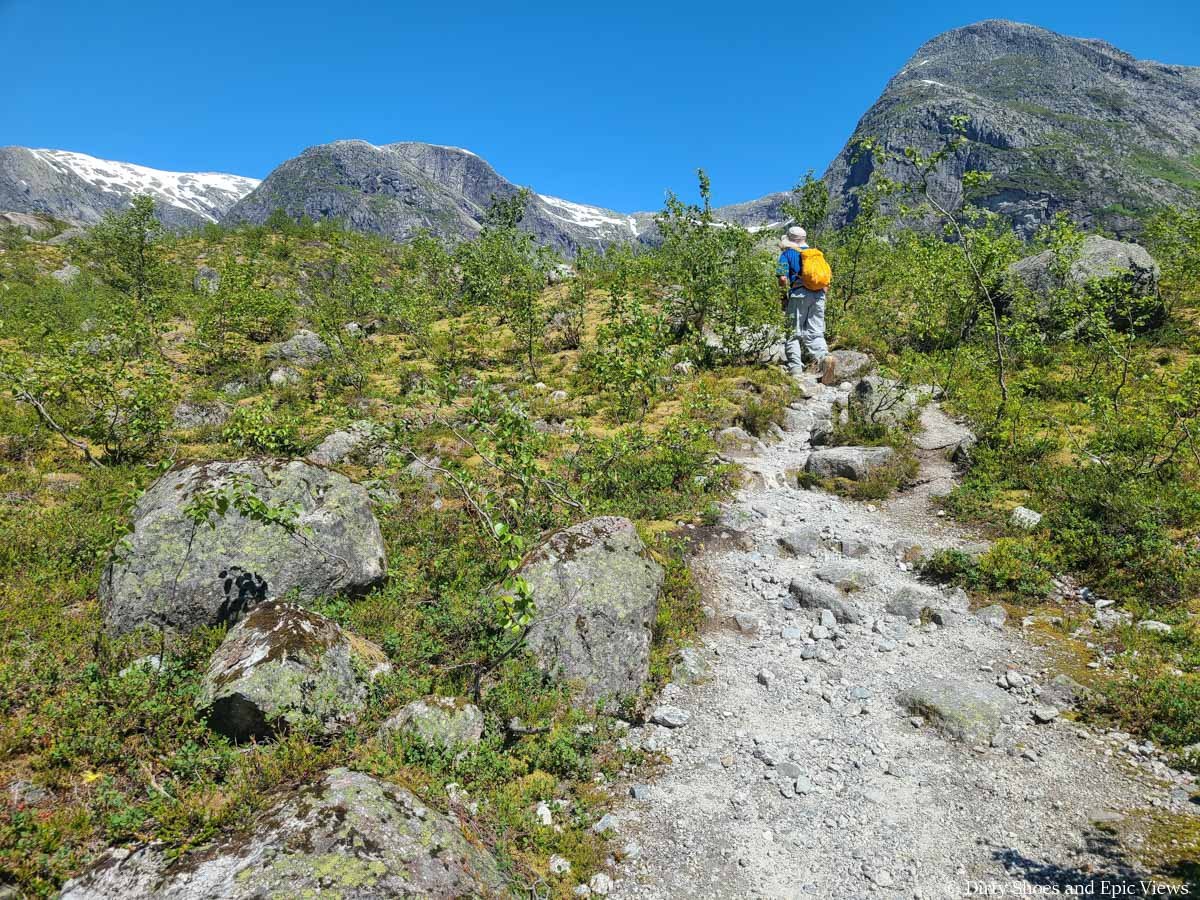
The first part of the Austerdalsbreen hike has a steady but gradual incline and can be a bit rocky and muddy and you’ll need to watch your footing.
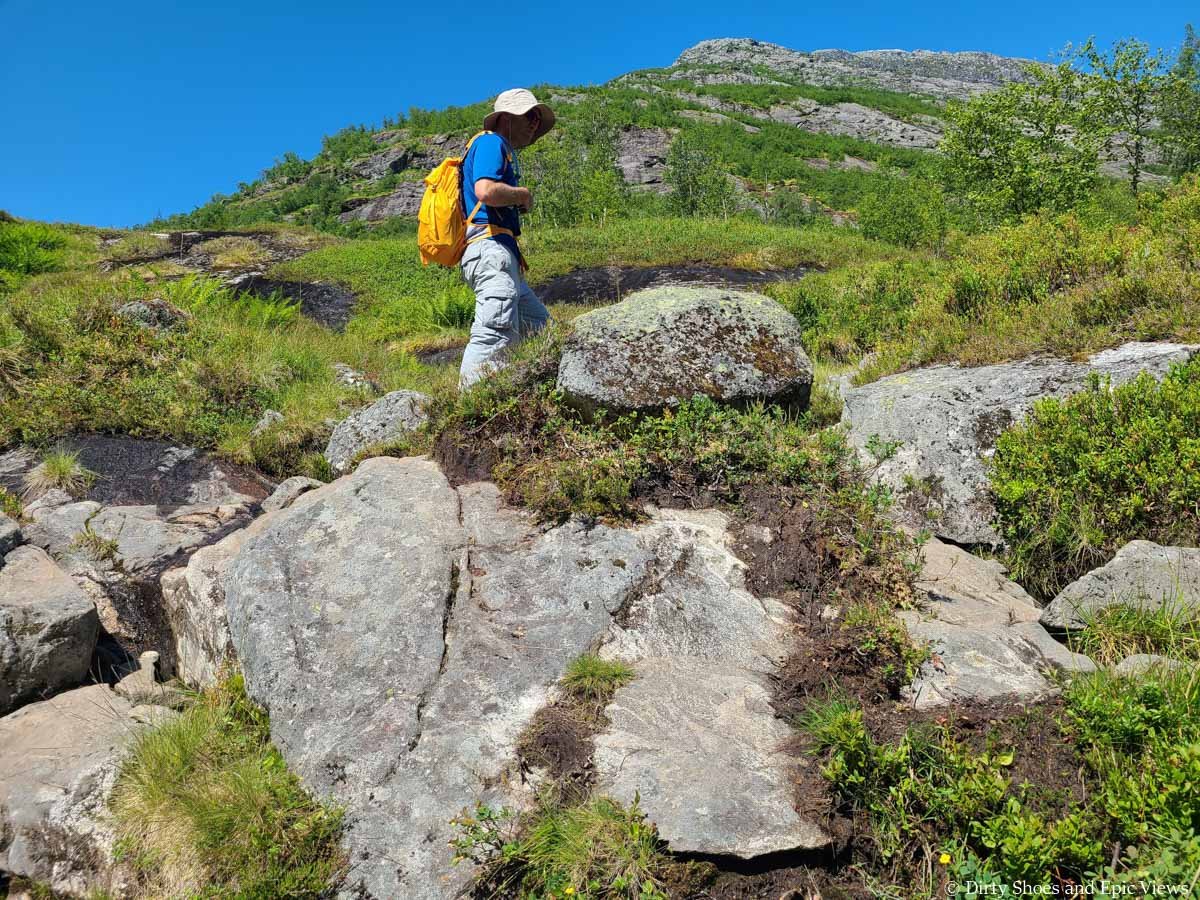
Rocky and muddy terrain on the early part of the Austerdalsbreen hike
Navigating the muddy patches
Then, just before you reach your first views of Austerdalsbreen towards the end of the hike, there’s a short but steady uphill climb up to the slopes above the glacier. And in fact, there’s a way to actually avoid this uphill, and instead go around it and head towards the glacier from ground level rather than from a higher viewpoint- check out our trail description below for more on that.
The small climb at the end of the Austerdalsbreen hike
The rest of the hike in between these sections is pretty much a flat walk through the Austerdalen Valley following a glacial stream. In fact, we felt the hike was so flat and the climbs so gradual and quick that we don’t quite know how or where it manages to gain the 1,000 feet in elevation that it supposedly climbs!
A large part of the Austerdalsbreen hike is fairly flat and easy
Terrain
Like we said above, the first part of the Austerdalsbreen hike is probably the most rugged in terms of rock and mud, but it’s nothing overly challenging. On the way back down, you’ll need to be a bit more cautious with your footing as you hike back down and around the larger rocks.
If you do choose to make that final uphill climb to the higher vantage point over the Austerdalsbreen Glacier at the end of the hike, you’ll be hiking across the rocky slopes above the glacial lagoon, and from up here, getting down to the lagoon can be a bit tricky. Well, more so just kind of annoying.
It just involves hiking down loose rock and scree, so you really have to watch your step and be cautious. There should be a herd path to guide you down, and it doesn’t take long at all- just a few minutes.
The rocky terrain around Austerdalsbreen
Stream crossings
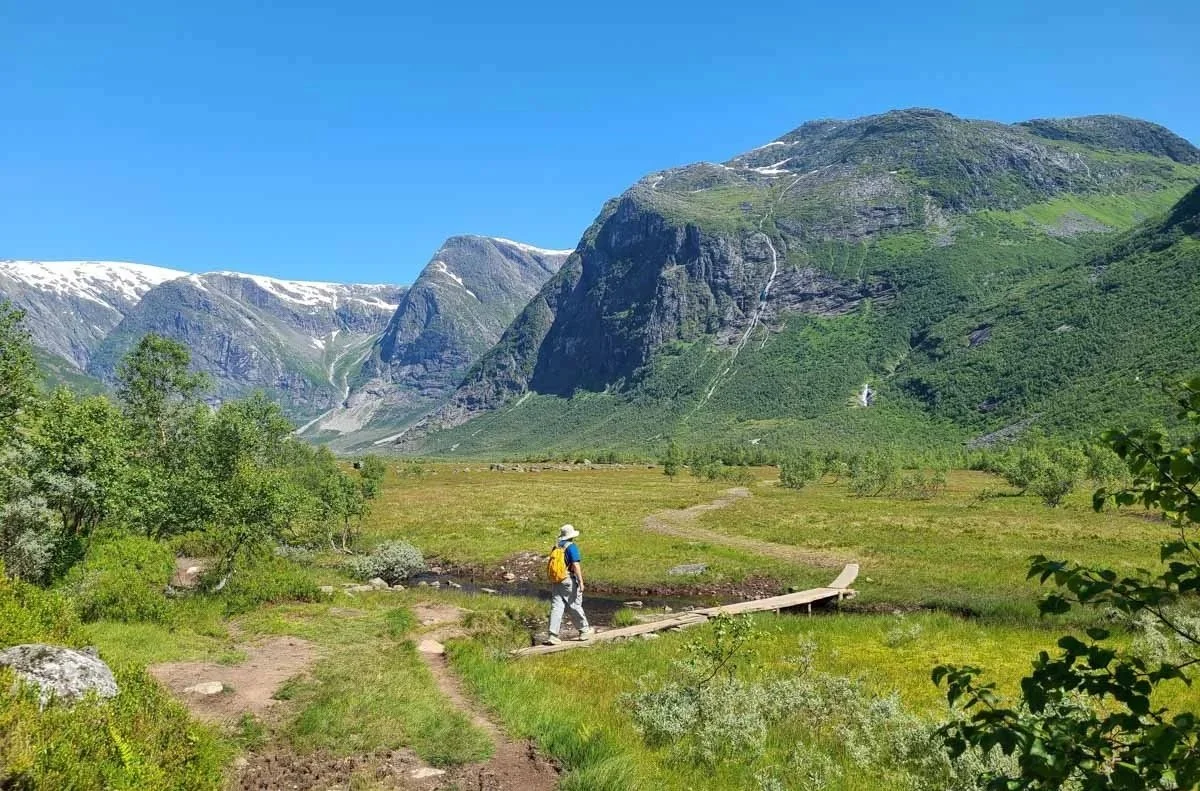
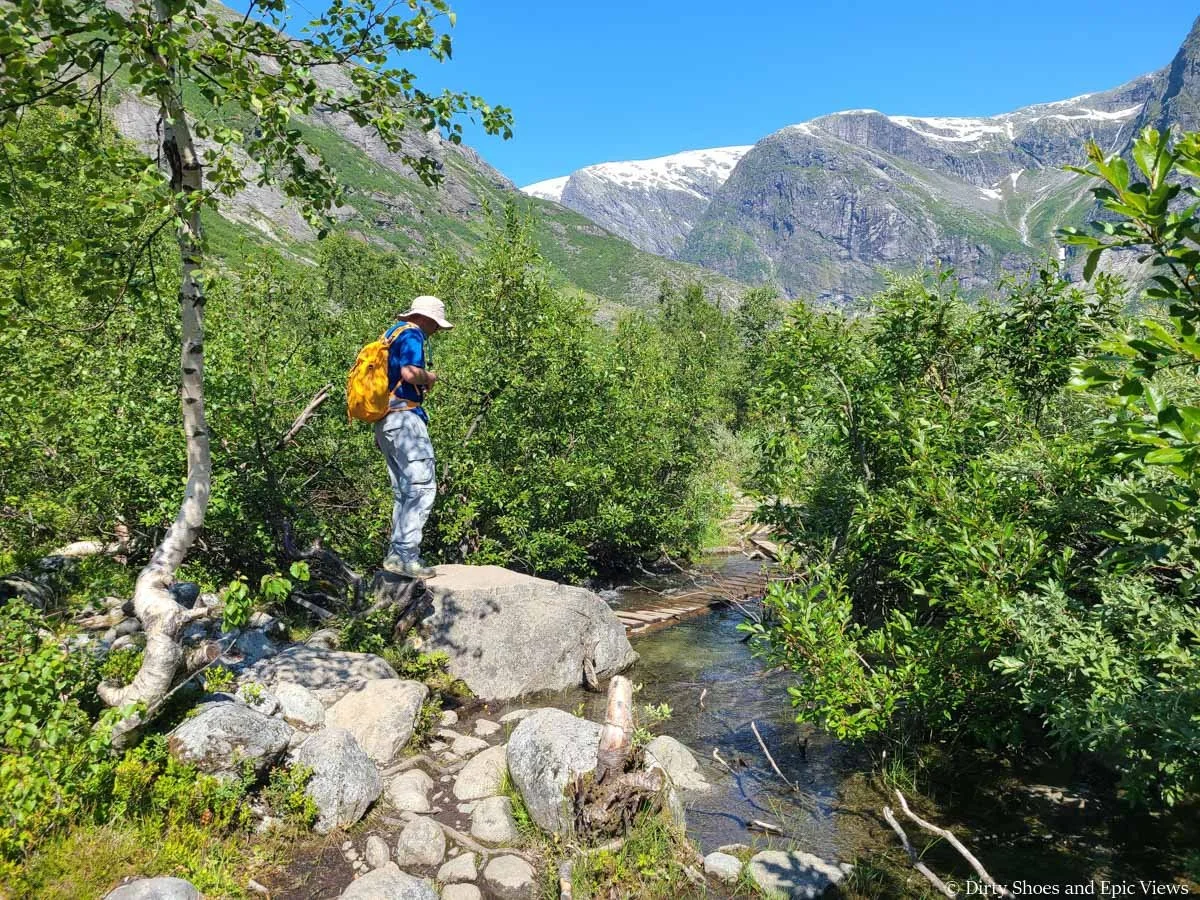
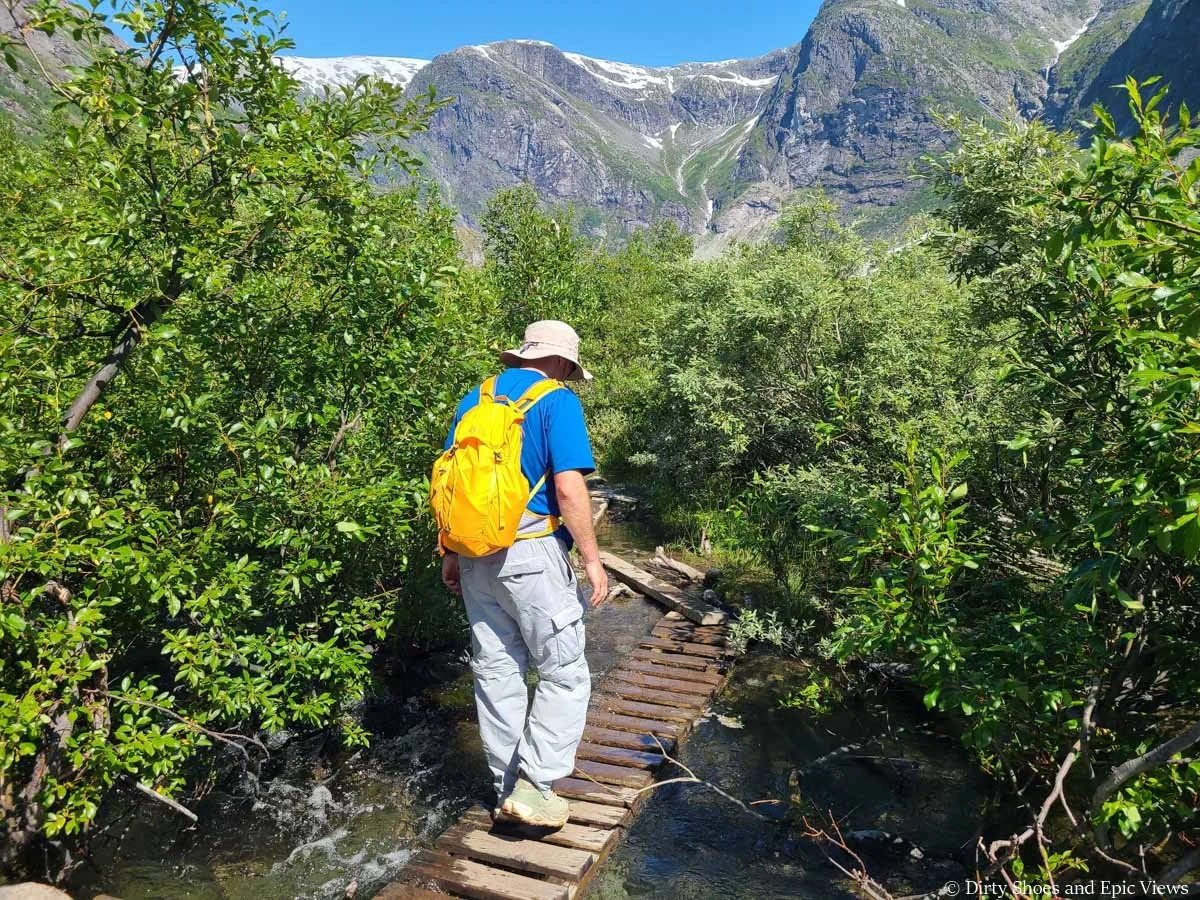
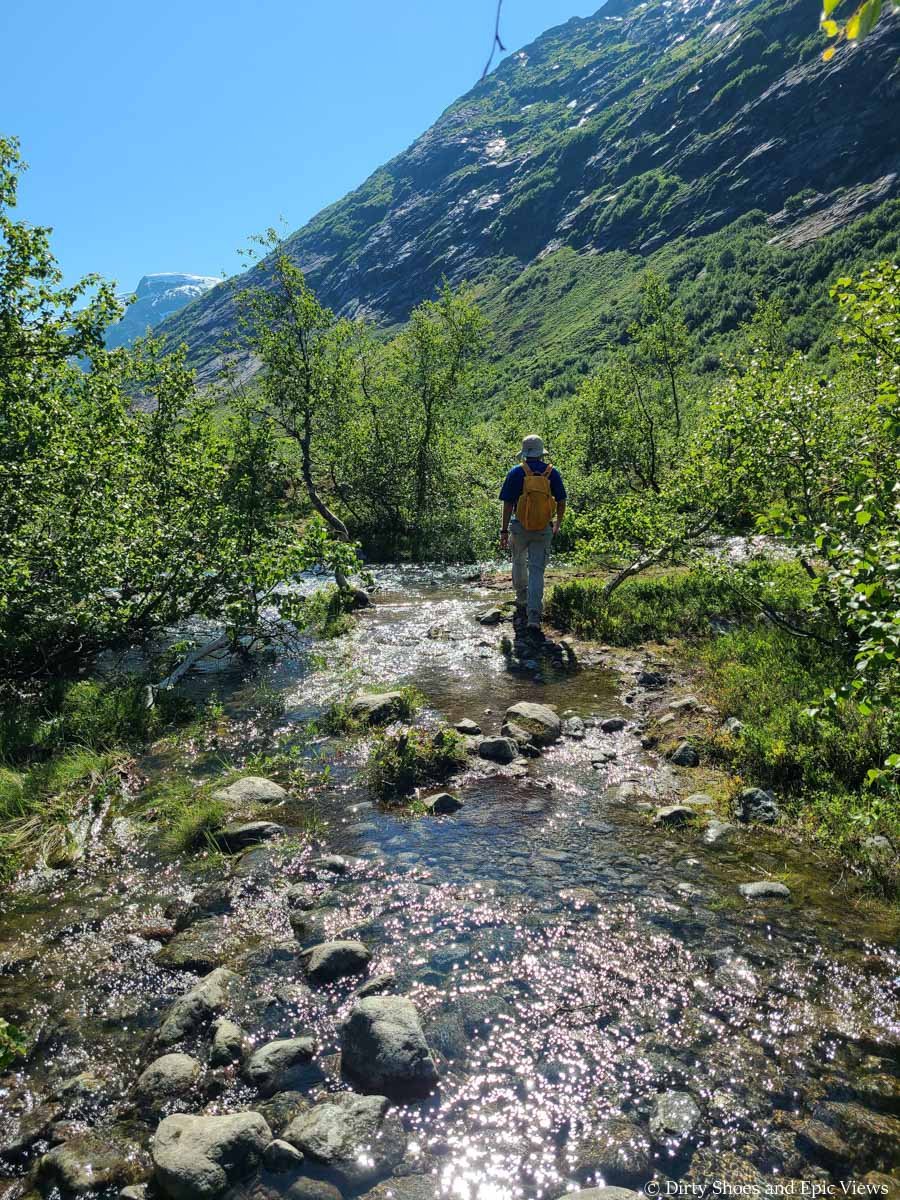
As you walk through the flat parts of the valley towards Austerdalsbreen, the trail is mostly wide, flat, well-maintained, and easy, however you will encounter lots of little stream crossings. Some of these have small wooden planks or foot bridges while others require some rock hopping.
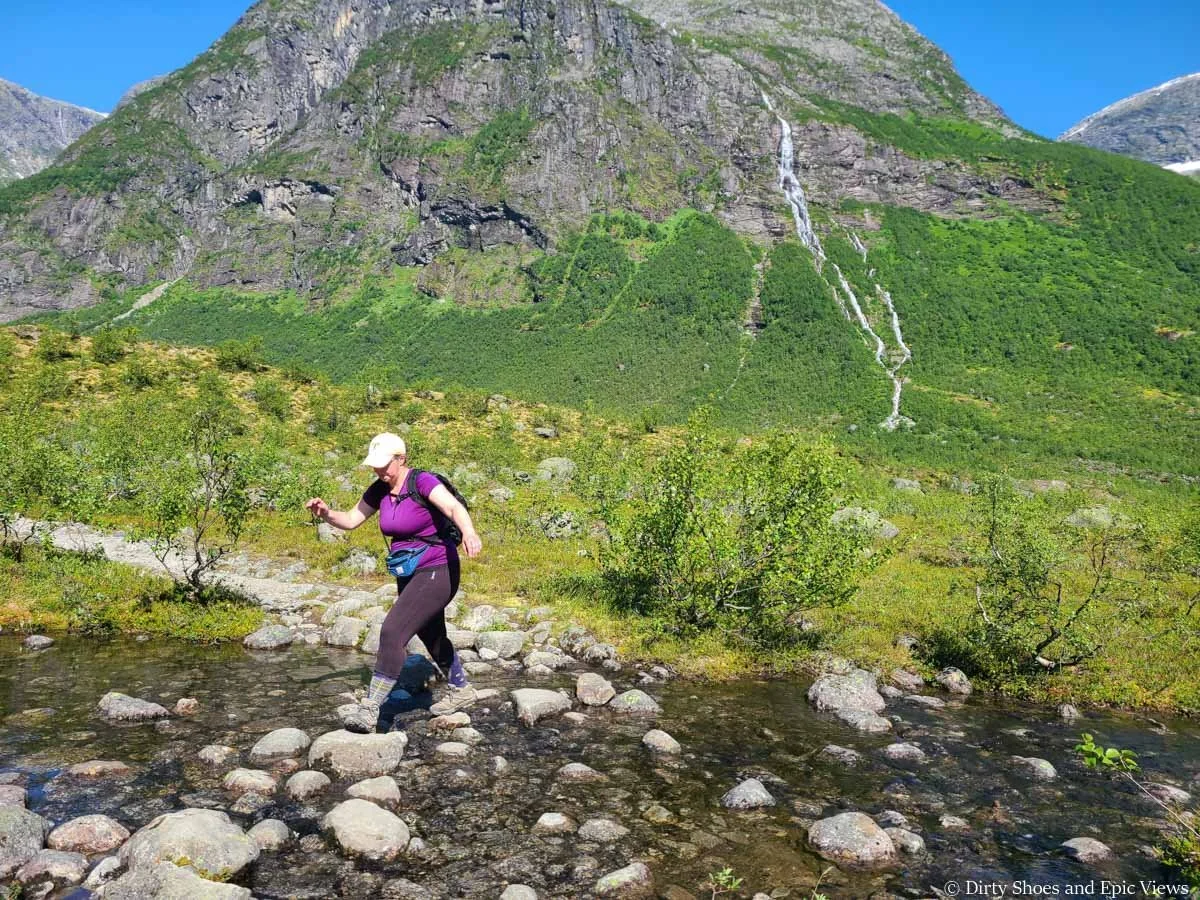
There are a handful of stream crossings on the Austerdalsbreen hike
It’s important to note that these stream crossings on the Austerdalsbreen hike may get harder later into the day, especially on a hot summer day that causes more glacier runoff leading to rising water levels throughout the day. We experienced this when we hiked to Austerdalsbreen, as we hiked on super hot day that reached over 30 degrees Celsius. We didn’t start the hike until midday and the water already seemed to be pretty high, and the stream running from the glacier was already roaring pretty good, however we were able to rock hop without problems. But on the hike back out in mid- to late afternoon, the water was noticeably higher. The streams were a bit harder to cross as many of the rocks were submerged and slick and some of the foot bridges were even starting to become submerged. We highly recommend hiking to Austerdalsbreen with a pair of trekking poles to make these crossings easier and to help keep your balance.
Trekking poles can definitely make some of the crossings easier!
Navigation
Aside from these small stream crossings, the actual trail to Austerdalsbreen is well-maintained. There’s no real signage along the trail, but it’s mostly a pretty obvious path. Through the valley, the trail is generally a wide and flat path and easy to follow- well, for the most part. We will say that it is still possible to go astray- because we did in fact go astray…
We realized where we went wrong on our hike back out, but the short story is that there was a particularly large stream that we didn’t realize we were supposed to cross. It might have been because the water levels were high so more of the trail on the other side was underwater and not visible, and there was really no indication that we were supposed to rock hop all the way through it.
Also, right at that exact spot, a pair of hikers had just come from another direction, like they were hiking back out, and there seemed to be a herd path through the brush in that direction so we kind of just continued along thinking this was the main trail, and the thought of crossing the water didn’t even cross our minds at that time.
This path took us towards the left side of the valley through what seemed to be an old rock fall, and once we got to this point we knew something was off. We were able to look back over the valley and locate the main trail pretty easily and head back to it with no issue.
Be sure to check out our trail description below for more details on where we went astray, but overall I wouldn’t worry too much about losing the trail while doing the Austerdalsbreen hike. Like we said, it really is overall pretty well-maintained and obvious most of the way. I think high water levels just led us in the wrong direction (and it seemed like most people that day were doing the same thing on the hike in!). Plus, even if you lose the trail, it’s still easy to see which way to go as the valley is so open and easy to see across- just keep heading straight ahead through the valley toward the glacier!
The Austerdalsbreen Glacier Hike in Norway: Trail Description and Our Experience
We started our Austerdalsbreen hike just before noon on a hot sunny Saturday.
From the parking lot, we crossed over the beautiful blue glacial river to get to the trailhead, well-marked by a sign.
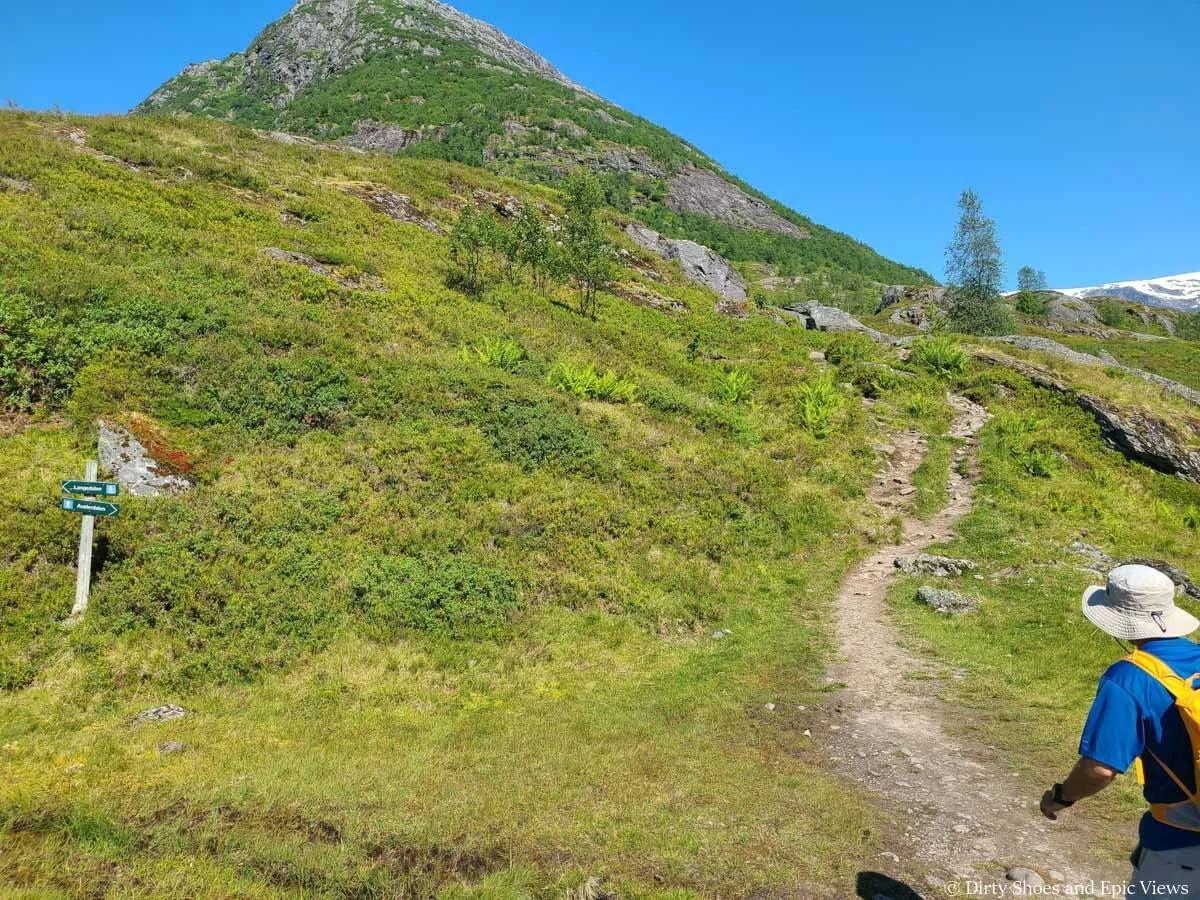
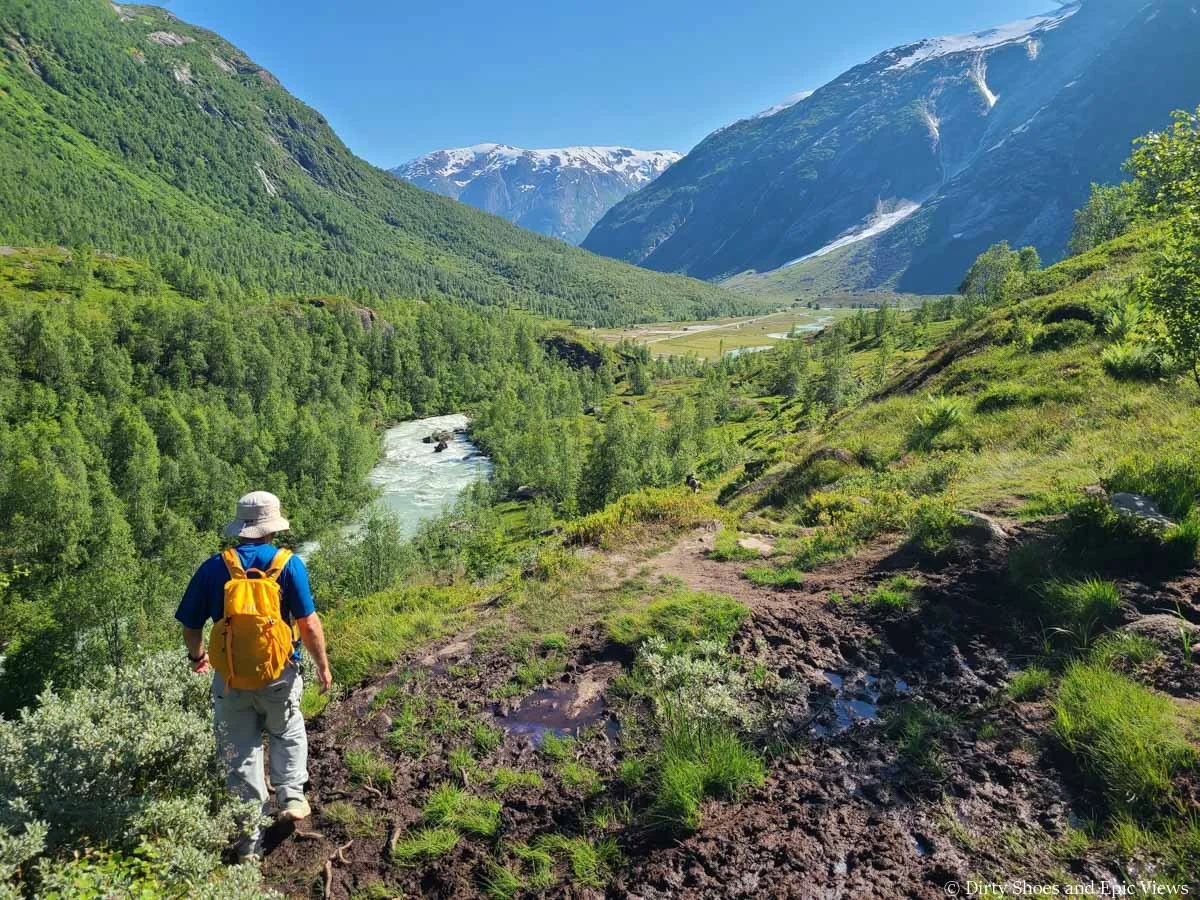
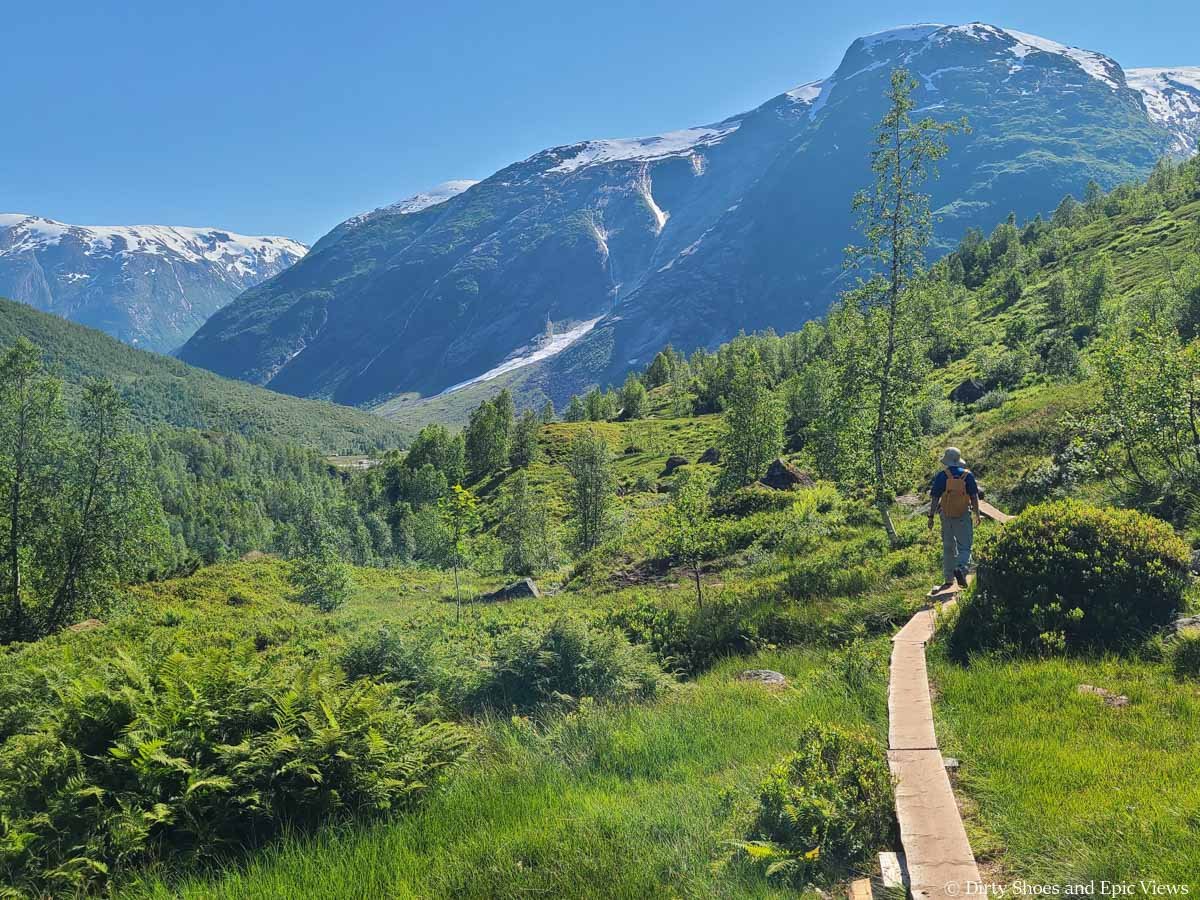
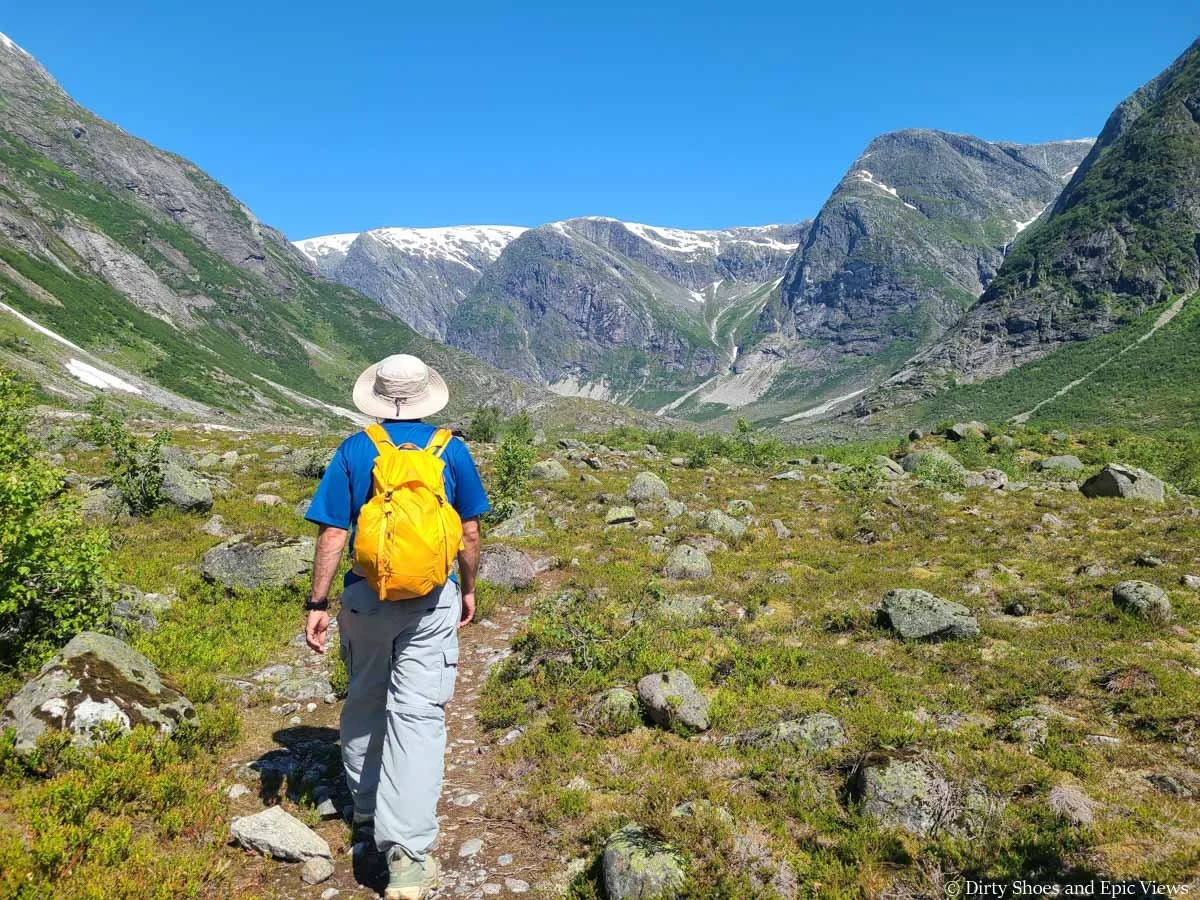
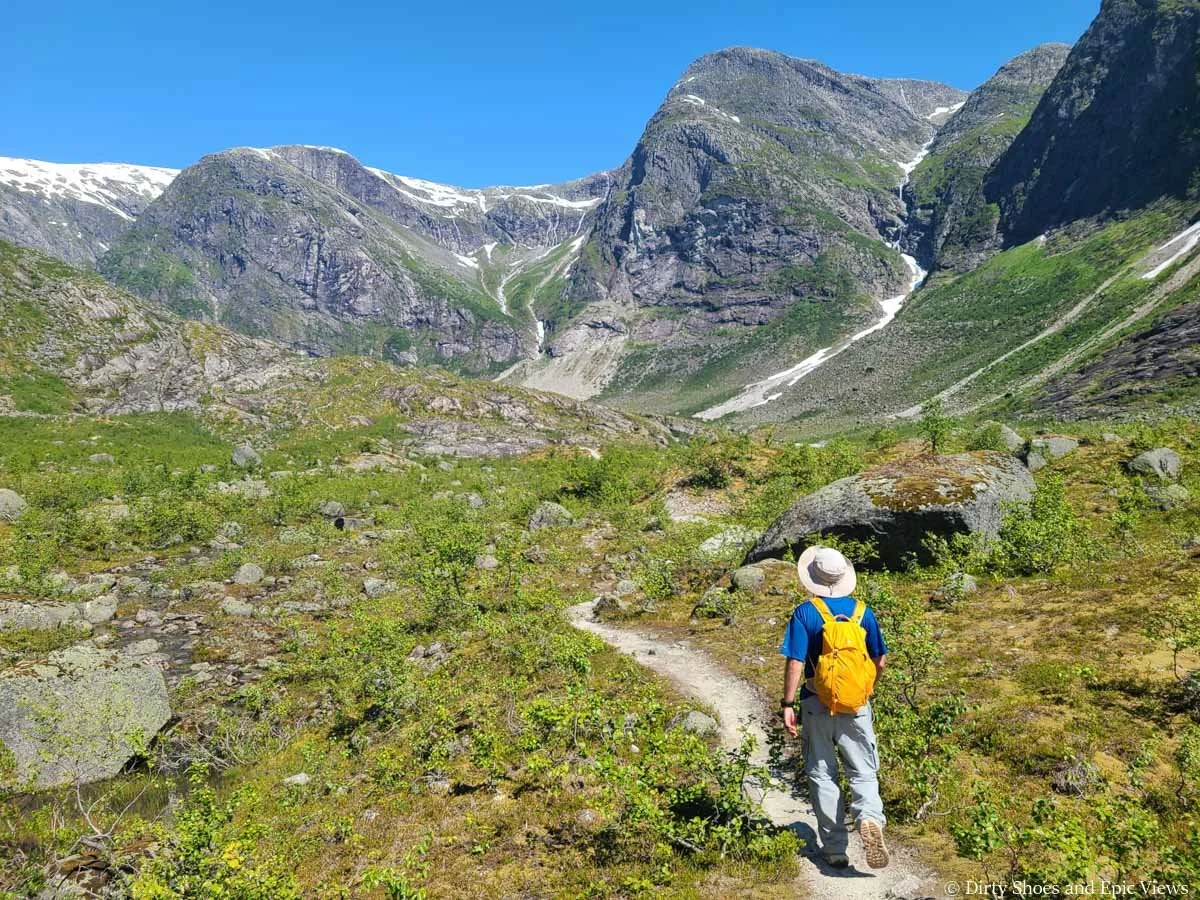
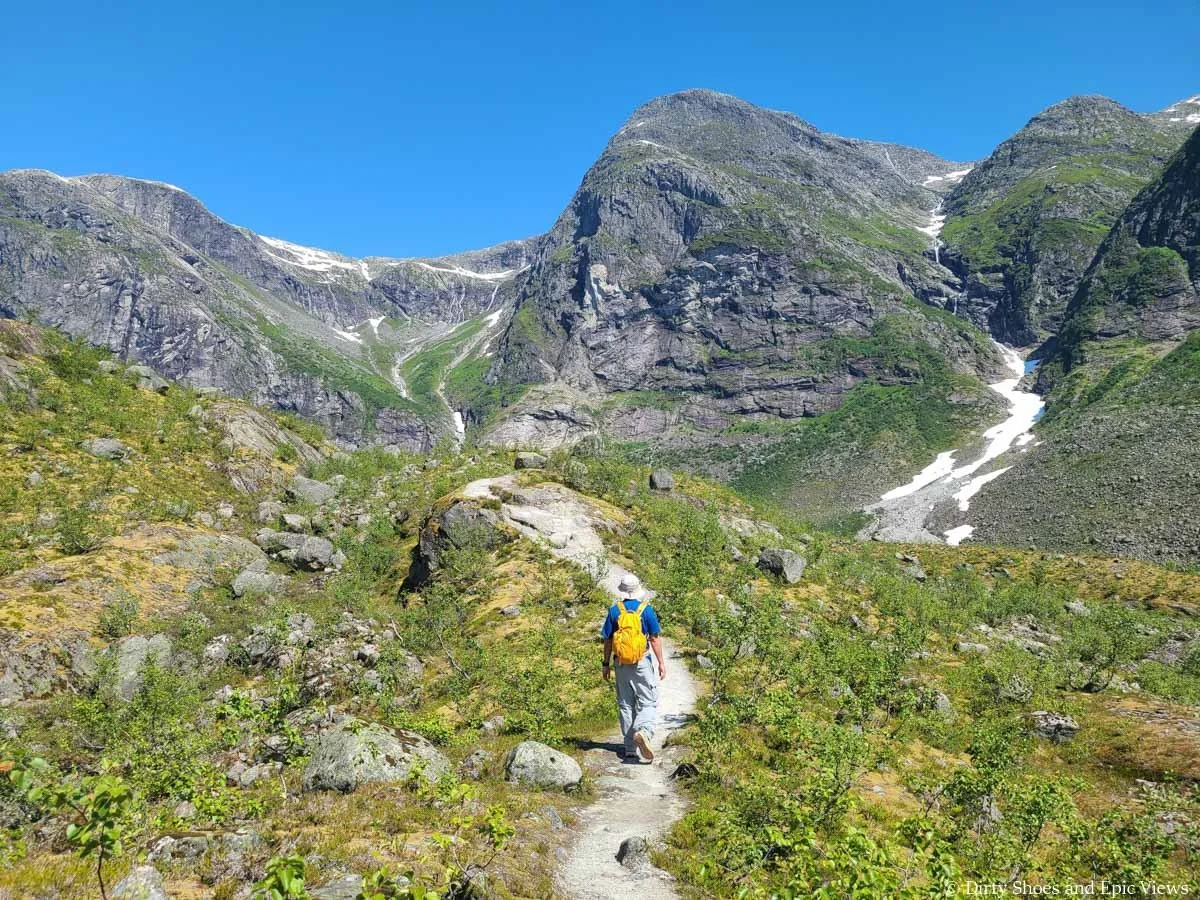
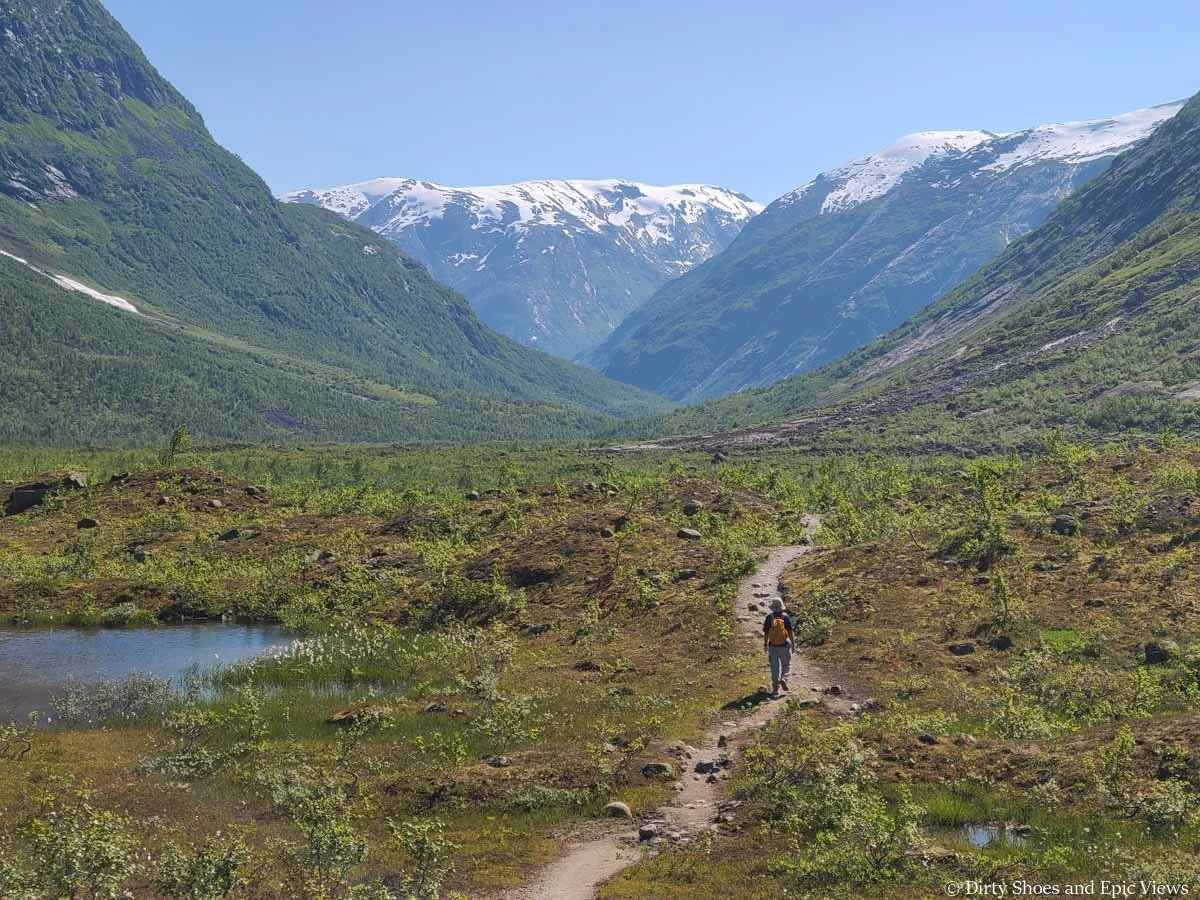
The trail starts off with a gradual climb up the grassy hillside above the river along a narrow dirt path. The views here of the Austerdalen Valley are already picture-perfect. We often only saw pictures of the final viewpoint of the Austerdalsbreen Glacier when researching this hike, and didn’t realize how beautiful the entire hike was actually going to be through the valley, so this was a pleasant surprise! It’s one of those trails where the journey is just as worth it as the final destination.
The Austerdalsbreen trailhead
Looking back along the trail towards the start of the hike
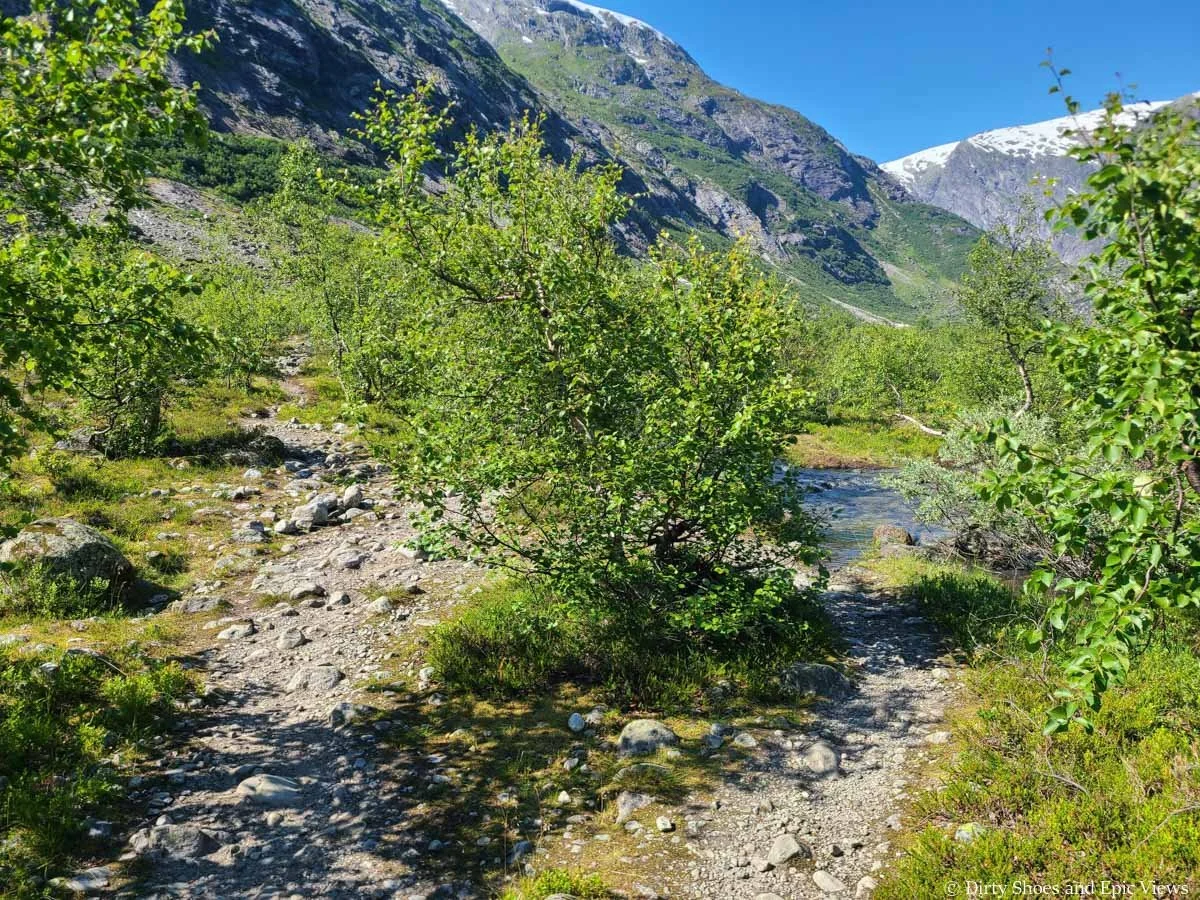
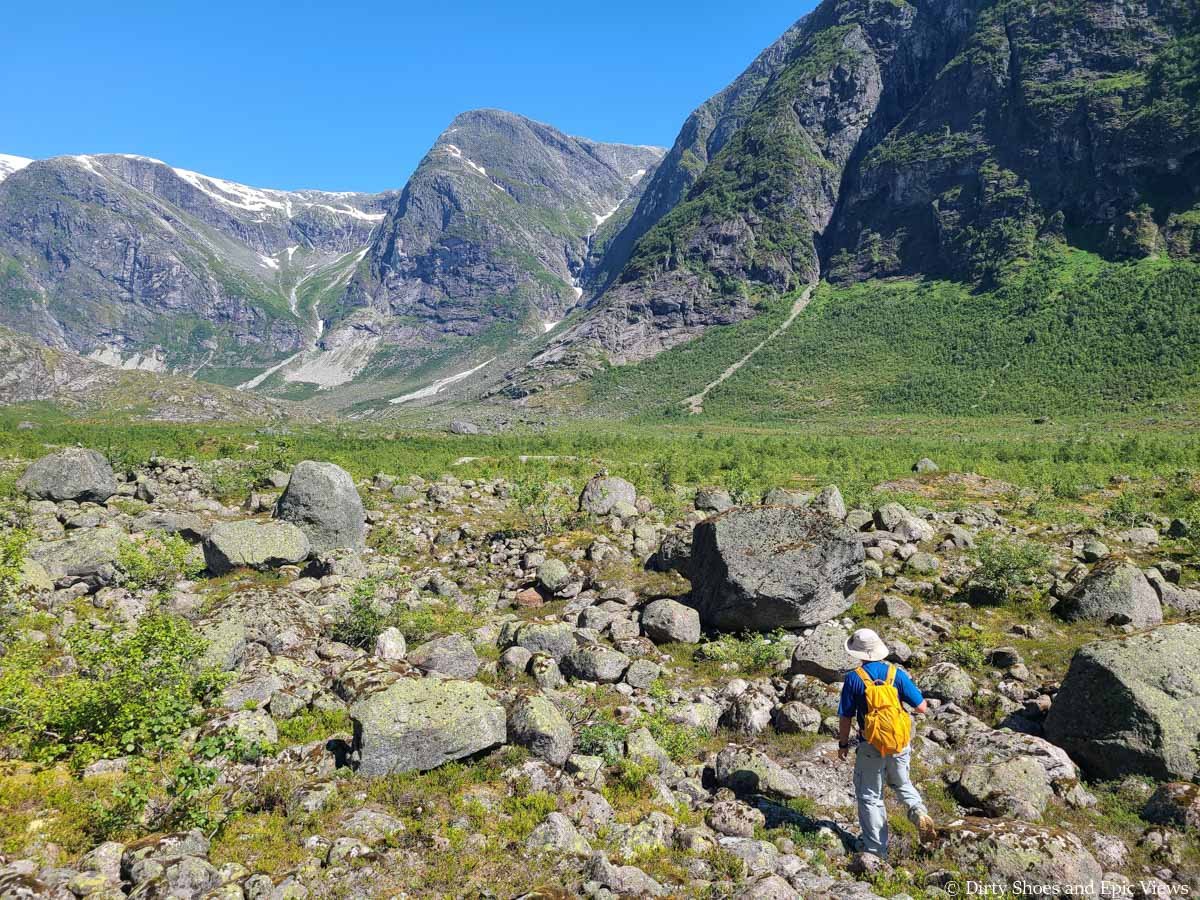
As you hike along the slopes above the valley during this early part of the hike, the trail here can become quite a bit rocky and muddy. It’s nothing technical, but it was a little tricker to navigate on the way back as you had to hike down some bigger, slicker rocks. But overall, it’s nothing difficult. There are some places where different herd paths diverge, but they all end back up in the same place, so just follow whichever path looks the most inviting to you.
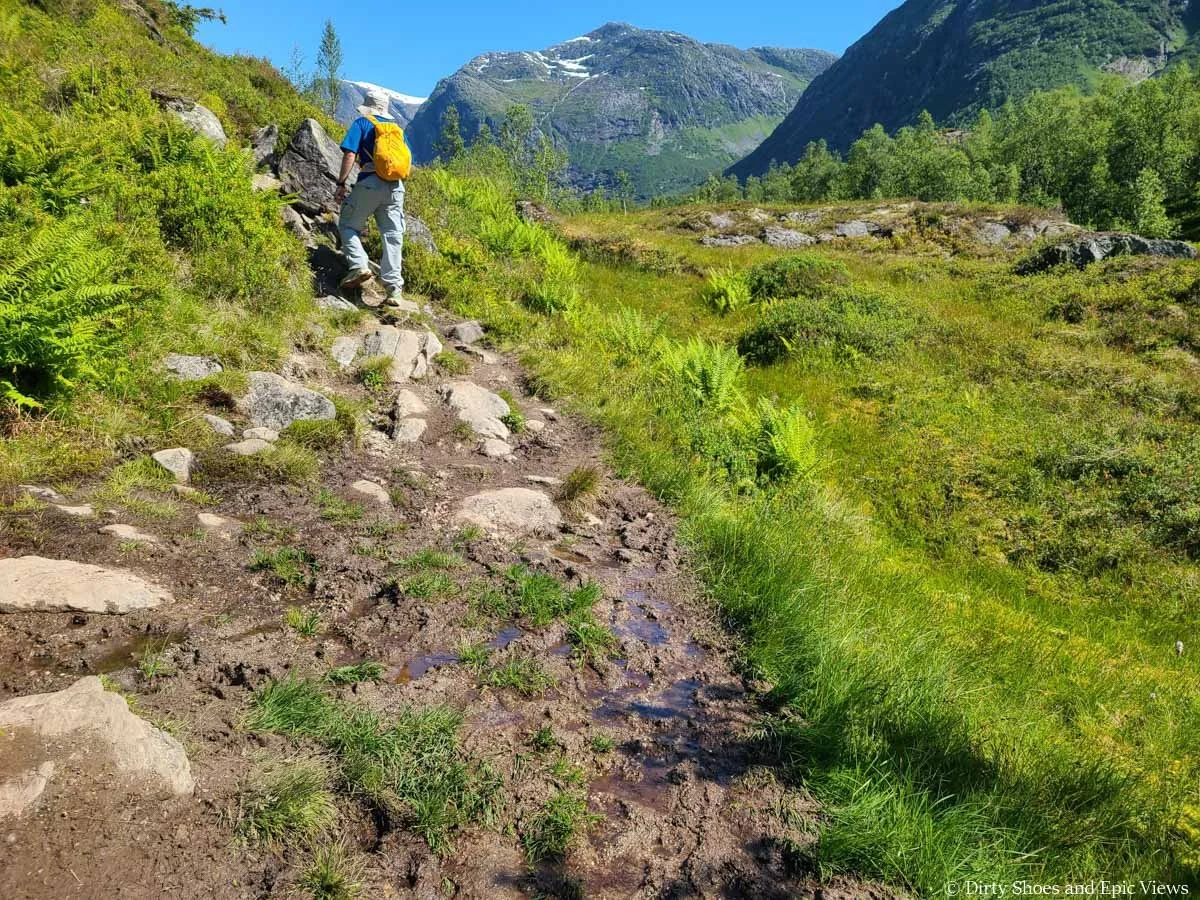
The first part of the Austerdalsbreen hike can get a bit muddy and rocky
Navigating the rocky landscape
As we hiked to Austerdalsbreen, we often heard the sounds of bells clanging, which came from the local sheep wandering the hillsides and fields, and we often spotted them through these early parts of the valley!
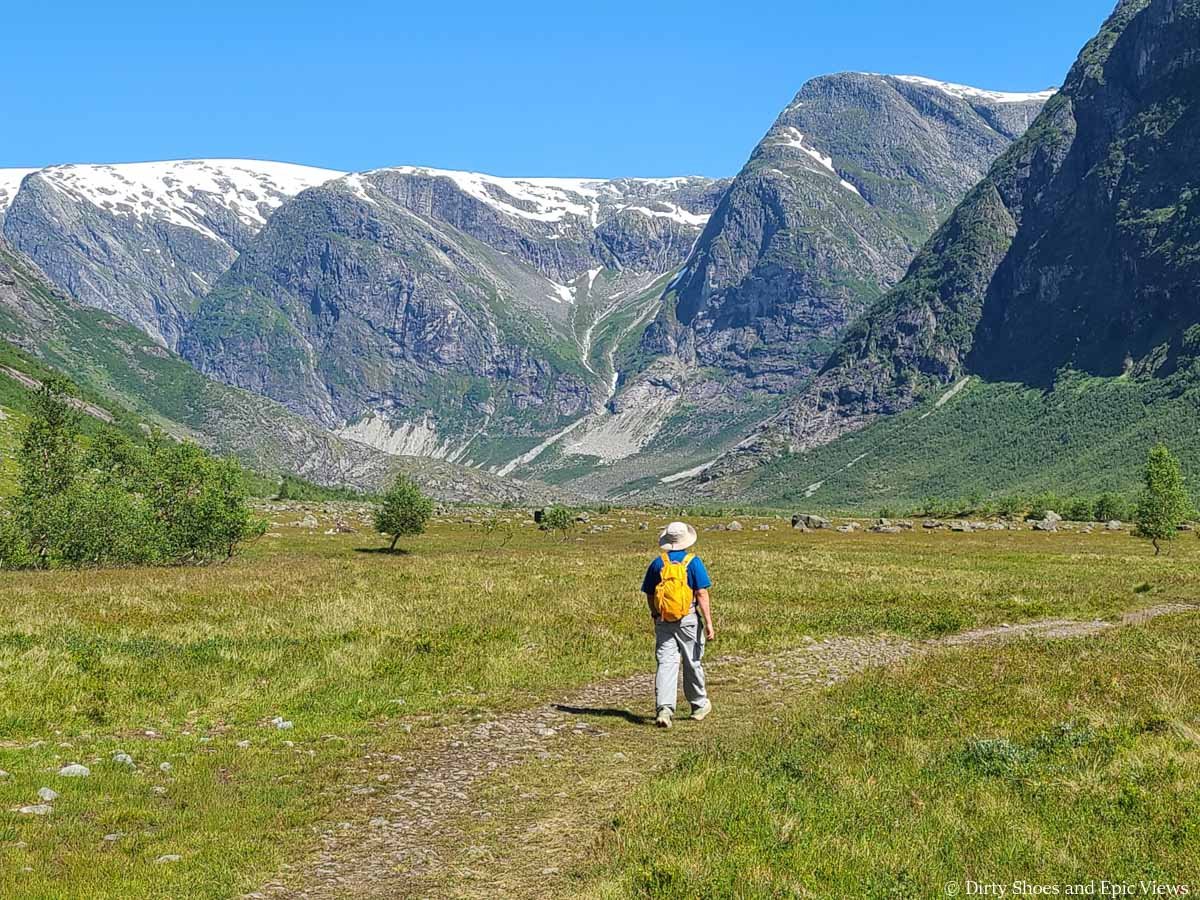
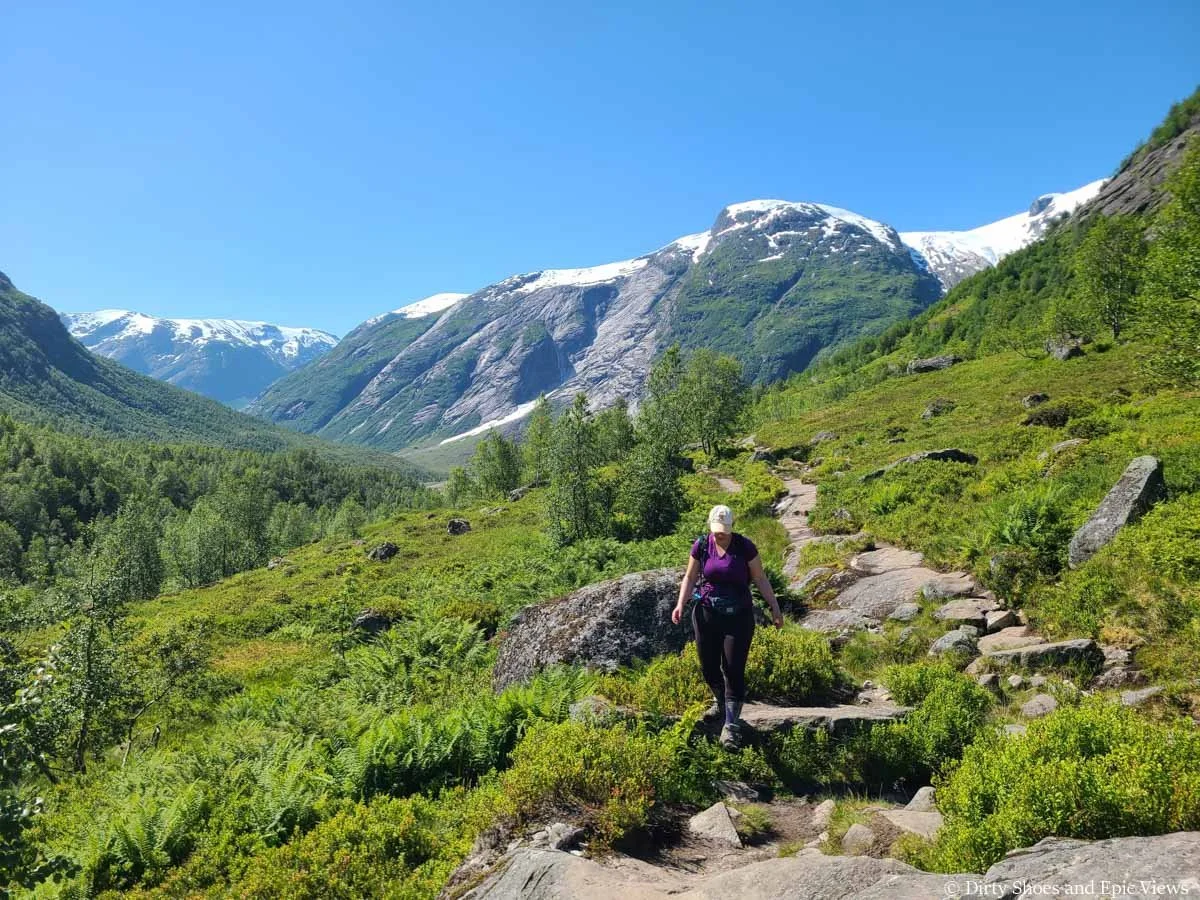
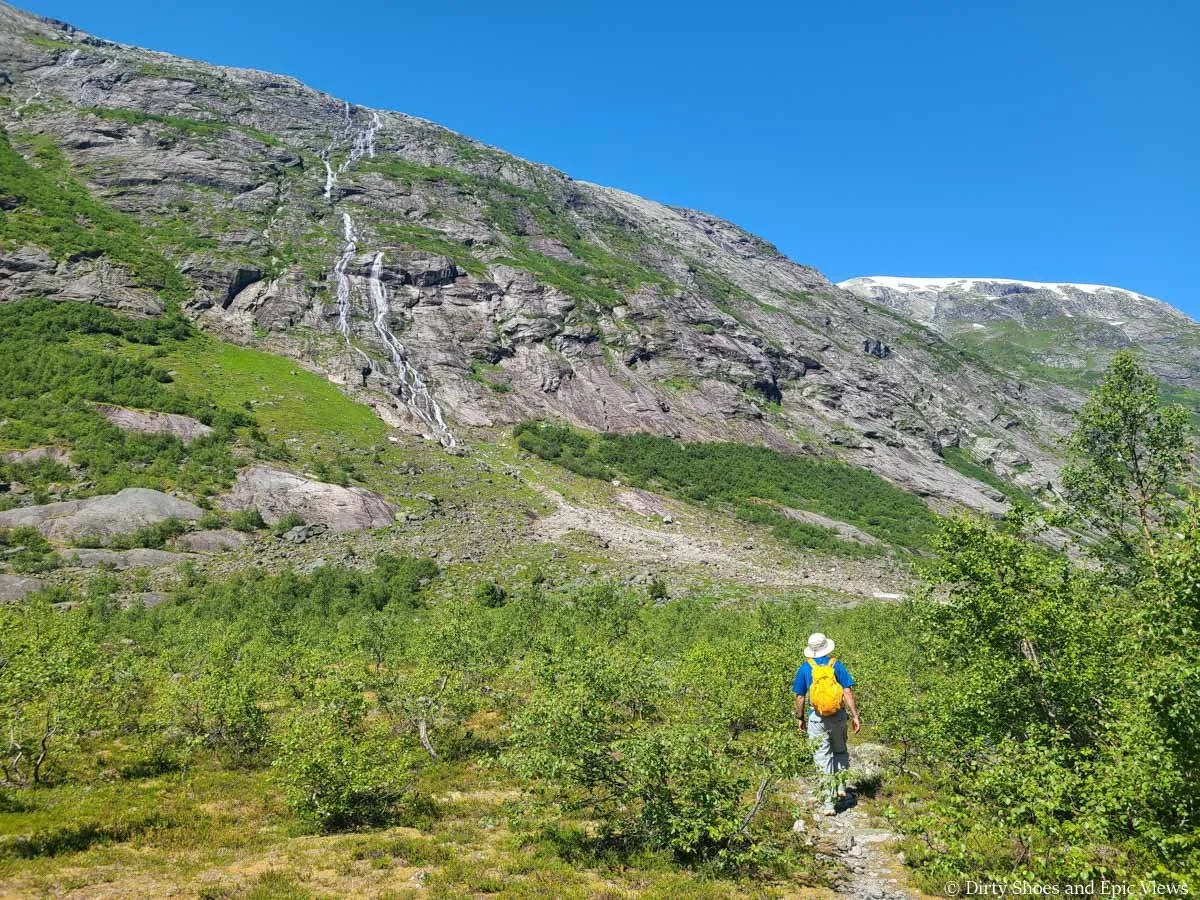
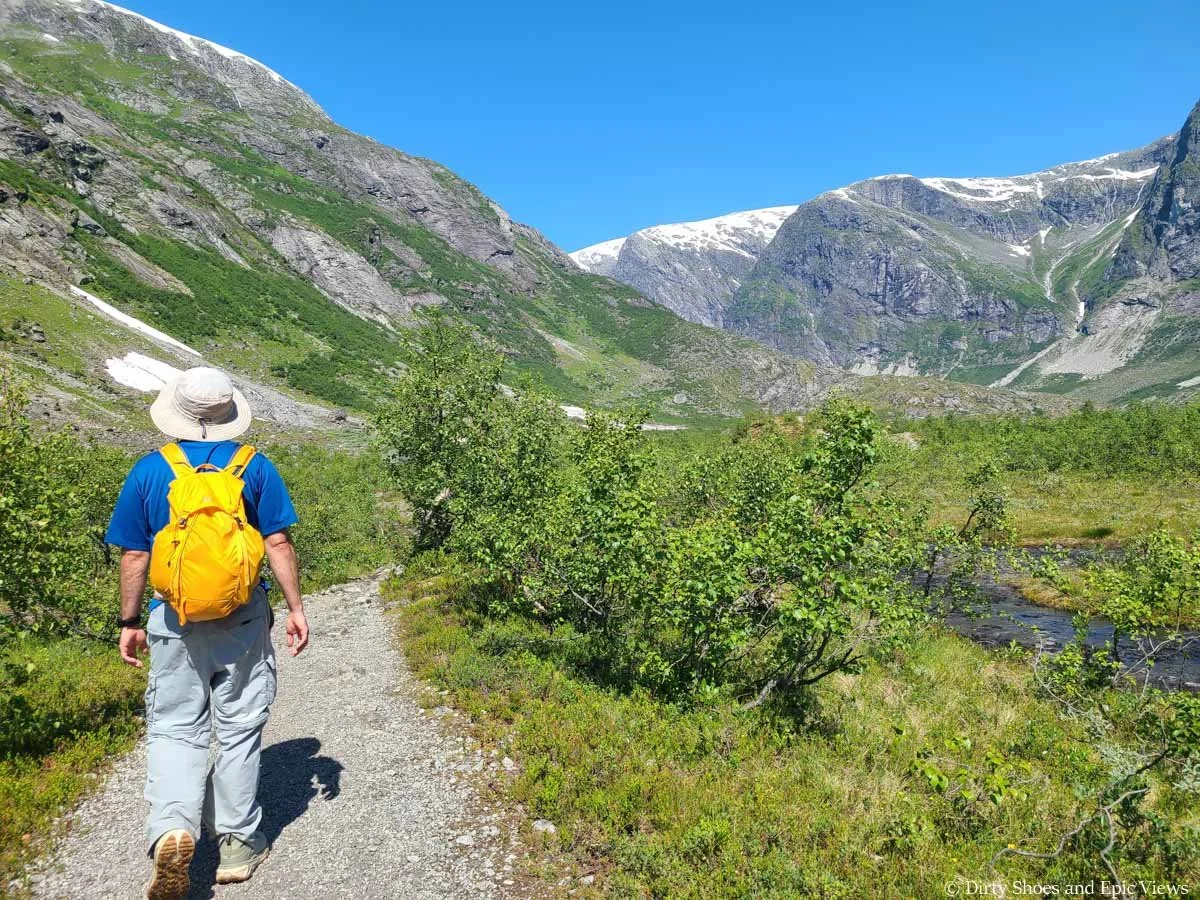
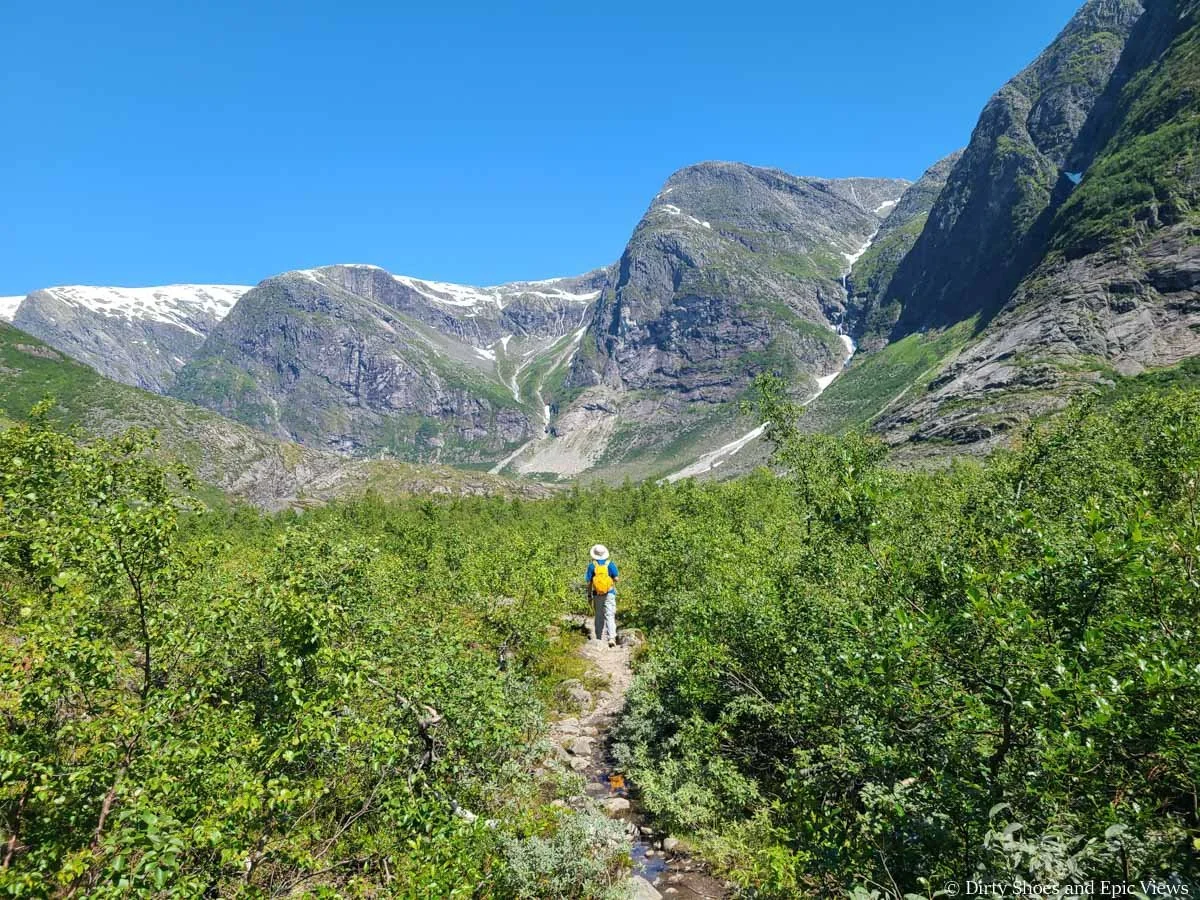
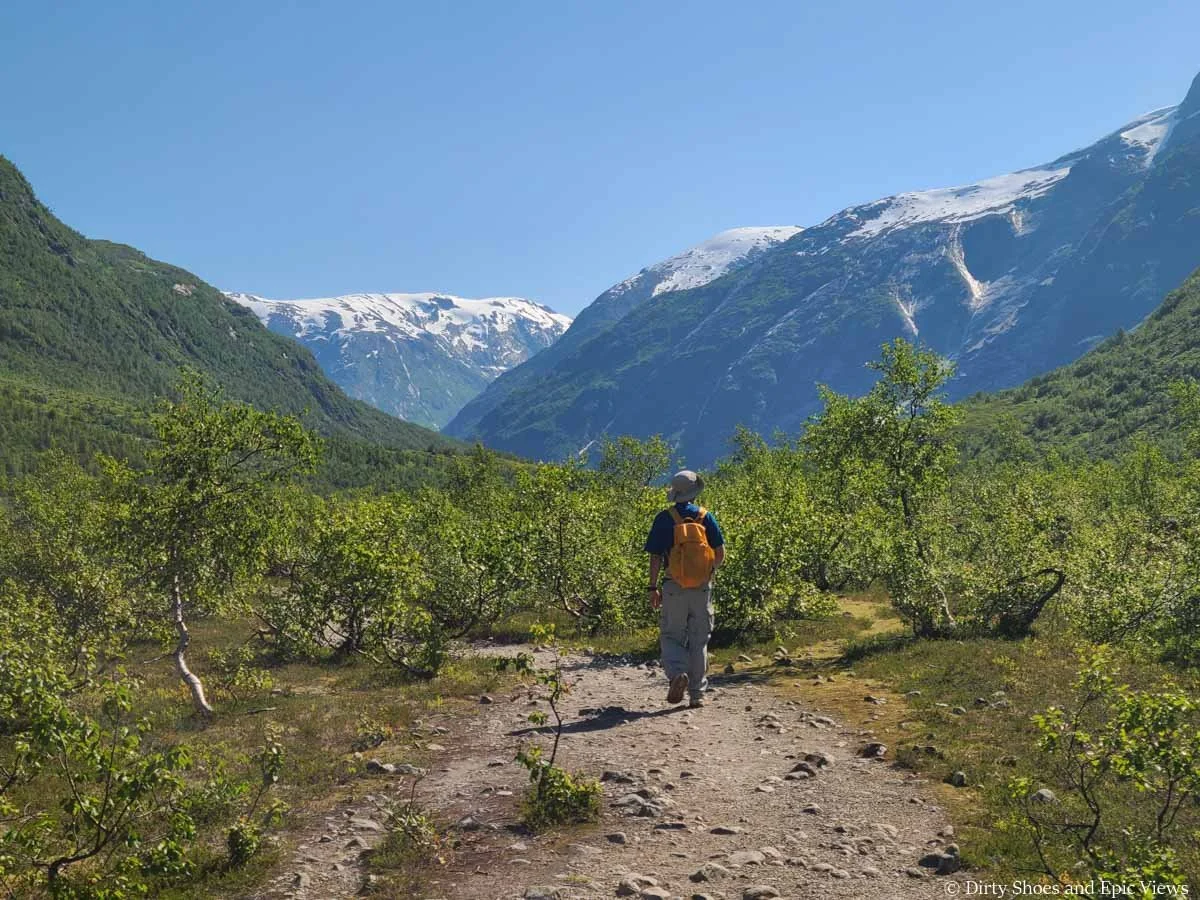
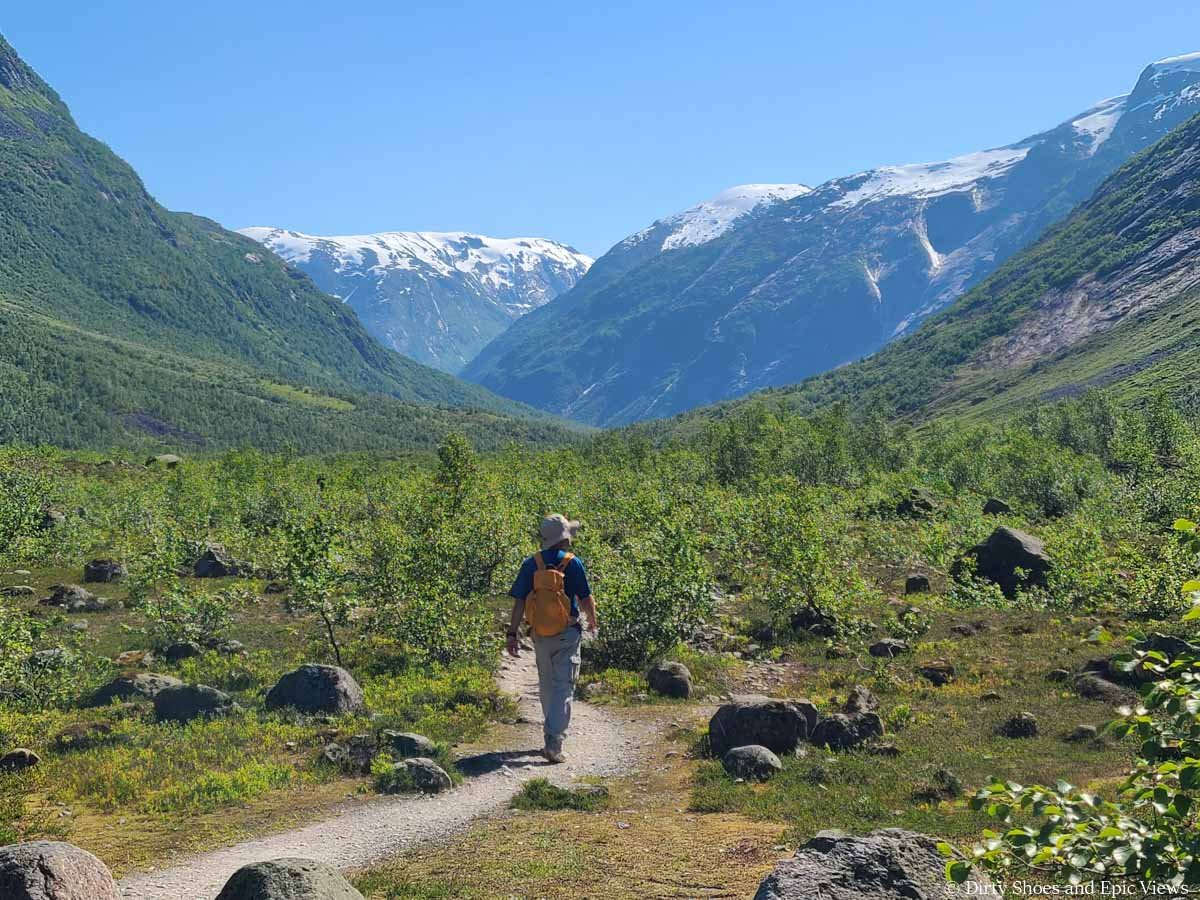
The trail becomes an easy dirt path again as it gently descends down to the valley floor, which we reached after about a half hour of hiking. Once you reach the valley floor, it’s mostly easy flat hiking from here until the last bit of climbing at the end of the trail.
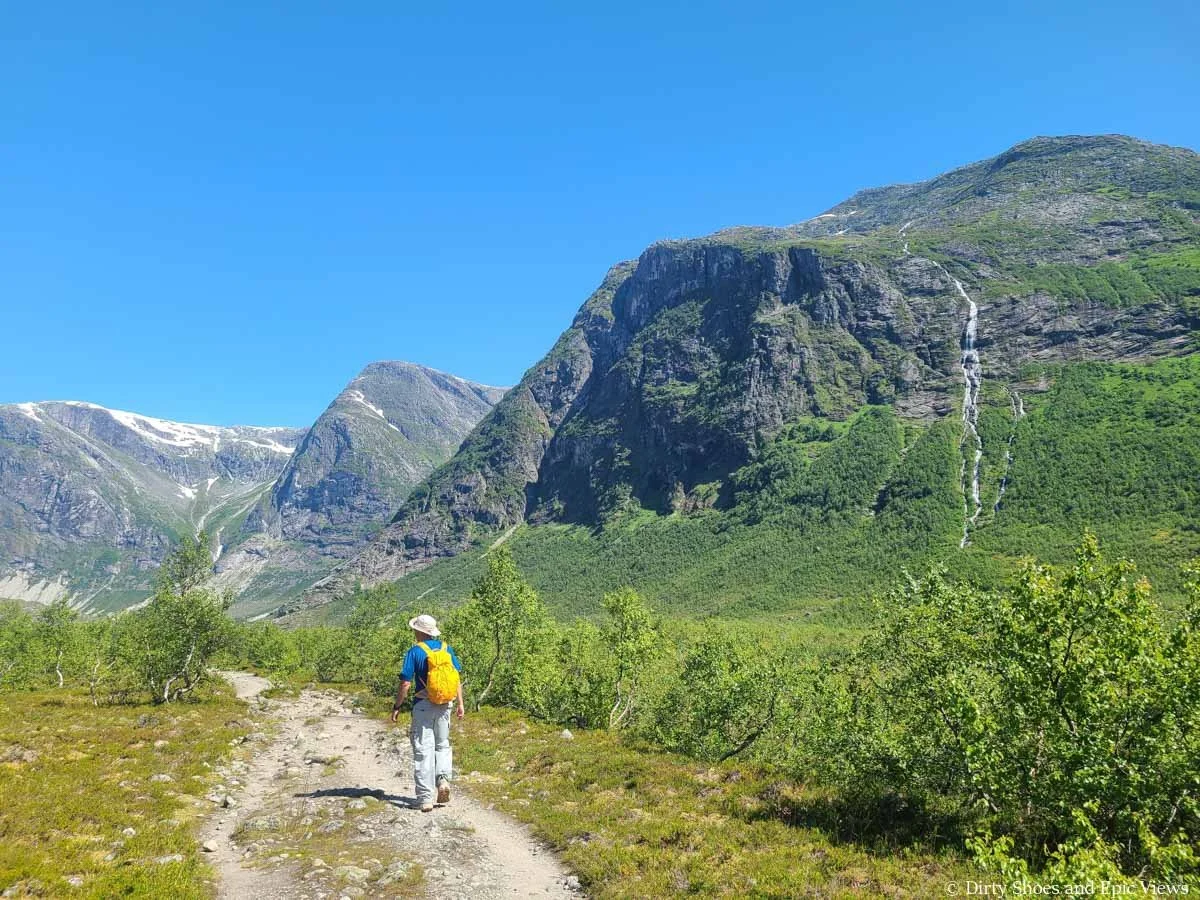
As we crossed the exposed grassy field to start our valley walk, we couldn’t get over the mountain views all around us, made even more beautiful by the frequent waterfalls streaming down the cliffsides. It felt almost unreal how beautiful the scenery is through this valley.
Starting the flat walk through the valley
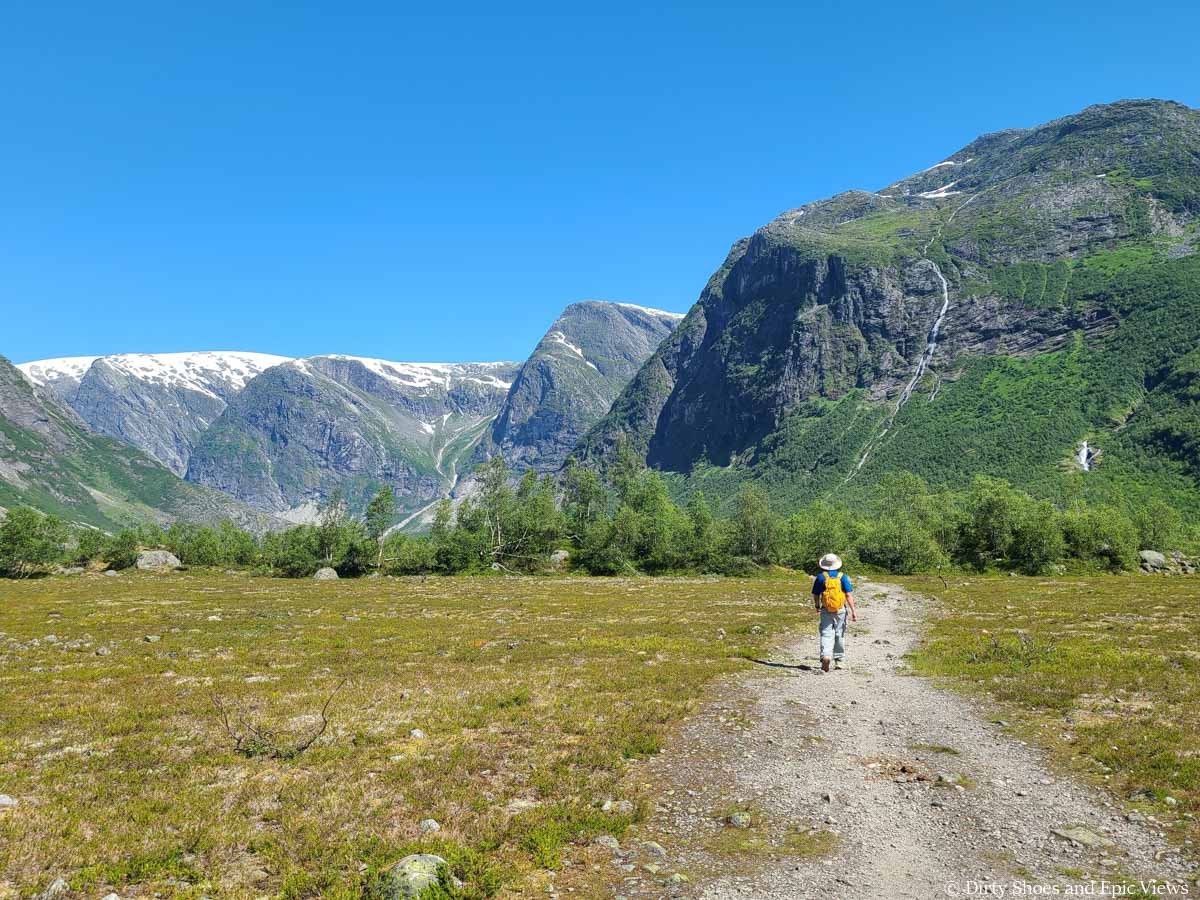
Surrounded by waterfalls and mountains
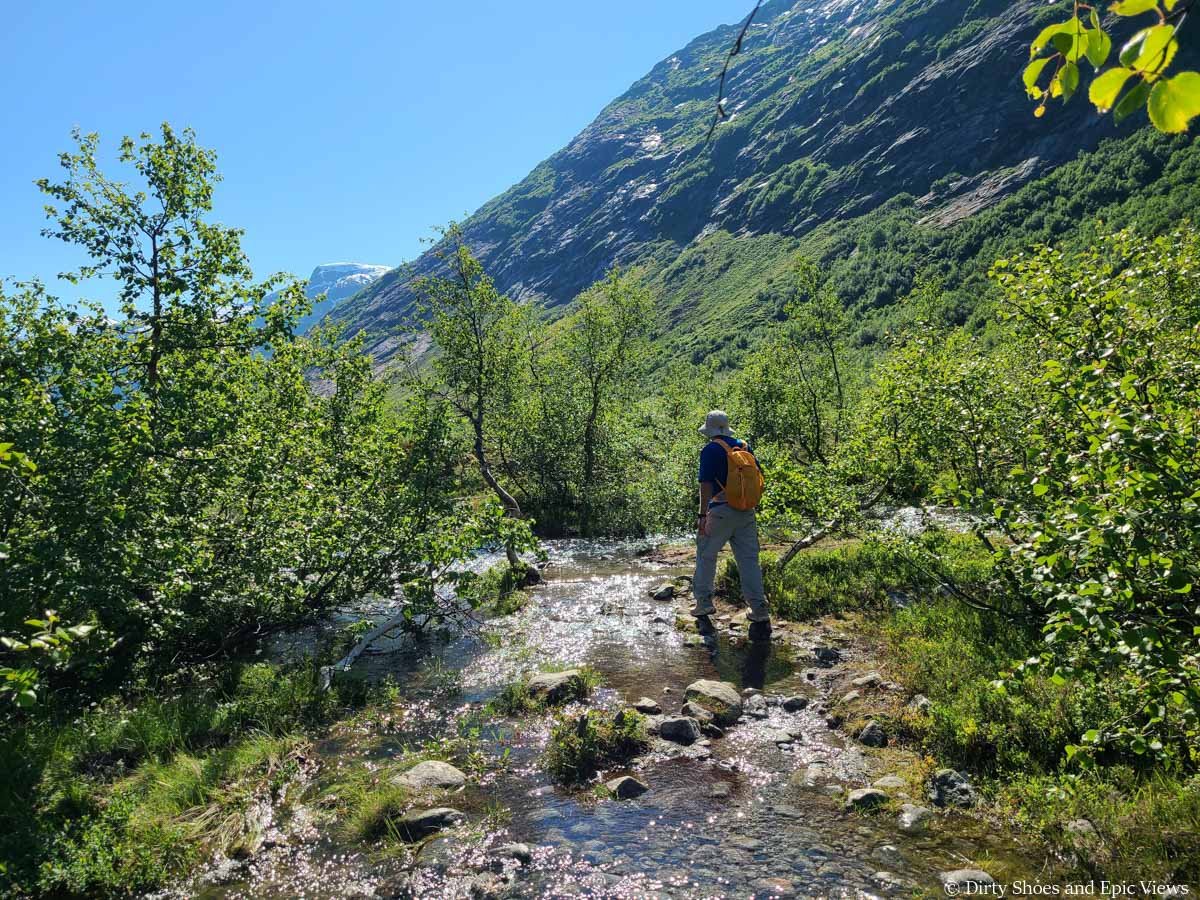
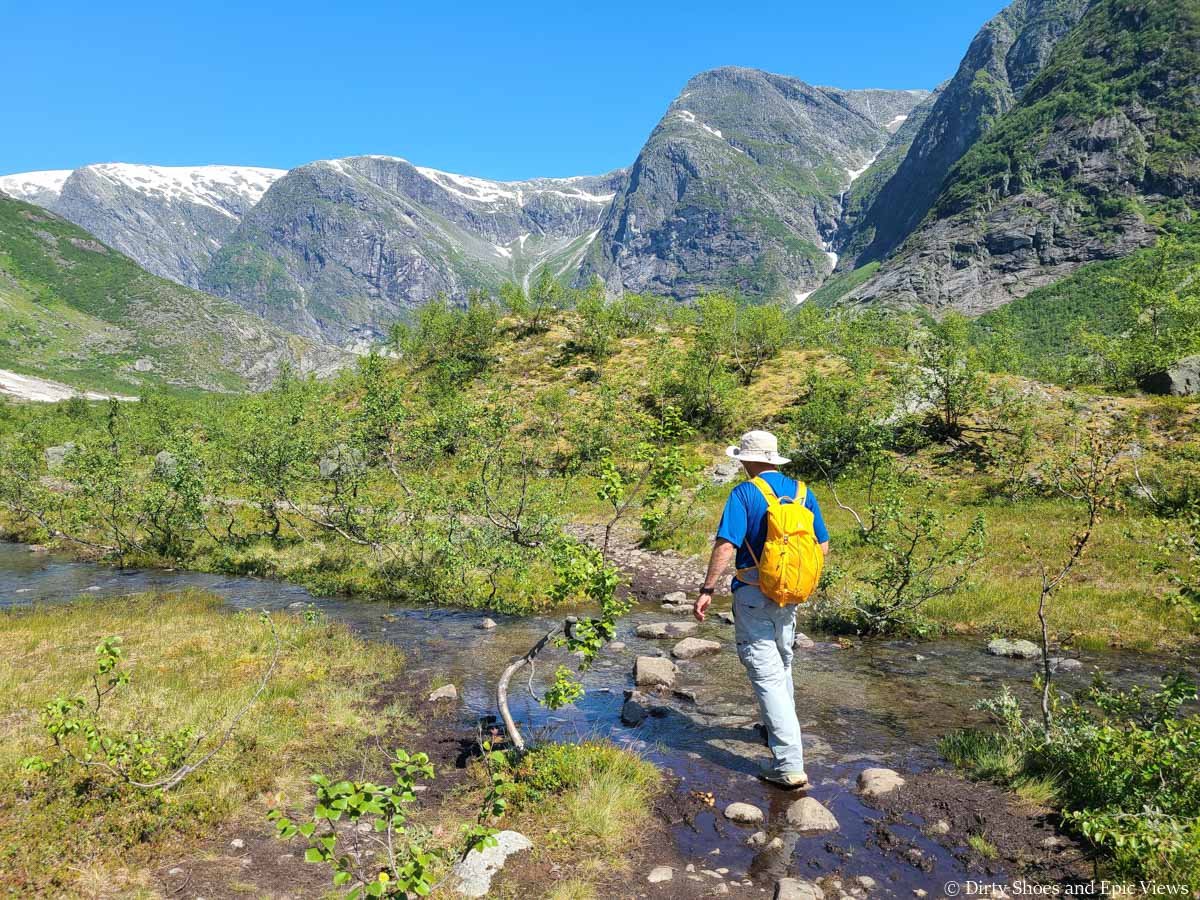
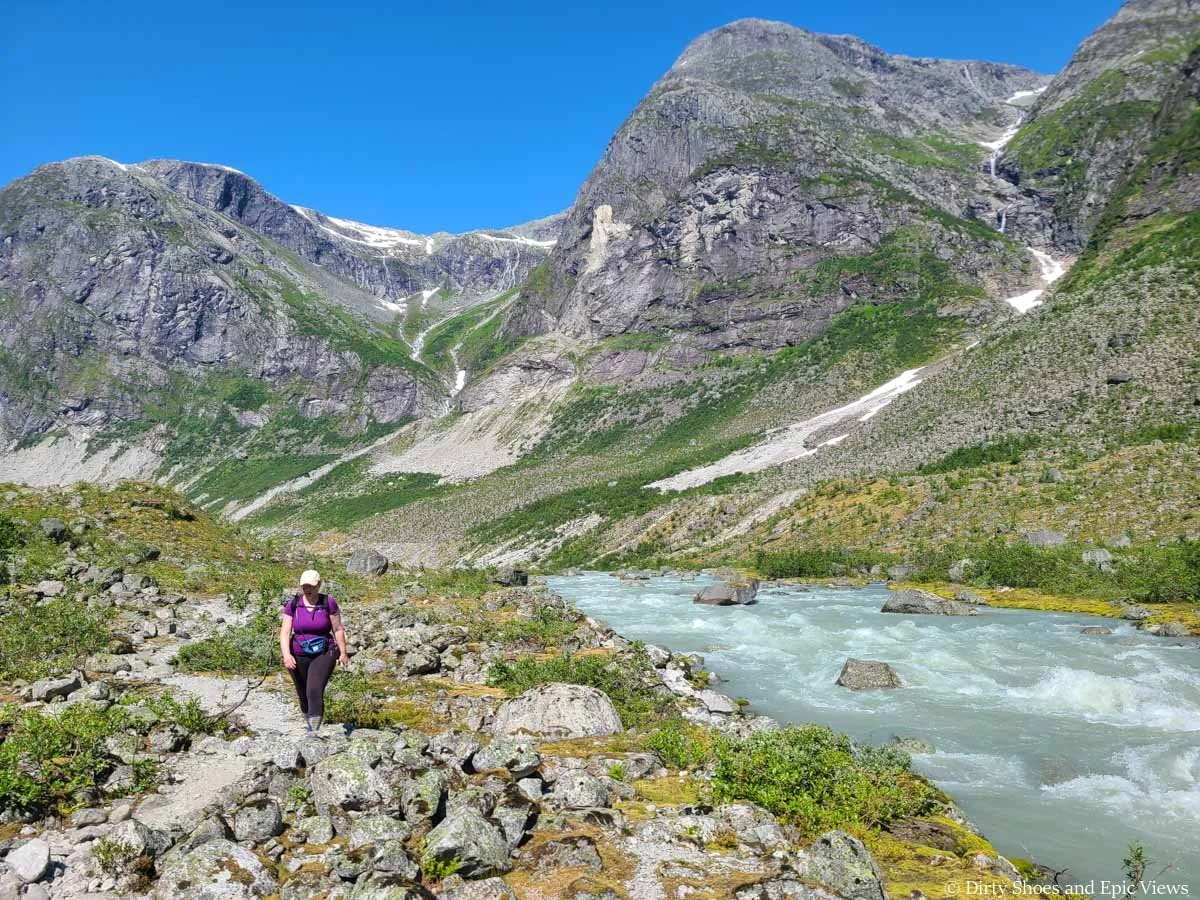
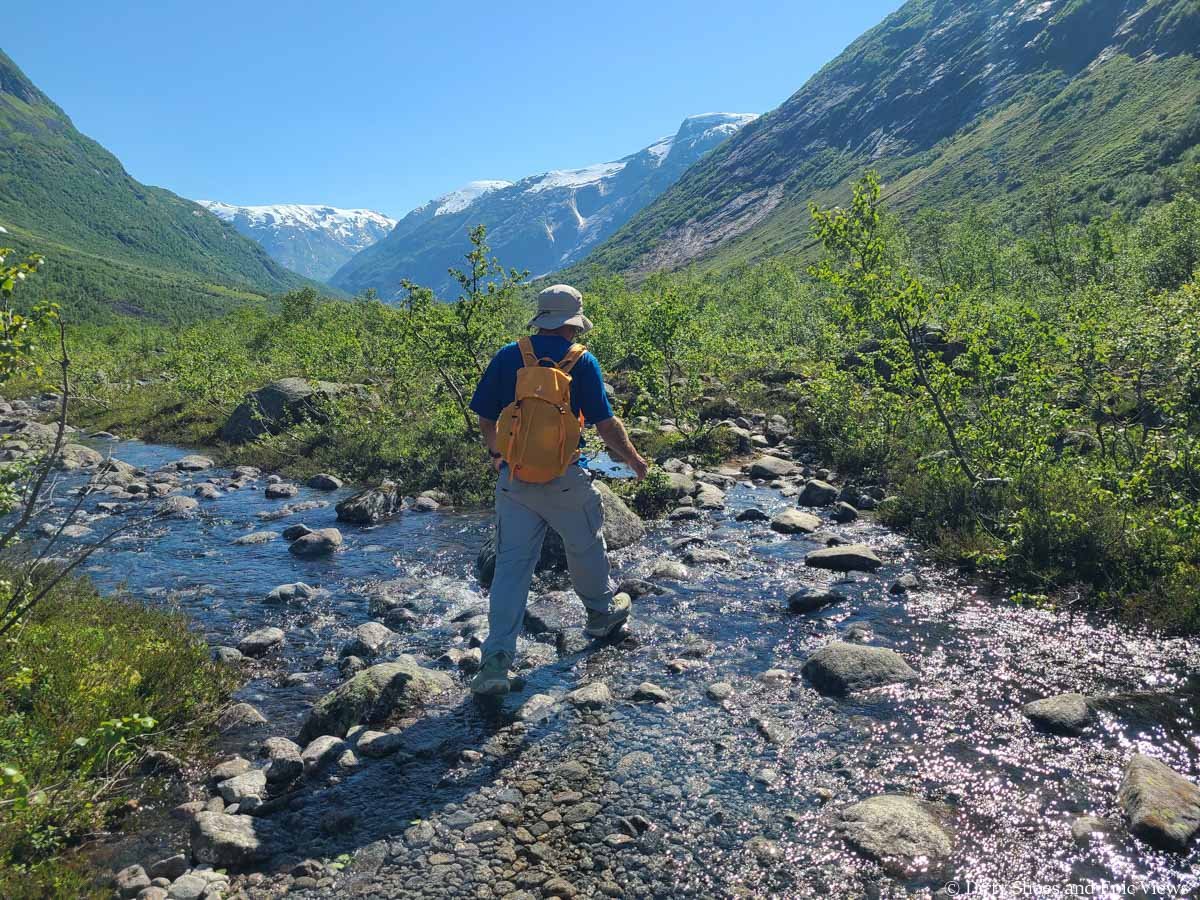
The gravel path stays wide and flat for a bit, with one easy stream crossing with the help of some wooden boards, and then it begins to enter some low-lying shrub as it approaches the banks of the glacial river. This water was a beautiful blue, and it was flowing pretty strongly in the afternoon heat.
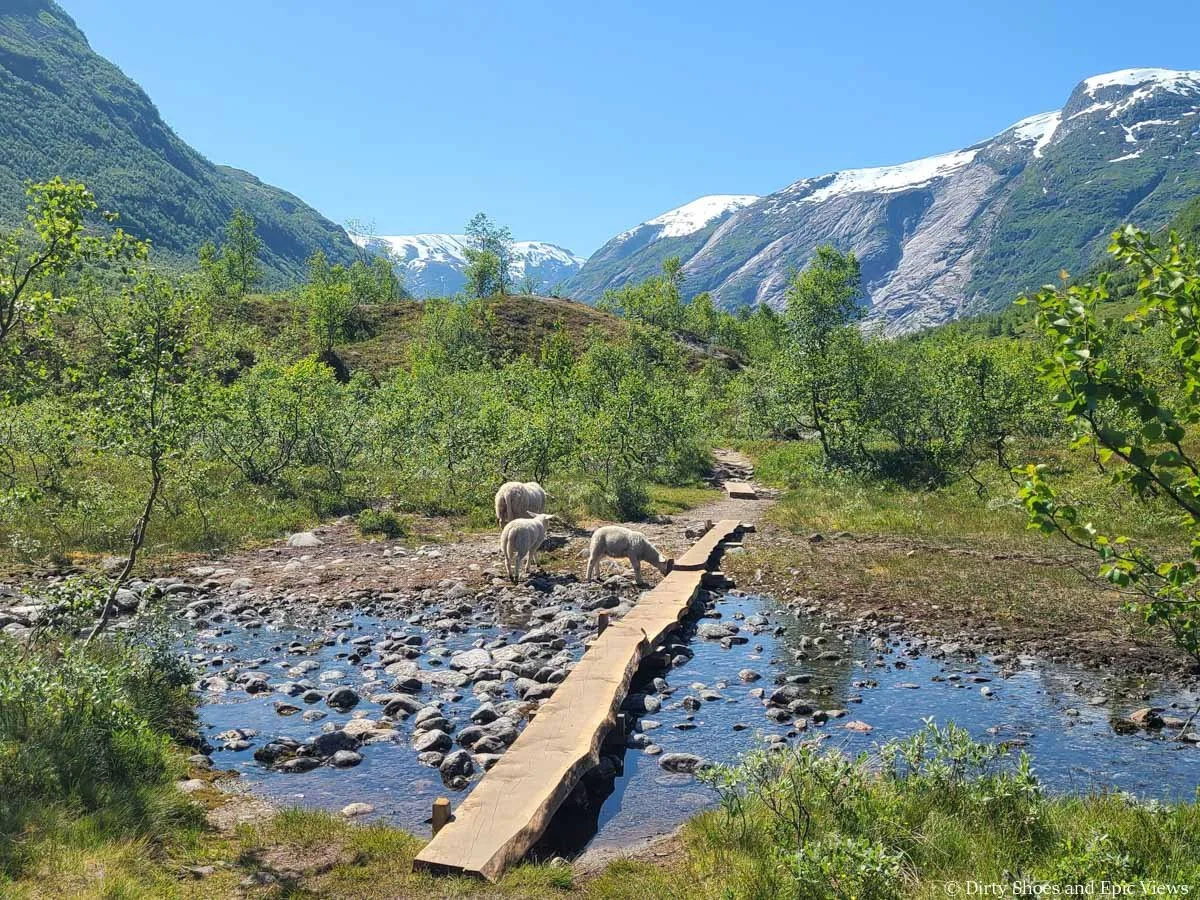
We saw lots of sheep on our way to Austerdalsbreen!
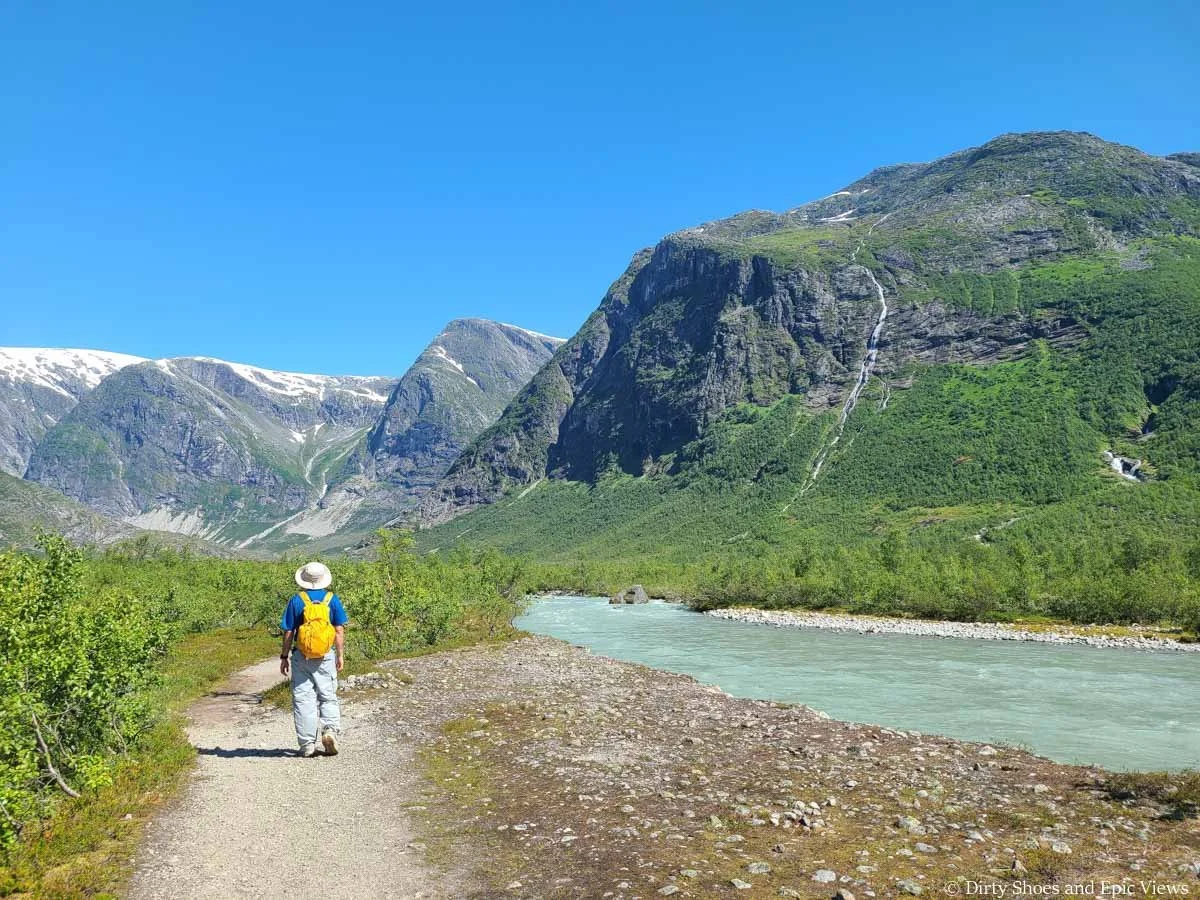
Hiking the easy flat trail by the river
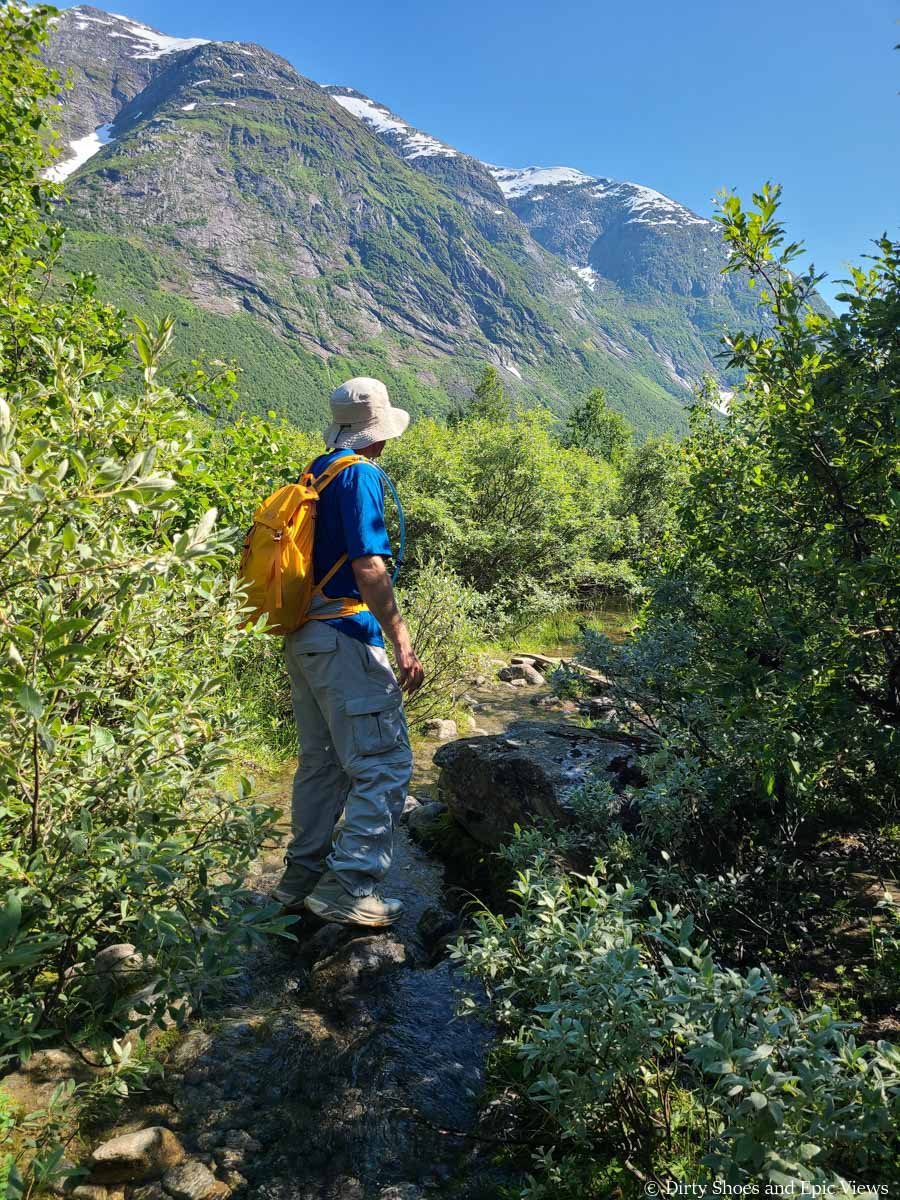
We followed the river for a bit and continued on the easy, flat, obvious path through the brush.
Then, less then an hour into our Austerdalsbreen hike is where we went astray…
We didn’t realize what our mistake was until we were hiking back out, but basically what we think happened is that the trail came to a pretty large stream that really didn’t have any indication we were supposed to cross. The water just seemed to be flowing through the brush with no sign of a trail across the way, so it didn’t even really cross our minds that we were supposed to rock hop through it. I’m not sure if this area is normally like this, or if the water levels were just higher that day and it was washing out the other side of the trail more than usual.
This is where we think we went astray on the Austerdalsbreen hike! We were supposed to cross the stream on the right, but instead kept following the path straight.
This is Kevin crossing that stream on the hike out. You can see the area was all pretty washed out, so it was hard to tell that the trail crossed through here when we were hiking in.
What also didn’t help here is that right as we got to this point, a pair of hikers were just coming from another direction through the brush alongside the stream, so we just kind of didn’t think much of it and continued in the direction they came from.
There was a narrower, more rugged trail through here (more like a herd path), but we knew pretty quickly that something seemed off, or different. I remember that we both even commented at how suddenly the trail had changed from the wide easy walking path we were both on to something more faint and rugged.
Following the herd path towards the left side of the valley
The herd path took us toward the left side of the valley through what seemed to be an old rockfall area, and through here it got a little harder to navigate (the herd path was very hard to follow), but we also eventually started to spot rock cairns as well, which confused us even more as to whether we were on an actual trail or not.
Trying to navigate back to the real Austerdalsbreen trail!
We’re not sure if we followed an initial herd path meant to simply go around that large stream crossing and we just followed it too far and continued on paths made by others who went astray here as well, but we definitely weren’t the only ones to do that this day. Since the valley is so flat and open, a lot of it is visible and we could see other people ahead of and behind us doing the same thing!
But luckily, because the area is so exposed, it’s still easy to not get actually lost out here, because there’s really only one way to go- straight ahead through the valley. But we were also able to look out to find the real trail back towards the center of the valley (we spotted people walking back on it) and were confused as to how we got so far off! (Once we hiked out, it was easy to see what we did, though- that stream crossing really wasn’t obvious!)
We wandered back towards the real trail and had to cross a small stream to get back to the path. The real path here was that wide obvious gravel track again- much better!
Back on the Austerdalsbreen trail- much better!
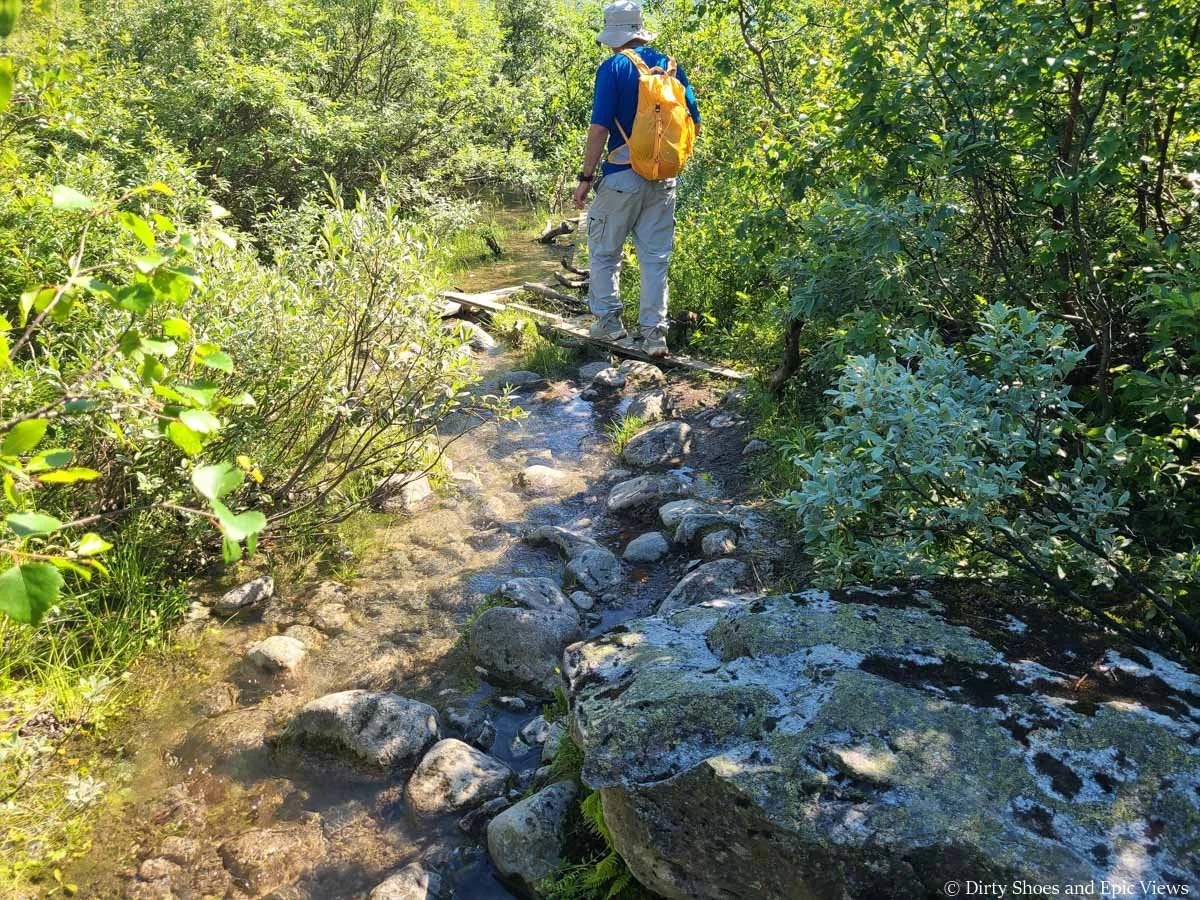
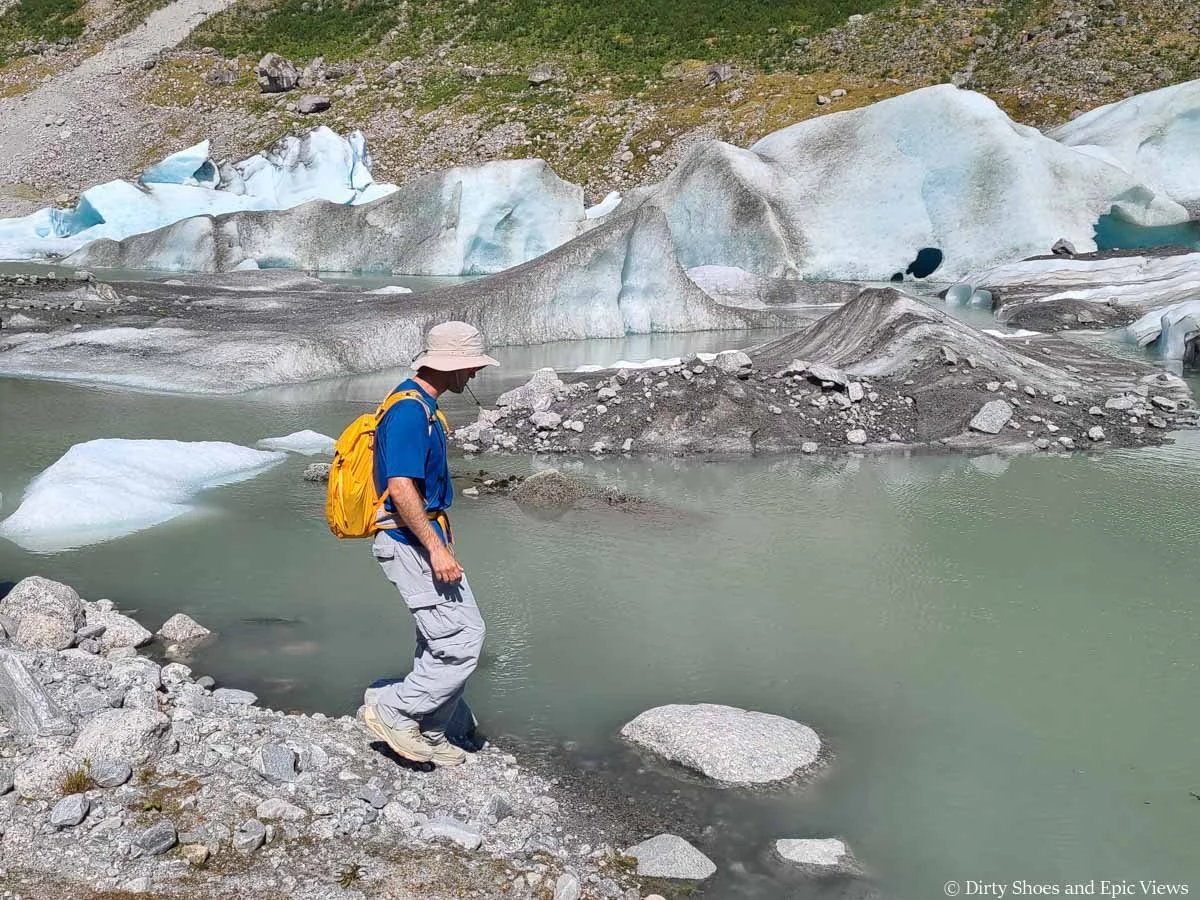
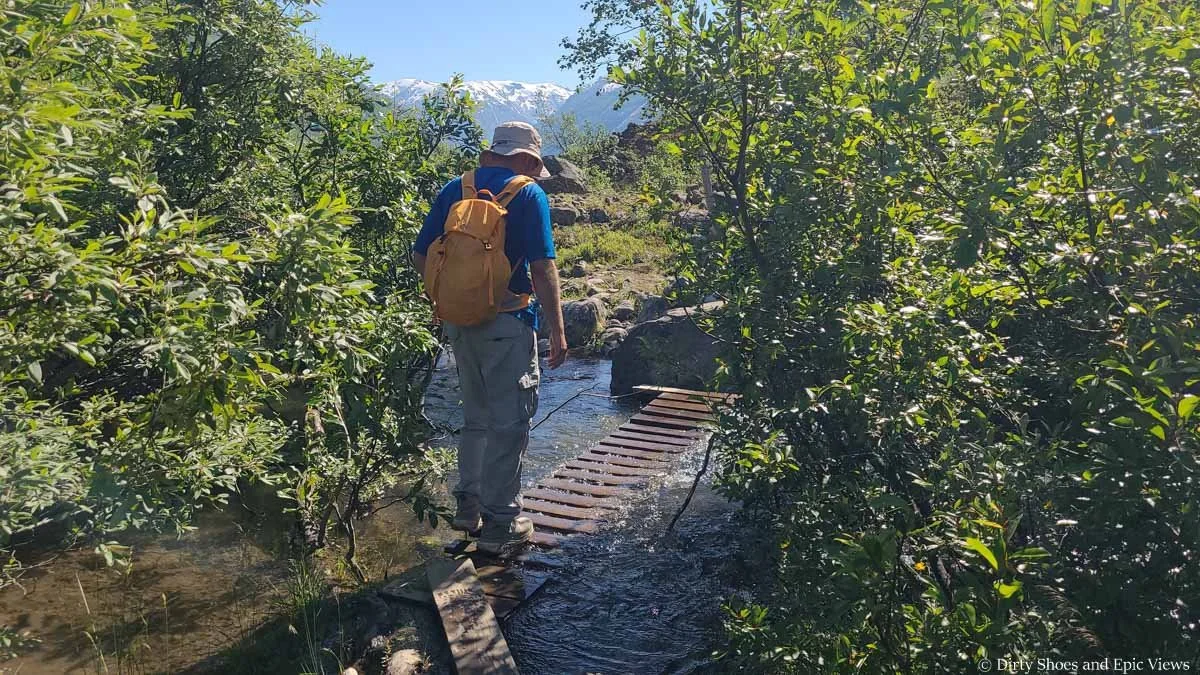
From here, we continued to follow the Austerdalsbreen trail through the scenic valley. Now there were a lot more stream crossings- these ones were very obvious because they are much smaller and easier to see where the trail continues on the other side!
Some of the streams required a bit of rock hopping, others had wooden bridges to help us cross. As it was early afternoon, some rocks were starting to get covered and slick, and the water was also starting to sneak up onto some of the bridges, but everything was still very passable with caution.
There are quite a few small stream crossings on the Austerdalsbreen hike
The water levels on the Austerdalsbreen trail were starting to get high in the early afternoon

Fortunately, the larger streams had footbridges!
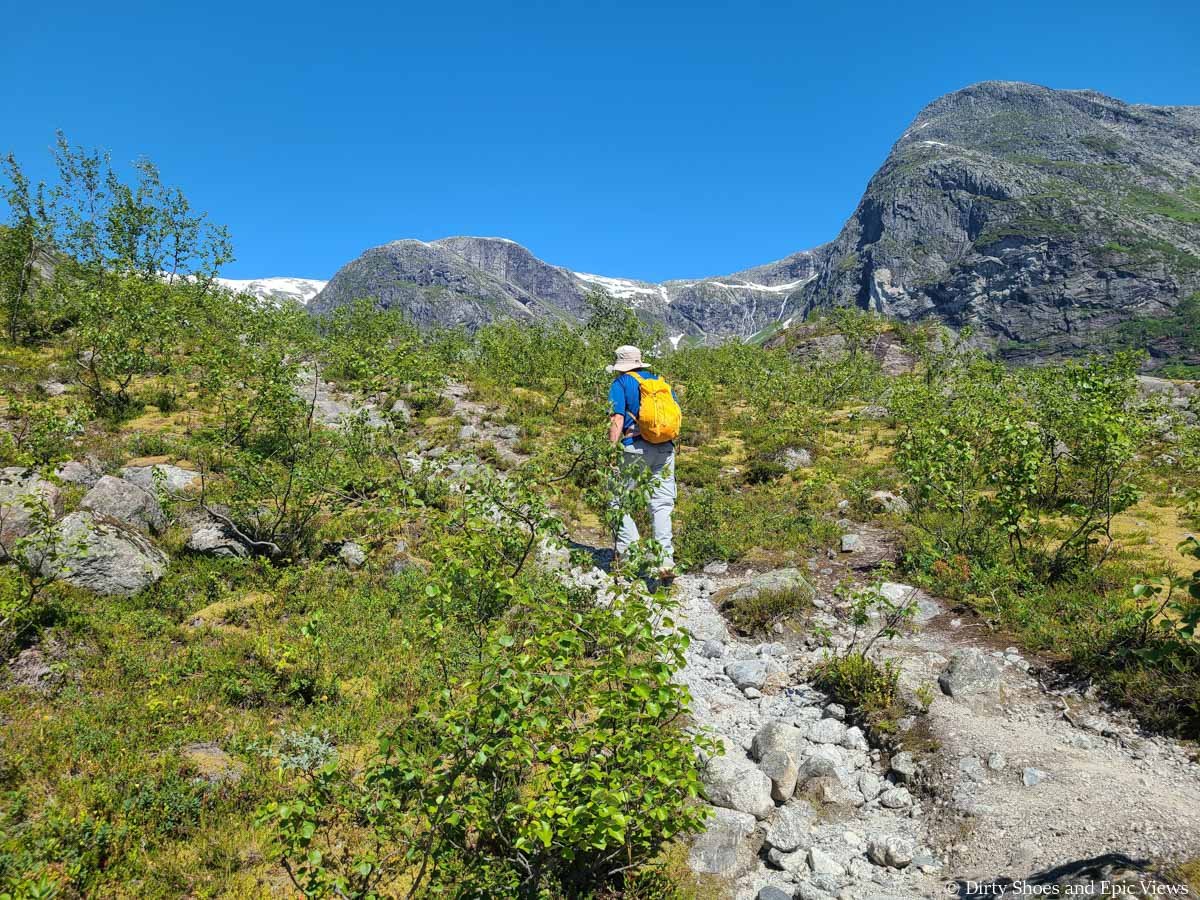
As the trail continues, it becomes a bit narrower and more rugged as it heads through shrub and brush with a bit more rock hopping through streams.
Eventually, the path eases up again into a smooth dirt track, and ahead you can see the trail as it heads up the final climb of the hike to the glacier viewpoint.
Just before this climb, you’ll come to a very obvious fork in the trail, and at the time we hiked here, there was a huge arrow made of small rocks on the trail pointing straight towards the hill climb.
Ahead, you can see the small hill just before you reach Austerdalsbreen. If you look closely, you might be able to ee the trail heading up it.
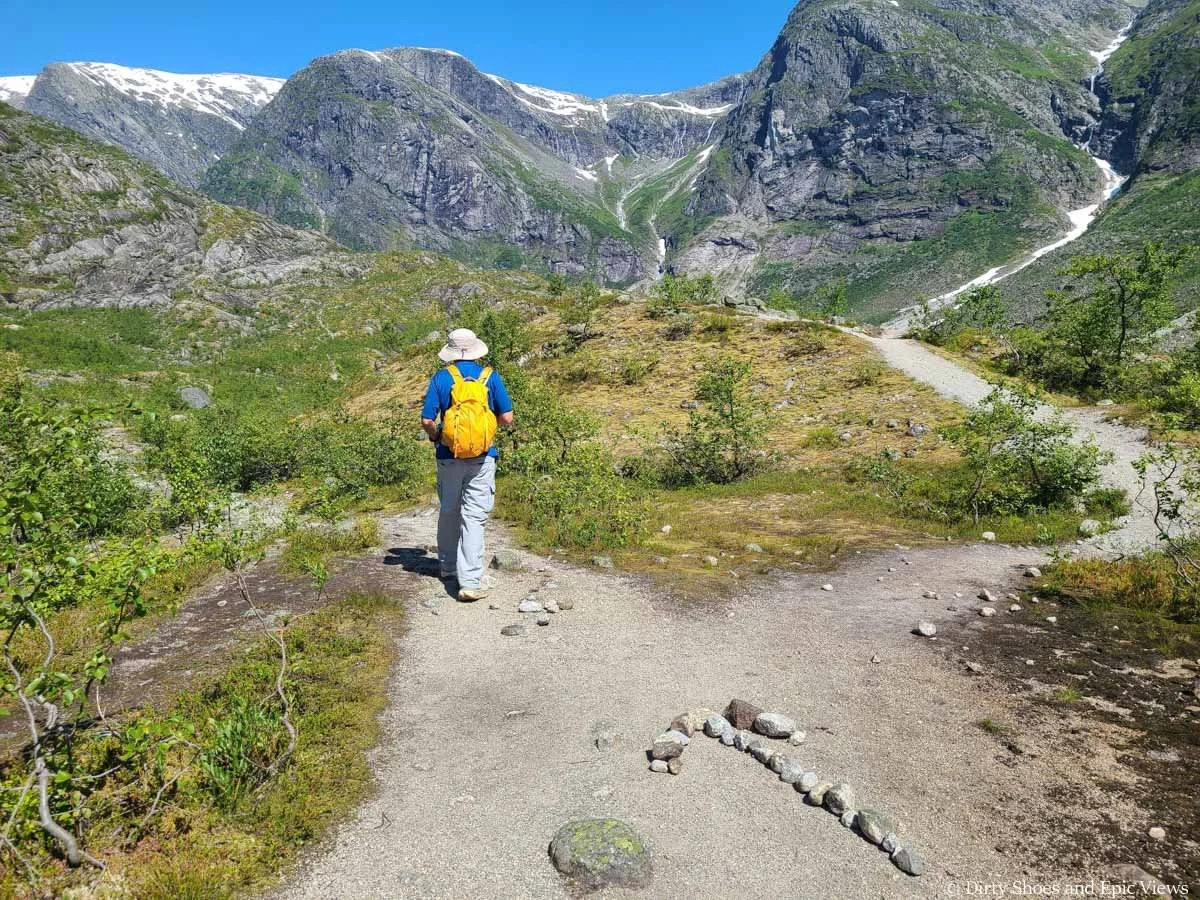
This is the main fork in the Austerdalsbreen trail. Head right here to bypass the small climb to the higher viewpoint over the glacier.
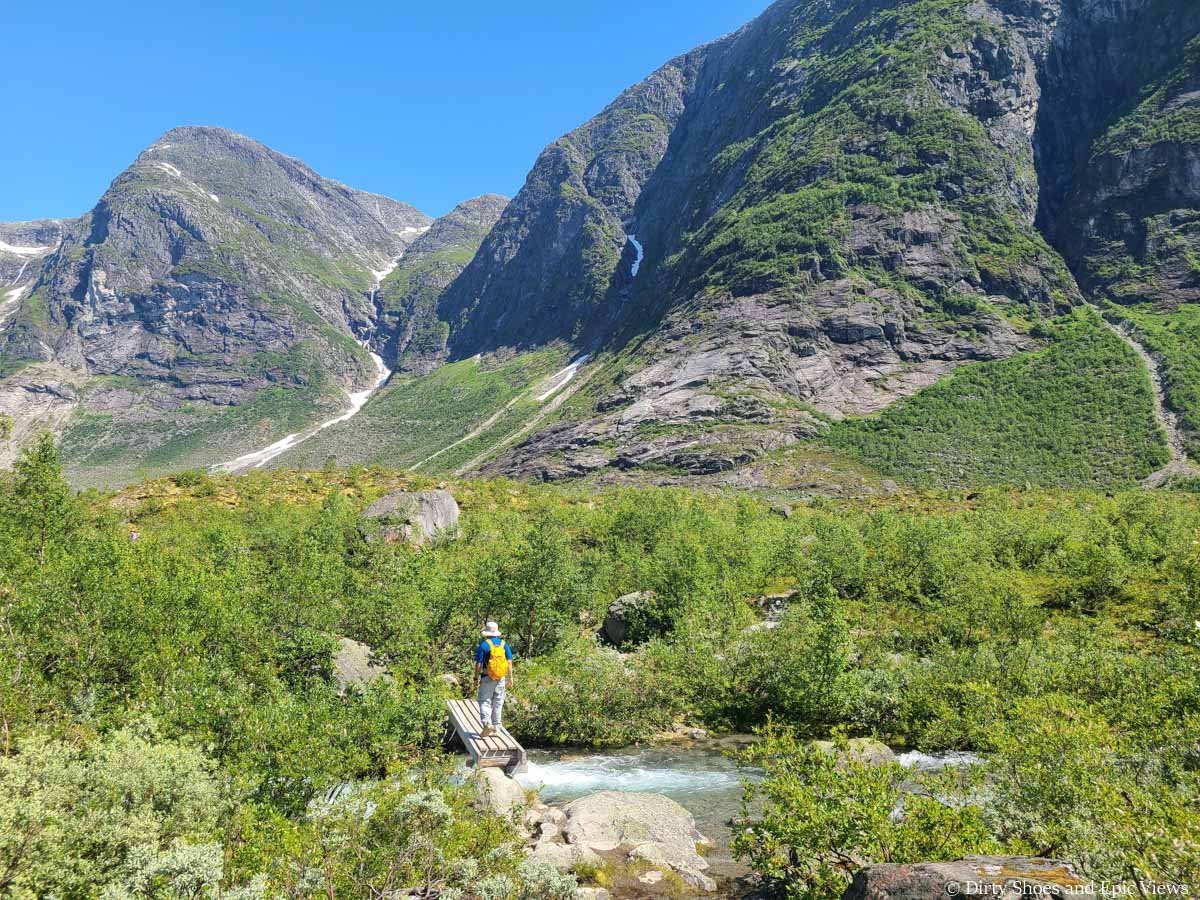
If you want to avoid this climb, you can take the path on the right to go around it. On this path, you’ll follow the glacier river along the valley floor to the glacial lagoon and view the glacier from ground level.
Most people seem to do this hike as a clockwise loop, though, making the climb up to the Austerdalsbreen Glacier viewpoint to see the glacier from above, and then hiking down to the glacial lagoon and following the river back to this junction. This is what we did, and it’s what we recommend because the view from a higher vantage point over Austerdalsbreen is really good. You’ll get to see both paths through our pictures- first the hill climb up to the viewpoint, and then the hike back out next to the river.
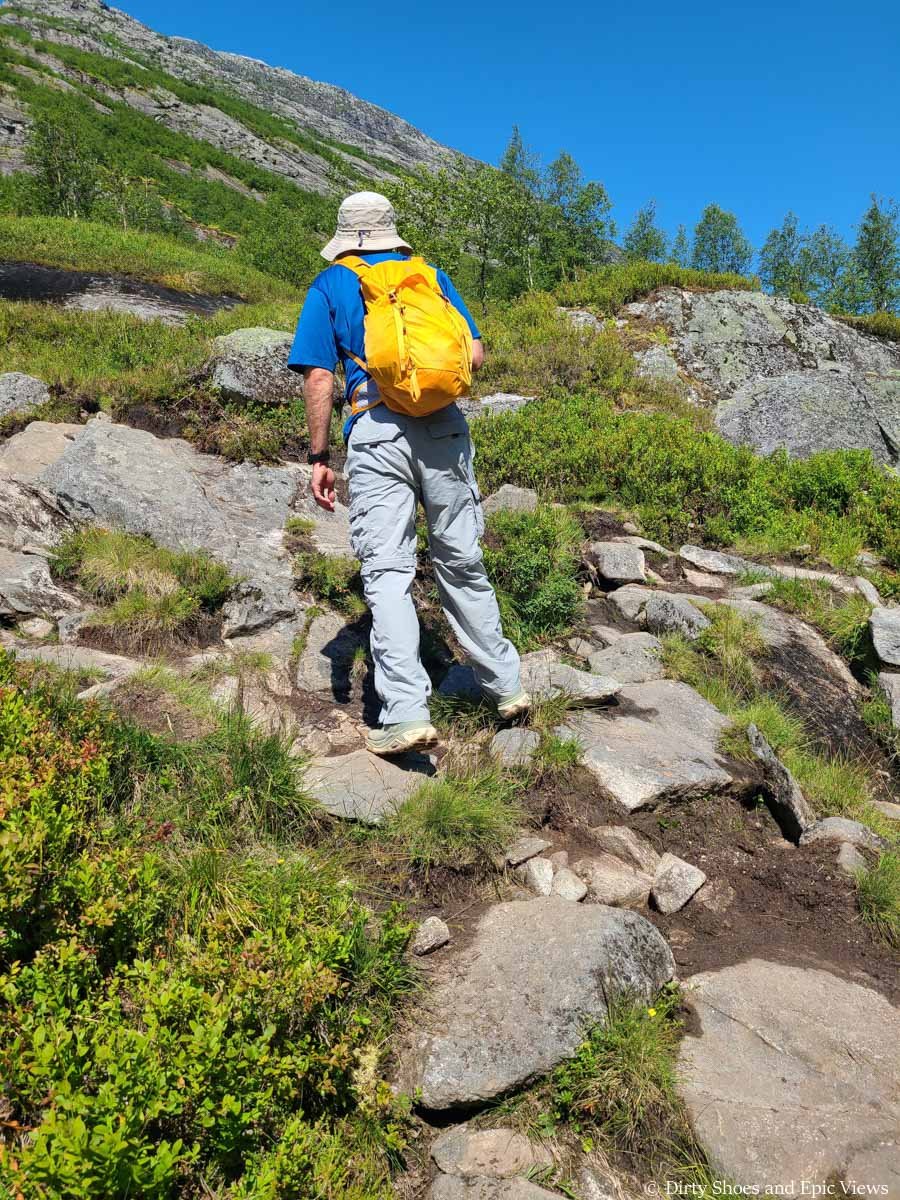
The climb up to the viewpoint of Austerdalsbreen isn’t too bad and it’s short, taking only about ten minutes. It’s a steady but not too steep climb up gravel and a bit of loose rock.
The short climb to the Austerdalsbreen viewpoint
A look back at the valley we’ve just hiked through
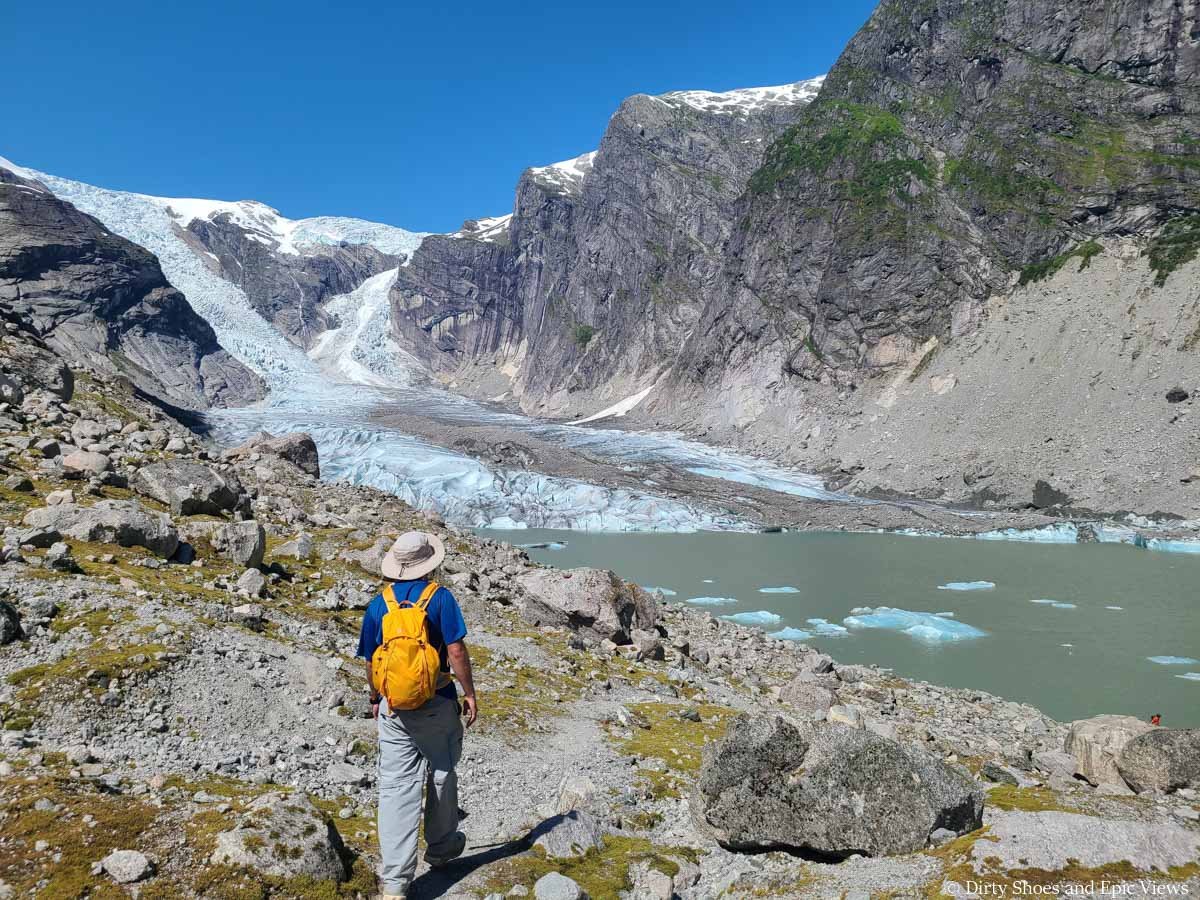
At the top, there is a little monument, and you get your first glimpses at the glacial lagoon below that’s often dotted with small icebergs. You can also see the tail end of the glacier from here- you’re almost there!
From here, the trail traverses across the slope above the lagoon towards the glacier. It starts off as an easy dirt path, and it’s flat or slightly downhill through here. We loved the view over the lagoon from up here, and a lot of the icebergs had a really cool deep blue hue to them.
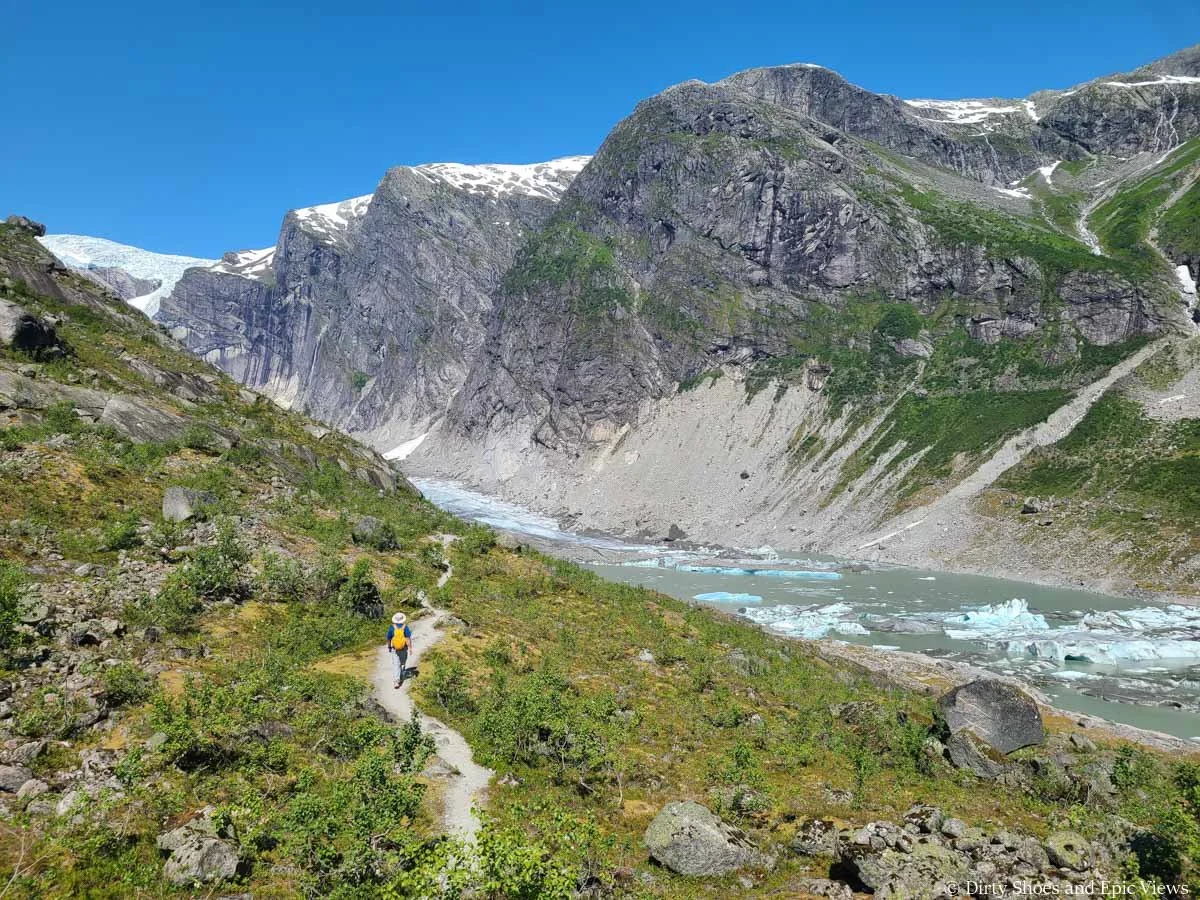
Heading towards Austerdalsbreen
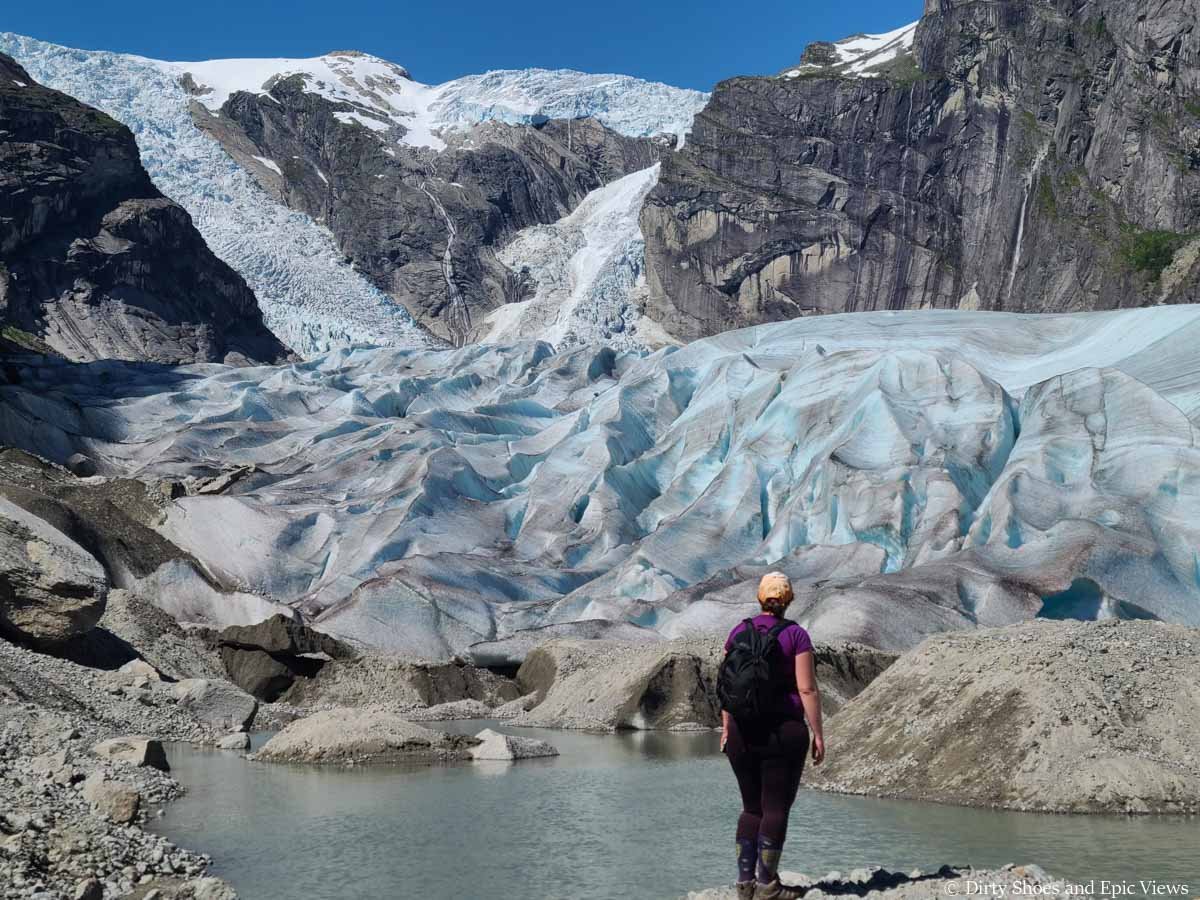
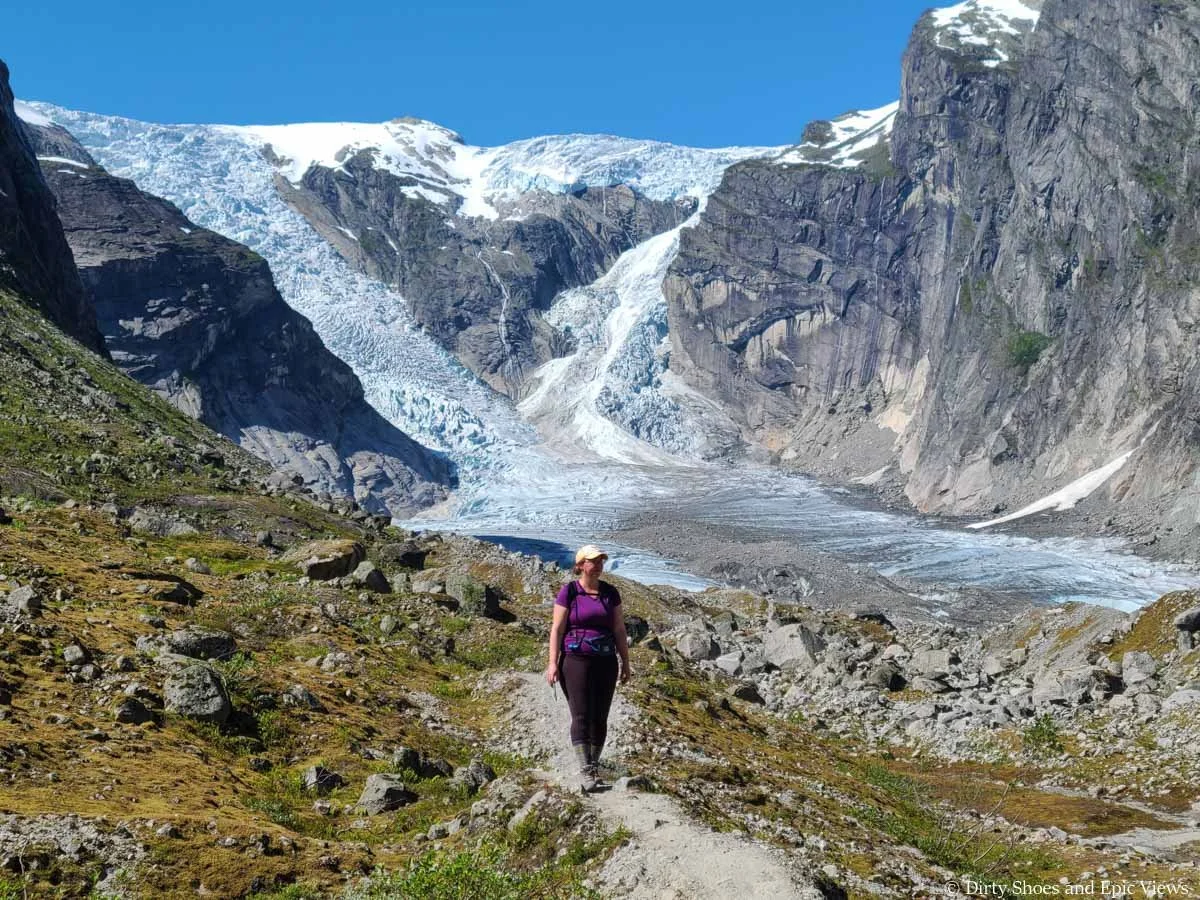
The first epic views of Austerdalsbreen!
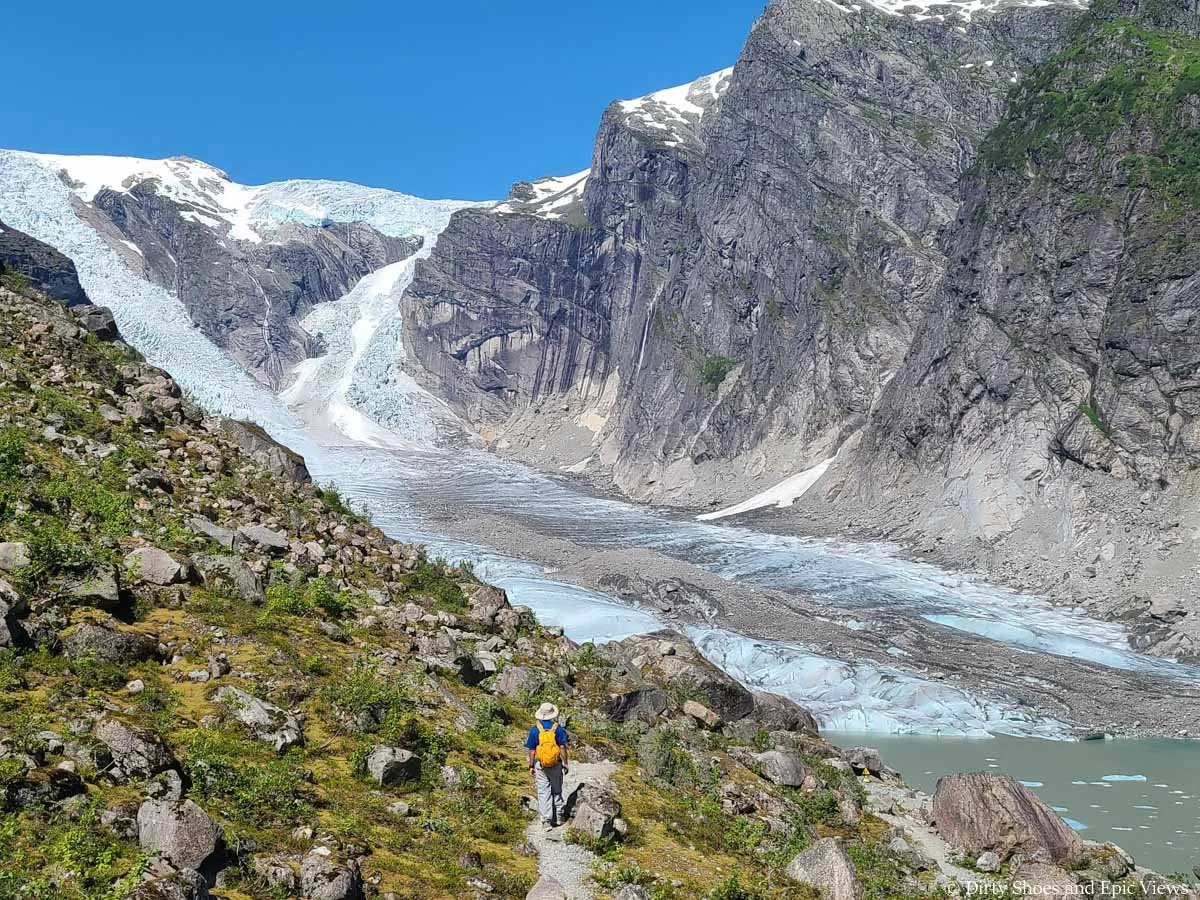
As you get closer to the glacier, the trail kind of starts melding into the rocky moraine. At some point, you should see some herd paths running down to the lagoon, but we recommend (carefully) continuing along some of the herd paths up here first for some great overhead views of the glacier.
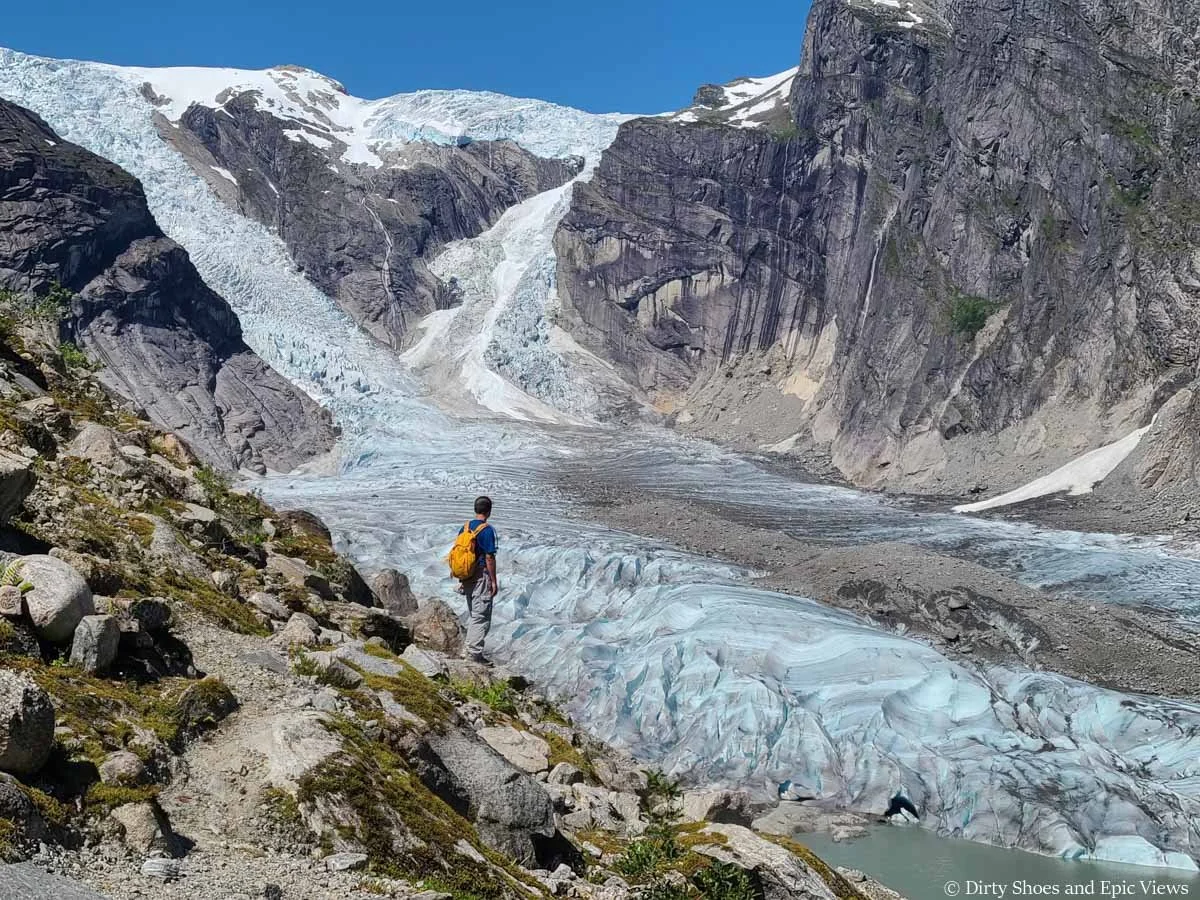
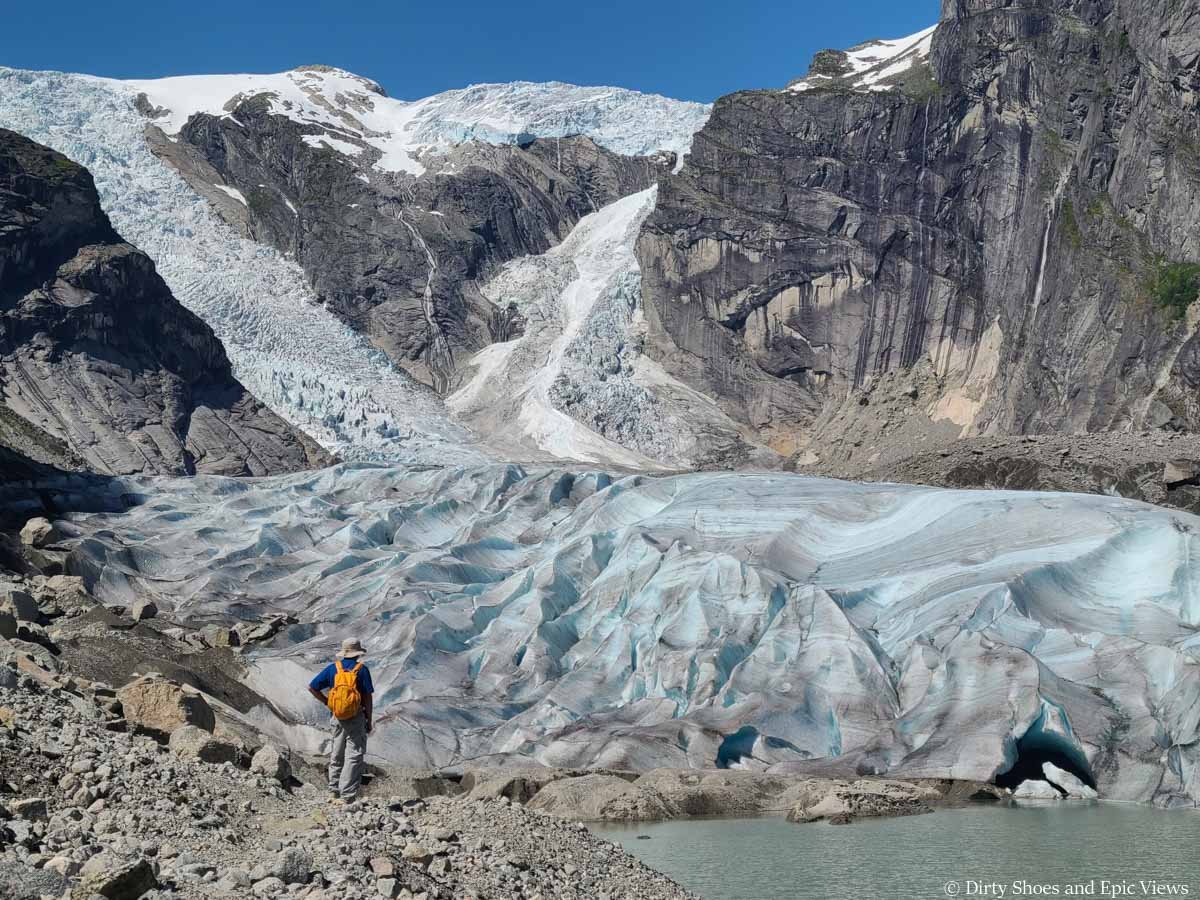
The views of the Austerdalsbreen Glacier are amazing from up here. It’s really cool to see the different icefalls merge into a massive glacier that fills the valley floor.
The Austerdalsbreen viewpoint is incredible
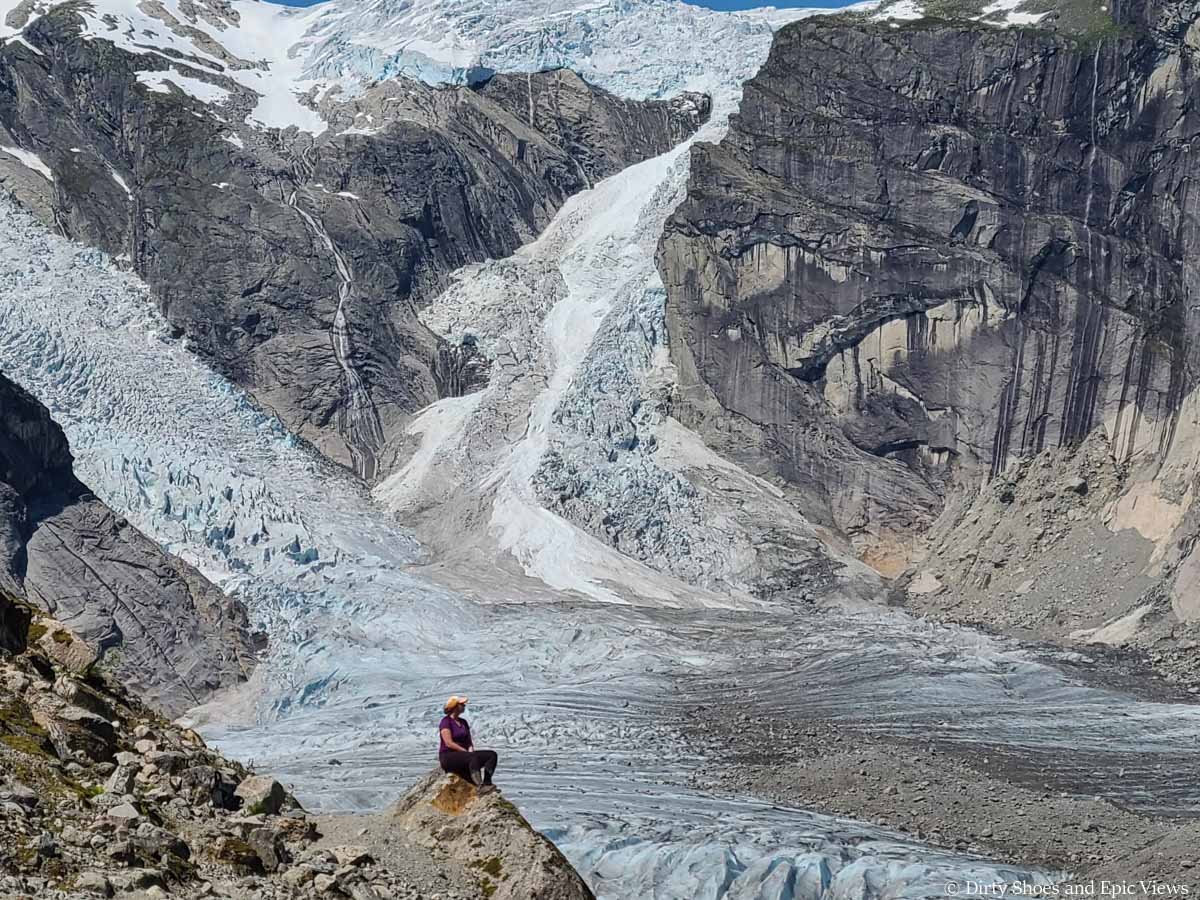
Loving these views of the Austerdalsbreen Glacier
And believe it or not, we even ran into some sheep all the way out here munching on grass between the rocks of the moraine.
Eventually we decided to follow the herd paths down to the shore of the lake below. It only takes a few minutes to get down there, but the path is steep and filled with loose rock, so just go slow.
Taking the herd paths down to the lake
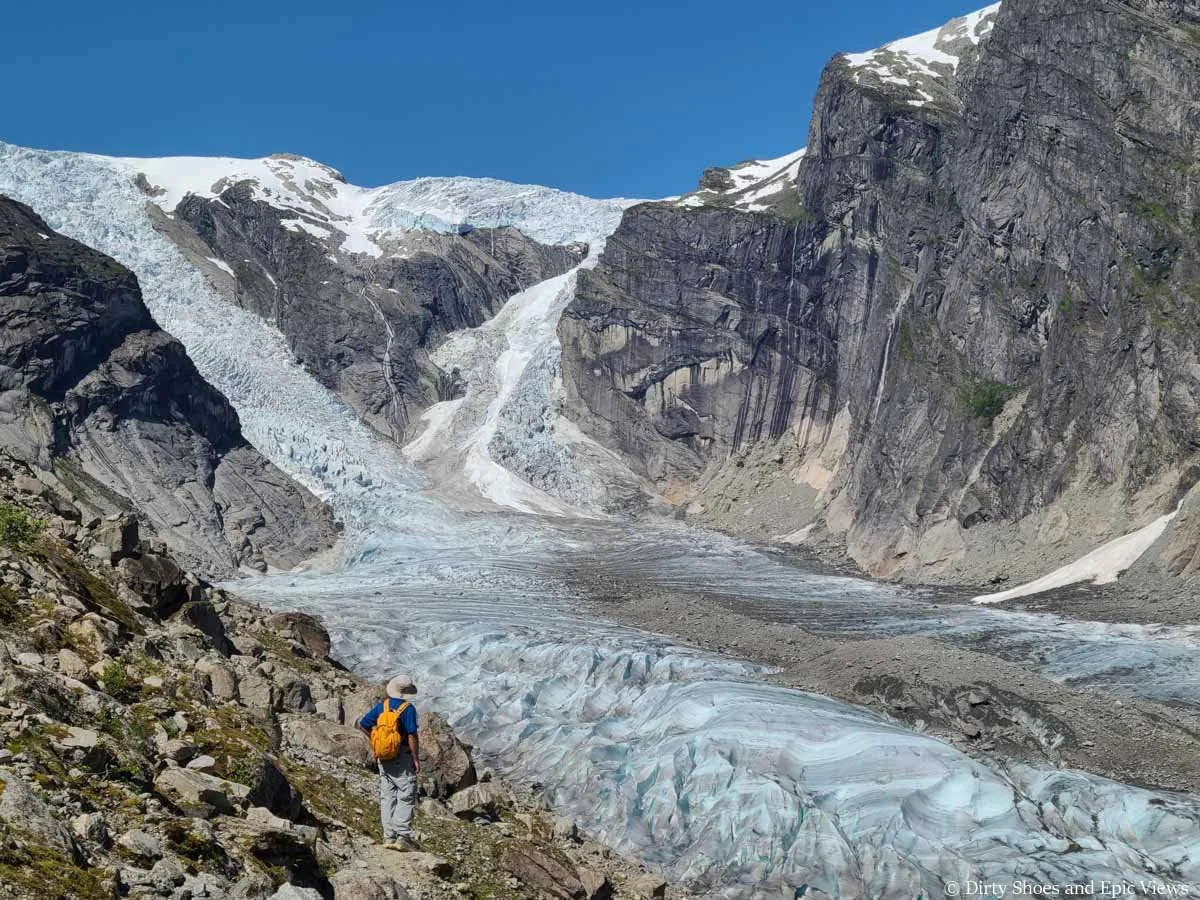
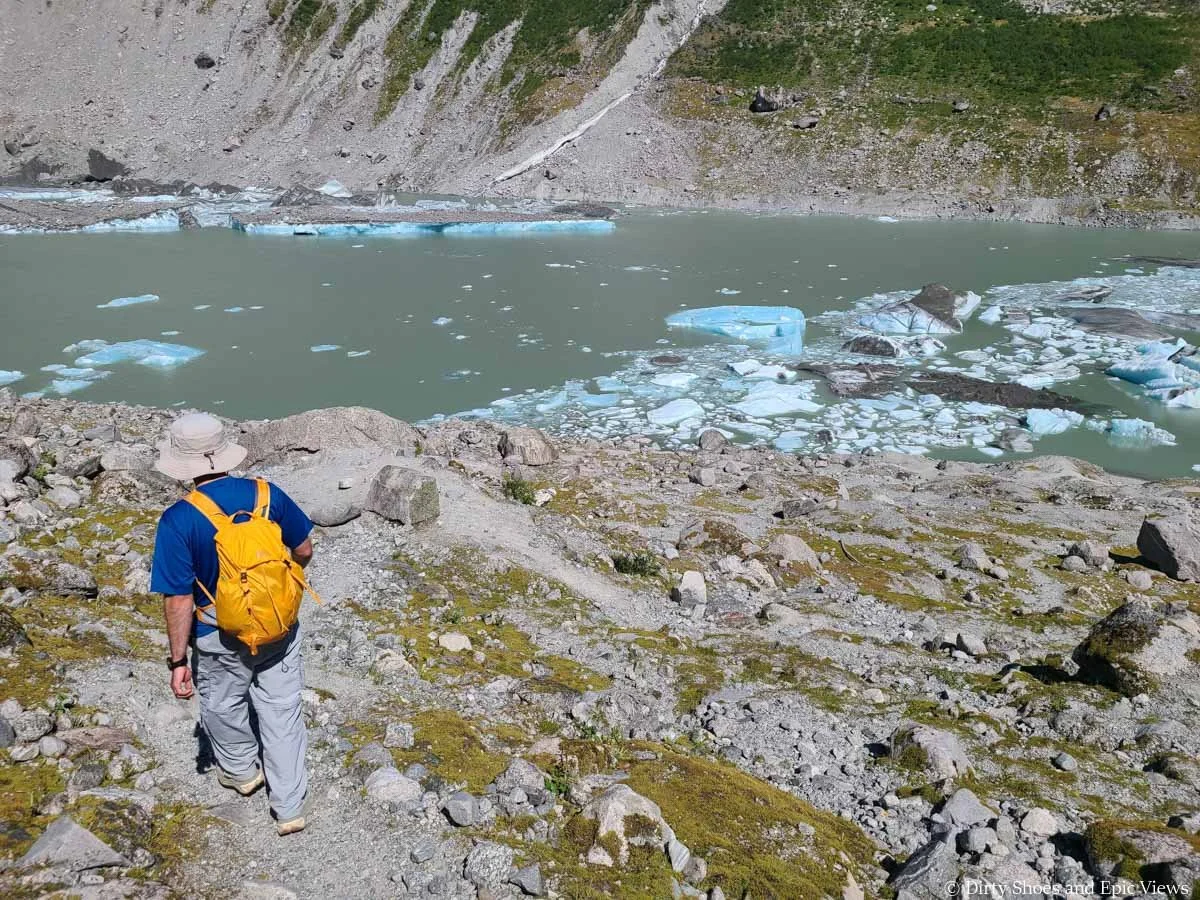
Once at the lake, you might see some faint herd paths leading through the rocky shoreline closer to the Austerdalsbreen Glacier. We explored a little bit on these paths, but we recommend not going too far. We definitely felt the danger of rockfall from above the closer we got and did not want to linger out there.
But even from a distance, you can get a sense of the magnitude of this glacier and it’s a great view! We spent some time eating lunch and exploring the icebergs alongside the lake shore.

Viewing Austerdalsbreen from the shore of its glacial lake
From the shore, you can really get a sense of just how massive Austerdalsbreen is!
Exploring around the lagoon
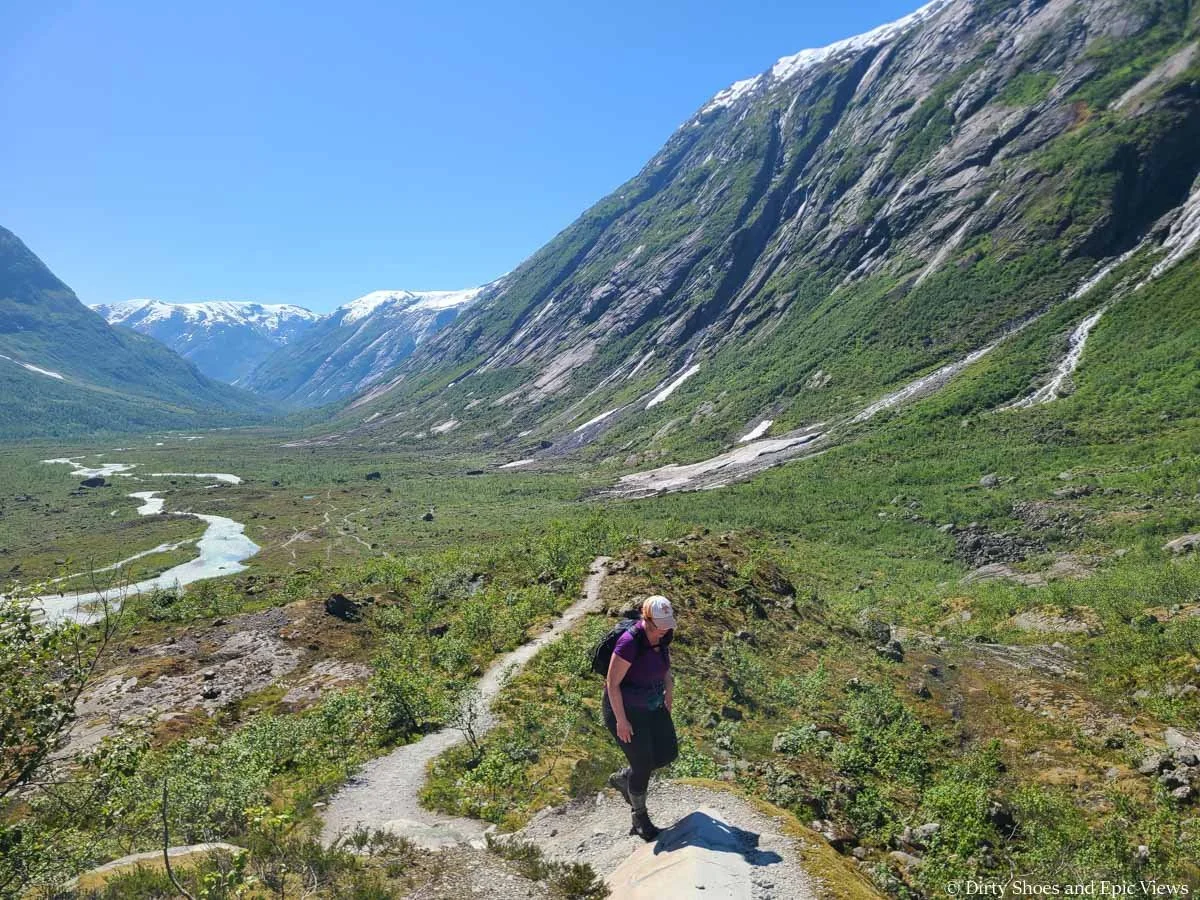
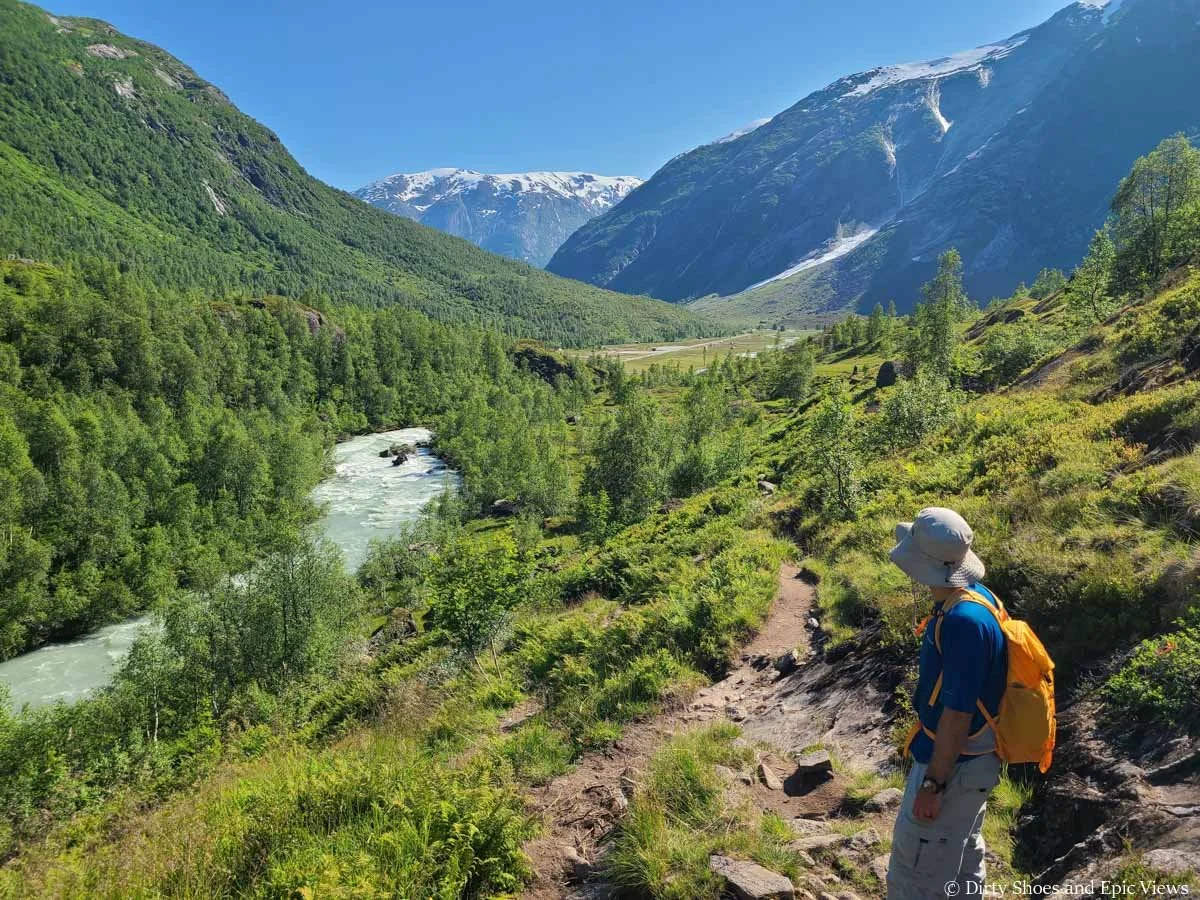
For the hike back out from Austerdalsbreen, we took the lower trail along the glacier lagoon. We took our time along here because it was very scenic and we wanted to take it all in. There is a fairly obvious path that follows the lake shore.
Hiking back out from Austerdalsbreen
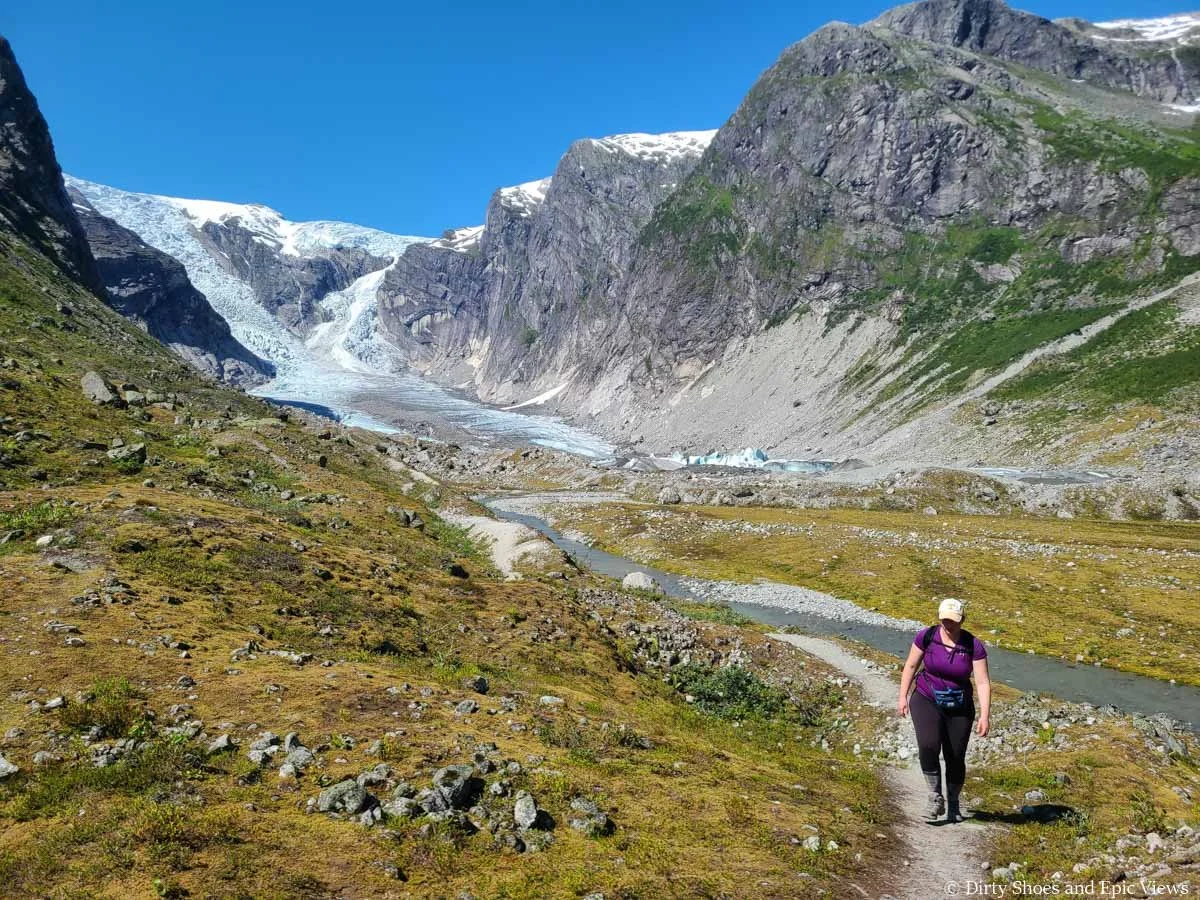
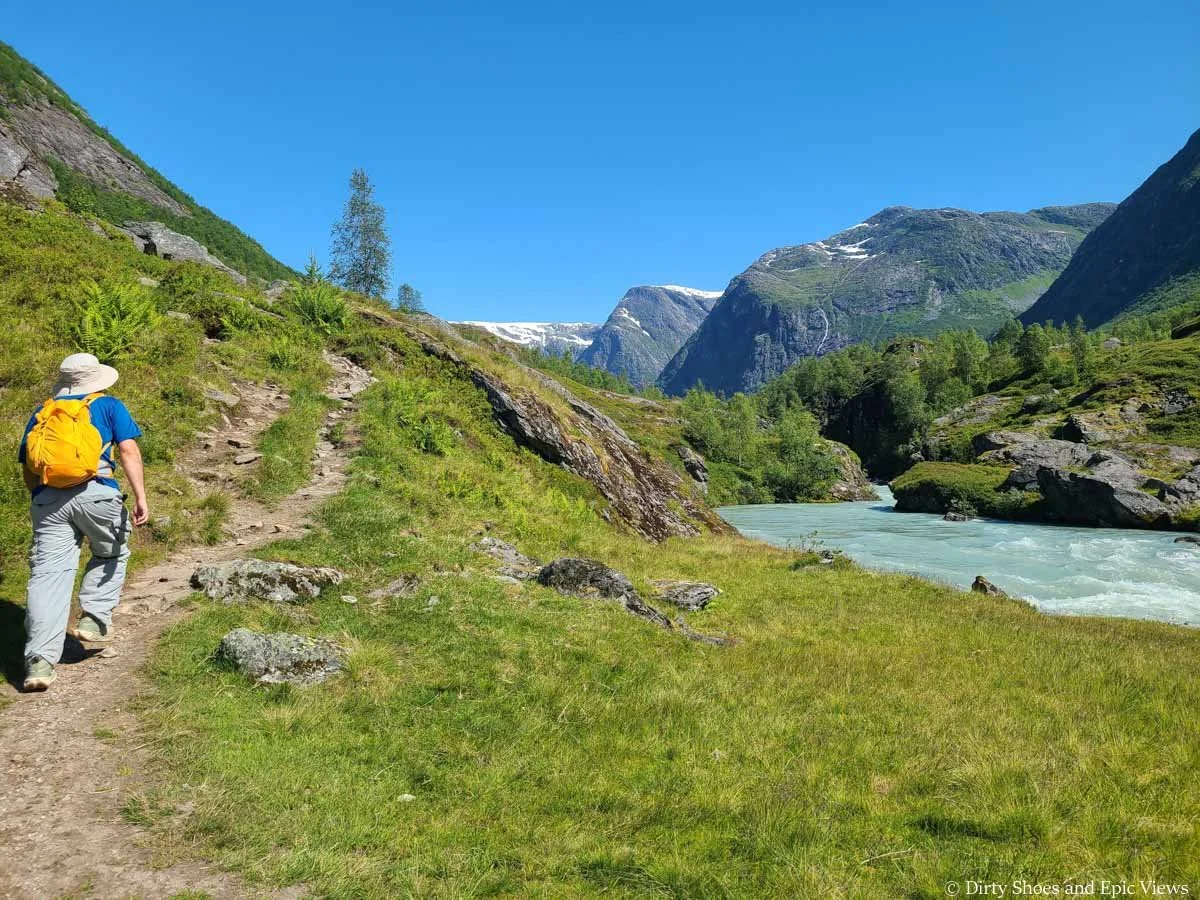
The lower path follows the glacial lagoon and then its outlet stream and is mostly flat and easy
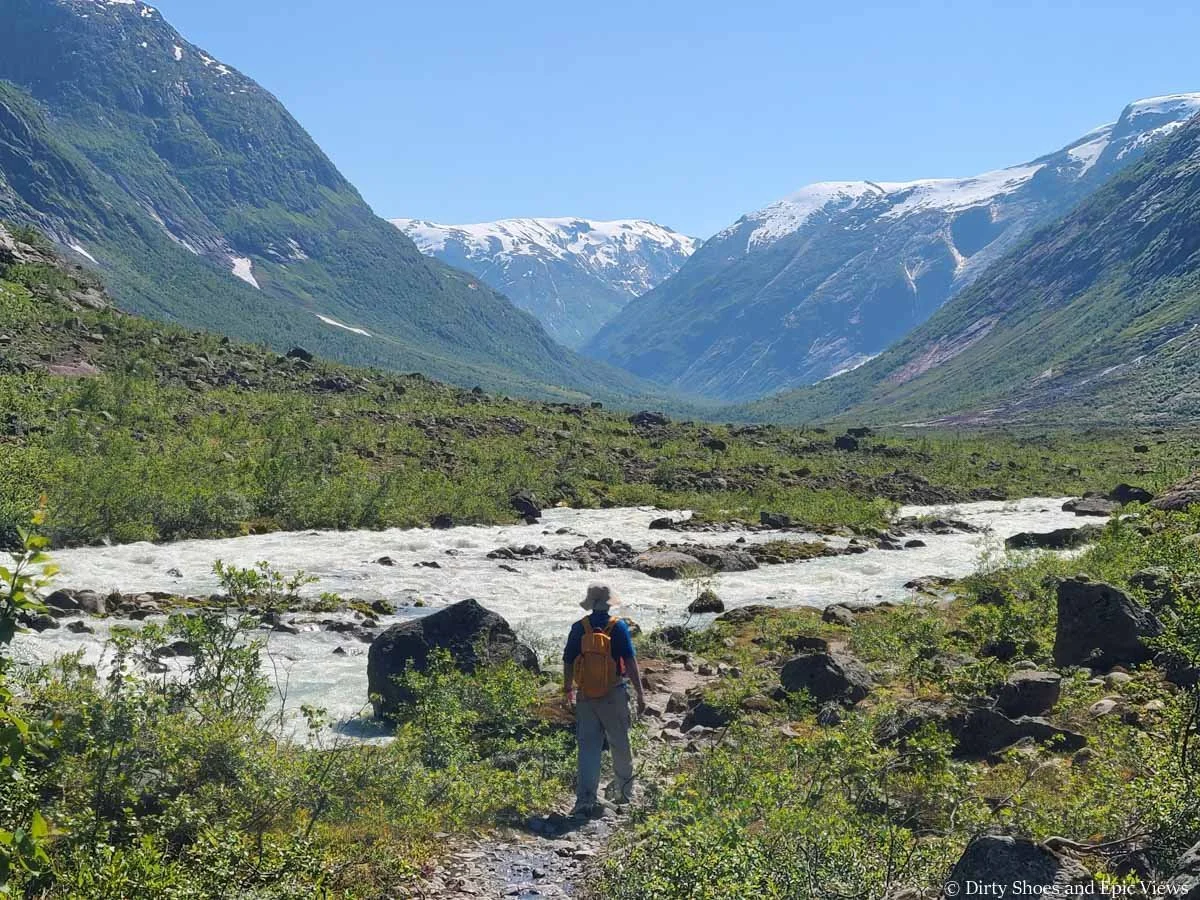
After a bit, the trail will start following the outlet stream from the glacial lake and before you know it, you’ll round a corner and the glacier view will be gone. But fortunately, the views ahead through Austerdalen Valley are just as stunning. Like we’ve said before, this hike has non-stop views!
The narrow footpath follows the river, which seemed to now be really roaring in the afternoon heat, basically until the it reaches the junction with the main trail.
Following the river back to the junction with the main trail
From here, we started back down the flat walk through the valley, and reconquered all the same stream crossings as before. This time, though, the water levels seemed a bit higher by maybe a couple of inches, meaning more rocks were submerged and slick, making the stream crossings a little bit tricker, but still doable (even easier if we had our trekking poles!). Some of the foot bridges even had a layer of water flowing across them. So expect to get your feet possibly a little wet through here!
Heading back through the valley
Rock hopping across the streams on the Austerdalsbreen trail
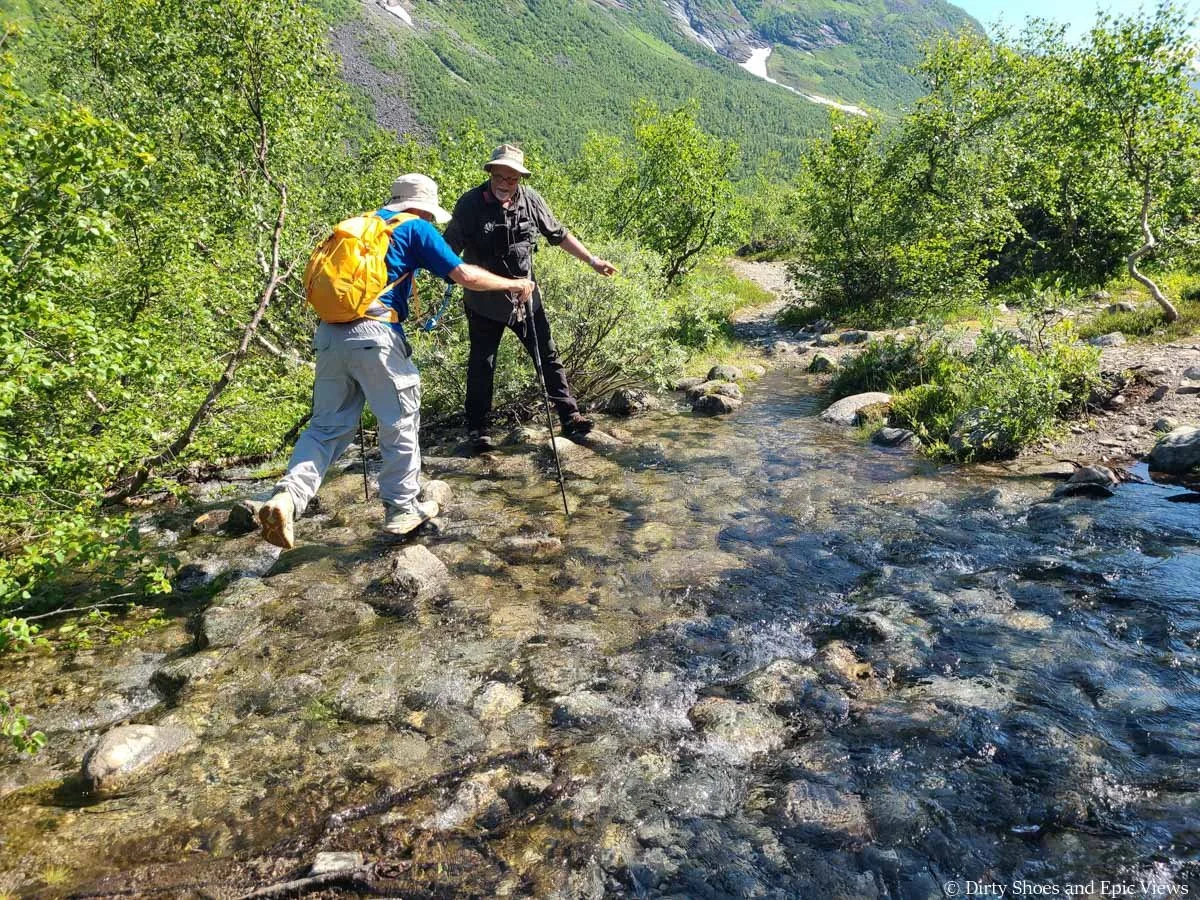
There was just one stream crossing that gave us a bit more of a challenge, and lo and behold, it was the stream crossing that we had missed on the way in and had caused us to go astray!
It was a pretty long crossing through shrubs and brush, and there weren’t a lot of good dry rocks to hop across as they were getting flooded over, so it was quite slick and hard to balance. Fortunately, a very nice and helpful fellow hiker (who I think was resting on the trail on the other side and saw our struggles) came to our rescue! He rock hopped to us and lent us one of his trekking poles for balance to help get us across. Our feet still got a bit wet, but we made it without any falls and we were super grateful for his help!
The trickiest part for us on the Austerdalsbreen hike
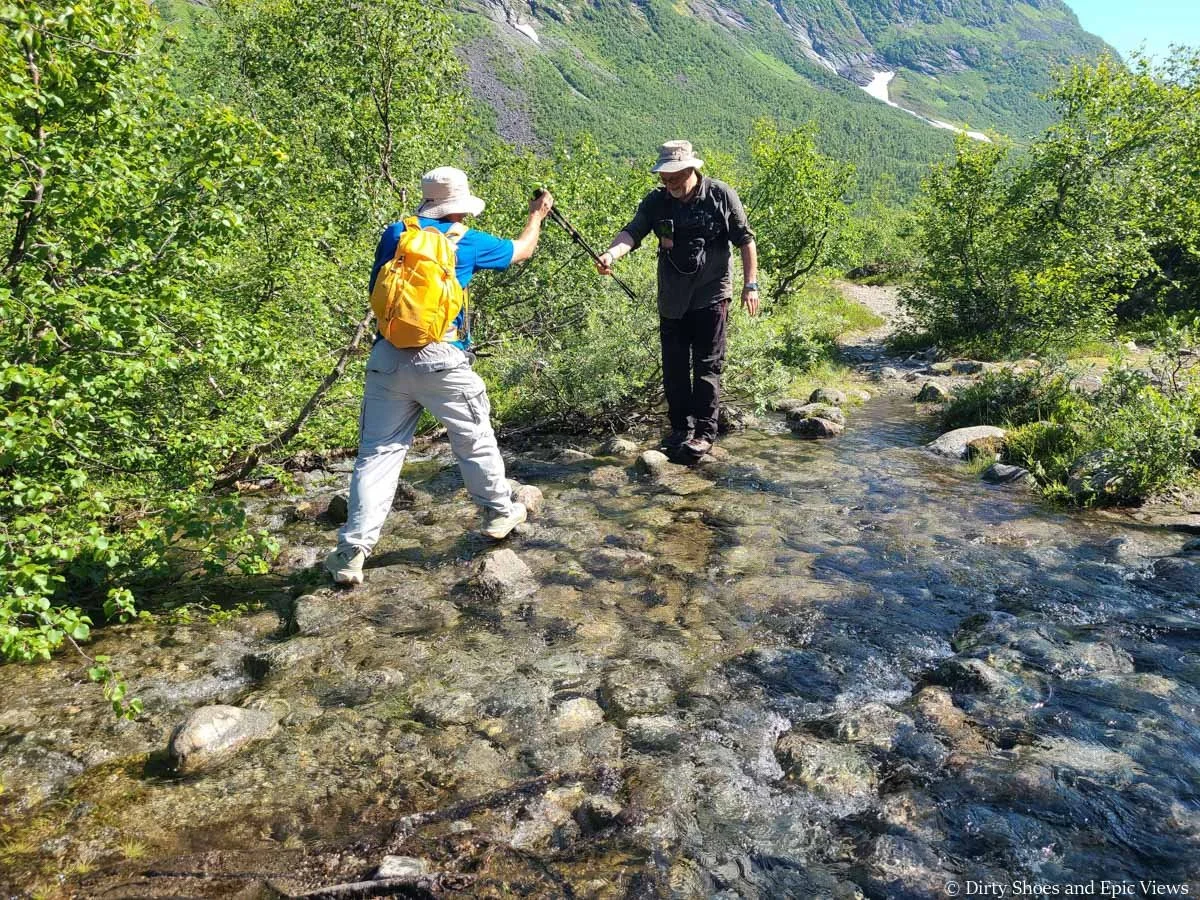
Thank you kind stranger for helping us cross here!
From this point, the stream crossings were pretty much done and it was an easy walk out through the valley. You’ll just have to get through the last part, right at the beginning of the trail that was particularly rocky and muddy. Again, it’s nothing hard, but just watch your footing and step carefully.
So, our overall thoughts on the Austerdalsbreen hike in Norway?
We loved it! It was one of our favorite hikes in Norway for sure. The scenery was amazing the entire way, it was relatively easy, and the glacier view was stunning.
We also loved how quiet the trail was. We hiked to the Austerdalsbreen Glacier midday on a perfectly sunny Saturday in mid-July. Talk about peak timing, right?
But it didn’t matter. The trail was so peaceful. We did see other hikers, often ahead or behind us on the trail, but we rarely crossed paths with many others, so we hiked in solitude for most of the time. This was in stark contrast to and a welcome break from the busy trail to Briksdalsbreen on the other side of Jostedalsbreen National Park!
Best Time to Hike to the Austerdalsbreen Glacier in Norway
The summer is the best time to hike to Austerdalsbreen, and because the hike is at a lower elevation through a valley, the snow-free hiking season may be a bit longer than other higher elevation hikes, lasting from around May into late October or even into November. Conditions might be muddier in those shoulder seasons, though. We always suggest checking current conditions before heading out.
In terms of the time of day, it’s probably best to hike to Austerdalsbreen earlier in the day to avoid the rising water levels since there are quite a few little stream crossings along the trail. We managed fine, but the crossings can get a bit slick and tricky when that water rises, and we recommend having trekking poles to help with this.
Where to Stay Near the Austerdalsbreen Glacier hike
If you want to stay right at the Austerdalsbreen Glacier trailhead, then consider staying at the Tungestolen DNT hut! This hut is found right by the trailhead parking lot, and we hear it’s amazing inside and has amazing views into the valley. Head to the Tungestolen website for pricing and booking. Accommodations include a bed in a dormitory, and includes three meals.
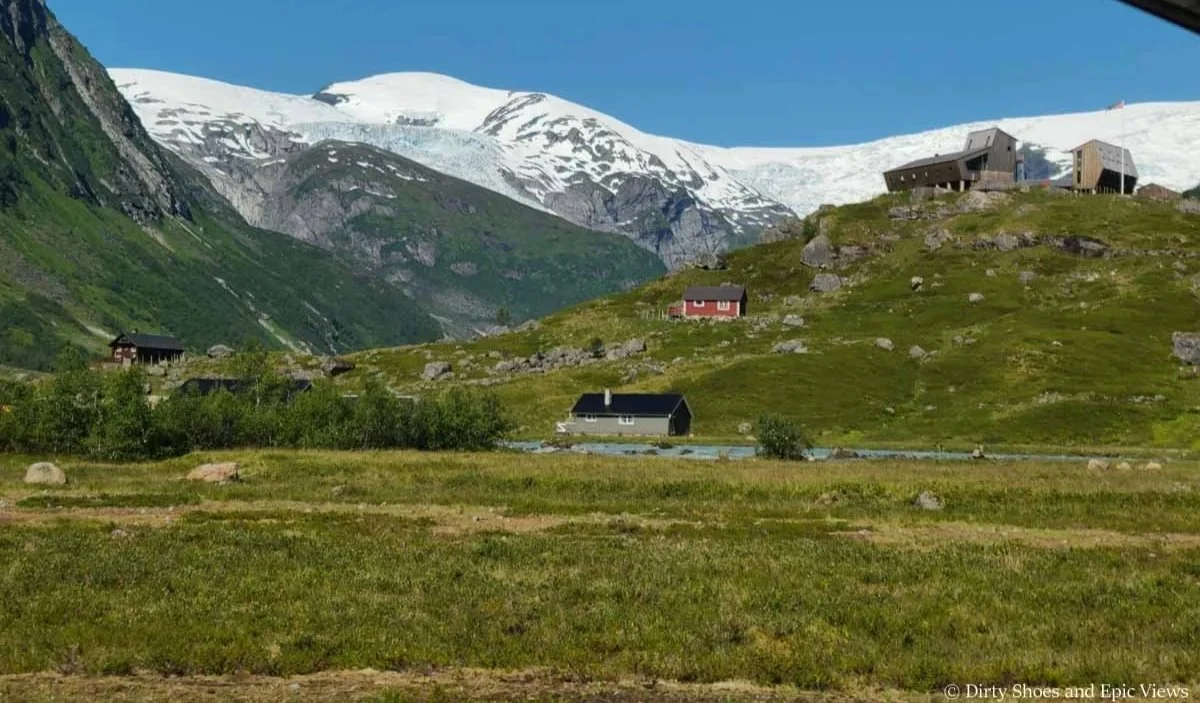
The scenic Tungestolen hut sits on the hill overlooking the Jostedalsbreen ice cap
If you are camping your way through Norway, we noticed that there were a lot of nice camping spots along the drive in as we got close to the trailhead. There were quite a few campervans settled into very scenic spots right off the side of the road. Otherwise, you can find various established campgrounds around Lustrafjorden.
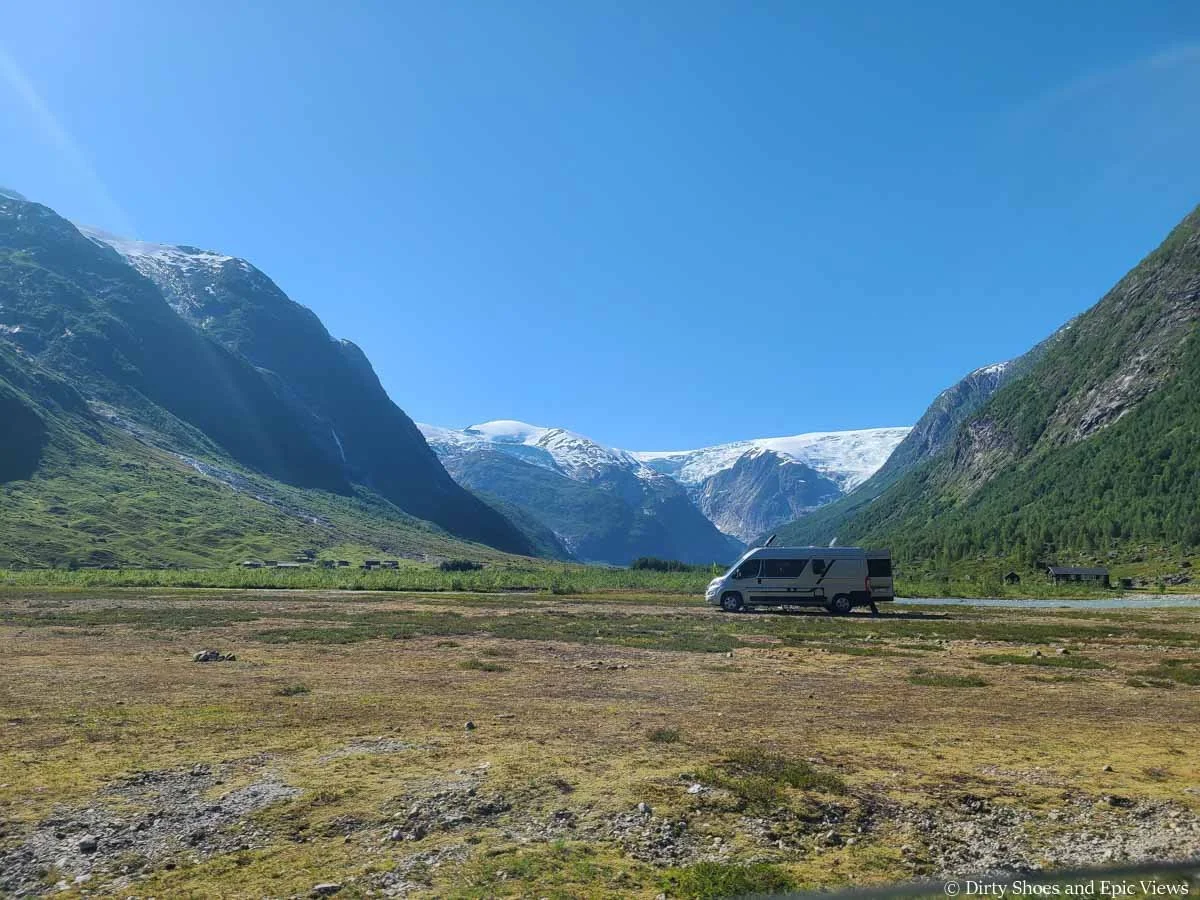
What stunning campsite views near the Austerdalsbreen hike!
The night before our Austerdalsbreen hike, we stayed in Sogndalsfjora, which is probably the closest big town to Austerdalsbreen and has lots of accommodation options. We used this town as a base to day trip to both sides of Jostedalsbreen National Park to avoid having to relocate too often/everyday of our trip. It did require more driving, but also less packing and repacking- a definite trade off! Sogndalsfjora is just about an hour away from the Austerdalsbreen trailhead.
Other Things to Do Near the Austerdalsbreen Glacier Hike
If you’re looking for more cool things to do near Austerdalsbreen, check out these amazing hikes:
Molden: This is a moderately steep but popular hike to a summit overlooking the beautiful Lustrafjorden. On a sunny day, the fjord can take on a bright, almost Gatorade-like, color.
Nigardsbreen: This is another accessible glacier tongue in Jostedalsbreen National Park. An easy to moderate hike brings you to the toe of the glacier. However, a popular way to experience this glacier is to hike on it! It’s common to take guided glacier walks on the Nigardsbreen Glacier on “blue ice tours”. It’s definitely a unique way to experience Norway’s glaciers.
Tips for Hiking to the Austerdalsbreen Glacier in Norway
Here are some of our final tips for hiking to the Austerdalsbreen Glacier.
Make sure to wear good hiking shoes/boots with good waterproofing as there are many small stream crossings and some rocky and muddy areas along this hike.
We recommend using trekking poles on the Austerdalsbreen hike to help you with the stream crossings and hiking down the scree to the glacial lagoon at the end of the hike.
Use lots of sun protection as the entire Austerdalsbreen hike is exposed to the elements.
Bring snacks and lots of water, especially in the summer when it can be really hot. When we hiked to Austerdalsbreen in July, the temperature reached 30 degrees Celsius and when we were trekking across the exposed valley floor, it felt a bit like a desert!
Bring layers, because although the hike can be hot, it might be a little cooler near the glacier.
Be sure to check the weather before you hike, as the weather in Norway’s fjords can be unpredictable. We recommend checking the night before and even the morning of on a site like YR, which we found the most reliable.
More Norway Guides
Looking for more things to do on your Norway road trip? Let us help you plan! Check out some of our other Norway guides:
Are you planning to hike to the Austerdalsbreen Glacier in Norway? Let us know your questions in the comments below! Happy hiking!